Table of Contents
Advertisement
Advertisement
Table of Contents

Related Manuals for Roku XS


Summary of Contents for Roku XS
- Page 1 Let’s get started.
- Page 2 © 2009-2012 by Roku, Inc. All rights reserved. Roku and the Roku logo are registered trademarks of Roku, Inc. Other brand and product names are trademarks or registered trademarks of their respective holders.
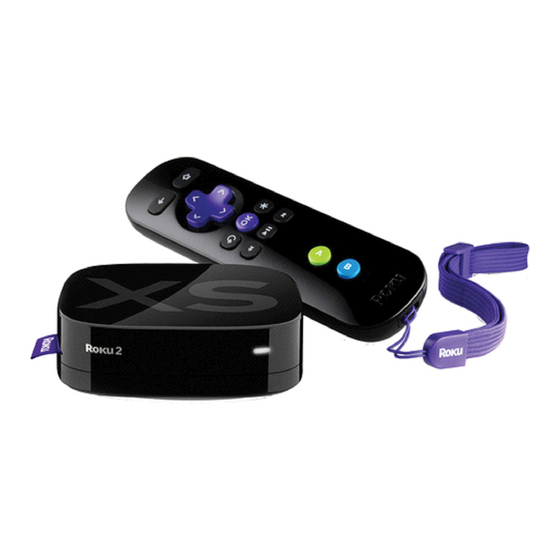
- Page 3 WhAt’s In the Box enhanced Roku player remote control 2 x AA batteries for remote A/V cable RCA to 3.5mm Power adapter...
- Page 4 Get tO knOW yOuR roKu Front view Back view...
- Page 5 – Lets you increase your storage capacity for Roku apps with a microsD card (optional, not included). hDMI port – Connects your Roku player to an hDtV with an hDMI cable (not included). A/V port – Connects your Roku player to a tV with the included A/V cable (3.5mm to RCA).
- Page 6 WhAt yOu neeD Roku player (hD or standard definition) A/V cable hDMI cable (included) (sold separately) high-speed Internet connection Router (DsL or cable modem) Pssst! your router can be wireless (any Wi-Fi) or wired. For wired networks, you’ll also need an ethernet cable (not included).
- Page 7 If you have an hDtV and want the best picture quality, use an hDMI cable (not included) to make the connection depicted in the diagram below: Connect one end to the hDMI port on the back of your Roku player. •...
- Page 8 Connect the other end to the A/V port on the back of your Roku player. • it’s sPeciAL. the A/V cable included with your Roku player was custom-built for Roku. Because the Roku 2 Xs is so small, we use a single connector into the Roku player to carry video and stereo audio.
- Page 9 WhAt tO DO steP 2 Power uP Key coMPonents In this step, we’ll make sure all systems are GO! First, power your Roku remote by inserting the included batteries: turn the remote control over and locate the rectangular battery door on the •...
- Page 10 WhAt tO DO steP 2 (COntInueD) next, power on your Roku player by connecting it to a wall outlet using the included power adapter, like this: Finally, power on your tV and look for a Roku message to fill the screen.
- Page 11 Just choose either wireless or wired and read on for instructions: wireLess: If you use a wireless network, you can grab that Roku remote and jump right into Guided setup. When prompted, select “Wireless” as your network connection and have your network name and password ready to do the following: select your network from the list of available networks.
- Page 12 Roku remote to select “Wired” from the on-screen network options. Connect one end to the ethernet port on the back of your Roku player. • Connect the other end to an open ethernet port on your router.
- Page 13 During Guided setup, you’ll be prompted to create your Roku account online at roku.com/link. your Roku player will generate a unique code that links your player to your new account. Roku accounts are free and secure. And while a valid credit card number is required to create your account, rest assured you will only be charged if you authorize purchases of apps and games from the Roku Channel store.
- Page 14 ROku reMote the Roku remote should feel right at home in your hand. We designed it to be incredibly intuitive for watching tV and great for gaming, too!
- Page 15 [FwD scAn] Fast forward, scroll right one page at a time [A & B] Action buttons for gaming [status LeD] Displays remote usage information cooL: Because your enhanced remote uses radio frequency instead of infrared, you don’t need to have a direct line of sight to your Roku player!
- Page 16 Get yOuR GAMe on! Just a couple of fun-facts about your Roku enhanced remote. It’s sensitive and smart. the Roku Xs remote incorporates motion-sensing • technology, allowing more precise and detailed control of gameplay. It comes with an adjustable wrist strap—for good reason. since some games •...
-
Page 17: Troubleshooting
Roku player on one end and to a working power source on the other end. If the Roku player is powered, the status light on the front of the unit will be on. If you are using hDMI with a home theater receiver, make sure the hDMI •... - Page 18 Make sure your remote is paired (see next section) with the Roku player. • If the status light on the front of your Roku player flashes once each time you • press a remote button, the problem is not with the remote.
- Page 19 PAIRInG yOuR ReMOte COntROL: the Roku remote should automatically pair with your Roku player at the beginning of Guided setup. If you are not able to use the remote to navigate through Guided setup, you can manually pair the Roku remote by following these steps: Be sure to turn off or move other devices that are near the Roku player.
Need help?
Do you have a question about the XS and is the answer not in the manual?
Questions and answers