Table of Contents
Advertisement
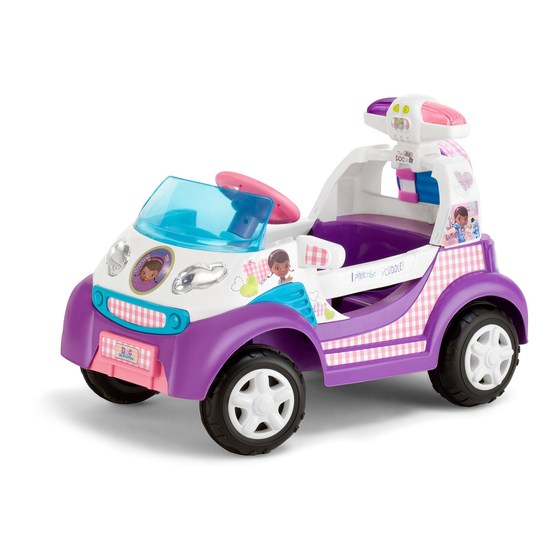
Toy Rescue Ambulance
KT1133KM
OWNER'S MANUAL
The owner's manual contains assembly, use
and maintenance instructions. The vehicle
must be assembled by an adult who has read
and understands the instructions in this
manual. Keep the packaging away from children
and dispose of all packaging before use.
Keep instructions for future reference.
©Disney
Styles and colors may vary
Made in China
Advertisement
Table of Contents

Related Manuals for Kid Trax Toys Doc McStuffins


Summary of Contents for Kid Trax Toys Doc McStuffins
- Page 1 Toy Rescue Ambulance KT1133KM OWNER’S MANUAL The owner’s manual contains assembly, use and maintenance instructions. The vehicle must be assembled by an adult who has read and understands the instructions in this manual. Keep the packaging away from children and dispose of all packaging before use. Keep instructions for future reference.
- Page 2 We hope your child will have years of riding enjoyment with our products. We appreciate your business. Please call us at Kid Trax Toys Consumer Relations with questions or comments at: Phone: 1-877-741-6154 The Web: www.kidtraxtoys.com Email: customerservice@kidtraxtoys.com...
-
Page 3: Table Of Contents
Contents 1 Safety ......... . 4 5 Maintenance . -
Page 4: Safety
Safety WARNING! The following safety hazards may result in serious injury or • Using the vehicle in unsafe conditions such as snow, rain, death to the user of the vehicle: loose dirt, mud, sand or fine gravel may result in •... -
Page 5: Battery Warnings
If contact or exposure may cause a fire or explosion. Only use the supplied occurs immediately call your physician. If the Kid Trax Toys 6V rechargeable battery and charger chemical is on the skin or in the eyes, flush with with the vehicle. -
Page 6: User Requirements And Warnings
USER REQUIREMENTS AND WARNINGS CARE WARNINGS WARNING! Age Range 3 to 7 years Weight Range No more than 66 lbs (30 kgs) • Park the vehicle indoors or cover it with a tarp to protect it from wet weather. Before using the vehicle the child should understand the vehicle •... -
Page 7: Parts
Left rear wheel (1) Rear assembly Right drive wheel (1) Battery charger Back view Hubcap (4) Doc McStuffins Wheel insert (4) Body Includes: Outside washer (4) • Headlights Inner washer (3) Retaining nut (4) • Seat belt Wheel insert (3) •... -
Page 8: Assembly
Assembly CONNECT THE BATTERY TO THE MOTOR WARNING! If wire connection are not made correctly, damage to the battery or cause short circuits may occur. Be sure to make the proper wire connections. Note: You will only need to connect the battery to the motor one time, unless you are removing the battery. -
Page 9: Install The Batteries
INSTALL THE BATTERIES WARNING! • DO NOT mix old and new batteries. • DO NOT mix alkaline, standard (carbon-zinc) or rechargeable (nickel-cadium) batteries. • DO NOT charge non-rechargeable batteries. Always have adult supervision when charging rechargeable batteries. Ambulance Lights ❶ Remove the small screw on the battery cover located at the back of the ambulance light assembly, and lift the battery cover off. -
Page 10: Attach The Wheels
ATTACH THE WHEELS ❹ Insert the outer washer over the axle until it stops at the wheel insert. ❶ Slide a inner washer over the axle until it hits the stop on the axle on all wheels except the right drive wheel. Figure 3.4 ❺... -
Page 11: Attach The Ambulance Lights
ATTACH THE AMBULANCE LIGHTS ❹ Fit the ambulance light over the top bar of the rear assembly. The face of the ambulance light should face ❶ Align the tabs on the bottom of the rear assembly with the toward the front of the vehicle. Figure 3.7 slots in the rear of the vehicle. -
Page 12: Attach The Steering Wheel
ATTACH THE STEERING WHEEL ATTACH THE WINDSHIELD AND MIRRORS ❶ Insert the steering wheel into the steering rod. Figure 3.8 ❶ Align the tabs of the windshield with the slots at the top of the vehicle body. Figure 3.9 ❷ Align the holes on the steering rod and steering wheel. ❷... -
Page 13: Use
CHARGE THE BATTERY Important! Before using the vehicle for the first time the battery needs to be charged for a full 8 hours. The table below shows the time needed for charging the Kid Trax 6 volt battery. First charge 12 hours. -
Page 14: Vehicle Controls
VEHICLE CONTROLS Important! Read the assembly and maintenance sections before use of this vehicle. ❶ Side mirrors: View objects behind the driver. ❷ Steering wheel: Steers the vehicle. ❸ Outside steering wheel buttons: Plays ambulance sounds. ❹ Inside steering wheel buttons: Plays horn sound. ❺... -
Page 15: Re-Charge Interval And Time
Do not charge the battery if damage has occurred. Only replace with a Kid Trax Toys 6V It is best to leave the battery in the battery compartment when rechargeable battery and charger. -
Page 16: Battery Replacement And Disposal
BATTERY REPLACEMENT AND DISPOSAL The Kid Trax Toys 6V battery will eventually lose the ability to ❻ Replace the battery with a Kid Trax Toys 6V battery. hold a charge. Depending on the amount of use, and varying Replacement batteries are available through Kid Trax conditions, the battery should operate for one to three years. -
Page 17: Maintenance
Maintenance The vehicle should be checked for damage, missing or badly worn parts before use. • Check the tightness of the fasteners before each use. • Check the tightness of the wheels. • Ensure the battery is securely in place before use •... -
Page 18: Troubleshooting Guide
The following are examples of potential problems. Completely read through this manual and the troubleshooting guide table before calling Kid Trax Toys Consumer Relations. If you still need help resolving the problem please call 877-741-6154. KidTrax Toys recommends that you take the vehicle to an authorized service center for periodic maintenance and service. Call the number listed above for the closest center to you. - Page 19 Problem Possible Cause Remedy Vehicle does not run very Battery is old Replace battery (see Battery: Replacement and long Disposal Vehicle runs sluggishly or Battery low on power Recharge battery (see Battery: Recharge Interval beeping occurs and Time) Battery is old Replace battery (see Battery: Replacement and Disposal Vehicle is overloaded...
- Page 20 Problem Possible Cause Remedy 6V Battery will not recharge Battery connector or adapter connector is loose Check that battery connectors are firmly plugged into each other Charger not plugged in Check that battery charger is plugged into a working wall outlet Charger is not working (lights not glowing) Call Consumer Relations at 877-741-6154 for an authorized service center...
-
Page 21: Services, Repairs And Parts
Services, Repairs and Parts Do not return this product to the place of purchase. If your vehicle needs service, repairs or replacement parts, call: KidTrax Toys Consumer Relations Hours: 8:00 am – 5:00 pm (CST) Monday - Friday Phone: 877-741-6154 Email: customerservice@kidtraxtoys.com Web: www.kidtraxtoys.com For service and repairs you will be directed to an authorized... -
Page 22: Warranty
Warranty One-Year Limited Warranty Six-Month Limited Warranty on Battery Pacific Cycle, Inc. (PC) warrants this product to the original retail purchaser as follows: The vehicle (except for the 6-volt battery) is warranted against defective materials or workmanship for one year from the date of original purchase. The 6-volt battery is warranted against defective materials or workmanship for six months from the date of original purchase. -
Page 24: Contact Information
Contact Information If you have any questions or comments please contact us at: In U.S.A. © 2013 Pacific-Cycle Inc. 4902 Hammersly Rd. Madison, WI 53711 Customer Service: 877-741-6154 customerservice@kidtraxtoys.com www.kidtraxtoys.com...
Need help?
Do you have a question about the Doc McStuffins and is the answer not in the manual?
Questions and answers