Sangean WR-2 Operating Instructions Manual
Hide thumbs
Also See for WR-2:
- Operating instructions manual (125 pages) ,
- Service manual (44 pages) ,
- Instruction manual (31 pages)
Table of Contents
Advertisement
TO PREVENT FIRE OR ELECTRIC SHOCK HAZARD, DO
NOT EXPOSE THIS PRODUCT TO RAIN OR MOISTURE.
THE LIGHTNING
FLASH AND ARROW-
HEAD WITHIN THE
TRIANGLE IS A WARN-
ING SIGN ALERTING
YOU OF "DANGEROUS
VOLTAGE" INSIDE THE
RADIO.
WARNING:
CAUTION
RISK OF ELECTRIC
SHOCK DO NOT OPEN
CAUTION: TO REDUCE THE
RISK OF ELECTRIC
SHOCK, DO NOT REMOVE
THE BACK, NO USER SER-
VICEABLE PARTS INSIDE.
REFER SERVICING TO
QUALIFIED SERVICE PER-
SONNEL.
WR-2
Operating instruction
Mode d' emploi
Instruccions de manejo
Gebruiksaanwijzing
Bedienungsanleitung
!
THE EXCLAMATION
POINT WITHIN THE
TRIANGLE IS A WARN-
ING SIGN ALERTING
YOU OF IMPORTANT
INSTRUCTIONS
ACCOMPANYING THIS
RADIO.
GB
F
E
NL
D
Advertisement
Table of Contents

Related Manuals for Sangean WR-2


Summary of Contents for Sangean WR-2
- Page 1 WR-2 Operating instruction Mode d’ emploi Instruccions de manejo Gebruiksaanwijzing Bedienungsanleitung WARNING: TO PREVENT FIRE OR ELECTRIC SHOCK HAZARD, DO NOT EXPOSE THIS PRODUCT TO RAIN OR MOISTURE. CAUTION RISK OF ELECTRIC SHOCK DO NOT OPEN CAUTION: TO REDUCE THE...
-
Page 2: Important Safety Instructions
IMPORTANT SAFETY INSTRUCTIONS 1. Read these instructions. 2. Keep these instructions. 3. Heed all warnings. 4. Follow all instructions. 5. Do not use this apparatus near water. 6. Clean only with dry cloth. 7. Do not block any ventilation openings. Install in accordance with the manufacturer’... - Page 3 10. Protect the power cord from being walked on or pinched particularly at plugs, convenience receptacles, and the point where they exit from the apparatus. 11. Only use attachments/accessories specified by the manufacturer. 12. Use only with the cart, stand, tripod, bracket, or table specified by the manufacturer, or sold with the apparatus.
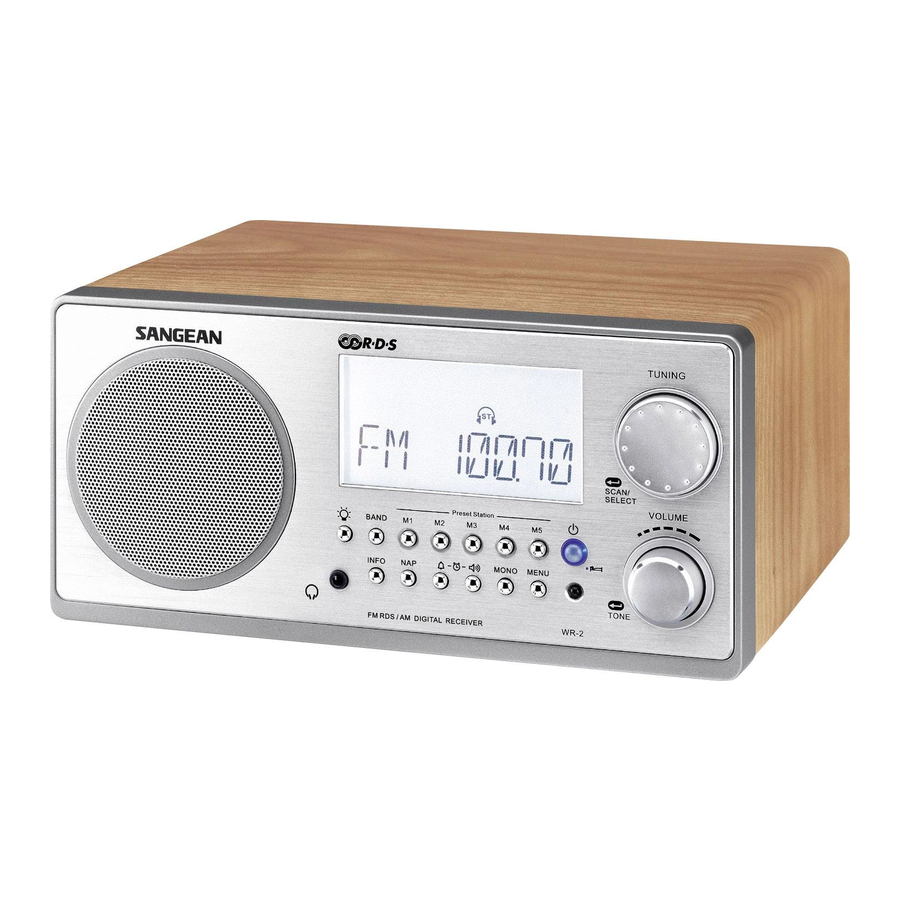
- Page 4 Controls Light button Radio band/AUX IN selection Memory presets Power On/Off/Sleep button Rotary Tuning Control Volume/Tone control IR sensor Traffic information button and minute adjustment Auto time button and hour adjustment Alterative frequency and Select button Set button Display button Station search and mono button Earphones jack...
- Page 5 External F-type FM antenna terminal External AM antenna terminal ( USA version only ) AC power cord socket 12V DC input socket ( ideal for vehicles/boats ) REC out socket Aux in socket External/Internal antenna switch...
-
Page 6: Remote Control
Reset button Remote Control Power on/off/Sleep button Tuning control Volume control Tone control Memory presets Mute Traffic button and minute adjustment Auto time button and hour adjustment Alternative Frequency and Select button Set button Display button Radio band and Aux in selection... -
Page 7: Display
Display Frequency/Time/Station display Radio/Buzzer alarm symbol Daylight Saving Time ( DST ) , not applicable for WR-2 Sleep/Snooze status RDS indicator Time indicator Stereo indicator Traffic indicator Aux In level attenuation Memory presets... -
Page 8: Power Your Radio
Power your radio AC operation Before you plug the AC cord into the radio, be sure the AC voltage is correct. Insert the plug on the end of the supplied power cord into the AC power socket on the back of the radio . DC operation For outdoors use, you can power the radio by using 12V DC input socket from a DC power supply (example, from the power supply of... -
Page 9: Clock Setting
Clock Setting 1. When radio power is off, long press SET button until display flashes “ AM 12:00” or “0:00” depending on the sales areas. 2. Press and release Hour and Minute button or rotary tuning control button to set the required clock time. 3. -
Page 10: Wake To Buzzer Alarm
Wake to buzzer alarm A beep tone will sound when using the buzzer alarm. The alarm beep will increase in volume every 15 seconds for one minute followed by one minute silence before repeating the cycle. The buzzer alarm will sound for one hour unless turned off by pressing the On/Off button. -
Page 11: Wake To Radio Alarm
Wake to radio alarm When the radio alarm is selected, the radio will turn on and play the selected radio station. The radio alarm will sound for one hour unless turned off by pressing the On/Off button. Pressing the on/off button whilst the alarm is sounding will cancel the alarm for 24 hours. -
Page 12: Snooze Function
Monitor radio alarm station Note: remote control unit is not applicable for this operation. 1. Ensure the radio is switched off. 2. Long press the M1 button, until display shows radio frequency. Hold down another 3 seconds, display will flash radio frequency, hold down another 3 seconds to cancel the set radio station. -
Page 13: Sleep Timer
Sleep timer The sleep timer will automatically switch off the radio after a preset time has elapsed. 1. Press and continue to hold down the Power On/Off/Sleep button, the display will cycle through the available sleep times in the order 60-45-30-15-120-90-60. -
Page 14: Scan Tuning
Operating your radio AM Connecting the antenna The radio comes with built-in AM antenna which should be enough for normal listening. To improve the AM reception, you may connect the outdoor AM antenna with AM antenna terminal (USA version only). Tuning your radio Your radio is equipped with three tuning methods –... - Page 15 Scan tuning via remote control device 1. Switch on your radio by pressing the power button. 2. Select the required waveband. 3. Press and hold down either the tuning up or down button until the frequency in the display begins to change rapidly. Release the button.
-
Page 16: Presetting Stations
Presetting stations There are 5 memory presets for each FM and MW wavebands. 1. Press the On/Off button to turn on the radio. 2. Tune to the required station using one of methods previously described. 3. Press and hold down the required Preset button until the radio beeps (greater than 2 seconds). -
Page 17: Fm Stereo/Mono Button
FM Stereo/Mono button 1. If a station being received is weak , some hiss may be audible. To reduce the hiss, press and hold down Mono button until radio beeps and display shows MONO. 2. Press and hold down the Mono button to return to Stereo operation. - Page 18 2) Adjust MW tuning step 1. Ensure that your radio is switched off. Press and hold down the M4 button until AM step begins to appear in the display. Hold down the M4 button for another 8 seconds until AM step begins to flash in the display .
-
Page 19: Radio Data System (Rds)
Radio Data System (RDS) The Radio Data System (RDS) is a system in which inaudible digital information is transmitted in addition to the normal FM radio program. RDS offers several useful features, the followings are available on your radio. Program Service (PS) name The Program Service name is a text usually consisting of not more than eight alphanumeric characters. -
Page 20: Alternative Frequencies (Af)
Clock Time (CT) automatic adjustment The Clock Time information transmitted from the broadcasting station can be used for setting and synchronizing the clock of your radio automatically. The Auto-Time function can be enabled or disabled by the user. Alternative Frequencies (AF) This feature provides a list of Alternative Frequencies for the station being received. -
Page 21: Alternative Frequency (Af)
Alternative Frequency (AF) The RDS system provides a list of alternative frequencies for the station you are tuned to. 1. Switch on your radio and select the FM waveband. Tune into a station carrying RDS information. 2. Press the AF button, your radio will scan the list of alternative frequencies and select the one giving best reception. -
Page 22: Display Button
CT ( Clock Time ) In the status while listening to a RDS station, press CT button to renew the clock time. Display button Whilst tuned to a station, you can change between station name/frequency, normal time and alarm time (if set) by repeatedly pressing of the Display button. -
Page 23: Headphone Use
REC OUT socket On the rear of your radio is for use with a tape recording/mini disc or to allow connection to line input of a Hi-Fi system. The signal on the Record out socket is unaffected by the volume control. External 12V DC Input If mains supply is not available, your radio may be powered by 12V DC via the rear mounted 12V DC supply at 1A with the center pin of... -
Page 24: Mute The Radio
Mute the radio Press MUTE button on the remote control to mute the radio. Press MUTE button again or power on/off or volume control to release the muting. Power failure The clock will continue to run 6 minutes during power failure while preset stations can last for approx. - Page 25 Output power: 7 W 10% T.H.D.@100 Hz Headphones socket: 3.5 mm diameter stereo jack monaural output Output : 5 mW + 5 mW Aux In socket : 3.5 mm diameter stereo jack. Input sensitivity: In 160 mV, Output 7W @ 100 Hz Input impedance: 47 Kohm REC out: Output impedance: 2.2 Kohm DC IN: 12V/1A center pin positive (operational voltage 9-14V)
Need help?
Do you have a question about the WR-2 and is the answer not in the manual?
Questions and answers