
Related Manuals for Numatic CleanTec NHL 15 Hi&Lo


Summary of Contents for Numatic CleanTec NHL 15 Hi&Lo
-
Page 1: Operating Instructions
Operating Instructions CleanTec NHL 15 Original Instructions Warning! Read instructions before using machine... -
Page 2: Cleaning Tips / Kit B26 - Bs27
Cleaning tips Good carpet cleaning is very much a team effort between operative and machine and a few well established rules to be followed to get the best results. Move furniture. Vacuum thoroughly. Test carpet for colour fastness (out of sight). Spot clean as necessary. -
Page 3: Table Of Contents
Before continuing, please refer to Quick Set Up Guide on Page 8 Cleaning Tips / Kit B26 - BS27 ......................Page 2 Index ............................... Page 3 Quick Set Up Guide ........................Page 4 Machine Overview ........................... Page 5 Rating Label / PPE / Critical components / Specifications ..............Page 6 Information for wet machines ...................... -
Page 4: Quick Set Up Guide
Quick Set Up Guide PLEASE READ BEFORE COMMENCING ANY OPERATION After the removal of all the packaging, carefully open and check the contents. Fig 1 Fig 2 Fit the handle to the machine using the fixings supplied. Remove the dome, unclip and remove the waste water (Fig 1) tank (Fig 2) Fig 3... -
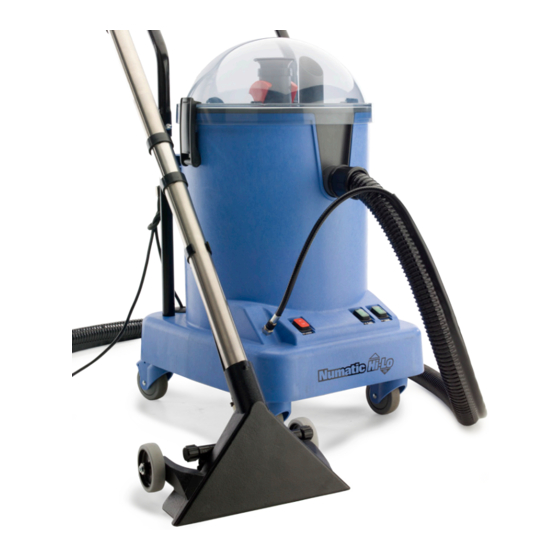
Page 5: Machine Overview
Machine Overview 1. Plugged Cable cover 2. 6.3 amp time lag fuse x 2. 3. Plugged cable 4. Cable grommet 5. Vacuum filter cover 6. Vacuum filter 7. Castor wheels x 4 8. Quick release 9. Hi Lo Pump Switch 10. -
Page 6: Rating Label / Ppe / Critical Components / Specifications
Rating Label - WEEE - PPE - Safety Critical Components About the machine Company WEEE Legislation name and address (Waste, Electrical and Electronic Equipment) Machine Description Vacuum cleaner, accessories and packaging should be sorted for environmental-friendly recycling. Voltage / Frequency Only for EU countries: Do not dispose of Vacuum cleaner into household waste! Power Rating... -
Page 7: Information For Wet Machines
Replace any worn or damaged parts immediately. • Regularly examine the power cord, if damage is found, power cord must be replaced by a qualified person Using the correct Numatic original part. • Ensure that all components are assembled correctly before use. -
Page 8: Fault Finding
Fault Finding - Wet - Spray Extraction Spray extraction machines only • Use only approved cleaning preparations. • Use defoamer if necessary. Use of detergents When using any detergent with this machine, please ensure you have read the safety data on the container and you are familiar with the procedures to clear up spills, inhalation, skin and eye contact. -
Page 9: Machine Set Up
Machine Set-Up Fitting the handle Fig 10 Fig 11 Secure the handle using the nut and bolt supplied Slide the handle over the two tubes already fitted to the (Fig 11). side of the machine. (Fig 10). Fig 12 The handle makes an ideal way to store the cable (Fig 12). -
Page 10: Removing The Dome And Waste Water Tank
Removing the dome and waste-water tank. To remove the dome, unclip the locking toggles and lift the dome off the machine (Fig 14). The waste water tank is held into place with a red locking clamp. Undo the clamp (Fig 15) and lift the waste water tank from the machine (Fig 16). -
Page 11: Chemical Usage
Avoid contact with skin and eyes. In case of eye contact flush with clean water seek medical attention. In case of contact with the skin rinse with plenty of clean water. Product data is available from Numatic. INGREDIENTS Composition: Greater than 30% = Among other ingredients water... -
Page 12: Replacing Waste Water Tank And The Dome
Replacing the waste-water tank and dome. To replace the waste-water tank fit into the drum and lock Fig 21 in place with the red locking clip (Fig 20). If the waste tank is not locked, the machine will lose performance. Locate the handle into the front of the drum (Fig 21). -
Page 13: Assembling Wands And Floor Tool
Assembling the wands and floor-tool The NHL 15 comes with a complete set of high quality stainless steel wands. To make the machine comfortable to use we have included a small spacer wand allowing the height of the wand set to be adjustable for different height operatives. -
Page 14: Operating The Machine
Operating the machine Controls and Switches All the switches on the NHL machine have been designed to enable easy use and they are placed on the front of the machine. These switches are to be operated by hand and NOT to be operated by foot. On heavy soiled carpets you can double the pressure of the pump to 60 PSI by using the Hi / Lo switch (A) To active the vacuum press ‘vacuum switch’... -
Page 15: Using The Hand Tool
Fig 35 Using the hand tool The NHL 15 comes with a quality upholstery tool Fig 36 Fit the upholstery tool to the end of the hose. Connect the solution tube (Fig 36) Switch the machine on and operate the trigger to apply the cleaning solution (Fig 37). -
Page 16: Cleaning The Machine
(Fig 41). Fig 40 Fig 41 Cleaning the tanks, filters and hoses. To keep your NUMATIC machine in pristine condition Fig 42 Clean all filters and tanks regularly. Remove the waste tank vacuum filter (Fig 42) and clean. -
Page 17: Blocked Nozzles
Located in the bottom of the NuChem / water tank is a barrel filter (Fig 43). Clean if necessary. Fig 43 Ensure the machine is cleaned and all hoses and tubes are flushed with cold clean water (fig 44). After use, ensure the solution tube has been flushed with clean water for at least 60 seconds. -
Page 18: Maintenance
To gain access to this filter remove the filter cover (Fig 50). Periodically, clean or renew the filter using (207119) Vacuum filter It is recommended you only use genuine NUMATIC parts. Fig 50 Replacing the vacuum and pump fuses Under the rectangular plate is 6.3 amp time lag fuse holder Remove the plate (Fig 51). -
Page 19: Changing The Cable
Changing the cable Check the cable before use if the cable is found to damaged or scuffed (fig 55) replace with a genuine Numatic part. The Cable has been designed to be changed easily. Unscrew the cable / fuse cover plate (fig 56) Ensure you dispose of the cable in a proper manner. -
Page 20: Troubleshooting
Trouble-Shooting PROBLEM CAUSE SOLUTION Machine will not operate Missing or blown plug fuse. Replace fuse. Mains power cable damaged. Replace damaged cable. Vacuum will not operate Vacuum not turned on. Turn on vacuum. Vacuum fuse missing or blown. Replace missing or blown fuse. Pump will not operate Pump not turned on. -
Page 21: Wiring Diagram
Wiring Diagram WD - 9729 15.04.2011 (A01) 233935 Page 21 06/11 (A04) -
Page 22: Warranty
Warranty Document 233935 Page 22 06/11 (A04) -
Page 23: Declaration Documents
DE CONFORMITATE EU VAATIMUSTENMUKAISUUSVAKUUTUS Europejska Deklaracja Zgodnosci EL-i VASTAVUSAVALDUS Noi, Numatic International Limited, cu sediul in Chard, Som- DICHIARAZIONE DI CONFORMITÀ EU erset, United Kingdom, nr de inregistrare: 773331 England, Me täten vakuutamme, että seuraava laite täyttää kaikki Oswiadczamy, ze nastepujacy sprzet spelnia wszystkie Käesolevaga deklareerime, et järgmine seade on... -
Page 24: Company Addresses
BenNeLux Distribution, Numatic International BV, Postbus 101, 2400 AC Alphen den Rijn, NEDERLAND. Tel: 0172 467 999 Fax : 0172 467 970 233935 Page 24 06/11 (A04)
Need help?
Do you have a question about the CleanTec NHL 15 Hi&Lo and is the answer not in the manual?
Questions and answers