Electronics Line CommPact Installation Manual
Hide thumbs
Also See for CommPact:
- User manual (56 pages) ,
- Quick start installation manual (16 pages)
Table of Contents
Advertisement
Quick Links
Download this manual
See also:
User Manual
Advertisement
Table of Contents

Related Manuals for Electronics Line CommPact


Summary of Contents for Electronics Line CommPact
-
Page 1: Installation Manual
Installation Manual For quick installation information please refer to the CommPact Quick Start Installation Guide provided on our website: www.electronics‐line.com ... -
Page 2: Table Of Contents
Table of Contents Introduction ................................... 1 1.1. Documentation Conventions ..........................1 1.2. Specifications ................................2 1.3. System Overview ..............................3 1.4. Hardware Layout ..............................4 System Installation ................................ 7 ... - Page 3 8.7. Tones Options ............................... 52 System Options ................................53 9.1. Code Lockout ................................ 53 9.2. Arm/Disarm Options ............................. 53 9.3. Panic Alarm ................................54 9.4. AC Loss Delay ..............................55 ...
- Page 4 Flood Detector (EL-2661) ..............................120 Gas Leak Detector (EL-2762) ............................123 Carbon Monoxide Detector (EL-2764) ..........................126 Low Temperature Detector (EL-2663) ..........................131 Outdoor Siren and Strobe (EL-2626AC) .......................... 132 Repeater (EL-2635) ................................. 135 Transmitter Specifications ...............................
-
Page 5: Introduction
The symbol on a key that appears on the Front Panel keypad √ 5. Interface Test The text that actually appears on the CommPact LCD display (bold). Important note, please pay attention. Due to the occurrence Caution: description of a potentially hazardous situation. -
Page 6: Specifications
2m from the Control System. Batteries shall be provided by a distributor and replaced by authorized service personnel. The backup battery pack should be replaced every five years. Batteries should be stored in a cool, dry place. CommPact Installation Manual... -
Page 7: System Overview
This system has been developed based upon a design concept geared towards easy installation and use. With this in mind, the user interface is based on a simple, menu‐driven model that suits the essential requirements of both the user and installer alike. You can program the CommPact Control System on‐site using the Front Panel keypad or PC, or off‐site via a PC using local programming option of the Remote Programmer. ... -
Page 8: Hardware Layout
Hata! Burada görünmesini istediğiniz metne Heading 1 uygulamak için Giriş sekmesini kullanın. Hata! Burada görünmesini istediğiniz metne Heading 1 uygulamak için Giriş sekmesini kullanın. Figure 1-1: System Architecture 1.4. Hardware Layout The aim of this section is to acquaint you with the circuit boards that make up the system. The CommPact Control System housing has two PCBs: the Main Board and the P ower Supply and Connections Board. CommPact Installation Manual... - Page 9 4. LCD Contrast Control 11. GSM Engine 5. USB Port 12. LCD Display 6. SIM-Card Holder 7. Speaker Connector Do not use VoIP phone lines for communication to the central monitoring station. In certain cases the system may not transmit alarm signals successfully over the VoIP network. To reduce the risk of fire, use only No. 26AWG or larger telecommunication wire. Flat cable (8) is not Removable! CommPact Installation Manual...
- Page 10 1. AC Power Connector 6. Transformer 2. AC Fuse 7. Front Tamper Switch 3. Terminal Block 8. Flat-Cable Interface Connector to the Main Board 4. Telephone Line Fuse 9. Battery Fuse 5. Back Tamper Connector 10. Battery Connector CommPact Installation Manual...
-
Page 11: System Installation
Mount the Control System in a location that provides easy connection to the router. For best performance of the GPRS Communication, the Control System should be mounted in a position where the GSM signal is strong. Refer to the following section in order to choose the optimal location for wireless devices in relation to the Control System. 2.1.1. Wireless Installation Guidelines In order to optimize wireless communication, consider the following guidelines: Whenever possible, mount the Control System centrally in relation to wireless detectors. Avoid installation in close proximity to sources of high noise or radio frequency interference. For example, metal air conditioner/heater ducts and circuit breaker boxes. Minimize the distance between the Control System and transmitters. Minimize the number of obstacles between the Control System and transmitters. Figure 2-1: Minimizing Obstacles Metal based construction materials, such as steel reinforced concrete walls, reduce the range of radio transmissions. Figure 2-2: Considering Construction Materials CommPact Installation Manual... -
Page 12: Installation Procedure
After unpacking the kit and making certain that you have all the necessary equipment, it is recommended that you install the system as follows: STAGE 1: Temporarily power up the system and install the SIM card. STAGE 2: Selecting language and defaults STAGE 3: Register the transmitters. STAGE 4: Test the chosen mounting location. STAGE 5: Program the relevant Internet options. STAGE 6: Permanently Install the Control System and Transmitters 2.2.1. Stage 1 – Temporarily Power Up the System In order to register and test transmitters, it is necessary to temporarily power up the Control System before permanently installing it. Insert a screwdriver between the front and back panels of the housing; carefully twist it to release the tabs (see p. 8, Figure 2‐4). Figure 2-4: Opening the Housing Thread the Power AC cable through the hole in the back cover. Connect it to the AC cable connector on the PCB and secure it by Cable Clamp (see p. 9, Figure 2‐5). The Control System is supplied without AC cable. Please use Standard Two‐Pin European Plug cable only. For the Cable Clamp, use the screw and the washer supplied in your kit to replace the PCB screw. CommPact Installation Manual... - Page 13 2.2.2. Stage 2: Selecting Language and Defaults The Control System supports several languages. Language and defaults settings must be defined before any configuration parameters are set or any transmitters registered. Setting language and defaults automatically initializes the Control System. This means that all prior configuration settings are reset to the default settings and all previously registered transmitters are deleted from the Control System. To select language and defaults: Press ʹ√ʹ. Enter your Installer code (the default Installer code is 1111). From the Programming menu, select Devices [971]. Select default and press ʹ√ʹ. Select language (Voice + LCD display) and press ʹ√ʹ. Press ʹ√ʹ once more to initialize the Control System 2.2.3. Stage 3 – Register the Transmitters For the Control System to recognize a device, its transmitter must be registered. In general terms, transmitter registration means sending two transmissions from a device when the Control System is in Registration mode. To register a device: Press ʹ√ʹ. Enter your Installer code. From the Programming menu, select Devices [91]. Select the type of transmitter you want to register. For example, if you want to register a wireless detector to a zone, select Zones. optional feature CommPact Installation Manual...
- Page 14 Once all of the transmitters are registered, it is recommended that you test the chosen mounting locations before permanently mounting the Control System and wireless devices. You can test the transmitter signal strength using the TX Test feature. To test transmitter signal strength: Press ʹ√ʹ. Enter your Installer code. Enter [7072] (Service, Transmitters, and TX Test) to initiate TX Test mode. Activate the transmitter you wish to test; the transmitter’s details appear on the Control System’s LCD. Additionally, between one and four tones are sounded to indicate the transmitter’s signal strength. If four tones are sounded, the transmitter is in the best possible location – see p. 30, 4.7.7 Transmitters for further information. After you have tested each transmitter, press Χ to exit TX Test mode. When using GPRS and/or GSM communication, test the GSM signal strength. To test the GSM signal strength: Press ʹ√ʹ. Enter your Installer code. Enter [7091] (Service, RF & GSM level, GSM Signal); RF RSSI level measured by the systemʹs receiver – see p. 31, 4.7.9 GSM Signal Strength for further information. Check the RF RSSI (Received Signal Strength Indication) level using the system’s RSSI meter. To view the RF RSSI level reading: Enter [7092] (Service, RF & GSM level, RF RSSI Level); the RF noise measured by the systemʹs receiver is displayed – see p. 32, 4.7.10 RF RSSI level for further information. CommPact Installation Manual...
- Page 15 Stage 6 – Permanently Install the Control System and Transmitters Having chosen and tested the mounting location of the Control System and each transmitter, you are now ready to permanently install the system. To permanently install the transmitters, refer to each device’s installation instructions in Appendix B of this manual or to those supplied individually with each product. To install the Control System: P lace the drilling template against the wall and mark the mounting holes. Install 2 wall anchors and screws leaving 2‐3mm out of the wall. The Control System must be mounted so that it shall withstand a force of at least three times its own weight. Disconnect (unplug) AC power from the Control System. Open the housing (see p. 8, Figure 2‐4). Thread any required cables through the hole in the back cover. Connect the optional Telephone Line, Telephone, Wired Zone, and PGM to their connectors on the Main Board terminal block – see p. 9, Figure 2‐5. Plug the AC power cable into the outlet. Always connect AC power before connecting the battery pack. Batteries are supplied uncharged. When you first connect the battery, it is probable that the system will display a Low Battery condition. Allow the battery to charge for at least 18 hours before use. Connect the Backup Battery to its connector on the Main Board – see p.6 Figure 1‐3. CommPact Installation Manual...
-
Page 16: Back Tamper
In this case, check that the Control System’s Internet Options are correctly programmed. If you still experience problems, the IP Protocol and GPRS settings must be checked. To check the IP Protocol and GPRS settings: Open the PCB Compartment and make sure a SIM Card with GPRS support is on the PCB – see p. 13 Figure 3‐2. Close the housing and enter your Installer code. Enter [95112] (Programming, Communications, Accounts, Account 1, and Protocol). If the setting is correct, you will see ʺIP Protocolʺ. Exit this menu and Enter [95113] (Programming, Communications, Accounts, Account 1, Interface). If the setting is correct, you will see ʺGPRSʺ. When using a SIM card with a PIN code, the installer has to make sure that the PIN code programmed in the Control System is the same as the SIM cardʹs PIN code – see p. 8, 10.7.2 PIN Code. CommPact Installation Manual... -
Page 17: Basic System Operation
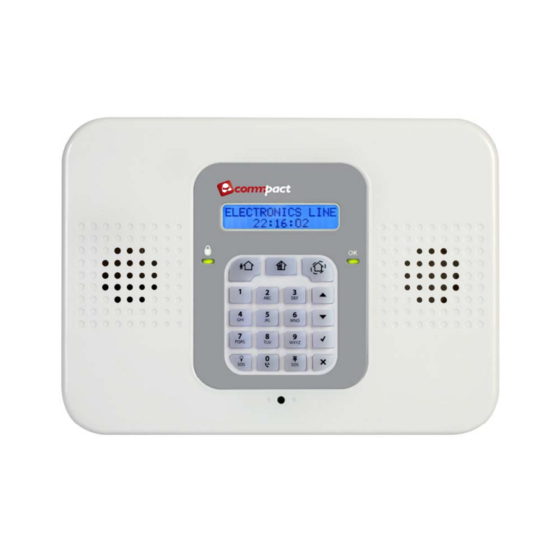
Front and Back Panel Layouts The front panel provides a detailed interface for operating and programming the system. The following diagram will familiarize you with the various elements of the front panel. Display Status Arming Keys Menu Navigation Keys Alphanumeric Keypad Figure 3-1: Front Panel Next diagram shows the Control Systemʹs back panel that provides access to the SIM card, the USB Connector and the battery power switch used at first installation – see Figure 3‐2 below. Figure 3-2: Back Cover CommPact Installation Manual... -
Page 18: Front Panel System Status Leds
Used to cancel the current selection. Used to return to the previous menu level. √ Used to enter Menu mode. Used to select the current menu item. Used to signify the end of an entered value. Toggles status in Zone Bypass/Unbypass function. CommPact Installation Manual... -
Page 19: Lcd Display
The system has been armed using the displayed arming method with the Instant arm feature activated. PERIM ARMED INST FULL ARMING PART ARMING The system is in the process of arming (displayed during exit delay). PERIMETER ARMING CommPact Installation Manual... -
Page 20: Audible Notification
– see p. 51, 8.6.3 Fire Trouble Tones. 3.5.1. System Trouble Tones In the event of system trouble, the CommPact Control System sounds a series of tones to alert the user. To silence these tones, press and scroll through the system trouble list displayed on the LCD. When the trouble condition is restored, it is removed from the system trouble list. CommPact Installation Manual... -
Page 21: Vocal Message Annunciation
You have three arming modes available: full, part, and perimeter. Figure 3‐4 illustrates the three arming modes. In each diagram, the protected area is shaded. Full Armed Part Armed Perimeter Armed Figure 3-4: Arming Modes The arming options are entirely flexible. You can program each detector to be included in any combination of the three arming modes – see p. 42, 7.3.2 Arm Set. Additionally, each arming mode has a separate exit and entry delay. CommPact Installation Manual... -
Page 22: Arming Keys
Front Panel Wireless Keypad EL-2620 Figure 3-6: Arming Keys 3.6.3. Full Arming Full arming is designed for when the occupant vacates the premises. To fully arm the system using the front panel keypad or Wireless Keypad: Check if the system is ready to arm. Press the Full arming key on the keypad. If One‐Key Arming is disabled, enter your user code. 3.6.4. Part Arming Part arming is designed for when the occupant intends to remain inside one part of the premises and secure another part. To partially arm the system using the front panel keypad or Wireless Keypad: Check if the system is ready to arm. Press the Part arming key on the keypad. If One‐Key Arming is disabled, enter your user code. CommPact Installation Manual... -
Page 23: Perimeter Arming
The entry delay depends on which detector was tripped first. For example, if the detector is included in Full arming, the entry delay for Full arming counts down – see p.42, 7.3.2 Arm Set. If the detector is included in both activated arming modes, the entry delay for Perimeter arming counts down. Disarming cancels both active arming modes. 3.6.7. Disarming When an entry/exit detector is tripped, the entry delay counts down; each arming method has its own entry delay. To disarm the system: Enter a valid user code, the system is disarmed. You can only disarm all the active arming modes. CommPact Installation Manual... -
Page 24: Additional Arming Options
F U L L A R M # 1 2 3 4 1 2 1 While the SMS Command Descriptor is optional, you must start the SMS command with the # symbol for the system to accept the command. After an SMS command is executed by the system, you can program the system to return a confirmation message to the sender – see p. 72, 10.7.5 SMS Confirmation. CommPact Installation Manual... - Page 25 To activate a Fire alarm from the front panel keypad: Press and hold down buttons 1 and 3 simultaneously. Figure 3-9: Fire Alarm Activation To activate a Medical alarm from the front panel keypad : Press and hold down buttons 4 and 6 simultaneously. Figure 3-10: Medical Emergency Alarm Activation CommPact Installation Manual...
- Page 26 Hata! Burada görünmesini istediğiniz metne Heading 1 uygulamak için Giriş sekmesini kullanın. Hata! Burada görünmesini istediğiniz metne Heading 1 uygulamak için Giriş sekmesini kullanın. CommPact Installation Manual...
-
Page 27: Advanced System Operation
Menu mode. Shortcut numbers appear in square brackets in the procedures throughout this manual. 4.1.1. Menu Mode Timeout Menu mode automatically terminates at a predefined amount of time after the last keystroke. The duration of this timeout depends upon which code is used to enter the menu. Usually the Menu Mode Timeout is two minutes but if you enter menu mode using the Installer code, the timeout is extended to fifteen minutes. CommPact Installation Manual... -
Page 28: Cancel Report
When a detector is bypassed, it is ignored by the system and does not generate an alarm when triggered. To bypass or unbypass a detector: From the Bypass Zones menu, select Bypass/Unbyp. [21]. Using the arrow keys, scroll to the detector you want to bypass or unbypass. Press ʹ√ʹ to change the bypass status. Press ‘Χ’; Save Changes? is displayed. Press ʹ√ʹ to confirm the changed bypass status. To unbypass all detectors: From the Bypass Zones menu, select Unbypass All [22]. Press ʹ√ʹ; all detectors are unbypassed. All bypassed zones are automatically unbypassed when the system is disarmed. A Fire zone cannot be bypassed. 4.4. User Codes The Control System supports up to 32 individual user codes. Each of these codes is four digits long. Most system operations require you to enter a valid user code. The ability to perform an operation is defined by your user code’s authorization level. These authorization levels are pre‐defined for each code as explained below. Codes 1‐29 can be edited only by the Master code. The Installer code and the Central Station TWA Code can be edited only by the installer. CommPact Installation Manual... - Page 29 The Central Station TWA code is designed to enable the central station operator to establish Two‐ Way Audio communication with the Control System after an alarm. This code is valid for use for the first ten minutes after an alarm has occurred. This code can only be used for this specific purpose and does not grant access to any additional system functions such as disarming. Code 31: Guard Code Guard Code is an option that allows a security guard to check the premise in case of an alarm. Only if arm/disarm event group is enabled inSystem Programming Only if arm/disarm event group is enabled during System Programming CommPact Installation Manual...
-
Page 30: Deleting User Codes
4.4.1. Editing User Codes To edit a user code: From the main menu, select User Codes [4]. Select the code you want to edit. From the code’s sub‐menu, select Edit Code [#1]; the 4‐digit code is displayed with the cursor flashing on the first digit. Edit the code. Press ʹ√ʹ; the new code is stored in the memory. If you enter a code that is identical to an existing user code, the Control System sounds an error tone and the new code is not accepted. 4.4.2. Deleting User Codes To delete a user code: From the main menu select, User Codes [4]. Select the code you want to delete. From the code’s sub‐menu, select Edit Code [#1]; the 4‐digit code is displayed with the cursor flashing on the first digit. Enter 0000. Press ʹ√ʹ; the code is deleted. The Installer and Master codes cannot be deleted. 4.4.3. User Code Descriptors Each user code can be assigned a 16‐character descriptor. These descriptors help to identify users in the event log and in SMS Follow‐Me messages. To edit a code descriptor: From the main menu, select User Codes [4]. Select a code. From the code’s sub‐menu, select Descriptor [#2]. Edit the descriptor using the alphanumeric keypad. Press ʹ√ʹ when you have finished editing. CommPact Installation Manual... -
Page 31: Follow-Me
The event descriptor – a brief description of the event that occurred. The zone where the event occurred. Time/date stamp – the exact time the event occurred. Report details – a single character indicating whether the event was reported to the central station. The options available are R: Report Sent, F: Report Failed, C: Report Canceled, N: No Report, or D: Disabled. Figure 4‐2 shows the detailed event log entry for a Fire alarm on November 14 2008. The event was successfully reported to the central station. Figure 4-2: Detailed Event Log Display CommPact Installation Manual... -
Page 32: Clearing The Event Log
The time and date are used to time stamp events in the event log. Additionally the time is also displayed on the LCD display. To set the time: From the Service menu, select Set Time/Date, Set Time [7011]. Enter the current time. Press ʹ√ʹ; the time is modified. To set the date: From the Service menu, select Set Time/Date, Set Date [7012]. Enter the current date. Press ʹ√ʹ; the date is modified. The format of the time and date is defined in the System Options – see p.56, 9.5.3 Time/Date Format. If you are setting the time in 12hr format, use the key to toggle between AM and PM. CommPact Installation Manual... -
Page 33: Message Center
Heading 1 uygulamak için Giriş sekmesini kullanın. 4.7.2. Message Center The CommPact Control System Message Center is designed to allow the user to record a short message that may be played back later by another user. After a message is recorded, Message Waiting is displayed on the LCD until the message is played back. If the Vocal Message option is ... - Page 34 Tamper condition Battery low The transmitter is out of synchronization The transmitter is inactive (Supervision Loss) – see p. 40, 7.2.3 Supervision Time Press Figure 4-3: TX List Display In most cases, an ʺout of synchronizationʺ condition indicates that an unauthorized attempt at grabbing the transmission has occurred – i.e. a previous transmission has been recorded and sent by somebody trying to violate the system. CommPact Installation Manual...
-
Page 35: Audio Volume
Audio Volume To adjust the sensitivity of the microphone and the volume of the speaker: Establish a two‐way audio connection – see 5.1.4 Telecontrol Call Procedure. From the Service menu, select Audio Volume [708]. Using the arrow keys on the Front Panel keypad, adjust the setting according to the following table. Table 4-3: Voice Level Adjustment Key… Function Increases microphone sensitivity Reduces microphone sensitivity Increases speaker volume Reduces speaker volume Press ʹ√ʹ; the new settings are stored in the memory. 4.7.9. GSM Signal Strength You can measure the GSM signal strength. This function and the RF RSSI level (see below) enable you to calculate the optimal location to install the Control System. To view the GSM signal strength reading: From the Service menu, select RF & GSM level, GSM Signal [7091]; the signal strength of the cellular network is displayed. In severe cases of low GSM signal consider using external GSM antenna. CommPact Installation Manual... -
Page 36: Display Version
6, consider relocation of the Control System or its peripherals – see p. 7 2.1.1 Wireless Installation Guidelines. The menu will have timeout of 5 minutes. If the installer doesnʹt exit the menu within 5 minutes of its entry, the Control System will exit all menus. To view the RF RSSI level reading: From the Service menu, select RF & GSM level, RF RSSI level [7092]; the RF RSSI level of the Control Systemʹs receiver is displayed. 4.7.11. Display Version To display the system’s software and hardware versions: From the Service menu, select Version [710]; the software (SW) versions is displayed. 4.7.12. Enable Programming The Enable Programming command enables a user with Master code authorization to grant access to system programming. This feature is relevant only if the Installer Access and/or the RP Access options are programmed as ʺUser Initiatedʺ – see p. 59, 9.11 and p. 66, RP Access Options. To grant access to the installer or Remote Programmer: From the Service menu, select Enable Prog. [711]; a 30‐minute time window is opened during which the Installer Code is valid or RP communication may be established. CommPact Installation Manual... - Page 37 To access the Global Chime option from Standby mode, press then. 4.7.14. Remote Firmware Update The Remote Firmware Update command enables a user with Master code authorization to initiate the update. This feature is relevant only if the Remote Firmware Update mode is programmed as ʺUser Initiatedʺ – see p. 73, 10.8.4 Remote Firmware Update To grant access to Remote Firmware Update: From the Service menu, select, SW Update [713]; a 24‐hours time window is opened during which the Remote Firmware Update may be performed. 4.7.15. System Reset System Reset feature can be accessed with Installer and Master Code. When accessed with Installer Code, reset message is registered in the log. To Reset the System: From the Service menu, select System Reset [714]; the OK? confirmation message is displayed. CommPact Installation Manual...
-
Page 38: Telecontrol And Two-Way Audio
To connect to the Control System using the double call method: Dial the telephone number of the line connected to the Control System. Wait for two or three rings and hang‐up. Wait at least five seconds and dial the number again; on the second ring, the Control System picks up and sounds two DTMF tones. 5.1.3. Incoming Calls via a Cellular Network The Control System has its own individual telephone number and therefore, the double call method is not needed. In this case, the user or central station operator may call the Control System directly. 5.1.4. Telecontrol Call Procedure The following procedure explains how to make a Telecontrol call. The conditions and procedure differ when using PSTN or Cellular Communication. For further information, see the entire section 5.1 Incoming Calls. To make a Telecontrol call: Call the Control System either using the double call method (PSTN) or directly (Cellular); when the Control System picks up, two DTMF tones are sounded. CommPact Installation Manual... - Page 39 (if the Siren Cut‐Off has not yet expired). During the call, pressing ʺ9ʺ on your telephone cancels the re‐activation of the siren. 5.1.8. Central Station Two-Way Audio Central Station Two‐Way Audio is an alarm verification feature that enables the central station operator to establish Two‐Way Audio communication with the Control System within ten minutes of an alarm. CommPact Installation Manual...
-
Page 40: Outgoing Calls
The Control System starts to dial. 5.2.2. TWA Alarm Reporting In the event of Burglary, Fire and Medical alarms, the Control System is able to report the events and then stay on the line after acknowledgment is received (ACK 2). This allows the operator to verify the alarm or provide assistance in the event of an emergency. For this feature to function, you must enable Two‐Way Audio for both the account and the event group. The sequence for Two‐Way Audio during alarm reporting is as follows: An alarm event is sent to the central station and acknowledgment is received (ACK 2). If Two‐Way Audio is enabled for the account and event group, the Control System stays on the line and opens the audio channel. If the TWA mode is defined as ʺSimplexʺ (see p.70, 10.6.11 TWA Mode), the audio channel opens in Listen mode (microphone active/speaker mute). The operator may switch to Speak mode, by pressing ʺ1ʺ on their telephone. Pressing ʺ0ʺ switches back to Listen mode. The duration of the call is determined by the TWA/VM Timeout. Ten seconds before the timeout expires, two short DTMF tones are sounded. To extend the call, the operator presses ʺ7ʺ on their telephone. This command restarts the timeout. CommPact Installation Manual... - Page 41 To disconnect before the end of the timeout, the user presses ʺ*ʺ then ʺ#ʺ on their telephone. 5.2.4. TWA Follow-Me The TWA Follow‐Me feature is designed to establish a Two‐Way Audio connection with the user in the event of an alarm. For this feature to function, the account’s protocol must be defined as TWA Follow‐Me. The sequence for a Two‐Way Audio Follow‐Me call is as follows: An alarm occurs. The Control System dials the programmed telephone number and sounds two DTMF tones when you pick up the call. Press ʺ2ʺ on your telephone; the Control System opens the audio channel. If you press ʺ9ʺ to answer the call, the Control System simultaneously cancels the siren when opening the audio channel. If the TWA mode is defined as ʺSimplexʺ, (see p. 68, 10.6.11 TWA Mode), the audio channel opens in Listen mode (microphone active/speaker mute). To switch to Speak mode, press ʺ1ʺ on your telephone. To switch back to Listen mode, press ʺ0ʺ on your telephone. The duration of the call is determined by the TWA/VM Timeout. Ten seconds before the timeout expires, two short DTMF tones are sounded. To extend the call, press ʺ7ʺ on your telephone. This command restarts the timeout. To disconnect before the end of the timeout, press ʺ*ʺ then ʺ#ʺ on your telephone. CommPact Installation Manual...
-
Page 42: Pgm Control
After an SMS command is executed, the system can return a confirmation SMS message to the sender. This message includes the PGM descriptor and the command that was sent. For further information on how to enable this feature, see p. 72, 10.7.5 SMS Confirmation. This message is sent when the parameter ‘SMS Confirm’ (Programming, Communications, Comm. Options, GSM Options, SMS Confirm [954135]) is Enabled. The following example shows the confirmation message the sender receives for the sample command from the previous section: P G M CommPact Installation Manual... -
Page 43: Devices
To register a device to the system: From the Programming menu, select Devices [91]. Select the type of transmitter you want to register. For example, if you want to register a wireless detector to a zone, select Zones. Select the specific device you want to register (for example, Zone 4); the system initiates Registration mode. During Registration mode, the system waits for two transmissions from the device. If a device has already been registered at the selected location, the system will not initiate Registration mode. If the device has already been registered at another location, attempts to register it are ignored by the system. Zones 1‐32 are intended for wireless detectors by default. Register the device – refer to each device’s installation instructions in Appendix B for further details. When two transmissions have been received, Save? is displayed. Press ʹ√ʹ to confirm registration. 7.2.2. Deleting Wireless Devices When you want to remove a device from the system, you have to delete the device. It is important to delete unused devices for two reasons. Firstly, you have to delete a device before you can register a new transmitter in its place. Secondly, if the device is a wireless detector, it is important to delete the device so that the system will not react to the transmitter’s failure to send supervision signals. CommPact Installation Manual... -
Page 44: Supervision Time
Transmissions that are out of synchronization are rejected by the system. For example, it is not possible to arm or disarm the system using a keyfob that is out of synchronization. In the event that a transmitter is out of synchronization, it is possible to re‐synchronize the transmitter and restore normal operation. To re‐synchronize transmitters: From the Programming menu, select Devices, TX Re‐synch [917]; a 10‐minute time window is opened. During the 10‐minute time window, if a transmission is received that is out of synchronization, the transmitter is re‐synchronized. CommPact Installation Manual... -
Page 45: Zones
Hata! Burada görünmesini istediğiniz metne Heading 1 uygulamak için Giriş sekmesini kullanın. Hata! Burada görünmesini istediğiniz metne Heading 1 uygulamak için Giriş sekmesini kullanın. 7.3. Zones The CommPact Control System supports Electronics Line 3000’s supervised wireless range of transmitters that includes various PIR detectors, magnetic contacts and smoke detectors. All these transmitters send supervision signals to the Control Systemʹs receiver in order to indicate that the transmitter is functional. ... - Page 46 The zone is included in Part arming. 3 (PE) The zone is included in Perimeter arming. To program the Arm Set option: From the Programming menu, select Devices, Zones [911]. Select the zone you want to program. From the zone’s sub‐menu, select Arm Set [#03]; the zone’s current Arm Set setting is displayed. Use the keys 1, 2 and 3 to toggle the current setting. It is not necessary to program this option for Panic, Medical, Emergency, Fire, 24Hr, Gas, Flood and Environmental zones. 7.3.3. Descriptor For information on device descriptor editing, see p. 39, 7.1 Device Descriptors CommPact Installation Manual...
-
Page 47: Force Arm
I f the Bell option is enabled for Environmental or Flood zones, the system sounds trouble tones from the keypad. 7.3.5. Chime When Chime is enabled, triggering the zone when the system is disarmed causes the Built‐In Siren to chime. To program the Chime option: From the Programming menu, select Devices, Zones [911]. Select the zone you want to program. From the zone’s sub‐menu, select Chime [#06]; the zone’s current Chime setting is displayed. Select either Enabled or Disabled. 7.3.6. Force Arm Force arming enables you to arm the system when the system is not ready. For example, a door that is protected by a magnetic contact is open. You may arm the system on condition that the zone is defined as Force Arm enabled. This door must be closed by the end of the Exit delay otherwise an alarm is generated. If the magnetic contact’s zone is defined as Force Arm disabled, the system will not be ready to arm until you close the door. To program the Force Arm option: From the Programming menu, select Devices, Zones [911]. Select the zone you want to program. From the zone’s sub‐menu, select Force Arm [#07]; the zone’s current Force Arm setting is displayed. Select either Enabled or Disabled. For the Force Arm feature to function, you must also enable Force Arming in System Options ‐‐ see p. 53, 9.2.1 Forced Arm. CommPact Installation Manual... - Page 48 From the Programming menu, select Devices, Zones [911]. Select the zone you want to program. From the zone’s sub‐menu, select Repeater [#09]; the zone’s current Repeater setting is displayed. Select either No Repeater or Use Repeater. Do not register the same transmitter to more than one repeater. 7.3.8. Loop Type (Wired zone 33 only) This option enables you to determine the zone’s loop type. The Control System supports the following Loop Types: Normally Closed (N.C.) – alarm on open, restore on close Normally Open (N.O.) – alarm on close, restore on open End of Line Resistor (E.O.L.R.) – alarm on short, alarm on open, restore on close Double End of Line Resistor (D.E.O.L.R) – alarm on short, alarm on open, restore on close, and tamper alarm on tamper. The zone Loop Types must be defined accordingly at each zone’s programming parameters. Figure 7-3: Loop Types To program the Loop Type option: From the Programming menu, select Devices, Zones [911]. Select the zone you want to program. From the zone’s sub‐menu, select Loop [#01]; the zone’s current Loop type setting is displayed. Select N.O., N.C., or E.O.L.R, or D.E.O.L.R. CommPact Installation Manual...
-
Page 49: Keyfobs
The EL‐2714 and EL‐2614E allows programming B2 button to control PGM. When PGM Assign function is enabled, B2 is used for PGM control; when PGM Assign is disabled, B2 is used for Perimeter arming. To program B2 button: From the Programming menu, select Devices, Keyfobs [912]. Select the keyfob you want to program. From the keyfob’s sub‐menu, select PGM Assign [#4]. Select Enable for PGM Operation or Disable for Perimeter Arm. CommPact Installation Manual... -
Page 50: Wireless Keypads
Figure 7-5: EL-2620 Keypad Layout Arm and Alarm Status LEDs Numeric Arming/ Keypad Keys Cancel Figure 7-6: EL-2621 Keypad Layout Keypad SOS Panic Alarm Activation Using any of the wireless keypads, you can activate an SOS Panic alarm by pressing the Full and Perimeter arming keys simultaneously. Figure 7‐7 illustrates how to activate an SOS Panic alarm on the EL‐2620 wireless keypad. Figure 7-7: SOS Panic Alarm Activation (EL-2620/2621) CommPact Installation Manual... -
Page 51: Repeaters
This gives the user enough time to disarm in the event that the alarm was accidentally triggered during Part or Perimeter arming. If the user disarms the system during the Siren Delay, an alarm event is not reported to the central station. To program the Wireless Siren Delay time: From the Programming menu, select Devices, Siren, WL Siren Delay [9153]. Enter a Siren Delay time (00‐63 seconds), then press ʹ√ʹ. CommPact Installation Manual... - Page 52 Heading 1 uygulamak için Giriş sekmesini kullanın. 7.7.3. Siren Cut-Off The Siren Cut‐Off is the period of time the sirens are activated after an alarm has occurred. You may program a Siren Cut‐Off time in the interval between ten seconds to twenty minutes. To program the Siren Cut‐Off time: From the Programming menu, select Devices, Siren, Cut‐Off [9154]. Enter a Siren Cut‐Off time MM:SS (00:10 ‐ 20:00), then press ʹ√ʹ. 7.7.4. Wired Siren When the system generates an audible alarm, both the wired Built‐In Siren and the wireless siren are sounded. This option allows you to disable the alarm from the Control System’s Built‐In Siren. If disabled, the Control System’s built‐in siren may still be used to sound arm/disarm and entry/exit tones. To program the Wired Siren option: From the Programming menu, select Devices, Wired Siren [9155]. Select Enabled or Disabled. CommPact Installation Manual...
-
Page 53: Entry/Exit Timers And System Tones
This feature automatically arms the system when an Entry/Exit zone is closed during the Exit delay. To program the Arm on Exit option: From the Programming menu, select Entry/Exit, Arm On Exit [923]. Select Enabled or Disabled. 8.3. Supplementary Entry Delay The Supplementary Entry Delay is a pre‐alarm feature that is employed in the event that the system is not disarmed during the entry delay. When the entry delay expires, the Control System’s Built‐In Siren is sounded during an additional entry delay period. At the end of the supplementary entry delay, the system generates a full alarm condition; the wireless siren is sounded and an alarm event is reported to the central station. To program the Supplementary Entry Delay setting: From the Programming menu, select Entry/Exit, Supp. Ent. Delay [924]. Select Enabled or Disabled. CommPact Installation Manual... -
Page 54: Entry Deviation
From the Programming menu, select Entry/Exit, Ent. Deviation [925]. Select Enabled or Disabled. 8.5. Arming Tones Arming tones are the tones sounded by the Control System’s Built‐In Siren and/or the wireless siren when arming and disarming the system. Each set of tones can be enabled or disabled according to the requirements of the installation. 8.5.1. Exit Delay Tones To program tones sounded by the wireless siren during the Exit delay: From the Programming menu, select Tones, Exit Tones, WL Siren [9311]. Select Enabled or Disabled. To program tones sounded by the Built‐In Siren during the Exit delay: From the Programming menu, select Tones, Exit Tones, Siren [9312]. Select No Tones, Four Tones or Continuous Tones. 8.5.2. Entry Delay Tones To program tones sounded by the wireless siren during the Entry Delay: From the Programming menu, select Tones, Entry Tones, WL Siren [9321]. Select Enabled or Disabled. To program tones sounded by the built‐in siren the Entry Delay: From the Programming menu, select Tones, Entry Tones, Siren [9322]. Select No Tones, Four Tones or Continuous Tones. 8.5.3. Arming Tones To program tones sounded by the wireless siren on arming: From the Programming menu, select Tones, Arm Tones, WL Siren [9331]. Select Enabled or Disabled. To program tones sounded by the Built‐In Siren on arming: From the Programming menu, select Tones, Arm Tones, Siren [9332]. Select Enabled or Disabled. CommPact Installation Manual... -
Page 55: System Trouble Tones
If this feature is enabled, fire trouble tones will be repeated 3½ hours after the user has manually silenced the tones if the trouble condition has not been restored. To program the Fire Trouble Tones option: From the Programming menu, select Tones, Fire Trb. Tones [937]. Select Enabled or Disabled. It is not possible to program the Telephone Trouble Tones and Fire Trouble Tones options if the Trouble Tones option is programmed as disabled. CommPact Installation Manual... -
Page 56: Tones Options
Hata! Burada görünmesini istediğiniz metne Heading 1 uygulamak için Giriş sekmesini kullanın. Hata! Burada görünmesini istediğiniz metne Heading 1 uygulamak için Giriş sekmesini kullanın. 8.7. Tones Options 8.7.1. Tones Output The Tones Output option enables you to determine whether the tones sounded when arming and disarming are sounded by the Control System’s Built‐In Siren or its built‐in speaker. To program the Tones Output option: From the Programming menu, select Tones, Tones Options, Tones Output [9381]. Select Siren or Speaker. 8.7.2. Speaker Volume The Speaker Volume option determines the volume level of the tones sounded by the speaker. To program the Speaker Volume option: From the Programming menu, select Tones, Tones Options, Speaker Vol. [9382]. Select High or Low. It is not necessary to program the Speaker Volume option if ʺSirenʺ is selected for the Tones Output option. CommPact Installation Manual... -
Page 57: System Options
Supervised Arm The Supervised Arm option is a feature designed to supervise a wireless device activity before you arm the system. If the system has not received a transmission from a detector during the interval defined for this option, all arming methods that include that detector will not be available. Medical, Panic, Fire, Gas, Flood, and Environmental zones are not included in this supervision and do not affect the system’s ability to arm. Press to check which detector is causing the ʺSystem Not Readyʺ condition. To make the required arming method available, activate the detector. PIR detectors have a three‐ minute delay between transmissions. CommPact Installation Manual... -
Page 58: Panic Alarm
For the Supervised Arm option, you can choose whether the Control System waits for a transmission of all the devices included in this supervision, or from at least one of them – see p. 53, 9.2.3 Supervised Arm. To program the Supervised Arm mode: From the Programming menu, select System Options, Arm/Disarm, and Super Arm Mode [94026]. Select All Reg. Devices or Any Reg. Devices. 9.3. Panic Alarm SOS Panic alarms generated from the front panel, keypads or keyfobs can be defined as either audible or silent. To program the Panic Alarm setting: From the Programming menu, select System Options, Panic Alarm [9403]. Select Audible or Silent. CommPact Installation Manual... -
Page 59: Ac Loss Delay
9.5. Display Options The following options relate to the information the system displays on the front panel keypad. 9.5.1. Arm Status Display The Arm Status Display includes the current arm status and any trouble conditions that may exist within the system. You can program the system to display this information at all times, only for two minutes, or only for 30 seconds after arming or disarming the system. To program the Arm Status Display options: From the Programming menu, select System Options, Display, and Arm Status [94051]. Select Display Always, Display 2 Min, or Display 30 sec. 9.5.2. Banner The Banner is the 16‐character text that you can program to appear on the top row of the LCD display. This text replaces the arm status if it is programmed to display for two minutes or 30 seconds only – see p.55, 9.5.1 Arm Status Display. To edit the Banner text: From the Programming menu, select System Options, Display, and Banner [94052]. Edit the Banner text using the alphanumeric keypad, then press ʹ√ʹ. The system never displays the Banner text if the Arm Status Display option is programmed as Always. CommPact Installation Manual... -
Page 60: Pgm Output Options
AC Loss or Low Battery conditions AC restore or Battery restore Trouble Tel. Line Telephone line supervision trouble Telephone line restore Trouble System System trouble condition System trouble restore Trouble Medical Medical alarm Any arming method, system disarmed CommPact Installation Manual... - Page 61 58, 9.6.4 PGM Cut‐off. If the PGM Cut‐off is programmed as 000 (continuous activation), the PGM output shall remain activated until it is toggled by the relevant change in system status. 9.6.2. Output Type The Output Type option determines whether the PGM output produces a steady or pulsed output. To program the Output Type: From the Programming menu, select System Options, PGM Options, and Output Type [94062]. Select Steady or Pulsed. The Zone Status, Siren and WL Siren trigger options have a fixed Output Type; there is no need to program an Output Type for these options. 9.6.3. Polarity You can determine the polarity of the PGM output from the following two options: Active High: The output is normally off and is switched on when activated. Active Low: The output is normally on and is switched off when activated. To program the Polarity: From the Programming menu, select System Options, PGM Options, and Polarity [94063]. Select Active High or Active Low. Zone Status functions only when the system is disarmed. CommPact Installation Manual...
-
Page 62: No Arm" Indication
The system is able to detect RF Jamming that is usually caused by an intruder attempting to compromise the security system. To program the Jamming Detection setting: From the Programming menu, select System Options, Jamming Det. [9409]. Select Enabled or Disabled. 9.9. "No Motion" Time The No Motion feature is designed to monitor the activity of disabled or elderly people. If a detector defined as No Motion (see p. 35, 7.3.1 Zone Type): When the system is disarmed, and the detector has not been triggered within a pre‐ defined period of time (00:00 to 72:00 hours), a No Motion event message is sent to the central station. When the system is armed, this zone behaves as Normal. The No Motion zone must be included in this arming mode – see p. 42, 7.3.2 Arm Set. To program the No Motion time: From the Programming menu, select System Options, No Motion [9410]. Enter the No Motion time value between 00:00 and 72:00. To disable the No Motion feature, enter 00:00. press ʹ√ʹ. CommPact Installation Manual... -
Page 63: Vocal Messages
USA– the clock is adjusted forward 1hr on the second Sunday in March at 2am, the clock is adjusted back 1hr on the first Sunday of November at 2am. To program the Daylight Savings option: From the Programming menu, select System Options, Daylight Savings [9413]. Select Europe, USA or Disabled. 9.13. Entry/Exit Trouble If this function is enabled, the system canʹt be armed when the Exit Delay expires, if one of the following conditions is present: An entry/exit zone is open; Tamper Alarm from a zone during exit (if not restored before the exit delay expires); Zone Active when Exit Delay expires. The event is then sent to the central station account. To program the Entry/exit Trouble option: From the Programming menu, select System Options, Entry Exit TR [9415]. Select Enabled or Disabled. CommPact Installation Manual... -
Page 64: Report Fail Trouble
To restore a System Trouble condition caused by failure to report, press until you have scrolled through the entire system trouble list. If the Report Fail Trouble is disabled, failure to report an event does not cause a system trouble condition. To program the Report Fail Trouble option: From the Programming menu, select System Options, Rep. Fail Trb. [9416]. Select Enabled or Disabled. 9.15. Immediate Arming from WUApp If immediate arming from WUApp is enabled, all WEB Arm commands received are executed immediately regardless of the programmed Exit Delay – see p. 49 8.1 Entry/Exit Delay. If disabled, the ARM commands will be executed with the programmed Exit Delay. From the Programming menu, select System Options, WEB Immed. Arm [9417]. Select Enabled or Disabled. CommPact Installation Manual... -
Page 65: 10. Communications
10.1.1. Telephone Number To edit an account’s telephone number: From the Programming menu, select Communications, Accounts [951]. Select the account you want to program (1‐6). From the account’s sub‐menu, select Phone Number [#1]. Enter up to 16 digits. Use the key to enter ʺ*ʺ, ʺ#ʺ, ʺ,ʺ (pause), ʺTʺ (switch to DTMF tone dialing), ʺPʺ (switch to pulse dialing) or ʺ+ʺ (international code). Use the key to delete one character at a time. Press ʹ√ʹ. 10.1.2. Protocol To program an account’s communication protocol: From the Programming menu, select Communications, Accounts [951]. Select the account you want to program (1‐6). From the account’s sub‐menu, select Protocol [#2]. Select a protocol from the options available. Set account 1 to IP protocol if you use GPRS communication. Account number 3 is designed for use with the Follow me feature. It is the only telephone number that can be programmed by the user. CommPact Installation Manual... - Page 66 Enter up to eight digits. Enter leading zeros for account numbers of less than eight digits. Use the key to enter hexadecimal digits. Press ʹ√’. If the programmed protocol is Contact ID, ʺAʺ is not a valid entry in the account number. 10.1.6. Call Attempts (Not Relevant for Voice Report) The Call Attempts option determines the number of times the system tries to call a telephone number before moving on to the next number in sequence. To program the number of call attempts for an account: From the Programming menu, select Communications, Accounts [951]. Select the account you want to program (1‐6). From the account’s sub‐menu, select Call Attempts [#6]. Enter a value between 01 and 15. Press ʹ√ʹ. CommPact Installation Manual...
-
Page 67: Report Cycles
Vocal Message Dialer The Vocal Message Dialer is a feature that calls the user’s telephone number when specific events occur and plays pre‐recorded messages. These calls are made after the system has reported the events to the central station. Additionally, in the event of an alarm, the user is able to establish a Two‐Way Audio connection on receiving the vocal message in order to check the premises. The system supports up to five Voice Report accounts. Each account has its own telephone number, communication interface and Two‐Way Audio options. CommPact Installation Manual... - Page 68 From the account’s sub‐menu, select Phone Number [#1]. Enter up to 16 digits. Use the key to enter ʺ*ʺ, ʺ#ʺ, ʺ,ʺ (pause), ʺTʺ (switch to DTMF tone dialing), ʺPʺ (switch to pulse dialing) or ʺ+ʺ (international code). Use the key to delete one character at a time. Press ʹ√ʹ when you have finished editing. 10.3.2. Protocol To program voice report protocol: From the Programming menu, select Communications, Accounts [951]. Select the account you want to program (2‐6). From the account’s sub‐menu, select Protocol [#2]. Select Voice Report. 10.3.3. Communication Interface For each Vocal Message account, you can choose whether the system employs cellular or PSTN communication, provided that it is available in your control system configuration. To program a Voice Report Account’s communication interface: From the Programming menu, select Communications, Accounts [951]. Select the account you want to program (2‐6). From the account’s sub‐menu, select Interface [#3]. CommPact Installation Manual...
-
Page 69: Remote Programming
PC either on‐site or from a remote location. The software provides a comprehensive interface to the CommPact Control System designed to facilitate programming. There are 3 access levels available: Supervisor (full access), Technician ... - Page 70 If there is no Callback telephone number programmed, RP Callback is disabled and the system connects to the Remote Programmer software using the ʺdirect callʺ method. RP Passcode The RP passcode is a six‐digit code that grants access to remote programming. When establishing an RP connection, the passcode programmed in the RP customer file on the PC must be identical to the system’s RP passcode. To edit the RP passcode: From the Programming menu, select Communications, Remote Prog., RP Passcode [9522]. Enter six digits, and then press ʹ√ʹ. RP Communication Interface For remote programming, the CommPact Control System can employ GPRS, GSM, or PSTN communication, provided that it is available in your control system configuration. To program the RP communication interface: From the Programming menu, select Communications, Remote Prog., RP Interface [9523]. Select PSTN or GSM (GPRS is relevant for the WEB RP only). RP Access Options Options are available to enable, disable or limit access to remote programming. To program RP Access Options: From the Programming menu, select Communications, Remote Prog., RP Access [9524]. ...
-
Page 71: Service Call
For the Service Call feature, you can choose whether the system employs cellular or PSTN communication, provided that it is available in your control system configuration. To program the Service Call interface: From the Programming menu, select Communications, Service Call, Interface [9532]. Select either GSM or PSTN. 10.6. Communications Options 10.6.1. Line Monitor The Line Monitor feature monitors the PSTN telephone line. If a problem is detected with the line, a Media Loss event is registered in the log. To program the Line Monitor setting: From the Programming menu, select Communications, Comm. Options, and Line Monitor [95401]. Select Enabled or Disabled. CommPact Installation Manual... - Page 72 To program the Periodic Test Interval: From the Programming menu, select Communications, Comm. Options, and Test Interval [95402]. Enter the test interval (001‐254 hours) or 255 for an automatically calculated test interval, then press ʹ√ʹ. To disable the Periodic Test: Program the Periodic Test Interval as 000. 10.6.3. First Test If the Periodic Test Interval is programmed as 001‐254 hours, you must also program the time that the first Periodic Test is sent. To program the First Test Time: From the Programming menu, select Communications, Comm. Options, and First Test [95403]. Enter a time (HH:MM), then press ʹ√ʹ. 10.6.4. Auto Interval The Auto Interval option determines the frequency of automatically calculated periodic test messages. To program the Auto Interval: From the Programming menu, select Communications, Comm. Options, and Auto Interval [95404]. Select Daily, Weekly or Monthly. CommPact Installation Manual...
-
Page 73: Call Timeout
If your country does not appear among the available options, select the option Custom Settings. 10.6.8. Dial Tone Wait This option determines whether the system dials only when the dial tone is present or if the dialing is initiated regardless of the dial tone. To program the Dial Tone Wait option: From the Programming menu, select Communications, Comm. Options, and Dial Tone Wait [95408]. Select Enabled or Disabled. 10.6.9. Incoming Calls This option determines whether the Control System is able to receive incoming Telecontrol/Two‐ Way Audio calls. To program the Incoming Calls option: From the Programming menu, select Communications, Comm. Options, and Incoming Call [95410]. Select Enabled or Disabled. CommPact Installation Manual... -
Page 74: Gsm Options
GSM signal strength report to the central station. The system also enters the GSM signal strength in the event log. If the Periodic Test is disabled, the GSM RX Report feature will not function. The GSM RX report belongs to the Peripherals event group – see p. 74, 10.9 Event Options for Central Station Reporting. If this event group is disabled, the GSM signal strength is still recorded in the event log. To program the GSM RX Report option: From the Programming menu, select Communications, Comm. Options, GSM Options, and GSM RX Report [954131]. Select Enabled or Disabled. CommPact Installation Manual... -
Page 75: Sms Command
The SMS Command option enables you to enable or disable the ability to send commands to the system via SMS. For further information on SMS commands, see p. 20, 3.7.3 Remote Arming/Disarming via SMS and p. 38, 6.2 Telephone Control. To enable/disable SMS commands: From the Programming menu, select Communications, Comm. Options, GSM Options, and SMS Command [954134]. Select Enabled or Disabled. CommPact Installation Manual... -
Page 76: Twa Event Report Options
10.8.1. TWA Event Report The TWA Event Report is an event report that is sent to the central station to indicate that Two‐Way Audio communication is about to commence. If enabled, the system sends the Contact ID event code 606000 before establishing Two‐Way Audio communication. This option affects Contact ID only. If using SIA, a TWA event report is always sent together with the TC/VM timeout, regardless of the configuration for this option. To program the TWA Event option: From the Programming menu, select Communications, Comm. Options, and TWA Event Rept. [95414]. Select Enabled or Disabled. 10.8.2. TWA Time Report If the TWA Time Report option is enabled, the last three digits of the TWA Event Report are replaced with the amount of seconds programmed for the TC/VM Timeout – p. 70, 10.6.10 Telecontrol/Vocal Message Timeout. For example, if the TC/VM Timeout is programmed as 120 seconds, the Contact ID event code to be sent for the TWA Event Report will be 606120. To program the TWA Time Report option: From the Programming menu, select Communications, Comm. Options, and TWA Time Rept. [95415]. Select Enabled or Disabled. CommPact Installation Manual... - Page 77 Always Enable Update is always possible. Disable Firmware update is not allowed. User Initiated The user must perform SW Update from the Service menu in order to establish a connection – see p. 33, 4.7.14 Remote Firmware Update. CommPact Installation Manual...
-
Page 78: Event Options For Central Station Reporting
10.9.1. Event Reporting You can enable or disable event reporting per Event Group. This allows you to filter the type of events that are reported to the central station. To enable/disable reporting for an event group: From the Programming menu, select Communications, Event Options [955]. Select an Event Group. From the event group’s sub‐menu, select Report [#1]. Select Enabled or Disabled. 10.9.2. Restore Reporting For each event group, you can determine whether restore messages will be sent. There is no Restore for No Motion event. To enable/disable restore reporting for an event group. From the Programming menu, select Communications, Event Options [955]. Select an event group. From the event group’s sub‐menu, select Report Restore [#2]. Select Enabled or Disabled. CommPact Installation Manual... -
Page 79: 10.10. Vocal Message Dialer Event Options
This allows you to enable or disable the Vocal Message feature for a specific group of events. For further information on this feature, see p. 63, 10.3 Vocal Message Dialer. The vocal message event groups and their associated system events are as follows: Burglary [#1] Alarm from Zone (excluding Gas and Environmental zones) Zone Tamper Tamper Duress Fire [#2] Zone Fire Alarm User Activated Fire Alarm Panic [#3] Zone Panic Alarm User Activated Panic Alarm Medical [#4] Zone Medical Alarm Zone Medical Alarm User Activated Alarm No Motion System Trouble [#5] Battery Low Transmitter Low Battery AC Loss Media Loss Device Trouble Communication Trouble Transmitter Out of Synch. Control System Transmitter Out of Synch. CommPact Installation Manual... - Page 80 Hata! Burada görünmesini istediğiniz metne Heading 1 uygulamak için Giriş sekmesini kullanın. Hata! Burada görünmesini istediğiniz metne Heading 1 uygulamak için Giriş sekmesini kullanın. Supervision Loss Zone Trouble FM Jamming Arm [#6] Full Arm Part Arm Perimeter Arm Disarm [#7] Disarm Disarm after Alarm Water [#8] Zone Water Alarm (Flood) To enable/disable the vocal message for an event group: From the Programming menu, select Communications, VM Event Opt. [956]. Select an event group. Select Enabled or Disabled. CommPact Installation Manual...
-
Page 81: 11. Internet Options
The following parameters, required to connect Control System to ELAS, should be provided by your ELAS administrator. 11.2.1. CP ID To edit the Control System ID: From the Programming menu, select Communications, Internet, CP ID [9573]. Enter the unique Control System ID provided by your ELAS administrator to connect the Control System to ELAS. Use the ʺ1ʺ key to enter ʺ.ʺ, key to insert and the key to delete one character at a time. The ID length must be six up to sixteen characters. Press ʹ√ʹ when finished. 11.2.2. CP Password To edit the Control System Password: From the Programming menu, select Communications, Internet, CP Password [9574]. Enter the Control System Password provided by your ELAS administrator to connect the Control System to ELAS. Use the ʺ1ʺ key to enter ʺ.ʺ, key to insert and the key to delete one character at a time. The password length must be six up to sixteen characters. Press ʹ√ʹ when finished. CommPact Installation Manual... -
Page 82: User Name
To edit the User name of your GPRS connection (optional setting provided by the cellular provider): From the Programming menu, select Communications, Internet, GPRS Options, and User Name [95762]. Enter the User Name provided by the cellular provider. Use the ʺ1ʺ key to enter ʺ.ʺ, key to insert and the key to delete one character at a time. Press ʹ√ʹ when you have finished editing. 11.3.3. Password To edit the Password of your GPRS connection (optional setting provided by the cellular provider): From the Programming menu, select Communications, Internet, GPRS Options, and Password [95763]. Enter the Password provided by the cellular provider. Use the ʺ1ʺ key to enter ʺ.ʺ, key to insert and the key to delete one character at a time. 11.3.4. GPRS Write TMO To edit the GPRS Write TMO of your GPRS connection: From the Programming menu, select Communications, Internet, GPRS Options, and GPRS Write TMO [95764]. CommPact Installation Manual... -
Page 83: 12. System Initialization
Factory programming defaults are restored, the event log is cleared, ser codes and wireless transmitters are deleted. During system initialization, recorded vocal messages (Message Center and Home ID) are not deleted. 12.2. Default Program Restore Loading the system’s default program enables you to restore the factory‐set programming defaults. To load the default program: From the Programming menu, select Initialize, Load Defaults [972]; the system prompts you for confirmation. 12.3. Clear User Codes Clear User Codes deletes all programmed user codes and restores the default Master and Installer codes. To clear user codes: From the Programming menu, select Initialize, Clear Users [973]; the system prompts you for confirmation. 12.4. Clear Wireless Transmitters The Clear Wireless Transmitters function enables you to delete all registered transmitters at once. To clear the transmitter register: From the Programming menu, select Initialize, Clear Wireless [974]; the system prompts you for confirmation. CommPact Installation Manual... -
Page 84: Appendix A: Menu Structure
Appendix A: Menu Structure Appendix A: Menu Structure CommPact Installation Manual... - Page 85 Appendix A: Menu Structure CommPact Installation Manual...
- Page 86 Appendix A: Menu Structure CommPact Installation Manual...
- Page 87 Appendix A: Menu Structure CommPact Installation Manual...
- Page 88 Appendix A: Menu Structure CommPact Installation Manual...
- Page 89 Appendix A: Menu Structure CommPact Installation Manual...
- Page 90 Appendix A: Menu Structure CommPact Installation Manual...
-
Page 91: Appendix B: Transmitter Installation
Figure B- 1: PIR Detector with Cover Removed – EL-2645/EL-2645PI Considerations before Installation Select a location from which the pattern of the detector is most likely to be crossed by a burglar, should there be a break in. Do not place bulky objects in front of the detector. Avoid a location that comes in direct contact with radiators, heating/cooling ducts or air conditioners. Do not place the detector in front of windows subject to direct sunlight or drafts. Pet Immunity Guidelines (EL-2645PI) It is expected that the EL‐2645PI will eliminate false alarms caused by: Animals up to 36kg/80lbs Several small rodents Random flying birds. The weight of the animal should only be used as a guide; other factors such as the length and color of fur also affect the level of immunity. CommPact Installation Manual... - Page 92 Alternatively, the Detector can be registered to the receiver by manually entering the transmitterʹs serial number. Choose an appropriate mounting height from 2.2 – 2.5 and test the transmitter from the exact mounting position before permanently mounting the unit. If you choose mounting height other than recommended (which is not advised), please perform a walk test to check the lens coverage. The recommended mounting height is the best in terms of detection area. Knock out the mounting holes and attach the base to the wall. If using the rear tamper switch, insert a screw into the rear tamper mounting hole located in the center of the back cover. When the detector is removed from the wall, the screw causes the tamper release to break away from the back cover and the rear tamper switch is released. Back tamper mounting hole Figure B- 2: Back Tamper Release Mount the PCB on the base cover and replace the PCB Screw. Replace the front cover. CommPact Installation Manual...
-
Page 93: Dip Switch Settings
Warm-Up Time The detector will need to warm up for the first 90 seconds after applying power. Walk Test Mode A walk test is performed in order to determine the lens coverage pattern of the detector – see Figure B‐ 4. Walk Test mode cancels the delay time between detections, enabling you to perform an efficient walk test. To perform a Walk Test: Set DIP 2 to ON. Walk across the scope of the detector according to the detection pattern selected. C onfirm that the LED activates and deactivates accordingly. Wait for ten seconds after each detection before continuing the test. After completing the walk test. Set DIP‐2 to OFF. LED Indication The LED indicator is lit every time a transmission is made. To enable/disable LED indication, refer to DIP Switch Setting section for the appropriate DIP‐switch setting CommPact Installation Manual... -
Page 94: Directional Pir (El-2650Xl)
This allows the occupants free movement within the premises while detecting intrusion via doors or windows. The detector implements a feature to combat the problem of multiple transmissions, which drastically reduce the life of the batteries. After a transmission is made, the EL‐2650XL initiates a delay of approximately three minutes during which transmissions will not be sent. The detector operates in two selectable modes: Curtain and Directional. CommPact Installation Manual... -
Page 95: Installation Instructions
Figure B- 5: EL-2650XL (Cover Off) Location of Detector Consider the following before mounting the detector: Select a location from which the pattern of the detector is most likely to be crossed by a burglar, should there be a break in. Avoid a location that comes in direct contact with radiators, heating/cooling ducts or air conditioners. Do not place bulky objects in front of the detector. Do not install the detector above beds, sofas, desks or in any area that people are likely to spend continued periods of time. If the occupant does not move within the delay time, an alarm will be generated when moving away from the protected area. Figure B- 6: Correct Placement of the Detector Installation Instructions To open the housing, remove the cover screw and, using a flathead screwdriver, press the locking tab at the side of the unit. Remove the Main Board by unscrewing the PCB screw. Do not touch the face of the PYRO sensor. Set the receiver to Registration mode. Apply battery power by removing the isolator that separates the battery from the contacts on the battery holder. The detector turns on and sends four transmissions in order to be registered with the system. Wait for the receiver to CommPact Installation Manual... - Page 96 PCB adjustment enables you to angle the infrared beams by changing the position of the pyro element in relation to the lens. To adjust the PCB, loosen the PCB screw and slide the PCB to the required position using the PCB adjustment scale as a guide. After adjusting the board, tighten the PCB screw. Slide the board towards ‐2 to position the beams closer to the wall. Slide the board towards +2 to position the beams further away from the wall. For the correct PCB adjustment, you must take into account the distance of the detector from the wall and the distance of the protected door/window from the detector – seeTable B‐ 2 as illustrated in Figure B‐ 8 are relevant both to wall and ceiling mounting. CommPact Installation Manual...
-
Page 97: Walk Test
(see Figure B‐ 9, step 1). Release the tamper switch and wait until the red LED turns on and then off (see Figure B‐ 9, step 2). Press the tamper switch once again. Both LEDS are lit momentarily (see Figure B‐ 9, step 3). The detector enters the Walk Test mode for 4 minutes. During the Walk Test, wait for twenty seconds between movements. To launch the Walk Test from the Normal mode: Just open the detector housing: the tamper is triggered and the detector enters the Walk Test mode for 4 minutes. Walk test should be performed weekly. In Walk Test mode there are no delays. CommPact Installation Manual... - Page 98 When approaching the protected wall, an alarm is not generated because the detector’s beams are crossed from the permitted direction. After detecting permitted motion, the detector counts down the Alarm Delay time. This timer is re‐triggered every time the detector detects motion. During the Alarm Delay, the detector permits motion in both directions. The duration of the alarm delay is selected using the Alarm Delay Jumper – see Table B‐4. CommPact Installation Manual...
-
Page 99: Led Indication
In case of a low battery (2.5 V and below), the detector low battery condition is reported to the Control System and low battery message is displayed. When the Back Tamper switch is released, the detector sends a tamper condition to the Control System that generates tamper alarm. Wall Mounted Ceiling mounted Figure B- 10: Lens Coverage Pattern (Side View) CommPact Installation Manual... -
Page 100: Wireless Pir (El-2652Sr)
S elect a location from which the pattern of the detector is most likely to be crossed by an intruder. A void a location that comes in direct contact with radiators, heating/cooling ducts or air conditioners. D o not place the detector in front of windows subject to direct sunlight or drafts. D o not place bulky objects in front of the detector. D o not place the detector in an area subject to direct sunlight or objects that may change temperature rapidly. If installed in external environment: D o not place the detector in an area exposed to direct wind or rain. R efrain from pointing the detector at roads and alleyways within the detector’s range. D o not point the detector at trees, bushes and other objects that may be caused to sway by the wind, within the detector’s range. CommPact Installation Manual... - Page 101 Pins 1&2 Walk Pins 1&2 Disabled Test Mode Pins 2&3 Radio Pins 2&3 Enabled Mode Removed Normal Removed Mode Set the receiver to Registration mode and wait for the receiver to indicate that the transmitter has been registered successfully. Write the number of the zone and the transmitter number (if applicable) on the sticker provided. Affix the sticker inside the front cover for future reference. Alternatively, the EL‐2652SR can be registered to the receiver by manually entering the transmitterʹs serial number. CommPact Installation Manual...
- Page 102 Operation and Adjustment Warm-up Time The detector will need to warm up for the first 90 seconds after applying power. Pulse Counter The pulse counter determines the amount of beams that need to be crossed before the detector will produce an alarm. The available options are 1, 2 or 3 pulse count. To set the pulse counter, refer to Table B‐ 7 for the appropriate jumper setting. Walk Test Mode: A walk test is performed in order to determine the lens coverage pattern of the detector – see Figure B‐ 12. Walk Test mode cancels the delay time between detections, enabling you to perform an efficient walk test. To walk test the detector: Place the Mode Jumper over pins 1 & 2 (see Table B‐ 6). Walk across the scope of the detector according to the detection pattern selected. Confirm that the LED activates and deactivates accordingly. Wait for ten seconds after each detection before continuing the test. After completing the walk test, remove the jumper and place it over one pin for storage ‐ see Mode Jumper Safeguard below. CommPact Installation Manual...
- Page 103 When the Back Tamper switch is released, the detector sends a tamper condition to the Control System that generates tamper alarm . Plan View Side View PIR1 PIR 2 Figure B- 12: Lens Patterns Back tamper mounting hole Figure B- 13: Back Tamper Release CommPact Installation Manual...
-
Page 104: Magnetic Contact (El-2601)
Due to the occurrence of voltage delay in lithium batteries that have been in storage, the batteries may initially appear to be dead. In this case, leave the unit in Test mode for a few minutes until the battery voltage level is stabilized. From the Programming menu, select Devices, Zones [911]. Select the zone to which you want to register the transmitter; the system initiates Registration mode. When Save? appears on the Control System’s LCD display, press ʹ√ʹ. After registration, press the EL‐2601’s tamper switch to terminate Test mode. Before permanently mounting the unit, test the transmitter from the exact mounting position The alarm is generated by magnet removal at 24 (+/‐ 0.5) mm and is cleared by magnet CommPact Installation Manual... - Page 105 Appendix B: Transmitter Installation approach at 22 (+/‐ 0.5) mm. To remove the PCB, press the PCB release tab and carefully lift the board and slide the board away from the back cover. When handling the PCB, do not apply pressure on the antenna. The EL‐2601 is able to operate in two modes: Magnetic Switch or Universal Transmitter. If connecting a wired contact loop (N.C.), connect the terminal block as follows: 1 ‐ Alarm; 2 ‐ GND. For this purpose, a wiring knockout is provided in the back cover. If using the Back Tamper switch, insert a screw into the Back Tamper mounting hole located in the center of the back cover – see p. 100, Figure B‐ 16. When the detector is removed from the wall, the screw causes the tamper release to break away from the back cover and the Back Tamper switch is released. Mount the back cover using two screws and replace the PCB. Use ISO 7050 (ST3.5 x 22), #6 X ¾ or similar countersunk screws so that the screw head will not touch the PCB – see p.100, Figure B‐ 15. To open the magnet’s housing, insert a small screwdriver into one of the pry‐off slots located at either end of the magnet’s back cover and lift to separate from the front cover. Mount the back cover of the magnet using two screws. Make sure that the guideline on the magnet is correctly aligned with the guideline on the transmitter. Do not install the magnet further than 1cm (0.4ʺ) from the transmitter. Test the transmitter, making certain that the LED is lit when opening the door/window and again when closing. Close the front covers of the transmitter and the magnet. EL‐2601 complies with EN‐50131 2‐6 Grade 2 Class II Power Supply Type C CommPact Installation Manual...
-
Page 106: Universal Transmitter (El-2602)
Remove the divider separating the battery from the contacts on the battery holder. When you apply power and the tamper switch is open, the EL‐2602 enters Test mode during which a transmission is sent every few seconds. You can terminate Test mode by closing the tamper switch. Test mode is automatically terminated after approximately five minutes. Due to occurrence of voltage delay in lithium batteries that have been in storage, the batteries may initially appear to be dead. In this case, leave the unit in Test mode for a few minutes until the battery voltage level is stabilized. From the Programming menu, select Devices, Zones [911]. Select the zone to which you want to register the transmitter; the system initiates Registration mode. When Save? appears on the Control System’s LCD display, press . After registration, press the EL‐2602’s tamper switch to terminate Test mode. Before permanently mounting the unit, test the transmitter from the exact mounting position. To remove the PCB, press the PCB release tab, carefully lift the board and slide the board away from the back cover. When handling the PCB, do not apply pressure on the antenna. Knockout the wiring hole in the back cover. Thread the wires through the wiring hole. If using the Back Tamper switch, insert a screw into the Back Tamper mounting hole located in the center of the back cover – see p.100 , Figure B‐ 16. When the detector is removed from the wall, the screw causes the tamper release to break away from the back cover and the Back Tamper switch is released. CommPact Installation Manual... -
Page 107: Mounting Considerations
Detector range: If mounting on the ceiling, the opposite wall or adjoining walls, the maximum range is 6m (20ʹ) for plate, tempered, laminated and wired glass. For armor‐coated glass, the maximum range is 3.65m (12ʹ). Minimum recommended glass size: 0.3m x 0.6m (1ʹ X 2ʹ) Glass thickness: Plate: 2.4mm to 6.4mm (3/32ʺ to 1/4ʺ) Tempered: 3.2mm to 6.4mm (1/8ʺ to 1/4ʺ) Wired: 6.4mm ( 1/4ʺ)) Laminated: 3.2mm to 6.4mm (1/8ʺ to 1/4ʺ) For best detection: The detector must always be in direct line of sight of all windows to be protected. If mounting on the wall, try to install the detector directly opposite the protected window. If this is not possible, adjoining side walls are also a good location. If mounting on the ceiling, install the detector 2‐3m (6ʹ‐10ʹ) into the room. Avoid installing in rooms with lined, insulating or sound deadening drapes. Avoid installing in rooms with closed wooden window shutters inside. CommPact Installation Manual... - Page 108 Antenna Mounting Mounting Knockout Knockout Acoustic Sensor Figure B- 19: EL-2606 (Cover Off) Open the housing using a small flat‐head screwdriver to separate the base from the cover. Remove the insulator separating the battery from the contacts on the battery holder. When you apply power and the tamper switch is open, the EL‐2606 enters Test mode during which a transmission is sent every few seconds. You can terminate Test mode by closing the tamper switch. Test mode is automatically terminated after approximately five minutes. Due to the occurrence of voltage delay in lithium batteries that have been in storage, the batteries may initially appear to be dead. In this case, leave the unit in Test mode for a few minutes until the battery voltage level is stabilized. CommPact Installation Manual...
- Page 109 EL‐2606 is only listening for mid‐range frequencies reproduced by the glassbreak tester. It’s these mid‐range frequencies that determine the detector’s range. In Normal mode, the tester will not activate the detector unless held directly over the detector. Figure B- 20: Testing the EL-2606 Test the detector using the Electronics Line GBS7 or Sentrol 5709C hand‐held tester. If using the 5709C tester, set the tester to tempered glass. The 5709C tester has a different setting for each type of glass. The tester should always be set for tempered or laminated glass (either is correct and both have the same range) unless the installer is certain that all the glass to be protected is plate glass. Hold the tester speaker directly on top of the detector and activate the tester; the detector generates an alarm and then enters test mode for one minute. When in test mode, the LED on the detector flashes continuously. You can extend the test mode time by firing the tester at the detector at least once a minute. Each time the detector generates an alarm, it also goes into Test mode for one minute. Hold the tester near the surface of the glass and aim the tester at the EL‐2606. If drapes or blinds are present, test with the hand‐held tester behind the closed drapes or blinds. CommPact Installation Manual...
- Page 110 6m (20ʹ) conditions. Do not exceed the rated range of the detector regardless of what the tester shows! Hand Clap Test The Hand Clap test enables you to test the EL‐2606 while in Normal mode. This test checks the detectors power supply, microphone and circuit board. To perform a Hand Clap test: Clap your hands loudly under the detector; the LED flashes twice but an alarm is not generated. CommPact Installation Manual...
-
Page 111: Vibration Detector (El-2607)
While the EL‐2607 is in Registration mode, set the receiver to Registration mode and make sure that the transmitter’s LED indicator lights up at least twice. After registration, momentarily close the Tamper switch to terminate Registration mode. Write the number of the zone and the transmitter number (where applicable) on the sticker provided. Affix the sticker inside the front cover for future reference. The EL‐2607 can also be registered to the receiver by manually entering the transmitterʹs serial number. Before permanently mounting the unit, test the transmitter from the exact mounting position. If necessary, relocate the transmitter to a better position. To remove the printed circuit board (PCB), press the PCB release tab, carefully lift the board and slide it away from the back cover. The plastic housing can be screw mounted to doors and window frames or can be affixed directly onto glass windows using a strong double‐sided non‐cushioned adhesive tape. Mount the back cover and replace the PCB. Use two ISO 7050 (ST3.5 x 22) or similar countersunk screws so that the screw head will not touch the PCB. CommPact Installation Manual... - Page 112 Adjustment mode saves the adjustment setting. Test Striking the protected door or Activated automatically when you press the window frame indicates whether the Tamper switch to save the adjustment impact would generate an alarm. setting. Test mode may be terminated by CommPact Installation Manual...
-
Page 113: Smoke Detector (El-2703)
This detector is not to be used in non‐residential buildings. Warehouses, industrial or commercial buildings, and special purpose non‐residential buildings require special fire detection and alarm systems. This detector alone is not a suitable substitute for complete fire detection systems for places where many people live or work, such as hotels or motels. The same is true of dormitories, hospitals; nursing homes or group homes of any kind, even if they were once single ‐ family homes. Please refer NFPA 101, the Life Safety Code, NFPA71, 72A, 72B, 72C, 72D, and 72E for smoke detector requirements for fire protection in buildings not defined as “households”. CommPact Installation Manual... -
Page 114: Selecting A Location
Figure B- 22: Locations for placing smoke Figure B- 23: Locations for placing smoke detectors for detectors for single residence with only one single-floor residence with more than one sleeping sleeping area area CommPact Installation Manual... - Page 115 Older mobile homes and RVs may have little or no insulation compared to current standards. Outside walls and roofs are often made of non‐insulated metal, which can transfer thermal energy flow from outdoors. This makes the air right next to them hotter or colder than the rest of the inside air. These layers of hotter or colder air can keep smoke from reaching a smoke detector. Thereby, install smoke detectors in such units only on inside walls. Place them between 4 and 6 inches (10 ~ 15 cm) from the ceiling. If you are not sure how much insulation is in your mobile home or RV, then install the detector on an inside wall. If the walls or ceiling are unusually hot or cold, then install the detector on an inside wall. Install one detector as close to the sleeping area as possible for minimum security, or install one detector in each room for security. Before you install any detector, please read the following section on “Where not to install your smoke detectors”. CommPact Installation Manual...
- Page 116 I n very cold or very hot areas, including unheated buildings or outdoor rooms. If the temperature goes above or below the operating range of smoke detector, it will not work properly. The temperature range for your smoke detector is 4°C to 38°C (40°F to 100°F). I n very dusty or dirty areas, dirt and dust can build up on the detectorʹs sensing chamber, to make it overly sensitive. A dditionally, dust or dirt can block openings to the sensing chamber and keep the detector from sensing smoke. N ear fresh air vents or very drafty areas like air conditioners, heaters or fans. Fresh air vents and drafts can drive smoke away from smoke detectors. D ead air spaces are often at the top of a peaked roof, or in the corners between ceilings and walls. Dead air may prevent smoke from reaching a detector. See Figure B‐ 22, Figure B‐ 23 and Figure B‐ 24 for recommended mounting locations. I n insect‐infested areas. If insects enter a detectorʹs sensing chamber, they may cause a false alarm. Where bugs are a problem, get rid of them before putting up a detector. N ear fluorescent lights, electrical ʺnoiseʺ from fluorescent lights may cause false alarms. Install smoke detectors at least 1.5 meters (5 feet) from such lights. CommPact Installation Manual...
- Page 117 Detectors” sections in this Manual before installing. To install the detector, perform the following steps (see Figure B‐ 28). Registration The EL‐2703 must identify itself to the EL wireless system receivers as follows: S et the system to registration mode. Go to the main menu and select [9]>[1]>[1] (Programming > Devices > Zones) Select a zone and press ʹ√ʹ. O pen the detector housing. Insert the batteries into compartment. The detector enters registration mode during which a transmission is sent every few seconds. You can terminate registration mode by pressing the Test Button. Test mode is automatically terminated after approximately five minutes. Due to the occurrence of voltage delay in lithium batteries that have been in storage, the batteries may initially appear to be dead. In this case, leave the unit in Test mode for a few minutes until the battery voltage level is stabilized. As soon as ʹSave?ʹ appears, press ʹ√ʹ CommPact Installation Manual...
- Page 118 Mode 1: The red LED indicator will not reset automatically at the end of an alarm event. This means that after the smoke chamber is cleared, the audible alarm will stop automatically, but the red LED indicator will continue to flash, until it is manually restored by the user. To restore – press the test button for 2‐3 seconds, the LED will stop flashing. Mode 2 (Default): The red LED will reset automatically at the end of an alarm event. The user can check to which mode the detector is defined and switch between modes. • To check the mode, press the Test button. The red LED will light up. If the red LED lights up continuously the detector is in Mode 1. If the red LED is blinking the detector is in Mode 2. • To switch from one mode to another, press the Test button for 8 seconds. The buzzer will sound and the red LED will change its behavior either from a continuous light to a blinking light or from a blinking light to a continuous light. CommPact Installation Manual...
- Page 119 Do not disconnect the batteries from the detector. This will cancel your protection from fire. Taking Care of Your Smoke Detector To keep your detector in good working condition, you must test the detector weekly, according to the “Testing Your Smoke Detector” section. Cleaning the Smoke Detector Clean the housing with a dry or damp cloth to remove dust and dirt. If necessary, open the smoke chamber and clean the interior of the detector. Remove the detector from the detector base. Remove the batteries. Using a flat screwdriver release the smoke detector cover. Using a flat screwdriver lift the smoke chamber housing slightly. Use a fine paintbrush to remove dirt from the chamber. After cleaning, close the smoke chamber, fix the housing and remount the detector on the ceiling. Do not forget to change the batteries! CommPact Installation Manual...
- Page 120 Smoke alarms are a significant help in reducing loss, injury and even death. However, no matter how good a detection device is, nothing works perfectly under every circumstance and we must warn you that you cannot expect a smoke alarm to ensure that you will never suffer any damage or injury. CommPact Installation Manual...
-
Page 121: Keyfobs (El-2711M / El-2711P / El-2614E And El-2714)
The EL‐2711M is a one‐button transmitter that generates a Medical alarm when pressed. The transmitter is water resistant and can be worn around the neck. Its large button makes it ideal for elderly or sight‐impaired users. When the battery is low, the EL‐2711M’s LED flashes during transmission and a Low Battery signal is sent to the receiver. When either of these two indications is observed, replace the unit. EL‐2711M complies with EN‐50131 Grade 2 Class II Power Supply Type C. EL-2711P The EL‐2711P is a one‐button transmitter that generates a Panic alarm when pressed. The transmitter is water resistant and can be worn around the neck. Its large button makes it ideal for elderly or sight‐impaired users. When the battery is low, the EL‐2711P’s LED flashes during transmission and a Low Battery signal is sent to the receiver. When either of these two indications is observed, replace the unit. EL‐2711P complies with EN‐50131 Grade 2 Class II Power Supply Type C. CommPact Installation Manual... -
Page 122: 1-Way Wireless Keypad (El-2620)
1-Way Wireless Keypad (EL-2620) The EL‐2620 is a one‐way wireless keypad primarily designed as additional arming station, including three arming keys that enable Full, Part, and Perimeter arming modes. Pressing the Full and Perimeter buttons simultaneously generates an SOS panic alarm. A slide‐out reference card on the rear of the EL‐2620 can be used for writing essential information. 9V Alkaline Battery Tamper Switch Buzzer Figure B- 34: EL-2620 Figure B- 35: EL-2620 (Back Cover Off) CommPact Installation Manual... -
Page 123: Wireless Indication Keypad (El-2621)
Note: Silent alarms are not indicated by the EL-2621. Both LEDs Flashing – the keypad is in Registration mode. Both LEDs & Flashing – the Control System is updating the user codes list. Backlight Note: During this indication, the keypad is temporarily locked. CommPact Installation Manual... -
Page 124: Flood Detector (El-2661)
Control System are reset. While the keypad is receiving user code data, both LEDs and the backlight flash and the keypad is temporarily locked. This process may take up to two minutes. Alternatively, the EL‐2621 can be registered to the Control System by manually entering the keypadʹs serial number. Test the keypad from the exact mounting position before permanently mounting the unit. Remove the adaptor from the electricity outlet and disconnect it from the keypad. Place the rear cover in position against the wall and mark the four mounting holes. Install wall anchors in the appropriate positions. Thread the adaptorʹs cable through the wiring hole and connect the adaptor to the keypadʹs DC power input – do not apply power yet! Mount the keypad to the wall using four screws. Close the front cover and apply power to the keypad. Flood Detector (EL-2661) CommPact Installation Manual... - Page 125 Remove the divider separating the battery from the contacts on the battery holder. When you apply power and the tamper switch is open, the EL‐2661 enters Test mode during which a transmission is sent every few seconds. You can terminate Test mode by closing the tamper switch. Test mode is automatically terminated after approximately five minutes. Due to the occurrence of voltage delay in lithium batteries that have been in storage, the batteries may initially appear to be dead. In this case, leave the unit in Test mode for a few minutes until the battery voltage level is stabilized. From the Programming menu, select Devices, Zones [911]. Select the zone to which you want to register the transmitter; the system initiates Registration mode. When Save? appears on CommPact LCD display, press . After registration, press the EL‐2661’s tamper switch to terminate Test mode. Choose a mounting location. The transmitter should be positioned in a vertical position high on the wall in order to optimize reception. The detector should be placed in a position where water will accumulate rapidly in the event of a flood. Before permanently mounting the unit, test the transmitter from the exact mounting position. To remove the PCB, press the PCB release tab, carefully lift the board and slide the board away from the back cover. When handling the PCB, do not apply pressure on the antenna. Knockout the wiring hole in the back cover. CommPact Installation Manual...
- Page 126 30‐second delay is canceled in order to speed up the test procedure. Make certain that the LED is lit during transmissions. The LED indicator does not function when the tamper switch is closed. Fix the detector to the floor using the two screws, spacers and wall anchors provided. Alternatively, you can fix the detector to the floor using the double‐sided adhesive tape provided – see the following section. Close the front cover of the transmitter. Detector Installation with Double-sided Adhesive Tape If using double‐sided adhesive tape to install the detector, perform the following procedure for best results: Clean all surfaces using a low strength solvent such as isopropyl alcohol to ensure that the surfaces are clean, dry and grease‐free. Peel away the backing from the pieces of adhesive tape and attach them to the underside of the detector. Do not touch the adhesive with your fingers. Peel away the backing from the other side of the adhesive tape. Fix the detector to the floor by firmly applying pressure for a few seconds. CommPact Installation Manual...
-
Page 127: Gas Leak Detector (El-2762)
B utane Gas: Propane and Butane are heavier than air, therefore the greatest concentration of gas is found right above the floor level. The Wireless Gas Leak Detector should therefore be installed about 30cm (12”) above the floor. Do not mount in a location where the gas alarm could be damaged by dirt, liquids, etc. Do not touch the adhesive with your fingers. Figure B- 39: Recommended Location for Methane and Butane Gas Detection I nstall the detector in close proximity to every gas‐operated appliance. Do not: Install the gas detector directly on any gas appliance. Install the gas detector in sealed or closed compartments or in an area where a wall or a closed door can obstructs the flow of gas to the gas alarm. I nstall the gas detector in locations where fans, open doors, open windows etc. may prevent gas from reaching the detector. I nstall the gas detector in any room where aerosols or ammonia are used (e.g. bathrooms). CommPact Installation Manual... -
Page 128: Testing The Detector
Figure B- 41: Securing the Detector Secure the Mounting Bracket to the Wall Line up the side slot of the bracket and the detector. Push the detector onto the mounting bracket and fix it (see arrow direction, Figure B‐ 41). Pull the detector outwards to make sure that it is securely attached to the mounting bracket. Connect the detector power cable to the wall power outlet. Transmitter/Receiver Communication Setup Set the panel to registration mode. I nsert the batteries into compartment. The detector enters registration mode during which a transmission is sent every few seconds. You can terminate registration mode by pressing the Test Button. Test mode is automatically terminated after approximately five minutes. V erify that the detector has been identified by the receiver. Testing the Detector To test the detector (do not test when detector is at warm up mode), press the Test Button. T he red and orange LEDʹs will flash and a sound will be heard CommPact Installation Manual... - Page 129 SERVICE ALARM ALARM VENT SENSOR VENT Figure B- 42: LED & BUZZER Indication Action to Take when Alarm Sounding In case of harmful levels of gas being detected, your detector will go into a continuous full alarm. Try to take the following necessary actions immediately or evacuate the building: W idely open doors and windows D isconnect electrical appliances A void open fire R epair the gas leak by a professional gas repairer CommPact Installation Manual...
-
Page 130: Carbon Monoxide Detector (El-2764)
When properly installed and maintained, your natural gas furnace and hot water heater do not pollute your air space with CO. Natural gas is known as a ʺclean burningʺ fuel because under correct operating conditions, the combustion products are water vapor and carbon dioxide (CO2), which is not toxic. The products of combustion are exhausted from furnaces and water heaters to the outside by means of a fuel duct or chimney. Correct operation of any burning equipment requires two key conditions: A n adequate supply of air for complete combustion Proper venting of the products of combustion from the furnace through the chimney, vent or duct to the outside CommPact Installation Manual... - Page 131 BEDROOM KITCHEN GROUND GARAGE FLOOR BASEMENT CARBON MONOXIDE DETECTOR Figure B- 43: Selecting the Installation Location This device is not suitable for installation in a hazardous location, as defined by the US National Electrical Code. Do not place the detector in the following areas: Where the temperature may drop below 4ºC (39ºF) or exceed 38ºC (100ºF). Near paint thinner fumes Within 1.5 meter (5 feet) of open flame appliances such as furnaces, stoves and fireplaces I n exhaust streams from gas engines, vents, flues or chimneys D o not place in proximity to an automobile exhaust pipe; this will damage the detector CommPact Installation Manual...
- Page 132 Figure B- 44: Mounting the Detector Hold the Mounting bracket against the wall as a template and mark the locations for the 2 mounting holes. Using a 5 mm (3/16‐inch) drill bit, drill two holes at the marks and insert wall plugs (Figure B‐ 45). Figure B- 45: Securing the Detector Secure the mounting bracket to the wall. Open the battery cover by pushing down on the battery snaps (Figure B‐ 46). Figure B- 46: Inserting the Batteries Insert the batteries (supplied) into the battery compartment. Pay attention to the correct battery polarity (+) (‐) and close the battery compartment Line up the side slot of the bracket and the detector. Push the detector onto the mounting bracket until a click is heard (see arrow direction, Figure B‐ 45). Pull the detector outwards to make sure that it is securely attached to the mounting bracket. Transmitter/Receiver Communication Setup Set the panel to registration mode. If you haven’t already done so, insert the batteries into the compartment. The detector enters registration mode during which a transmission is sent every few seconds. You can terminate registration mode by pressing the Test Button. Test mode is automatically terminated after approximately five minutes. Verify that the detector has been identified by the receiver. CommPact Installation Manual...
- Page 133 LEDs will flash. Release the Test button. The beep and the three LEDs will stop and the green LED remains on or flashes every 60 seconds. Muting Your Detector You can partially mute the detector in an event of alarm by pressing the Test Button. The Red LED will continue to flash and a short beep will be heard every 16 seconds. Detector Malfunctioning A malfunctioning unit is indicated by beep‐sounding on and off sequentially, i.e., beeping for 3 seconds with 3 seconds delay between two beeps. If this occurs, remove the batteries from the unit for 10 seconds and then install them again. Should the unit again beep intermittently, DO NOT use this detector. Send the malfunctioning unit to the manufacturer for servicing. Taking Care of Your Detector You have to maintain the detector to ensure proper operation: Use a vacuum cleaner to clean the air vents occasionally to keep them free of dust. Press the Test button on your detector to test its operation once every week. CommPact Installation Manual...
-
Page 134: Technical Information
Once the problem of the CO gas presence in the premises has been corrected, the detector alarm should be off. After waiting for 10 minutes, push the Test button to test the detector, and by that, being confident that the detector is working properly again. Technical Information The Carbon Monoxide Detector is engineered to be able to provide alarm sounds based on the UL standards due to various exposure times at different level of carbon monoxide concentrations. According to the Underwriters Laboratories Inc. the carbon monoxide concentrations and exposure time standards for the alarms have been established and specified below: A full alarm is activated under the following conditions: B etween 60 and 90 minutes at exposures of 70 ppm B etween 10 and 30 minutes at exposures of 150 ppm B etween 4 and 10 minutes at exposures of 400 ppm CommPact Installation Manual... -
Page 135: Mounting Location
Mount the detector in a location that is likely to get cold first when the temperature drops. Try to locate the detector in a location where there is good air circulation. Installation Instructions To open the housing, insert a small screwdriver at the bottom of the unit between the front and back cover and twist the screwdriver to release the cover. Remove the divider separating the battery from the contacts on the battery holder. When you apply power and the Tamper switch is open, the EL‐2663 enters Test mode during which a transmission is sent every few seconds. You can terminate Test mode by closing the Tamper switch. Test mode is automatically terminated after approximately five minutes. Due to the occurrence of voltage delay in lithium batteries that have been in storage, the batteries may initially appear to be dead. In this case, leave the unit in Test mode for a few minutes until the battery voltage level is stabilized. While the EL‐2663 is in Test mode, set the receiver to Registration mode and make sure that the transmitter’s LED indicator lights up at least twice. After registration, momentarily close the Tamper switch to terminate Test mode. Write the number of the zone and the transmitter number (where applicable) on the sticker provided. Affix the sticker inside the front cover for future reference. Note: Alternatively, the EL‐2663 can be registered to the receiver by manually entering the transmitterʹs serial number. CommPact Installation Manual... -
Page 136: Outdoor Siren And Strobe (El-2626Ac)
Transmission LED Mode Jumper (JP1) External Tamper Jumper Arming Tones Jumper (JP2) Front Tamper Terminal Block Transmitter Delete Front Cover Tamper Switch Button Location of Figure B- 49: EL-2626AC Transmitter (Cover Off) Cover Screw Wear hearing protection when installing the siren. CommPact Installation Manual... - Page 137 O n the control system, perform the External Siren Test twice in order to register the control system’s transmitter to the EL‐2626AC’s receiver. To perform an External Siren Test: From the Service menu, from the Service menu, select WL. Siren Test [703] or Ext. Siren Test [702], depending on your control system model; the siren sounds an acknowledge tone when each transmission is received. During the registration procedure, make certain that no other wireless devices are transmitting so as not to interfere with registration. In the event that the wrong transmitter is registered to the siren’s receiver, you can delete the transmitter by pressing the Transmitter Delete button while the Mode jumper is set to Registration mode. CommPact Installation Manual...
- Page 138 In case of a low battery (2.5 V and below), the detector low battery condition is reported to the Control System and low battery message is displayed. When the rear tamper switch is released, the detector sends a tamper condition to the Control System that generates tamper alarm. CommPact Installation Manual...
-
Page 139: Repeater (El-2635)
Hole Hole Flash Programming Transmitter Connector Programming Receiver Keypad Connector Power Input Terminals AC Power Protection Lower Fuse Mounting Hole Lower Mounting Hole Tamper Switch Wiring Hole Figure B- 53: EL-2635 (cover removed) Connect the antenna provided to the antenna connector. Connect the backup battery pack to the Battery connector. Connect a 9VAC to the Power Input terminal block (polarity is not important when connecting AC to the terminal block). CommPact Installation Manual... - Page 140 Appendix B: Transmitter Installation All registration and test functions, described in the following sections, are performed from the LCD programming keypad model no. 5200250 shown in Figure B‐ 54. Connect the programming keypad to the Programming Keypad connector. The repeater’s programming keypad is not able to operate on battery power only. Register the repeater to the Control System using the following procedure: Set the Control System to Registration mode as follows: a. From the Programming menu, select Devices, Repeaters [914]. b. Select the repeater you want to register (1‐4). c. From the repeater’s sub‐menu, select Register [#1]. Send two Status transmissions from the repeater as follows: a. On the LCD programming keypad, press until 5. STS Transmit appears on the display. Figure B- 54: LCD Programming Keypad b. Press ʹ√ʹ.. c. Press ʹ√ʹ. again. Confirm registration to the Control System as follows: When Save? appears on the Control System’s LCD display, press ʹ√ʹ. Test the repeater from the required mounting location before permanently mounting the unit. Mount the base to the wall using four screws and replace the front cover. CommPact Installation Manual...
- Page 141 Figure B- 58: TX Test Procedure Do not register the same transmitter to more than one repeater. To register transmitters to the repeater: On the LCD programming keypad, press until 4. TX Register appears on the display. Press ʹ√ʹ; New Device appears on the display. Press ʹ√ʹ again; Transmit 1 appears on the display. Send two transmissions from the device you want to register. When the transmitter number and Save? appears on the display, press ʹ√ʹ to confirm registration. The EL‐2635 repeater automatically allocates a transmitter number to each newly registered device. Write this number and the zone number on the sticker provided with the detector and stick it inside the transmitterʹs cover for future reference. After you have confirmed registration, the display returns to New Device. Press ʹ√ʹ to register another device or press Χ to exit Registration mode. Deleting Registered Transmitters To delete transmitters from the repeater’s register: On the LCD programming keypad, press until 3. TX Delete appears on the display. Press ʹ√ʹ; the first transmitter in the list appears on the display. Use the arrow navigation keys (5/6) to scroll to the transmitter you want to delete. Press ʹ√ʹ to select the transmitter. Press ʹ√ʹ again for confirmation; the transmitter is deleted. Select another transmitter to delete or press Χ to exit. CommPact Installation Manual...
- Page 142 Appendix B: Transmitter Installation Installer Utilities The EL‐2635 repeater offers two installer utilities that serve as a valuable aid during installation and maintenance. TX List The TX List is a scrollable inventory of all transmitters that are registered to the repeater and their last reported signal strength. To view the TX list: Press until 1. TX List appears on the display. Press ʹ√ʹ; the first transmitter in the list is displayed. Use the arrow navigation keys (/) to scroll through the list. Press Χ to exit the list. TX Test: TX Test is a utility that enables you to identify transmitters that are registered to the repeater and to test their signal strength. To perform the TX test: Press until 2. TX Test appears on the display. Press ʹ√ʹ. Activate a transmitter; the transmitter number, type and signal strength are displayed. Press Χ to exit TX Test mode. CommPact Installation Manual...
-
Page 143: Transmitter Specifications
Dimensions: 133 x 73 x 52mm Current Consumption: 25mA (transmission), 10A (standby) *Designed to meet EN-50131 2-2 Grade 2 Class II Operating Temperature: 32-140°F (0 to 60°C) Power Supply Type C Dimensions: 2.5"H x 1.18"W x 0.9"D (65 x 30 x 25mm) CommPact Installation Manual... - Page 144 Alarm Sound Level: Exceeds 85dB at 10 feet (3m) Operating Temperature: 39 to 100°F (4 to 38°C) Dimensions (L X W X H): 140 X 80 X 49 mm (5.5 inch x 3.2 inch x 2 inch) CommPact Installation Manual...
- Page 145 Due to the occurrence of voltage delay in lithium batteries that have been in storage, the batteries may initially appear to be dead. In this case, leave the unit in Test mode or Radio mode for a few minutes until the battery voltage level is stabilized. CommPact Installation Manual...
-
Page 146: Appendix C: Web User Application
You can change your password on the Change Password page that is accessible from the Settings menu. Your new password should be no less than six characters and must start with a letter – see p. 145, Change Password. The Main Page After logging in, your system’s home page (Main Page) is displayed. Menu Bar Workspace Status Bar Figure C- 2: The Main Page When using WAP service of your cellular phone, the main page looks the following way: CommPact Installation Manual... -
Page 147: Status Bar
To refresh the current system status, click the Refresh Status button on the right‐hand side of the Status bar. Workspace The workspace offers additional links to the following pages of the application: Users and Codes, History, Alerts, Change Password, Video. When you choose a page, either from the Main Menu, or from the workspace, the page is displayed in the workspace. For example, if you choose History from the Main Menu, a list of system events is displayed in the workspace. SMS alerts relate only to SMS sent from ELAS (WEB User Application). Options Available from Main Page CommPact Installation Manual... - Page 148 It is important to note that when you arm using the Web application, the system is armed with the programmed delay. On the Status Bar below on the page you can see the current status of the system (in our example it is Disarmed and System Ready, which means that the system and all the detectors are working properly and there are no events to report). It is possible to check if there were alarms in the system – see p. 148. System Users and Codes In this area you can add, delete, or change users and the User Codes for your system (for example, add codes for family members). On The Main Page menu, click Settings. Figure C- 5: Settings Button Click System Users and Codes, the following page appears: CommPact Installation Manual...
-
Page 149: Change Password
On The Main Page menu, click Settings, then Web Interface Users and Codes, the following page appears: Figure C- 7: Web Interface Users and Codes Page Change Password Click Settings then Change Password to change the password you use to login to the Web Application. CommPact Installation Manual... -
Page 150: Zone Bypass
Zone Bypass On The Main Page menu, click Settings then Zone Bypass to bypass certain zones in your home that you donʹt want to receive event messages from – see p. 24, Zone Bypassing/Unbypassing. Select the checkboxes for the zones you want to bypass. Figure C- 9: Zone Bypass Page Change Appearance On The Main Page menu, click Settings then Change Appearance to change the color scheme of your account. Figure C- 10: Change Appearance Page CommPact Installation Manual... - Page 151 The Alerts page allows you to enter the details of contacts you wish to be informed when events occur in your system. For example, you can enter your own email address and/or cellular phone number so that you will receive email or SMS notification in the event of an alarm. On The Main Page menu, click the Alerts area. Figure C- 11: Alerts Area The following page appears: Figure C- 12: Alerts Page Press Add new to add email addresses or cellular telephone numbers for the alert messages. CommPact Installation Manual...
- Page 152 In addition to viewing the event log, you may also save the log to a file (HTML, PDF or RTF) or print the log. On The Main Page menu, click History, the following page appears: Figure C- 14: History Page Video Using IP video cameras installed in your home, the Web Application enables you to view streaming video over the Web in order to check your home and family while you are away. Discuss this capability with your security service provider to determine if it is applicable to your system. CommPact Installation Manual...
-
Page 153: Appendix D: Event Table
Device Number Gas Alarm 1151 Device Number Gas Alarm Restore 3151 Device Number Open/Close Full Arm 3401 User Number Part Arm 3456 User Number Perimeter Arm 3441 User Number Disarm (entire system) 1401 User Number CommPact Installation Manual... - Page 154 3341 Device Number Supervision Loss 1381 Device Number Supervision Restore 3381 Device Number GSM Signal Level 1605 Signal Level (0-9) Zone Trouble 1380 Device Number Zone Trouble Restore 3380 Device Number CommPact Installation Manual...
- Page 155 DEVICE NUMBER USER NUMBER Value Description Value Description Control System Control System 01-32 Users 01-33 Zones Remote Access 41-59 Keyfobs 41-59 Keyfobs 77-80 Repeaters 81-84 Wireless Keypads 81-84 Wireless Keypads Front Panel Keypad Front Panel Keypad Wireless Siren CommPact Installation Manual...
-
Page 156: Appendix E: Zone Types
Fire zones are always active. When triggered, Fire zones generate a Fire alarm. These zones are designed for use with smoke detectors and panic buttons that may be pressed in the event of a fire. A Fire zone always activates the siren even if the Bell option is programmed as disabled. Fire alarms sound a pulsating siren to distinguish them from other alarms. Event Group: Fire 24Hr 24Hr zones are always active. When triggered, 24Hr zones generate a Burglary alarm. These zones are used for applications that require constant protection. Event Group: Burglary CommPact Installation Manual... - Page 157 These zones are designed for applications that monitor environmental conditions such as temperature or humidity. If the Bell option is enabled for Environmental zones, the system sounds trouble tones from the keypad. These tones are sounded until the user presses on their keypad. Environmental alarms are not affected by the expiry of the siren cut‐off. Event Group: Burglary No Motion No Motion zones are used to monitor the activity of disabled or elderly people. When the system is disarmed, and the detector has not been triggered within a pre‐defined period of time (00:00 to 72:00 hours), a No Motion event message is sent to the central station. When the system is armed, this zone behaves as Normal. Event Group: Medical Not Used This zone type disables the detector output. All alarm transmissions from the detector are ignored. Event Group: Not applicable CommPact Installation Manual...
- Page 158 Electronics Line 3000 Ltd. Limited Warranty EL and its subsidiaries and affiliates (ʺSellerʺ) warrants its products to be free from defects in materials and workmanship under normal use for 24 months from the date of production. Because Seller does not install or connect the product and because the product may be used in conjunction with products not manufactured by the Seller, Seller cannot guarantee the performance of the security system which uses this product. Sellersʹ obligation and liability under this warranty is expressly limited to repairing and replacing, at Sellers option, within a reasonable time after the date of delivery, any product not meeting the specifications. Seller makes no other warranty, expressed or implied, and makes no ...
- Page 159 Contacting Electronics Line 3000 Ltd. International Headquarters: Electronics Line 3000 Ltd. 14 Hachoma St., 75655 Rishon Le Zion, Israel Tel: (+972‐3) 963‐7777 Fax: (+972‐3) 961‐6584 All rights reserved. No part of this document may be reproduced in any form without prior written permission fro m the publisher. Electronics Line 3000 Ltd. 01/2012 5 IN1668 ...
Need help?
Do you have a question about the CommPact and is the answer not in the manual?
Questions and answers