Chauvet Hurricane 1800 Flex User Manual
Hide thumbs
Also See for Hurricane 1800 Flex:
- Quick reference manual (44 pages) ,
- User manual (19 pages) ,
- User manual (16 pages)
Table of Contents
Advertisement
Quick Links
Advertisement
Table of Contents

Subscribe to Our Youtube Channel
Related Manuals for Chauvet Hurricane 1800 Flex


Summary of Contents for Chauvet Hurricane 1800 Flex
- Page 1 User Manual...
-
Page 2: Table Of Contents
ECHNICAL PECIFICATIONS The information and specifications contained in this document are subject to change without notice. Chauvet assumes no responsibility or liability for any errors or omissions that may appear in this manual. © Copyright 2014 Chauvet. All rights reserved Printed in P.R.C. -
Page 3: Before You Begin
Chauvet. The customer must submit the report upon reception of the damaged merchandise. Failure to do so in a timely manner may invalidate the customer’s claim with the carrier. -
Page 4: Product At A Glance
To eliminate unnecessary wear and improve its lifespan, during periods of non-use completely disconnect the product from power via breaker or by unplugging it. FCQ (Fog Cleaner Quart) was specifically developed by Chauvet to clean your Hurricane™ 1800 Flex. Make sure you use FCQ regularly, no longer than 90 days between cleanings, to increase the life of your fogger. -
Page 5: Introduction
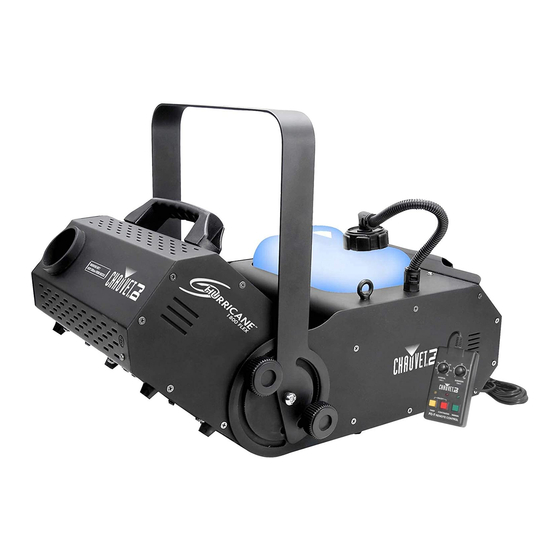
2. I NTRODUCTION Product Overview Hanging bracket Bracket adjustment Remote knobs control DMX in DMX in 5-pin 3-pin DMX out 5-pin Manual DMX out 3-pin button Power switch Dipswitches Breaker Power input Hurricane™ 1800 Flex User Manual Rev. 7 Page 5 of 19... -
Page 6: Setup
Allow to cool for 5-15 minutes. Using your hand, press on the button for the breaker, until it remains in place. In the event this breaker will not reset, contact Chauvet for troubleshooting. The product may need to be serviced. -
Page 7: Data Cabling
Data Cabling To link products together you must obtain data cables. You can purchase CHAUVET® certified DMX cables directly from a dealer/distributor or construct your own cable. If you choose to create your own cable please use data-grade cables that can carry a high quality signal and are less prone to electromagnetic interference. -
Page 8: 3-Pin To 5-Pin Conversion Chart
3-Pin to 5-Pin Conversion Chart If you use a controller with a 5 pin DMX output connector, you will need to use a 5 pin to 3 pin adapter. The chart below details a proper cable conversion: IN TO ONVERSION HART Conductor 3 Pin Female (output) -
Page 9: Mounting
Mounting Orientation This product may be mounted in a 90° degree angle (horizontal), provided there is adequate room for ventilation. The tank of the product should not move from this position. However, the front portion of the fog machine can tilt up and down in the desired direction. This is secured by using the bracket adjustment knobs. -
Page 10: Operation
4. O PERATION DMX Channel Summary HANNEL UNCTION Fog output DMX Mode This mode allows the unit to be controlled by any universal DMX controller. If you are unfamiliar with DMX, please read the DMX Primer in the Appendix of this manual. This product will automatically switch to DMX mode operation, once a DMX controller has been plugged into the 3-pin or 5-pin DMX input. -
Page 11: Wireless Controller (Fc-W) (Optional)
Wireless Controller (FC-W) (Optional) This mode will allow you to control the fogger using the optional wireless controller. This consists of the transmitter and the receiver. You may control up to 4 independent fog machines or many more if you run them simultaneously. See the below instructions on setting up your fogger to operate with the FC-W. -
Page 12: Setting The Starting Address
Setting the Starting Address This DMX mode enables the use of a universal DMX controller device. Each product requires a "start address" from 1 to 512. A product requiring one or more channels for control begins to read the data on the channel indicated by the start address. For example, a product that uses 6 DMX channels and was addressed to start on DMX channel 100, would read data from channels: 100, 101, 102, 103, 104, and 105. -
Page 13: Dmx Quick Reference Chart
DMX Quick Reference Chart DMX Address Quick Reference Chart DIP Switch Position DMX DIP #9 0 0 0 SWITCH SET 0=OFF #8 0 0 0 1=ON #7 0 0 1 X=OFF or ON #6 0 1 0 #1 #2 #3 #4 #5 0 0 0 0 0 32 64 96 128 160 192 224 256 288 320 352 384 416 448 480 1 0 0 0 0... -
Page 14: Technical Information
Note: Do not operate the machine without fluid at any time. Do not operate the machine without fluid at any time. Fog Cleaner Quart (FCQ) was specifically developed by Chauvet to clean your Hurricane™ 1800 Flex. Make sure you use FCQ regularly, no longer than 90 days between cleanings, to increase the life of your product. -
Page 15: General Troubleshooting
45° angle. Empty fluid tank Refill tank with the correct CHAUVET® water-based haze fluid If you still experience problems after trying the solutions presented here, contact Chauvet Technical Support. Hurricane™ 1800 Flex User Manual Rev. 7 Page 15 of 19... -
Page 16: Contact Us
(954) 577-4455 tech@chauvetlighting.com Email: Fax: (954) 929-5560 Toll free: (800) 762-1084 www.chauvetlighting.com World Wide Web UNITED KINGDOM AND IRELAND - Chauvet Europe Ltd. General Information Technical Support Address: Unit 1C uktech@chauvetlighting.com Email: Brookhill Road Industrial Estate Pinxton, Nottingham, UK www.chauvetlighting.co.uk... -
Page 17: Returns
You must send the merchandise prepaid, in its original box, and with its original packing and accessories. Chauvet will not issue call tags. Clearly label the package with the RMA number. Chauvet will refuse any product returned without an RMA number. -
Page 18: Appendix
6. A PPENDIX DMX Primer There are 512 channels in a DMX-512 connection. Channels may be assigned in any manner. A product capable of receiving DMX 512 will require one or a number of sequential channels. The user must assign a starting address on the product that indicates the first channel reserved in the controller. -
Page 19: Technical Specifications
Technical Specifications WEIGHT & DIMENSIONS Length ......................22.2 in (563 mm) Width ......................13.4 in (340 mm) Height ......................15.0 in (380 mm) Weight ....................... 27.6 lbs (12.5 kg) POWER AC power (voltage specific) .......... 115 VAC, 60 Hz or 230 VAC, 50Hz Breaker size (120 V version) ................
Need help?
Do you have a question about the Hurricane 1800 Flex and is the answer not in the manual?
Questions and answers