Table of Contents
Advertisement
1/10 SCALE ELECTRIC POWERED TOURING CAR SERIES
This radio control model car is not a toy! Before beginning assembly, please read this manual thoroughly.
The contents are subject to change without prior notice due to product improvements and specificatrion changes.
Maintenance Manual & Parts Catalogue
Introduction
Thank you for purchasing this Thunder Tiger product. This manual contains the steps and instructions required to assemble
your car. Please read this manual completely before attempting to start maintenance. Follow the directions in this manual closely
to reduce problems during operation. We offer online help on our www.acehobby.com or www.thundertiger.com and forums
and our product specialists are ready to take your call if you have any technical questions. Have fun and enjoy the exciting world
of R/C.
SPARROWHAWK VX
24
tiger.com.tw
1:10
No.6535-F
www.thundertiger.com
www.
Advertisement
Table of Contents

Related Manuals for THUNDER TIGER SparrowHawk VX


Summary of Contents for THUNDER TIGER SparrowHawk VX
- Page 1 Maintenance Manual & Parts Catalogue Introduction Thank you for purchasing this Thunder Tiger product. This manual contains the steps and instructions required to assemble your car. Please read this manual completely before attempting to start maintenance. Follow the directions in this manual closely to reduce problems during operation.
-
Page 2: Table Of Contents
FrontBody Mounts P.16 STEP5 Front Axle STEP19 Tire/Wheels P.17 STEP6 Front Bullkhead Unit STEP20 Body Shell P.18 STEP7 Front Suspension SPARROWHAWK VX EXPLODED VIEW P.19 STEP8 Shock Absorber SPARROWHAWK VX PART P.10 P.22 STEP9 Steering Bellcrank P.11 SPARROWHAWK VX OPTION PART P.27... -
Page 3: Manual Format
Manual Format How to read the instruction manual? Example STEP4 Indicates the assembly step number and the Front Suspension parts that are to be assembled. Displays actual size drawings, and part quantities used. 10x15x4mm All parts, except screws, are identified by its Ball Bearing order numbers. -
Page 4: Step1 Rear Differential
STEP1 Rear Differential 2.5x12mm F/H Philip Machine Screw 8x14x4mm Ball Bearing 3x5mm Washer 5x8mm Washer 4.4x0.8mm O-Ring silicon oil 3x19mm You may also use silicone oil to replace grease for the differentials. Fill up to 80%. Change the viscosity of the silicone oil according to track conditions and your driving style. STEP2 Spur Gear &... -
Page 5: Step3 Rear Bulkhead Unit
STEP2 Spur Gear & Input Shaft 2.5x8mm F/H Philip Machine Screw STEP3 Rear Bulkhead Unit 6mm(L) Ball Stud 3x12mm BT Philip Machine Screw 14x10.5x0.1mm Diff Shim 3x10mm F/H Philip Machine Screw Adjust the backlash with the shims. Marked "C" "C" Hint Apply grease... -
Page 6: Rear Suspension
STEP3 Rear Suspension Arm Inner Hinge Pin 6mm(S) Ball Stud 3x10mm F/H Philip Machine Screw 2.5x6mm F/H Philip Machine Screw 4x10mm SET Screw Marked "D" "D" STEP4 Rear Suspension 10x15x4mm Ball Bearing 6mm(L) Ball Stud In the chassis set, these dog bones have been assembled in one-piece unit. -
Page 7: Step4 Rear Suspension
STEP4 Rear Shock Tower Rear Suspension 6mm(L) Ball Stud 3x10mm BT Philip Machine Screw Marked "ES-CM" "ES-CM" 2x4mm BT Self-Tapping Screw W/washer 2.5x22mm Outer Hinge Pin (Rear) For Right STEP4 Rear Suspension Body Clip 3x8mm BT Philip Machine Screw Rear Body Post Assemble left and right side the same way... -
Page 8: Step5 Front Axle
STEP5 Front Axle 2.5x12mm F/H Philip Machine Screw 8x14x4mm Ball Bearing 2x10mm You may also use differential gears to replace direct drive axle for the front differential.(Option) STEP6 Front Bullkhead Unit 6mm(L) Ball Stud 5x11x4mm Ball Bearing 3x12mm BT Philip Machine Screw 2.5mm E-Clip2 Adjust the backlash... -
Page 9: Step7 Front Suspension
STEP6 Front Suspension Marked "B" Outer Hinge Pin (Rear) "B" 6mm(S) Ball Stud 3x10mm F/H Philip Machine Screw 2.5x6mm F/H Philip Machine Screw 4x10mm SET Screw Marked "A" "A" STEP7 For Right Front Suspension Marked "R" "R" 5x11x4mm Ball Bearing 6mm(L) Ball Stud Marked "L"... - Page 10 STEP7 Front Shock Tower Front Suspension 6mm(L) Ball Stud Marked "ES-CM" "ES-CM" 2x4mm BT Self-Tapping W/washer 2.5x20mm Outer Hinge Pin (Front) For Right STEP7 Front Suspension 3x10mm BT Philip Machine Screw 6mm(L) Ball Stud Assemble left and right side the same way...
-
Page 11: Step8 Shock Absorber
STEP8 Shock Absorber Front Shock Absorbers Rear Shock Absorbers... -
Page 12: Step9 Steering Bellcrank
STEP9 Steering Bellcrank Top View 6mm(L) Ball Stud Rear Swing Post Screw 5x8x2.5mm Bushing Side View Rear Note direction STEP9 Steering Bellcrank Marked "ES-ST" "ES-ST" Marked "ES-ST" "ES-ST" Pay close attention here Ensure smooth, non-binding movement when assembling Apply grease... -
Page 13: Step10 Installation Of Rear End
STEP10 Installation of Rear End 3x10mm F/H Philip Machine Screw 3x14mm F/H Philip Machine Screw M3 Lock Nut Rear Suspension STEP11 Front Suspension Installation of Front End M3 Lock Nut 3x10mm F/H Philip Machine Screw 3x12mm F/H Philip Machine Screw... -
Page 14: Step12 Steering Servo
Adjust the gear ratio by changing pinion gears according to the size of the track and other conditions. 1. Sparrowhawk VX at present comes with 72T spur gear and 26T pinion gear. Thunder Tiger also provides 19T/20T/21T/22T/23T/25T racing pinion gears as optional parts. -
Page 15: Step13 Steering Servo
STEP13 Steering Servo 3x10mm F/H Philip Machine Screw 3x8mm BT Self-Tapping Screw W/washer STEP14 Installation of Motor Mount Turn the motor to find proper gear mesh, the spur gear should spin smoothly after adjusting. 3x10mm F/H Philip Machine Screw Finally tighten the motor mount screw. -
Page 16: Step15 Installation Of Top Plate
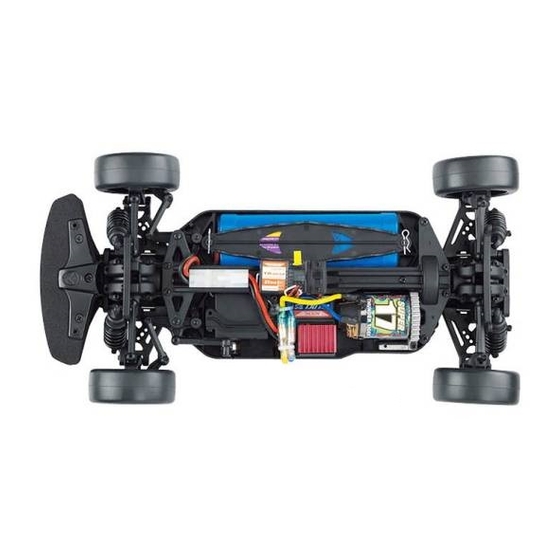
STEP15 Installation of Top Plate 3x6mm BT Philip Machine Screw Note the size of screw. Too long screw will touch the driveshaft cup. 3x8mm BT Philip Machine Screw 3x18mm BT Philip Machine Screw STEP16 Installation of Battery Pack 3x12mm Socket Hex Machine Screw Body Clip 7.2V Stick Pack Battery 7.2V... -
Page 17: Step17 Receiver & E.s.c
STEP17 Receiver & E.S.C Receiver Electronic speed control STEP18 Front Bumper FrontBody Mounts 3x8mm F/H Philip Machine Screw Body Clip 3x10mm F/H Philip Machine Screw Adjust height to suit body. -
Page 18: Step19 Tire/Wheels
STEP19 Tire/Wheels Tire insert foam Install the tire onto the wheel. Glue the tire to the wheel with instant glue in four spots around the tire on both sides. Warning: Follow the adhesive instructions for proper use and safety. Wear eye and hand protection. ... -
Page 19: Step20 Body Shell
STEP20 Body Shell Body Clip Round Tap Screw 5.5mm 5.5mm 5.5mm 5.5mm Antenna Hole 5.5mm Drill holes with the specified diameter... -
Page 23: Sparrowhawk Vx Part
SPARROWHAWK VX PART PD7712 ANTENNA BAG PD7338 MOTOR W/DECAL SET PD7831 OUTDRIVE CUP SET PD7832 SOLID AXLE PD7833 DRIVE PINION&INPUT SHAFT PD7834 SPUR GEAR MOUNT W/B.B PD7835 SPUR GEAR HUB,72T PD7836 PINION GEAR, 26T PD7837 MOTOR MOUNT (72T) PD7838 REAR SUSPENSION ARMS... - Page 24 SPARROWHAWK VX PART 4COILS / 4 PD7871-B HOCK SPRING, BLACK PD7879 BULKHEAD COVER PD9051 DIFFERENTIAL CASE PD9052 REAR BULK SET 21x1.8mm PD9058 DIFF SPUR GEAR 34T PD9053 FRONT BULK SET PD9055 DIFFERENTIAL GEAR SET PD9057 DRIVE PINION SET 13T PD9072 BUMPER SET...
- Page 25 SPARROWHAWK VX PART PD7475 M3x10B (20) PD1569 4 (20) PD1532 M3x8B (20) PD0874 d5xD10xW4(4) PD7469 M4x12B (20) PD0978 2.5 (20) PD1533 M3x10B (20) PD1573 d5xD11xW4(2) PD8205 M3x6B (20) SK.H.M SCREW E-CLIP PD0458 d10xD15xW4(2) PD2488 M3x18B (20) PD0876 d8xD14xW4(4) PD1534 M3x12B (20) PD1683 M3x10B (20) PD9131 M2.6x10(20)
- Page 26 SPARROWHAWK VX PARTS LIST PART# DESCRIPTION NOTE BODY CLIPS(20) PD0388 (20) PD0458 BALL BEARINGS(2), d10XD15xW4 (2), d10XD15xW4 PD0668 BT M. SCREW(20), M3x10 (20), M3x10 PD0876 BALL BEARINGS(4), d8XD14xW4 (4), d8XD14xW4 PD0973 WASHER(20), 4mm (20), 4mm PD0978 E-CLIP(20), 4mm (20), 4mm PD1191 CTP.M.SCREW(20), M3x8...
- Page 27 SPARROWHAWK VX PARTS LIST PART# DESCRIPTION NOTE SHOCK TOWER SET PD9074 PD9077 STEERING BLOCK SET PD9078 CASTER BLOCK SET PD9080 OUTER HINGE PIN SET PD9083 INNER HINGE PIN SET PD9086 SWING RACK SET PD9087 SWING POST SCREW HUB CARRIER SET...
-
Page 28: Sparrowhawk Vx Option Part
CFRP=CARBON FIBER REINFORCED PLATE ALUM=ALUMINUM SPARROWHAWK VX OPTION PART PD7722 ALUM STEERING BLOCK SET PD7723 ALUM CASTER BLOCK SET PD7724 ALUM HUB CARRIER SET PD7865 ALUM MOTOR MNT. (12) PD7866 CFRP CHASSIS PD7867 BATT.BRACE&ACC PD7868 ALUM TURNBUCKLE SET PD7869 REAR UNINI SHAFT 4COILS / 4 3.2COILS / 3.2... - Page 29 CFRP=CARBON FIBER REINFORCED PLATE ALUM=ALUMINUM SPARROWHAWK VX OPTION PART PD9141 FLAME DECAL,YELLOW PD9142 FLAME DECAL,RED PD9143 CFRP BUMPER TOP PLT PD9144 CFRP FR SHK TOWER PD9149 ALUM. REAR TOE BLOCK PD9154 ALUM.UPPER ROD PD9145 CFRP REAR SHOCK TOWER PD9146 CFRP BULK LOWER COVER...
- Page 30 CFRP=CARBON FIBER REINFORCED PLATE ALUM=ALUMINUM SPARROWHAWK VX OPTION PARTS LIST PART# DESCRIPTION NOTE PD7033 MOTOR PINION GEAR, 19T PD7034 MOTOR PINION GEAR, 20T PD7035 MOTOR PINION GEAR, 21T PD7036 MOTOR PINION GEAR, 22T PD7037 MOTOR PINION GEAR, 23T PD7039 MOTOR PINION GEAR, 25T...
-
Page 31: Body Shells
BODY SHELLS PD8257 PAINTED BODY SET PD8258 CLEAR BODY W/DECAL PD8260 PAINTED BODY SET PD8259 DECAL SET SKYLINE Z-TUNE SKYLINE Z-TUNE BMW M6 SKYLINE Z-TUNE PD8261 CLEAR BODY W/DECAL PD8262 DECAL SET PD8263 PAINTED BODY SET PD8264 DECAL SET BMW M6 BMW M6 AUDI TT AUDI TT... -
Page 32: Wheel & Tire Option Part List
WHEEL & TIRE OPTION PART LIST 5-SPOKE WHEEL / 5 RACING DISH WHEEL / 5-SPOKE WHEEL / 5 10-SPOKE WHEEL / 10 PD6601-L C/BLUE , 26mm PD7649 WHITE , 26mm PD6679 GOLD , 26mm PD7699 WHITE , 26mm PD6601-P C/PURPLE , 26mm PD7650 WHITE , 30mm... - Page 33 OPTIONAL ELECTRONICS 7.2V Ni-MH Battery Pack / Stick No.2937 Ni-MH Battery Pack/Flat, No.2941 Ni-MH Battery 7.2V/2400mAh SC Pack/Flat, 7.2V/3600mAh SC Specifications Item No. 8050 Voltage range 4.8~8.4V Internal resistance 0.004 Momentary Load (1 sec) 400A Electronic Speed Control Brief Load (30 sec) 230A Continuous Load (5 min) 170A...
- Page 34 2008 JD7138 V2...
Need help?
Do you have a question about the SparrowHawk VX and is the answer not in the manual?
Questions and answers