Table of Contents
Advertisement
Quick Links
Chapter of Contents
Chapter of Contents .................................................................................1
A Thank-you Note Before You Get Started ..............................................3
Chapter1. The InterVideo InstantON CD Installation Guide ...................4
1.1 System Requirements..................................................................................... 5
1.2 Steps Before the Installation of InstantON....................................................... 5
1.3 Installation of InstantON ................................................................................ 7
Chapter2. The InterVideo InstantON User Guide ..................................10
2.1 Enter The InterVideo InstantON.....................................................................11
2.2 Definitions and Usage of Remote Control .......................................................13
2.3 General Setup Menu......................................................................................15
2.4 CD/MP3 Mode...............................................................................................22
2.5 DVD/VCD Mode ............................................................................................29
2.6 TV Mode ......................................................................................................36
2.7 FM Mode ......................................................................................................45
2.8 Photo Mode ..................................................................................................51
3.1 Driver Installation .........................................................................................58
3.2 System Requirements....................................................................................59
3.3 Installation Process .......................................................................................59
3.4 Configuring The InterVideo Home Theater in Windows ...................................61
Chapter4. The InterVideo Home Theater User Guide ............................62
4.1 The InterVideo Home Theater Key Features....................................................63
4.2 The InterVideo Home Theater Setting Page ....................................................64
4.3 The Common Use Buttons .............................................................................66
4.4 TV Mode Features .........................................................................................67
1
Advertisement
Table of Contents

Related Manuals for AOpen XC CubeAV


Summary of Contents for AOpen XC CubeAV
-
Page 1: Table Of Contents
Chapter of Contents Chapter of Contents .................1 A Thank-you Note Before You Get Started ..........3 Chapter1. The InterVideo InstantON CD Installation Guide ....4 1.1 System Requirements..................5 1.2 Steps Before the Installation of InstantON............5 1.3 Installation of InstantON ................7 Chapter2. - Page 2 5.1 The Features of This Chapter.................91 5.2 Preliminary Tool ....................92 5.3 What’s In The Box?..................93 5.4 Accessory .....................94 5.5 Features of XC CubeAV..................95 Chapter 6 Starting Installation ..............96 6.1 Starting Installing ..................97 6.2 Hard Disk, and Optical device ................98 6.3 Cables and Connectors ..................99 6.4 Install CPU ....................101...
-
Page 3: A Thank-You Note Before You Get Started
We regret not informing about any changes in usage standards and other related information. AOpen Company reserves the right of altering or modifying the content of this manual. In case of any mistakes or incorrect descriptions, which include those on the products, AOpen makes no guarantee or commitments. -
Page 4: Chapter1. The Intervideo Instanton Cd Installation Guide
Chapter1. The InterVideo InstantON CD Installation Guide... -
Page 5: System Requirements
The “InterVideo InstantON” is a complete digital entertainment solution in XC CubeAV. The system provides the most stable and compatible personal entertainment environment. The InterVideo InstantON allows you to play MP3 files from your hard disk drive, CD/VCD/DVD, or tune into a FM radio station without entering Windows system. Users may use the audio buttons in the front panel or the remote controller to navigate through the InterVideo InstantON window. - Page 6 F llow the instruction and set [First Boot Device] to [CD-ROM] Finally, move the cursor to [Save & Exit Setup] and press [Enter] to save the parameters and exit BIOS setup.
-
Page 7: Installation Of Instanton
1.3 Installation of InstantON General requirements: Non-paritioned and clean 350MB HDD space. The paragraph here will cover the following issues: Installation: Install InterVideo InstantON from the Installation CD. Recovery: Recover InterVideo InstantON from the OEM provided image (HDD or CD). Update: Keep InterVideo InstantON up-to-date. -
Page 8: Installation Steps
Installation Steps The onscreen steps during installation are as follows: Welcome Page and Language Selection. Area Selection Available free space (at least 350MB of non-partitioned free space) or a previously installed partition is found. However, if it fails to find the available space, an error message will appear. - Page 9 Installation in progress Installation complete and successful. Press “Enter” to shut down the system. Launch InterViewo InstantON again, and get ready for a whole new world of entertainment! Recovery If you want to use installation CD to re-install InterVideo InstantON, please refer to Installation for Detail procedures.
-
Page 10: Chapter2. The Intervideo Instanton User Guide
Chapter2. The InterVideo InstantON User Guide... -
Page 11: Enter The Intervideo Instanton
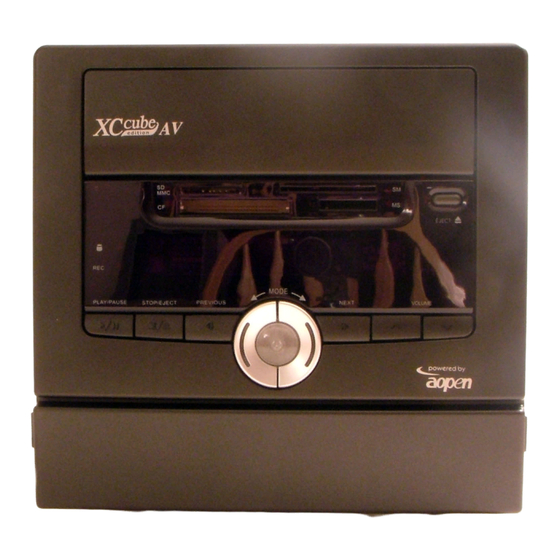
2.1 Enter The InterVideo InstantON The XC CubeAV front panel includes a set of basic audio/video control buttons. The following figures illustrate functions of these buttons under different modes in The InterVideo InstantON environment. Users may press [Mode] button to select the mode you prefer and press [Power] button to start. - Page 12 RTC 12 Hour Mode RTC 24 Hour Mode Night Lamp Mode. For users’ convenience, AOpen provides night lamp mode on the front panel. Please press and hold [Stop] button for 5 seconds to turn on/off the night lamp.
-
Page 13: Definitions And Usage Of Remote Control
You may start the program by pressing any of the mode toggle buttons according to your requirement. These two pages describe how to use the remote control handset. Not all XC CubeAV remote controls have the same keypad. Here we demonstrate two different types. - Page 14 Remote – Type 2 Power On/Off Mode Select Button HT Launch Button (TV/PVR mode), (Photo mode) (DVD Root Menu/DVD mode), (Video/Clipper mode) Display Channel and (FM mode) Status (CD/MP3 mode) MTS Button Setup Menu Exit (Close Setup Menu) Audio Navigation Buttons Tune +/- Mute Scan Channels...
-
Page 15: General Setup Menu
2.3 General Setup Menu The general Setup menu lets you make various adjustments to items such as menu language, sleep timer and even update the InstantON software. Press the Photo , DVD/VCD , TV/PVR , or CD/MP3 button to turn on the system. (Here we take Music Mode as illustration) Press the Menu button. - Page 16 Features in the General Setup Menu First Layer Second Layer Details English Menu Language OSD and menu language Traditional Chinese Simplified Chinese Japanese Korean Finnish Dutch Danish French German Greek Hebrew Italian Norwegian Brazil/Portuguese Spanish Swedish Polish Russian Turkish Slovenian Czech French Canadian Hungarian...
- Page 17 Changing the Language To set or change the language of Setup menus or onscreen displays: Turn on the system. Press randomly a mode. (Here we use TV/PVR as illustration) Press the Menu button. Press the arrow button to select General Setup, and then press OK button. Press the arrow button to select Menu Language, and then press the...
- Page 18 InstantON. That’s all it takes to get the latest updated version. Step 1 - Download components First off all, user must download the update components and unzip the download file. The unzipped file will be placed in a specific folder automatically. (“This step must to be done under Windows O.S.”) Double-click Setup icon from the folder.
- Page 19 Step 2 - Update The updating procedure uses the following steps: Press the AV keys to enter InterVideo InstantON. Enable the Setup menu. Select “General Settings” in the Setup menu. Select “Update” in the General Settings menu. InterVideo InstantON will check the availability of a new update.
- Page 20 ote: If a serious error should occur during the updating process and cause InterVideo InstantON to malfunction, please use the recovery disc to repair the damage and restore the system to normal status. Step 3 - Restart InterVideo InstantON TV-Out Turn on the system.
- Page 21 Version Information Turn on the system. Press the Menu button. Press the arrow button to select Version information, and then press arrow button. The screen displays the current version information. Press the Exit button to close the menu window. Reset to Default You can easily remove all your custom settings to their default values Just follow these steps: Turn on the system.
-
Page 22: Cd/Mp3 Mode
2.4 CD/MP3 Mode Music Control Panel Playlist Source Directory Total Tracks Track Now Playing Track Title Repeat Volume Fast Reverse/Forward Shuffle Previous/Next Playback Time Pause Play Stop MUSIC mode Arrows Play Next Previous Fast forward Fast reverse Stop Volume +/- Menu Exit Mute... - Page 23 Items Actions Details Music Mode Enter Music Mode Navigate the current page and jump from column to column, including folder buttons and list items (via moving highlight). Go to Next/Previous Page: When the moving highlight is on the first item of the column, pressing “Up” arrow returns to the previous page.
-
Page 24: Keyboard Mapping
Increase or decrease the volume. Volume +/- Enable/disable General setup menu Menu setup menu Information disable setup menu Exit Silence Mute Repeat all, Shuffle Repeat->shuffle-> Repeat every song, shuffle all the songs disable Display Enable/disable TV-Out Eject Tray in or out CD-ROM Keyboard Hotkeys Function-key mapping for Music mode Keyboard... -
Page 25: Playing An Audio Cd
Opening the Music Mode Press the CD/MP3 button to power up the system and launch Music mode. Information Turn on the system. Press Menu during playback. Press the arrow button to select Information, and then press the OK button. The screen displays the current track/playlist information. - Page 26 Browsing the Folders and Tracks Press the arrow buttons to browse the folders and tracks. To move to the upper-level folder, press arrow button. The “To parent folder” submenu appears, so press the OK button. If you want to display a folder, press the arrow buttons to select it and then press the OK button.
- Page 27 A list of the tracks contained in the folder appears. Press the arrow button to select a track, and the press the OK button to add it to the playlist. To add more tracks to the playlist, repeat steps 2 and 3. Removing Selections from the Playlist The tracks you’ve added to a playlist can be removed, too.
- Page 28 Playing MP3s 1. Insert an mp3 CD-ROM to the optical drive or browse the folders of your hard driver. 2. Press the arrow button to select a folder, and then press the OK button. 3. A list of the tracks contained in the folder appears.
-
Page 29: Dvd/Vcd Mode
2.5 DVD/VCD Mode Remote DVD mode / V CD menu Menu Exit Play/p ause Fast reverse Fast fo rward Previous C hapter Previous Chapter Stop Volume +/- Mute Display Repeat Items Actions Details DVD /VCD mode Enters Disc mode Plays DVD, VCD, or Depending on the Menu Opens the DVD root... - Page 30 Previous chapter Goes to the prev ious isplays chapter chapter. If the number in upper-left first/last chapter is corner for 5 sec. reached, it stays in the first/last chapter. Next chapter Goes to the next/chapter Fast reverse 2X, 4X, 8X, 20X, 30X If the speed is backward already 30X, and the...
- Page 31 Fast forward 20X, “F,” “f” 20X, Fast reverse “R,” “r” backward Next Goes to next chapter If the VCD content is “Page Down” multifile which means the content of VCD cont aining couple of VCD form at files, PgUp/PgDn will contro l the Previous Goes to previous chapter...
-
Page 32: Using The Setup Menu
Using the DVD Menu A DVD is divided into long sections of a picture or a music feature called “titles.” When you play a DVD that contains several titles, you can select the title you want using the DVD MENU button. Wh n you play DVDs at allow you to select ite ms such as the language for the... - Page 33 The menu gives you access to the following features: First Layer Second Layer Details General Setup Enables/disables the information display. If no information is displayed, select the Information em to enable the display. If there is information displayed, select the item to disable the display.
- Page 34 Color Adjustment (Picture Properties) First Layer Second Layer Details Signed indicator bar Turns from green to red. Each has 32 steps. Contrast Signed indicator bar The default is 0. Negative and positive signs on each side. Each has 16 steps. Brightness Signed indicator bar The default is 0.
- Page 35 Subtitle When playing a multi-subtitle DVD, you can select one subtitle to show it on the screen. Press Menu during playback. Press the arrow button select Subtitle, and then press the Arrow button. Press the arrow button to select the settings you want to set, and then press the OK button.
-
Page 36: Tv Mode
2.6 TV Remote TV mode Menu Exit Volume +/- Ch +/- Scan Mute Display Items Actions Details TV mode Menu Enable setup menu Navigate the UI a menus Exit Disable setup menu Selected Confirms the previous remote controller input or the menu item selected Vol +/- Increases/decreases the... - Page 37 Ch +/- Changes channels Channel numbe Will only navigate in forward/backward (upper-ri ght corner) available channels (when Auto Scan is turned on). Channel number is displayed accord to Ch+/-. The last channel number will o nly be splayed for 5 seconds the channel display is turned off.
- Page 38 Stereo Mono1 Mono2 “A” Numerical key Selects channels directly “0” ~ “9” key pening the Mode Press the TV/PVR button to power up the system and launch the TV/PVR mod Ca e or Ante Select the input source you want to view. Th ere are two choices: Antenna or Cable.
-
Page 39: Audio Input
deo Input Selec t the input source you want to view. Press the Me button. Press the arrow button to select A/V Input, and then press the button. Press the arrow butto n to select Vi deo-Input, and then press the button. - Page 40 TV Area Select the input source you want to view. Press the Menu button. Press the arrow button to select TV -Area, and then press the button. Press the arrow button to select, and then press the OK button. Press the Exit button to close the menu window.
- Page 41 ing Favourite Ch nnels reate a List of Favourite Channels The Favorite Channels feature lets you sele ct programs from a list of up to 12 favorite channels that you specify. Use the Ch +/- button to select a channel you want to store.
- Page 42 Information Press Menu during playback. Press the arrow button to select Informatio n, and then press the OK button. Press th arrow button to select Yes or No, and then press the OK button. Press the Exit button to close the menu window.
- Page 43 Picture properties Contrast rightness Saturation Reset to default A/V input TV source Antenna Cable TV system PAL I PAL B PAL D PAL G PAL M PAL N SECAM L SECAM_B SECAM_D SECAM_G SECAM_K SECAM_K1 Video input S-Video Composite Audio input Line In With Video CD In...
- Page 44 Switzerland Austria Ireland France Belgium Netherlands Luxembourg Sweden Italy Spain Portugal Denmark Finland Norway Poland Czech Stereo This depends on the TV signal provided and if a tuner card Mono supported or not. Fine Tune...
-
Page 45: Fm Mode
2.7 FM Mo FM Control Pa e Date and time Volume scale Station frequency Favorite Channel number Radio mode Menu Exit Channel +/- Vol +/- Mute Scan Fast forward/reverse Next/previous Display Stop Tune up /down... - Page 46 Items Actions De ails Radio mode Set frequency The range of FM radio frequency is from 87.5MHz to 108.0MHz. There are four digits that need to be set by the us Use 0-9 to set the frequency. From left to right If the first digit were 1 or 0, there are 3 more digits left;...
- Page 47 Display Enable/Disable TV-Out function Stop Stop auto tuning Tune up/dow from current frequency circulate around frequen cy 87.5 to 108 board Hotk unction-key ma pping for FM mode Keyboard Keys Usage Notes Mapping Setup To call the Setup menu A very important key, “O,”...
- Page 48 Opening the Radio Mode Pres the FM button to power up the sy stem and launch the Radio mode. istening to the Radio ress the Previo , Next n to get the available radio station yo want and adju st the volume. To do this…...
- Page 49 alling a Favourit e Channel Press the arrow button repeatedly to select a favorite channel. Set Sensit ivity Level Use this function to adju st the sensitivity level for a radio station. These settings help to maximize the quality of the FM reception.
- Page 50 The menu gives you access to the following features: First Layer Second Layer Details General Setup Information Display the sleep timer Save Channel Displays the channel Save the current frequency in the stored channel table. number and Highlight the channel number to set the channel to the frequency current frequency.
-
Page 51: Photo Mode
2.8 Photo Mode Photo View Thumbnail mod e Control Panel Highlight picture file name Picture size Image source Highlight picture index Total pictures Photo m Menu Exit Display Eject/Load viou s/Next Play/Pa Stop... - Page 52 Items Actions Details Photo mode Menu Call up setup menu Exit Close setup menu Get into slide show rrent folder had pictures, it will go slide mode show mode, if not, won’t chan ge anything. Display Enable/disable if connect to a TV set, enable th is function TV-Out function ll see image on TV scr...
- Page 53 Previous Slide Show Mode Display previous image “Page Up” Selection for menu items Entering slide show mode Enter and start to play from selected image. Arrows Navigate the UI and menus Opening the Photo View Mode Press th e Photo button to power up the system and launch the Photo mode.
- Page 54 g Photo Press th e OK button to get into slide show mode To do this… Press Go to th e next/previous favorite picture Press the arrows. Stop slid e show Press Stop lide Show-Rotate Rotate a picture Press Menu during playback.
- Page 55 lide Show-S lide Show Preference Set the picture display Press the Menu button. Press the arrow button to select the prefe rence of slide show mode and then press the arrow button. Press the arrow button to highligh t option, and then press the OK button to confirm the setting.
- Page 56 The menu gives you access to the following features: First Layer Second Layer Details General Setup Information Display the sleep timer...
-
Page 57: Chapter3. Driver And Intervideo Home Theater Installation Guide
Chapter3. Driver and InterVideo Home Theater Installation Guide... -
Page 58: Driver Installation
3.1 Driver Installation Afte nstallation of InterVideo InstantON and operation system, we have to install driver. You may think that installing drivers would be a repeated task of going through those inst alla tion wizards and steps-by-steps. Now, you will be surprised with how “Ez” EzInstall could do. -
Page 59: System Requirements
AOpen Home Theater allows you to maximize the XC CubeAV multimedia features. The following chapter provides information on installation. 3.2 S ystem Requirements el Pentium 4 1.6GHz 128 MB system memory D-ROM ndows 2000, or Windows XP .3 Installation Process... - Page 60 When prompted, please select the program folder where you intend to ve the AOpen Home Theater program icons. Please click [Next] to continue. lease decide where you want to add this program icon. Please click [Next] continue. lease select the file types for which you want The InterVideo Home Theater layer to be the default player.
-
Page 61: Configuring The Intervideo Home Theater In Windows
3.4 Configuring The InterVideo Home Theater in Windows The co nfiguration dialog will be displayed automatically once the installation is done. -
Page 62: Chapter4. The Intervideo Home Theater User Guide
Chapter4. The InterVideo Home Theater User Guide... -
Page 63: The Intervideo Home Theater Key Features
The InterVi deo Home Theater Key Features Complete di gital media solution: TV, VCR, Music, Photos, Radio and DVD TV iewing & Recording Music Picture Video clip Radio Extensive Feature Set Channel Scan Channel Surfing Screen Capture Schedule TV shows for r ecording Sort recorded programs: Date/Name... -
Page 64: The Intervideo Home Theater Setting Page
4.2 The InterVideo Home Theater Setting Page Main Page elcome to InterVideo Home Theater. The main page a llows you to start any of the pplications: TV, Music, Pictures, Video Clips or DVD/V CD playback. In addition, the [Setup] page can be accessed at any time to change your settings. - Page 65 TV Settings Here you can set the TV Source, Input Source (TV, S-video, and Composite), ecording Quality, Audio and TV Audio. Picture Settings In this page, your Picture settings are stablished: Transition Time between ictures, option to have pictures Play in Random Order, to Include Subfolders and set the location of the Default Slide Show Music.
-
Page 66: The Common Use Buttons
Finally, please click [Finish] to complete and save the setting. 4.3 The Common Use Buttons The buttons shown below are very common used ones in the InterVideo Home Theater. Returns to the previous menu. Returns to the main menu of the Home Theater. Opens the help file. -
Page 67: Tv Mode Features
4.4 TV Mode Features Please click [TV] in main page or press [TV/PVR] on the remote controller entering TV mode. ing TV using the Home Theater provides full screen video and eas y to use viewing controls. With the Ho me T heater, you can schedule your favorite sh... - Page 68 Links to TV Program Schedule Provider web site (vary by region). Moves to Closed Caption page. Moves to the Schedule page. Moves to Channel Surfing page. Displays list of previously recorded programs. Allows you to take Snapshot. Moves to View Snapshots page. Moves to TV Settings page.
- Page 69 4.4.1 Guide Guide Click the [Guide] button to open the TitanTV website. Titan TV is an Electronic Program Guide (EPG) that allows users to record and watch TV right from the guide. Visit the Titan TV website for details. 4.4.2 Closed Caption Closed Caption Closed Caption allows you to close th movi...
- Page 70 To add a schedule: Press [Add] for adding a schedule. Label your program schedule to prevent confusion for fut ure use. Select the chan nel you want to record by scrolling left or right. Choose the frequency of the recording such as a one time recording or a weekly occasion.
- Page 71 Once you've clicked, the video display will split into a 4x4 grid with thumbnail view of each channel. Select the thumbnail to view and it will automatically switch to the selected channel. Clicking on an individual TV cell (thumbnail image), will channel surfing and being playback of that channel in that cell.
- Page 72 4 4 .4.6 Take Snapshot .4.6 Take Snapshot Take Snapshot Take Snapshot You may just click this button to take You may just click this button to take snapshot snapshot in the program. By default in the program. By default recorded progr recorded progr ams are stored in My...
- Page 73 Lists cont ents of folder containing all of the recorded TV programs b y name. Lists contents of folder containing all of the recorded TV programs by Date. You may check if there are other Media from this place. You may view snapshots here. 4.4.8 Setting Setting Configuring your TV Settings allows you...
- Page 74 TV Source Select the TV source from antenna or cable. Input Source Select the input source of the signal. The InterVideo Home Theater supports antenna and cable feeds for a television source. In addition, there is support for S-video and composite to enable you to connect to your camcorder or VCR.
-
Page 75: Dvd/Vcd Mode Features
4.5 DVD/VCD Mode Features lease place a DVD/VCD in your optical drive, then click [DVD/VCD] in main page or press [DVD/VCD] on th e remote controller. The [Settings] button is enabled only when a DVD/VCD is inserted in the optical drive. Click Menu will jump back to DVD/SVCD/VCD menu page. - Page 76 Allows you to view your taken Snapshots. Moves to the DVD/VCD Setting Page. Records current source: television, s-video in, and etc. Moves to the previous chapter. Moves to the next chapter. Play media. Pause during the playback. Click Play, the movie will begin from th e same position.
-
Page 77: Radio Mode Features
4.6 Radio Mode Features The InterVideo Hom e Theater lets you tune in and listen t o an FM radio station. Click [Radio] on the InterVideo Home Theater main window. The Radio wind appears. You may also press [FM] button on the remote controller for entering radio mode Basic Function in Radio Mode The system will automatically scan to view... - Page 78 Will list all of your favorite radio programs. You may add any radio program into your Favorite list. Lists all of the Radio programs by name. Lists all of the Radio programs by frequency. Click this button for adding a station. Lists all recorded Radio programs.
-
Page 79: Pictures Mode Features
4.7 Pictures Mode Features The InterVideo Home Theater lets you view your pictures, wallpaper, and other graphics stored on your computer. Your pictures are shown in thumbnails, so y can easily vi ew, which graphic you want to lect. The InterVideo Home Theater rovides support to multiple graphic formats. - Page 80 Shows picture by slideshow. Lists all pictures files in current folder, sorted by name. Lists all pictures files in current folder, sorted by date. Rotate designated picture to left. Rotate designated picture to right. Shows other media in your picture folders. Selects previous photo (photo layout) or displays previous photo in slide show (when player controls are showing) Selects next photo (photo layout) or displays next photo in...
- Page 81 Transition Time: ontrol the amount of time in between ctures for your slide show. Play in Random Order: Selecting Yes or No will control, if th ere is a specific order to how you view you pictures. Include Subfolders: hen browsing for your pictures, you ight have other folders that you must browse through for your specific picture you are looking for.
-
Page 82: Video Clips Mode Features
.8 Video Clips Mode Features iewing video clips with the Home Theater provides full screen viewing and high quality playback. When p laying a video clip , you can selec t which vide o clip you want to view just by clicking on the video. - Page 83 Selects next video clip. Resumes playback when paused or begin playback from stopped position. Pauses the current playback. Stops playback. Fast-backward, goes backwards in the current playback mode. Fast-forward, goes forward in the current playback mode. Changes volume up and down. Mutes the current audio.
-
Page 84: Music Mode Features
4.9 Music Mode Features The InterVideo Home Theater allows you lay audio CD, MP3 files and radio recording using the [Music] window. The [Mus ic] window will organize your audio files by title and other methods. You hav full playback control of the music you listen to. - Page 85 Select [Albums] to view what albums saved to y our hard disk drive. Select [Artists] to view artists’ information. Select [Genres] will tell yo t u he genres of your albums.
- Page 86 Button Functions Displays visualization for current music playback. Vi deo Window Lists all audio clips, sorted by current sort method, Title. Lists all audio clips, sorted by current sort method, Artist. Lists all audio clips, sorted by current sort method, Album. Lists all audio clips, sorted by current sort method, Genre.
- Page 87 Go to Playlist Play st is easy for a user to organize and arrange the way their music plays. With a Playlist, you can sort lists to your current mood. lick [Go to Playlist], you may find out if you ha ve had songs in your laylist.
- Page 88 To save a playlist: 1. Clicking on [Save]. . Please enter the name for your ved playlist. To clear a playlist: elect the playlist you want to clear nd then click [Clear].
-
Page 89: Other Media
Other Media You may click [Other Media] to view if there re other media in your Music folders. Update Music You may click [Update Music] to search for music on your computer. After searching, it will tell you how many files found. -
Page 90: Chapter 5 Preparation Before Installation
Chapter 5 Preparation Before Installation... -
Page 91: The Features Of This Chapter
5.1 The Features of This Chapter In this Chapter, you'll be able to learn how to: setup a personal computer on your own. correctly and safely put everything together and learn something about hardware. learn some practical techniques that make doing the job easier. In addition, this chapter DOES NOT offer you: any sorts of back doors, such as overclocking. -
Page 92: Preliminary Tool
5.2 Preliminary Tool "A workman must first sharpen his tools if he is to do his work well". Right before you start the assembly, there are some tools that can't be spared. Firstly, the most frequently-used too is cross screwdriver by which most interior components are fixed. -
Page 93: What's In The Box
5.3 What’s In The Box? Open the XC CubeAV box, you will find components as follow: XC CubeAV chassis / Drives Cage Motherboard Power Supply CPU cooler All in One Drives Cage Power Supply / XC Cube AV chassis Motherboard CPU cooler The pictures above may look different from the product you purchased. -
Page 94: Accessory
5.4 Accessory Beside main components, you are supposed to see the following accessories: Fixed screws: After opening the accessory parcel, you'll see the following four different types of screws: As shown in the As shown in the picture, the picture, the threads on NO.3 screw’s NO.1... -
Page 95: Features Of Xc Cubeav
PC design that obviously highlighted your individual style. In addition to its unique appearance, AOpen XC CubeAV is easy to move around in your house, suitable for decoration even in your living room. As light and crispy as it is, it is definitely your choice for a PC. -
Page 96: Chapter 6 Starting Installation
Chapter 6 Starting Installation... -
Page 97: Starting Installing
6.1 Starting Installing Unscrew all screws on the chassis. Use your thumb to push the chassis backward to you. Lift the chassis up. Here you may see the internal of the chassis. -
Page 98: Hard Disk, And Optical Device
6.2 Hard Disk, and Optical device 6.2.1Install Hard disk After taking out Cooler, let’s focus on Installing Drives Cage. Slide hard disk into the Drives Cage, and use screw no. 3 to screw it firmly to the cage. Heat dissipation side faces Front mark 6.2.2 Install Optical Drive Slide in the optical drive. -
Page 99: Cables And Connectors
Don't mess up screws!! Generally there are special screws for hard disk in the parcel when you buy a new hard disk. There will be no harm done using those screws. If no screws are attached, use those packed in the accessory parcel. Make sure to use the NO.2 screws. - Page 100 If you happen to have Serial ATA hard disk, this motherboard comes with Serial ATA connectors onboard as well. With EzColor design, you may easily find out the correct flame-red cable with the correct header. You may kindly install the Serial ATA cables onto Serial ATA headers.
-
Page 101: Install Cpu
6.4 Install CPU 6.4.1 Install CPU on Socket 478 Erect sensor up a bit (it might have been folded while shipped in with Cooler on top of it). After that, erect CPU socket lever up. Lever Sensor Install CPU onto the CPU bracket. Press the lever back to CPU socket. And it’s done. - Page 102 6.4.2 Install CPU on Socket T Remove plastic cap and erect CPU socket lever up. Plastic Cap Lever Pull CPU socket plate up and install CPU onto CPU socket. Then press plate back to CPU socket. Plate Press down CPU socket lever to finish CPU installation.
- Page 103 6.4.3 Install CPU on Socket 754 Erect CPU socket lever up and gently put CPU onto socket. Lever Press lever back to CPU socket, and then it’s done. 6.4.4 Install CPU on Socket A Erect CPU socket lever up and gently put CPU onto Socket Lever...
- Page 104 Press lever back to CPU socket, and then it’s done. 6.4.4 Install CPU on Socket 479 Remove plastic membrane from CPU socket and make sure the drop-shaped indicator on socket screw aims at open direction (the default is open). Plastic membrane Drop-shaped indicator Socket screw Match socket Pin 1 and golden arrow, and gently put CPU onto CPU socket.
-
Page 105: Install Cpu Cooler And Cpu Fan Connector
6.7 Insert TV/FM Tuner Card to Motherboard There is a TV/FM tuner card coming with the XC CubeAV. Please get it out from the box and we are going to install it. You may insert into the sand color PCI slot as shown. Screw the... - Page 106 Before insert the TV/FM Tuner Card into PCI Slot, we have to connect the audio cable from TV/FM Tuner Card to motherboard After that, please plug in the TV/FM Tuner card. Screw the iron lock on top of the AGP slot will do.
-
Page 107: Putting Drives Cage Back To Chassis
6.8 Putting Drives Cage back to Chassis Putting all cables aside, you may assemble the Drives Cage back to the chassis from top of the chassis. Lift the Drive Cage up at 45 degree for better installing the optical drive. Connecting optical drive/power cord to Drive Cage:... - Page 108 Connecting hard disk/power cord to Drive Cage: Lock the Drives Cage with screw No. 2.
-
Page 109: Optical Drive Ejecting Spacer
6.9 Optical Drive Ejecting Spacer At the back of Optical Drive Panel Cover, there is a removable ejecting spacer. Like shown below, the spacer can be fit into one of the three positions to fit various optical drive button designs. Please adjust your ejecting spacer to match the optical drive ejecting button. -
Page 110: All Set
6.10 All Set Assemble the housing back to the chassis. Screw the chassis back. 6.11 How about all external peripheral? Let’s take a look at the Front Panel and Back Panel ports. Back Panel Ethernet network connecto (RJ-45) Line-In Jack IEEE1394 connector Coaxial RCA Port FM antenna connector... -
Page 111: Front Panel
Front Panel Optical Devices SD/MMC Card Reade r SM Card Reader CF Card Reader MS Card Reader On/Off button IEEE1394 port IEEE1394 port (4-pin) USB2.0 ports S/PDIF Out port Speaker jack Microphone jack keyboard and mouse Connect monitor and tighten screws Connect... - Page 112 Microphone (speaker or earphone) and network cable Connect Finally, connect the TV cable, FM antenna and S-video cable (video-in) respectively. FM Antenna FM Antenna (NTSC) (PAL) TV Cable S-video Cable...
-
Page 113: Power Supply Cable
voltage power supply cable. Set proper and connect The voltage supplied by power outlet differs from countries or areas you dwell in. If the outlet is supplied by 110V, please set the switch to 115V. If the outlet is supplied by 220V, please set the switch to 230V. - Page 114 [Note]...
-
Page 115: Chapter 7 Turn On The Power
Chapter 7 Turn On The Power! - Page 116 Tab button. Phoenix-AwardBIOS BIOS v6.00PG, An Energy Star Ally Copyright (C) 2003, Phoenix Technologies, LTD. L210 R0.05 July.16.2003 AOpen Inc. Main Processor : Pentium4 2600 Mhz Memory Testing : 491520K OK + 32M Shared Memory DDR Dual Channel Enabled...
- Page 117 After pressing Delete, you'll see the following BIOS setup: Now, you can move the cursor by using direction keys on the keyboard. Move the cursor to the option item "Load Setup defaults" and press Enter...
- Page 118 Then, the following dialogue screen will pop up to confirm the default BIOS values. Please press "Y" to confirm and then press Enter Finally, move the cursor to "Save & Exit Setup" and press Enter to save the parameters and exit BIOS setup.
- Page 119 At the same time, type "Y" in the dialogue box and press Enter to exit. Now everything is perfectly finished!!
-
Page 120: Postscripts
We sincerely hope every customer who wants to assemble a computer on his or her own has a wonderful beginning! To learn more about AOpen XC Cube, visit us at Http://xc.aopen.com.tw P/N: 49.EA651.10B... -
Page 121: Appendix
Appendix Install OS Into Serial ATA Hard Disk for EZ661 Series UX661 is equipped with powerful SiS 964 chip with Serial ATA function. Please notice that when installing OS into Serial ATA hard disk, there will be some limitations due to the limitation of SiS 964 chip. - Page 122 RAID Driver Installation Guide for EZ661 Series By the strength of SiS 964 chip, UX661 provides RAID 0 and 1 functions. User could build RAID in Windows 2000 or Windows XP. For enabling RAID function, it’s needed to install driver from Floppy drive. Please connect Floppy drive to motherboard before starting to install OS.
- Page 123 Select the driver for your OS (Windows 2000 or Windows XP) and press <Enter> to install the driver. For more information of RAID installation, please refer to the file “964_180umh030.pdf“ in the Utility CD.
- Page 124 Introduction To Jumper Settings and Other Connectors JP14 Clear CMOS You can clear CMOS to restore system default setting. To clear the CMOS, follow the procedure below. 1. Turn off the system and unplug the AC power. 2. Remove ATX power cable from connector PWR2. 3.
- Page 125 CPU and System Fan Connector Plug in the CPU fan cable to the 3-pin CPUFAN1 connector. If you have chassis fan, you can also plug it into SYSFAN2. +12V SENSOR CPUFAN1 connector SYSFAN2 connector...
Need help?
Do you have a question about the XC CubeAV and is the answer not in the manual?
Questions and answers