Table of Contents
Advertisement
Quick Links
Advertisement
Chapters
Table of Contents

Related Manuals for Bosch KAN 58A50


Summary of Contents for Bosch KAN 58A50
- Page 1 Downloaded from Fridge-Manual.com Manuals...
- Page 2 ..............
-
Page 3: Table Of Contents
en Table of Contents Congratulations ............... . Safety and warning information . -
Page 4: Congratulations
Important information Safety and warning when using the appliance Congratulations information S Never use electrical appliances inside With the purchase of your new the appliance (e. g. heaters, electric fridge freezer you have opted for Before you switch ON ice makers, etc.). Risk of explosion! a modern, high quality domestic the appliance S NEVER use a steam cleaner to... -
Page 5: Disposal Of Your Old Appliance
x Disposal of your old Children in the household Information appliance S Do not allow children to play with the appliance! concerning disposal Old appliances are not worthless rubbish! Valuable raw materials can be S If the appliance features a lock, keep reclaimed by recycling old appliances. -
Page 6: Your New Appliance
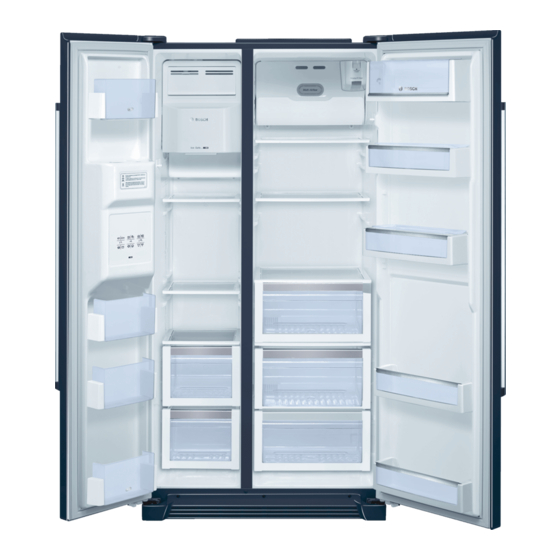
Your new appliance These operating instructions refer to several models. The illustrations may differ. A Refrigerator compartment B Freezer compartment Glass shelves in refrigerator 14 Bar compartment * Door storage compartment compartment (2 star compartment) opens from the outside for quick for storage of cooked food, milk removal of drinks without opening for short term storage of food and... - Page 7 Note If some of the indicate parts are missing from your appliance, these parts belong to a different model. Ice maker Ice and water dispenser Screw conveyor Dispenser pad Water collecting tray Control and display panel Selection button for freezer Reset button, water filter Temperature control compartment temperature...
-
Page 8: Installation
Explanation of the symbols on the display panel Filter needs changing" display Water" display After changing the filter, press the water filter reset button for approx. 5 seconds to switch off the display. Ice maker locked" display Crushed ice" display Control panel locked"... -
Page 9: Selecting The Temperature
Appliances with temperature control Selecting Switching off and - The appliance features a separate the temperature disconnecting temperature control for the refrigerator and freezer the appliance compartments. Appliances with control panel - The factory setting for the refrigerator Switching off and freezer compartments is in - The temperature for the refrigerator the appliance... -
Page 10: Bar Compartment
Bar compartment (not all models) Variable interior Fridge To remove drinks, etc. from design The refrigerator compartment the refrigerator compartment, it is not temperature can be set from +2 °C to necessary to open the door. You can vary the shelves inside the ap +8 °C. -
Page 11: Freezer Compartment
When buying food, please note: Freezer Freezing and storing purchase freshness is important " compartment food for the shelf life of your food. In principle the following applies: the fresher the food is placed in The freezer compartment temperature Storing deep frozen food cool fresh compartment, can be set from 16 °C to -22 °C. -
Page 12: Making Ice Cubes
The following products are Making ice cubes suitable for wrapping food: (Appliances without ice maker) Automatic ice and Plastic film, polyethylene blown film, water dispenser aluminium foil and freezer tins. These products can be purchased from a specialist outlet. Remove where necessary: - Cooled water The following products are suitable for sealing... -
Page 13: Dispensing Ice
When the appliance has been switched Dispensing ice Inserting the ice cube on, it takes approx. 24 hours until container S Press the button until the symbol for the first batch of ice cubes are ready. ice cubes or crushed ice lights up. S Push the ice cube container all When ice cubes are being made, the way back onto the supports until... -
Page 14: How To Save Energy
How to save energy Defrosting S Install the appliance in a cool, well Defrosting is actuated automatically. ventilated room, but not in direct The water which occurs during sunlight and not near a heat source defrosting runs down to (radiator, cooker, etc.). If required, the evaporation tray on the rear panel in use an insulating plate. -
Page 15: Eliminating Minor Faults Yourself
Eliminating minor faults yourself Before you call customer service: Please check whether you can eliminate the fault yourself based on the following information. Customer service will charge you for advice, even if the appliance is still under guarantee! Refrigerator and freezer compartments Fault Possible cause Remedial action... - Page 16 Fault Possible cause Remedial action Ice cubes have melted power Remove the ice cube maker, empty and rub dry. Ice cubes are watery. failure or the freezer compartment door was not closed properly. Cold air flowing over the ice cubes is causing Ice cubes are evaporating.
-
Page 17: Changing The Bulb
Changing the bulb on the ice and water Changing the bulb Calling customer dispenser service S Attention: Pull out the mains plug or Changing the bulb inside switch off the fuse! Your local customer service can be the appliance found in the telephone directory or in S Prise out the cover with a screw S Attention: Pull out the mains plug or the customer service index. -
Page 18: Installation Instructions
Installation location Unpacking the appliance S Remove packaging material and Installation Warning: adhesive tape. (Adhesive residue on The appliance is very heavy, for empty instructions the housing can be removed with weight see the following table. the adhesive side of the removed Important note: Basic model 104 kg... -
Page 19: Connecting The Appliance To The Water Supply
If the depth of the adjacent kitchen Press the clamping ring in Unscrewing the refrigerator compartment door equipment is more than 60 cm, the direction of the arrow and observe lateral minimum distances in simultaneously pull the hose out of S Unscrew the refrigerator order to utilise the full door opening the hose connection. -
Page 20: Aligning The Appliance
S Connect the line to the tap. The plug to secure the appliance must Aligning the appliance be freely accessible. Connect the To ensure that the appliance functions appliance to a 220 - 240 V / 50 Hz AC correctly, it must be set level with current via a plug which has been a spirit level. -
Page 21: Disconnecting The Appliance
Refrigerator compartment door is Switching on Note: deeper: Due to the weight of the appliance and the appliance the food load in the door, Switch on the appliance according to the refrigerator compartment door may the enclosed operating instructions. incline, even if the appliance itself is level. - Page 22 fr Table des matières Félicitations ................Consignes de sécurité...
-
Page 23: Félicitations
Pendant l'utilisation Consignes S N'utilisez jamais d'appareils élec Félicitations triques à l'intérieur de l'appareil de sécurité (par. ex. des appareils de chauffage, Avec l'achat de ce réfrigérateur et avertissements sorbetières électriques, etc.). congélateur, vous venez d'opter pour Risque d'explosion ! un appareil électroménager moderne Avant de mettre l'appareil et de haute qualité. -
Page 24: Conseils Pour La Mise Au Rebut
x Mise au rebut Les enfants et l'appareil Conseils pour la mise de l'ancien appareil S L'appareil n'est pas un jouet, éloignez les enfants. au rebut Les appareils usagés ne sont pas des déchets sans valeur. Leur élimination S Si l'appareil est équipé d'une dans le respect de l'environnement serrure : rangez la clé... -
Page 25: Votre Nouvel Appareil
Votre nouvel appareil La présente notice d'utilisation vaut pour plusieurs modèles. Selon le modèle, l'appareil peut différer du contenu des illustrations. A Compartiment réfrigérateur B Compartiment congélateur Clayettes en verre 14 Minibar * Support en contre porte du compartiment réfrigérateur (compartiment 2 étoiles) Il s'ouvre de l'extérieur pour Pour ranger des aliments cuits,... - Page 26 Remarque Si certaines des pièces indiquées ne figurent pas sur votre appareil, c'est qu'elles se réfèrent à d'autres modèles. Distributeur de glaçons Distributeur de glaçons et d'eau Vis sans fin de transport Plot de prélèvement Bac récupérateur d'eau Bandeau de commande et d'affichage Touche de réglage Touche de réarmement du filtre Commande de la température...
-
Page 27: Installation
Légende des symboles apparaissant sur le bandeau d'affichage Symbole «Changement de filtre nécessaire» Symbole «Eau» Après un changement de filtre, appuyez pendant env. 5 secondes sur la touche de réarmement pour désactiver ce symbole. Symbole «Distributeur de glaçons verrouillé» Mention «Glace pilée» Symbole «Bandeau de commande verrouillé»... -
Page 28: Enclenchement De L'appareil
Appareils à commande de la température Enclenchement Arrêt et remisage - L'appareil dispose d'une commande de l'appareil de l'appareil de température séparée pour le compartiment réfrigérateur S Branchez la fiche mâle dans une et le compartiment congélateur. Coupure de l'appareil prise de courant. -
Page 29: Fonctions
S Soulevez légèrement le couvercle Consignes de rangement du casier à beurre et à fromage, à respecter : Fonctions appuyez à gauche puis retirez le. - Placez les produits à décongeler dans le compartiment réfrigérateur. Alarme relative à la porte - L'air ne doit pas pénétrer dans Si vous laissez une porte de l'appareil l'emballage pour que les aliments... -
Page 30: Compartiment Congélateur
Minibar Produits non adaptés au compartiment fraîcheur : (selon le modèle) Compartiment - Fruits et légumes craignant le froid Il permet de retirer rapidement des congélateur (agrumes, avocats, papayes, fruits boissons et assimilées présentes dans de la passion, aubergines, le compartiment réfrigérateur sans concombres, poivrons) La température du compartiment devoir ouvrir la porte de ce dernier. -
Page 31: Congélation Et Rangement
Emballages corrects: Préparation de glaçons Feuilles en plastique, feuilles boyaux en (Appareils sans distributeur de glaçons) Congélation et polyéthylène, feuilles d'aluminium, boîtes de congélation. Vous trouverez rangement ces produits dans le commerce spécialisé. Ranger des produits Pour obturer les emballages, surgelés utilisez des : Au moment d'acheter des produits... - Page 32 Remarques concernant Prélèvement d'eau Retirer et nettoyer le bac le fonctionnement du dis de récupération d'eau S Appuyez sur la touche jusqu'à ce que tributeur de glaçons le symbole s'allume. L'eau renversée afflue dans le bac de récupération. Vous pouvez le retirer Une fois que le compartiment congéla pour le vider et le nettoyer.
-
Page 33: Economies D'énergie
Mis en place du bac L'appareil touche quelque chose. à glaçons Economies Eloignez l'appareil de meubles S Poussez le bac à glaçons complète d'énergie ou d'appareils voisins. ment à l'arrière sur les surfaces, jus qu'à ce qu'il encoche. Des tiroirs, paniers ou S Placez votre appareil dans un endroit surfaces de rangement frais et bien aéré. -
Page 34: Si Vous Dégivrez L'appareil
Ne nettoyez jamais les clayettes et les bacs au lave vaisselle. Si vous dégivrez Nettoyage de Ces pièces pourraient se déformer. l'appareil l'appareil S Après le nettoyage : rebranchez la fiche mâle dans la prise de courant La décongélation a lieu automatique S Attention : débranchez la fiche mâle ou réarmez le disjoncteur / remettez ment. - Page 35 Dérangement Cause possible Remède L'ampoule est grillée. Changez l'ampoule (voir «Changement d'ampoule») L'éclairage intérieur ne fonctionne pas: L'interrupteur de l'éclairage est Vérifiez s'il peut s'enfoncer. coincé. La porte compartiment congélateur Sortez les produits congelés de l'appareil et rangez les Le compartiment est restée longtemps ouverte.
-
Page 36: Changement D'ampoule
Changement Appeler le service d'ampoule après vente Pour connaître le service après vente Changer l'ampoule situé le plus près de chez vous, consul du compartiment tez l'annuaire téléphonique ou le réper toire des services après vente (SAV). réfrigérateur Veuillez indiquer au SAV le numéro S Attention : débranchez la fiche mâle de série (E Nr.) de l'appareil et son de la prise secteur ou coupez... -
Page 37: Instructions D'installation
Le sol sur l'emplacement de l'appareil ne doit pas s'affaisser. Vous devrez Instructions le cas échéant renforcer le sol. L'appareil est très lourd (env. 145 kg d'installation à vide). Une fois rempli, il peut atteindre 400 kg). Afin que le distributeur Remarque importante : de glaçons fonctionne impeccable Ces instructions d'installation valent... - Page 38 Dimensions de l'appareil et cotes d'encombrement Si la profondeur des équipements Dévisser les portes Appuyez sur l'anneau de serrage de cuisine voisins dépasse 60 cm, dans le sens de la flèche et détachez Si l'appareil ne passe pas par la porte il faudra respecter des écarts latéraux simultanément le flexible de son d'entrée de votre logement, vous...
- Page 39 S Défaites les jonctions électriques (2). Suivant les impératifs locaux, il pourra être nécessaire d'installer un détendeur sur la conduite d'eau. Le robinet d'eau, diamètre 3/4", destiné à raccorder la conduite de branchement ci jointe, doit être librement accessible. Les conduites de raccordement ci jointes mesurent 1,5 et 7 mètres de long.
- Page 40 Vérifier l'étanchéité Ajuster l'appareil Si la porte du compartiment réfrigérateur se trouve plus bas: du raccordement de l'eau Afin que l'appareil fonctionne impeccablement, il faut l'horizontaliser S Mettez l'appareil en service à l'aide d'un niveau à bulle. en respectant le contenu de la notice d'utilisation.
- Page 41 Mise en service Remarque: Il peut arriver que la porte du compar de l'appareil timent réfrigérateur s'incline, même Mettez l'appareil en service lorsque l'appareil est bien d'aplomb ; en respectant le contenu de la notice cela est dû au poids propre de la porte d'utilisation.
- Page 42 tr Žçindekiler Tebrik ederiz ................Güvenlik ve ikaz bilgileri .
-
Page 43: Tebrik Ederiz
Hasar durumunda S Cihazžn plastik parçalaržna ve kapžnžn contasžna sžvž ve katž - Açžk ateå veya alev kaynaklarž Tebrik ederiz ya dememesine özen gösteriniz. cihazdan uzak tutulmalždžr, Aksi halde bu parçalar delinip Soutucu ve dondurucu bölmelerine - Eski cihazžn elektrik fiåini çekip aåžnabilir. -
Page 44: Giderme Bilgileri
Evdeki çocuklar x Eski cihazžn giderilmesi Giderme bilgileri S Bu cihaz çocuklar için bir oyuncak deildir! Eski cihazlar hiç deeri olmayan çöp deildir! Çevreci bir giderme S Kapžsžnda kilit tertibatž olan x Yeni cihazžn iåleminden geçirilerek, çok deerli cihazlarda: Kilidin anahtaržnž ambalajžnžn giderilmesi ham maddeler yeniden kullanžlmak çocuklaržn eriåemiyecekleri bir... -
Page 45: Yeni CihazžNžZ
Yeni cihazžnžz Bu kullanma kžlavuzu birden fazla model için geçerlidir. Resimlerde farklžlžklar olabilir. A Soutucu bölmesi B Dondurucu bölmesi Cam raflar, soutucu bölmesi 14 Bar bölümü Kapž için raflar (2 yžldžzlž göz) Piåirilmiå besinlerin, süt Buzdolabžnžn kapžsžnž açmadan, Kžsa bir süre için besin ve mamullerinin, sucuk türü... - Page 46 Eer resimlerde gösterilen parçalardan bazžlarž sizin cihazžnžzda yoksa, ilgili parçalar baåka modellere ait demektir. Buz hazžrlayžcž Buz ve su deposu Sevk helezonu Alma bezi Su toplama kabž Kumanda ve gösterge alanž Dondurucu bölmesi sžcaklžž Su filtresi sžfžrlama tuåu Sžcaklžk kontrolü için ayar tuåu Su/buz talep tuåu Dondurucu bölmesi sžcaklžž...
-
Page 47: Kurulmasž
Gösterge alanžndaki sembollerin açžklamalarž "Filtre deiåtirilmesi gereklidir" göstergesi "Su" göstergesi Filtre deiåtirme iåleminden sonra, su filtresi sžfžrlama tuåuna yaklaåžk 5 saniye basarak, göstergeyi kapatžnžz. "Buz hazžrlayžcž kilitli" göstergesi "Doranmžå buz" göstergesi "Kumanda alanž" kilitli göstergesi "Küp buz" göstergesi Cihazžn kurulmasž Oda sžcaklžžna ve ve balanmasž... -
Page 48: CihazžN ÇalžÅtžRžLmas
Sžcaklžk kontrollü cihazlar Cihazžn Cihazžn Cihaz, soutucu ve çalžåtžržlmas kapatžlmasž, cihazžn dondurucu bölmeleri için ayrž olan tamamen bir sžcaklžk kontrolüne sahiptir. S Elektrik fiåini bir elektrik prizine takžnžz. Soutucu ve kapatžlmasž dondurucu bölmelerinin fabrika Cihaz elektrik åebekesine ayarlarž orta derecede bir ayardžr. balandžktan sonra, soutmaya Cihazžn kapatžlmasž... -
Page 49: CihazžN KapatžLmasž, CihazžN Tamamen KapatžLmasž
Besinleri yerleåtirirken S Tereyaž ve peynir bözlerinin kapažnž hafifçe kaldžržnžz, sola dikkat edilecek noktalar: Fonksiyonlar bastžržnžz ve çžkaržnžz. - Sžcak yiyecek ve içecekleri dolaba koymadan önce, džåaržda Kapž alarmž soumalaržnž bekleyiniz veya soutunuz. Cihazžn kapžlaržndan biri açžk bžrakžlžrsa, bir dakika sonra bir alarm - Besinleri hava giremiyecek åekilde sinyali duyulur ve 5 dakikalžk bir süre paketleyiniz ki, tadž... -
Page 50: Dondurucu Bölmesi
Bar bölümü Taze tutmak için uygun olmayanlar: Dondurucu bölmesi (her modelde deil) - Souk derecelere karåž hassas Soutucu bölmesinden içecek vb. meyveler ve sebzeler (narenciyeler, Dondurucu bölmesinin sžcaklžž besinlerin çabuk alžnmasž için avokadolar, papayalar, güney -16 °C ile -22 °C arasžnda kullanžlžr. -
Page 51: Besinlerin Dondurulmasž Ve Depolanmasž
Besinlerin doru Dondurulmuå besinlerin ambalajlanmasž: buzunun çözülmesi Besinlerin S Besinleri ambalajžn içine Besinlerin türüne ve kullanžm amacžna dondurulmasž yerleåtiriniz. göre, aåaždaki olanaklardan birini ve depolanmasž seçmek mümkündür: S Ambalaj içindeki havayž bastžržp tamamen boåaltžnžz. - Oda sžcaklžžnda Derin dondurulmuå S Ambalajž sžzdžrmayacak åekilde - Buz dolabžnda besinlerin depolanmasž... -
Page 52: Otomatik Buz Ve Su Deposu
Buz alma Cihazžn devreye sokulmasžndan sonra, ilk küp buz parçalarž Otomatik buz ve su S Küp buz veya "Crush-Ice" sembolü yaklaåžk 24 saat sonra hazžrlanžå olur. yanžncaya kadar, tuåa basžnžz. deposu Küp buz hazžrlanžrken, su valfinin sesi, suyun buz kabžna akmasž ve küp Žhtiyaca göre åunlar alžnabilir: buz parçalaržnžn aåaž... -
Page 53: Enerji Tasarruf Bilgileri
Küp buz kabžnžn Kaplar birbirine temas ediyor yerleåtirilmesi Åiåeleri vey akaplarž birbirinden biraz Enerji tasarruf ayžržnžz. S Küp buz kabžnž altlžk üzerinden, bilgileri yerine oturuncaya kadar arkaya doru itiniz. S Cihazž dorudan güneå žåžnlaržna Cihazžn buzunun maruz bžrakmayžnžz ve žsž kaynaklaržndan (örn. -
Page 54: Küçük AržZalaržN Giderilmesi
Küçük aržzalaržn giderilmesi Yetkili servisi çažrmadan önce: Aåaždaki talimatlaržn yardžmžyla aržzayž kendinizin giderip gideremiyeceinizi kontrol ediniz. Garanti süresi içerisinde dahi, bu gibi durumlarda servis görevlisinin masraflaržnžn tümünü kendiniz ödemek zorundasžnžz! Soutma ve dondurma bölmesi Aržza Muhtemel sebebi Giderilmesi Cihaz soutmuyor. Elektrik kesintisi;... - Page 55 Aržza Muhtemel sebebi Giderilmesi Küp buzlar sulu. Küp buzlar erimiå. Elektrik kesiklii Küp buz kabžnž džåarž çžkaržnžz, boåaltžnžz ve silip söz konusu olmuå veya cihazžn kurulayžnžz. kapžsž doru kapatžlmamžå. Küp buzlar buharlaåžyor. Küp buzlar üzerinden geçen souk hava, öncelikle küp buzlar az kullanžldžžnda küp buzlaržn küçülmesine neden olur.
-
Page 56: Ampul DeIåtirilmesi
Buz ve su deposunun ampulünün deiåtirilmesi Ampul Su filtresinin S Dikkat: Cereyan fiåini åebeke deiåtirilmesi deiåtirilmesi prizinden çžkaržnžz veya cihazžn balž olduu sigorta üzerinden Yeni bir filtreyi yetkili servis Žç kžsžmdaki ampulün gerilimi kesiniz! üzerinden 497818 tanžm numarasž ile deiåtirilmesi S Kapaž... -
Page 57: Kurma Ve Montaj KžLavuzu
Cihazžn ambalajdan çžkaržlmasž Kurma ve montaj S Ambalaj malzemelerini ve yapžåkan kžlavuzu bantlarž sökünüz. (Cihaz gövdesinde kalan yapžåkan bant Önemli not: artžklarž, yapžåkan bandžn yapžåkanlž Bu kurma kžlavuzu farklž modeller için tarafž kullanžlarak temizlenebilir. geçerlidir. Bunun için bandž yapžåkan artžklarž olan yerin üzerine birkaç... - Page 58 Cihazžn ve kurulacaž yerin ebatlarž Kapžlaržn sökülmesi Cihazžn kurulacaž yerdeki komåu Germe halkasžnž ok yönünde mutfak donanžmžnžn derinlii 60 cm'yi bastžržnžz, aynž zamanda hortumu Cihaz evin kapžsžndan geçmezse, aåžyorsa, kapžlaržn açžlma açžsžndan hortum balantžsžndan çekip cihazžn kapžlarž sökülebilir. tamamen yararlanabilmek için, yan çžkaržnžz.
- Page 59 Elektrik balantžsž Suyun tadž ve kokusu, ekteki su filtresi su giriåine takžlarak daha iyi Uzatma kablosu veya dažtžcž yapžlabilir. kullanmayžn. Bu cihazžn Balanmasž balanabilmesi için, sabit monte edilmiå bir prize ihtiyaç vardžr. S Balantž hattžnž manyetik valfe balayžnžz. Cihazžn balanmasž için prize kolay ulaåžlabilir olmalždžr.
- Page 60 Su balantžsžnžn Eer åimdiye kadar uyguladžžnžz iålem adžmlarž kapžyž ayarlamaya sžzdžrmazlžžnžn kontrolü yetmiyorsa: S Cihazž ekteki kullanma kžlavuzuna S Taban panosunu çžkaržnžz. göre çalžåtžržnžz. S Suyu kullanma kžlavuzunda bildirildii gibi alžnžz. Henüz hatlarda ve su tankžnda hava olduu için, suyun gelmesi birkaç saniye sürebilir.
-
Page 61: CihazN ÇalÅtRLmas
Cihazžn çalžåtžržlmasž S Üst menteåe kapažnž sökünüz (1). Cihazž ekteki kullanma kžlavuzuna göre çalžåtžržnžz. Cihazžn tamamen kapatžlmasž Cihazž ekteki kullanma kžlavuzuna kapatžnžz. Cihaz kapalž åekilde veye sžfžržn altžnda bir derecede muhafaza edilecekse, içme suyu deposunun su kabž boåaltžlmalždžr. S Menteåe cžvatasžnž çözünüz (2). Cihazžn içindeki su kabžnžn Cžvatayž... - Page 62 • • • • • • • • • • • • • • • Downloaded from Fridge-Manual.com Manuals...
- Page 63 • • • • • • • • • • 220-240 • • Ecoboy; Save Plug Downloaded from Fridge-Manual.com Manuals...
- Page 64 • ° 135 ° • 0,1 MPa 10,0 1,0 MPa • • • • • • • Downloaded from Fridge-Manual.com Manuals...
- Page 65 • BASIC Dispenser • Homebar • Downloaded from Fridge-Manual.com Manuals...
- Page 66 • • • (E-Nr.) • (FD-Nr.) • • • • Downloaded from Fridge-Manual.com Manuals...
- Page 67 Ice maker lock „ Downloaded from Fridge-Manual.com Manuals...
- Page 68 • • • ∆ ∆ ∆ ∆ ∆ • „ „ Downloaded from Fridge-Manual.com Manuals...
- Page 69 • • • • • • • • – • Ice maker lock • « » • Ice maker lock • • Downloaded from Fridge-Manual.com Manuals...
- Page 70 • • • • Downloaded from Fridge-Manual.com Manuals...
- Page 71 (Polyethylen) • • • (Polyethylen) • • • • super • • • • (Cellophan) Downloaded from Fridge-Manual.com Manuals...
- Page 72 • • super “Off” Downloaded from Fridge-Manual.com Manuals...
- Page 73 • • • • • • • • • • • • • Downloaded from Fridge-Manual.com Manuals...
- Page 74 • BASIC Ecoboy; Save Plug Dispenser Homebar • Downloaded from Fridge-Manual.com Manuals...
- Page 75 “super “super “super “super Downloaded from Fridge-Manual.com Manuals...
- Page 76 Downloaded from Fridge-Manual.com Manuals...
- Page 77 « • « • 2002/96/EG (waste electrical and electronic equipment - WEEE) • • • (89/336/EEC) Downloaded from Fridge-Manual.com Manuals...
- Page 78 • • • • • • R600a • • • • • • • • Downloaded from Fridge-Manual.com Manuals...
- Page 79 fa-2 fa-2 fa-3 fa-4 fa-6 fa-6 fa-6 fa-7 fa-7 fa-7 fa-8 fa-9 fa-9 fa-10 fa-11 fa-11 fa-12 fa-12 fa-12 fa-14 fa-14 fa-15 Downloaded from Fridge-Manual.com Manuals...
- Page 80 • • • • • • • • • • • • • • • Downloaded from Fridge-Manual.com Manuals...
- Page 81 • • • • • • • • • • – • • „Ecoboy; Sava Plug“ Downloaded from Fridge-Manual.com Manuals...
- Page 82 • º º • 0,1 MPa 1,0 MPa ½ „ • • • • • • • Downloaded from Fridge-Manual.com Manuals...
- Page 83 • • • „ Downloaded from Fridge-Manual.com Manuals...
- Page 84 • • Ident-Nr 497818 • • • • • • • • – • – (FD-Nr.) (E-Nr.) • • Downloaded from Fridge-Manual.com Manuals...
- Page 85 – Downloaded from Fridge-Manual.com Manuals...
- Page 86 • • • • Downloaded from Fridge-Manual.com Manuals...
- Page 87 • • • • • • • • – – – • „ – • „ • „ • • Downloaded from Fridge-Manual.com Manuals...
- Page 88 (Crush-Ice) • ¾ • „ • • Downloaded from Fridge-Manual.com Manuals...
- Page 89 ° ° ° • • • ° • • „super„ • • „super„ • • • • „ Downloaded from Fridge-Manual.com Manuals...
- Page 90 °+ °+ °+ ° ° • „super„ • „super„ „Off„ „ Downloaded from Fridge-Manual.com Manuals...
- Page 91 • • • • • „ • • • • °+ °+ • „ • „ • • Downloaded from Fridge-Manual.com Manuals...
- Page 92 • – „ < „Ecoboy; Sava Plug“ ° ° • ° ° ° ° ½ ° ° + ° ° „ Downloaded from Fridge-Manual.com Manuals...
- Page 93 „reset„ „super„ „super„ „super„ „super„ „ „ „reset„ „ „ „ Downloaded from Fridge-Manual.com Manuals...
- Page 94 Downloaded from Fridge-Manual.com Manuals...
- Page 95 « • • „2002/96/EG“ (waste electrical and electronic equipment - WEEE). • « • • „89/336/EEC“ Downloaded from Fridge-Manual.com Manuals...
- Page 96 • … • • • R600a • … • • • • • ³ • • • • Downloaded from Fridge-Manual.com Manuals...
- Page 97 ar-2 ar-2 ar-3 ar-4 ar-6 ar-6 ar-6 ar-7 ar-7 ar-7 ar-8 ar-9 ar-9 ar-10 ar-11 ar-11 ar-12 ar-12 ar-12 ar-14 ar-14 ar-14 ar-15 Downloaded from Fridge-Manual.com Manuals...
- Page 98 Downloaded from Fridge-Manual.com Manuals...
- Page 99 Downloaded from Fridge-Manual.com Manuals...
- Page 100 Subject to modification. Sous réserve de modifications. Deiåiklikler olabilir. Robert Bosch Hausgeräte GmbH Carl Wery Straße 34 81739 München 9000 241 934 Downloaded from Fridge-Manual.com Manuals www.bosch hausgeraete.de en, fr, tr, fa, ar (8703)