Table of Contents
Advertisement
CG-1280
REV N
AUGUST 2013
Operation AND MAINTENANCE MANUAL
FOR THE
7200 ANTENNA CONTROL SYSTEM
EXPORT CONTROL WARNING - the disclosure of this
document or its contents to non-U.S. persons, or the
transmission of its contents outside the United States must
be in compliance with U.S. Export Laws and Regulations.
The bearer of this document is under obligation to know the
applicable restrictions for the dissemination of its contents
that relate to U.S. Export Laws and Regulations or any other
3750 W. Loop 281
U.S. government approvals.
Longview, Texas 75604
Advertisement
Table of Contents

Summary of Contents for General Dynamics 7200
- Page 1 REV N AUGUST 2013 OPERATION AND MAINTENANCE MANUAL FOR THE 7200 ANTENNA CONTROL SYSTEM EXPORT CONTROL WARNING - the disclosure of this document or its contents to non-U.S. persons, or the transmission of its contents outside the United States must be in compliance with U.S.
- Page 2 Revision History N- Revised table 5-35 L. Shirey 8/2/13 D. Harrison 8/2/13 13463 M – Revised Analog Input Conn D. Cunningham 3/15/12 D. Harrison 3/15/12 11420 L – Revised for CE Certification B. Tanner 11/15/11 S. Martinez 11/15/11 10897 K – Table 5-28 Corrections B.
- Page 3 General Dynamics. Such information is transmitted in this manual or related documents for the benefit of General Dynamics customers and is not to be disclosed to other parties verbally or in writing without prior written approval of General Dynamics. Additionally, this manual may not be reproduced in whole or in part without written consent from General Dynamics.
-
Page 4: Declaration Of Conformity
Declaration of Conformity The General Dynamics 7200 ACU Rack Mount Unit (201379) was tested to the following specifications and found to be in compliance with the required criteria on the indicated test date. In accordance with the following directives: 72/23/EEC The Low Voltage Directive and its amending directives. -
Page 5: Table Of Contents
User Supplied Power Cord Requirements........... 3 1.5.4 Note about connecting/disconnect from mains power......... 4 2.0 OVERVIEW OF THE 7200 ACS ..............1 2.1 General Information About the 7200 ACS .......... 1 2.2 System Specifications ..............2 2.3 System Configuration ..............3 FIGURE 2-1 TYPICAL 7200 ACS BLOCK DIAGRAM ...... -
Page 6: Table Of Contents
Connecting the Drive Motors to the Drive Cabinet ........6 4.3.3 Limit Switch Connections ............... 7 4.3.4 Installing the 7200 ACU Control Cable ............. 8 FIGURE 4-4 7200 ANTENNA CONTROL UNIT REAR PANEL ..8 4.3.5 Resolver and Encoder Connections ............11 4.3.6... -
Page 7: Table Of Contents
V1000 DRIVE PARAMETER SETTINGS OR VALUES .. 27 4.4.2 ACU Power-Up and Initialization ............32 5.0 OPERATION ................... 1 5.1 Introduction ..................1 5.2 The 7200 ACS Menu System ............1 FIGURE 5-1 7200 ACS BASIC MENU SYSTEM ......2 5.2.1 Multiscreen Menus ................2 FIGURE 5-2 MULTISCREEN MENU .......... - Page 8 Table of Contents 6.1 Air Filter ..................1 FIGURE 6-1 7200 ACU REAR PANEL FAN ........1 6.2 Battery ................... 2 6.2.1 Checking the Battery................2 6.2.2 Replacing the Battery ................2 6.3 Power Entry Module Fuse ..............2 ENGINEERING DRAWINGS ..............1 APPENDIX A Acronyms and Abbreviations .............
-
Page 9: Organization Of Included Contents
Information for obtaining technical support is also included in this section. • Section 2.0, Overview of the 7200 ACS, provides a general overview of the system, including specifications, the functions of the system, and a description of the controls and indicators. -
Page 10: Supplemental Literature On Cd And Website
Introduction • Appendix D, Tracking Tutorial for Operators, provides instructions for quickly setting up tracking with the 7200 ACS, eliminating the need to read the step-by-step instructions in Section 5.0 of the manual. • Appendix E, 7200 Troubleshooting Guide, contains probable causes and corrective action for troubleshooting the 7200 ACS. -
Page 11: Technical Support
The 7200 Antenna Control Unit (ACU) contains context-sensitive, on-line help that is easily accessible from any menu or submenu in the system by simply pressing the [HELP] key on the 7200 ACU's front panel. For operational problems, a troubleshooting guide is provided in Appendix E of this manual. -
Page 12: Note About Connecting/Disconnect From Mains Power
Introduction 1.5.4 Note about connecting/disconnect from mains power. The main power source supplying power to the rack that the 7200 Antenna Control Unit is installed in should be easily accessible for disconnect should an equipment fault occur. - Page 13 Introduction THIS PAGE INTENTIONALLY LEFT BLANK...
-
Page 15: Overview Of The 7200 Acs
AZ and EL with continuously variable drive rates over a range of approximately 50 to 1. The 7150 Drive Cabinet houses the drive controls and interfacing equipment to the 7200 ACS. The 7150 Drive Cabinet is normally mounted on the antenna foundation. -
Page 16: System Specifications
Portable Maintenance Control Unit (PMCU) located in the 7150 drive cabinet. 2.2 System Specifications As shown in Table 2-1, the 7200 ACS has specifications that reflect performance sufficient for virtually any communications system antenna, as well as Tracking, Telemetry, and Control (TT&C) applications. Tracking accuracy within 5 percent of the receive antenna beamwidth are achievable due to the advantages provided in the sophisticated OPT modeling. -
Page 17: System Configuration
Overview TABLE 2-1 7200 ACS SPECIFICATIONS FEATURE DESCRIPTION Antenna Control Rack-mounted Unit: Temperature - 0°C to + 50°C; Humidity - 90% non-condensing Drive Cabinet: Environmental Temperature (Standard) -10°C to +50°C Temperature (Optional) -40°C to +50°C (Low temperature package) Humidity - 100% condensing. - Page 18 Overview The standard main input voltage for the drive cabinet is either 208 VAC three- phase WYE, or 380 - 415 VAC three-phase WYE requiring a four-wire circuit plus a ground conductor. The actual current/power requirements for a given system are essentially established by the drive motor characteristics with only a small portion being used for control logic power.
- Page 19 0.2 V/decibels (dB) to 1.0 V/dB. Beacon select outputs are provided on a 7200 ACU rear panel terminal strip (TB1), allowing remote manual or automatic beacon selection with General Dynamics tracking receivers. Full function remote control of the tracking system is facilitated through the 10BASE-T Ethernet port or one of the serial ports (both EIA/TIA-232E and EIA/TIA- 422B are provided).
-
Page 20: Acu Hardware
Optical Encoder I/O PCB (Optional) • The 7200 ACU front panel is shown in Figure 2-2. The 7200 ACU functional block diagram is shown in Figure 2-3. Figures 2-4 and 2-5 show the top and side view of the ACU respectively. (Refer to the engineering drawings in Section 7.0) - Page 21 Overview Figure 2-3 7200 ACU Functional Block Diagram...
- Page 22 Overview Figure 2-4 7200 Antenna Control Unit Top View Figure 2-5 7200 Antenna Control Unit Side View...
- Page 23 2.4.1.1 VertexRSI Central Processing Unit (VCPU) PCB Assembly The 7200 ACU uses the Motorola 68030 32-bit microprocessor as the Central Processing Unit (CPU), providing sufficient computing power for the sophisticated control and tracking algorithms used by the ACU. A dedicated VME CPU circuit...
- Page 24 (each of these four allocations in memory is referred to as a boot bank). This is useful when upgrading the 7200 ACU firmware because the new image can be uploaded to another boot bank, the rotary switch can be changed, and the ACU can be booted up with the new application firmware without erasing the original factory supplied application code.
- Page 25 ♦ Denotes the normal operating position of the switch (factory setting). ♠ Enabling self-test mode should ONLY be performed when directed to do so by General Dynamics technical support. Some of the self-tests erase NVRAM (parameter storage space) and some erase all the flash banks (application firmware).
- Page 26 Overview Potentiometer PT3 – The analog input circuit contains an AGC gain amplifier. The gain of this amplifier is adjusted by PT3. To use the AGC gain amplifier, the shunt plug on 201358-01 site J4 must be moved from the “Bypass” position (factory setting) to the “Gain”...
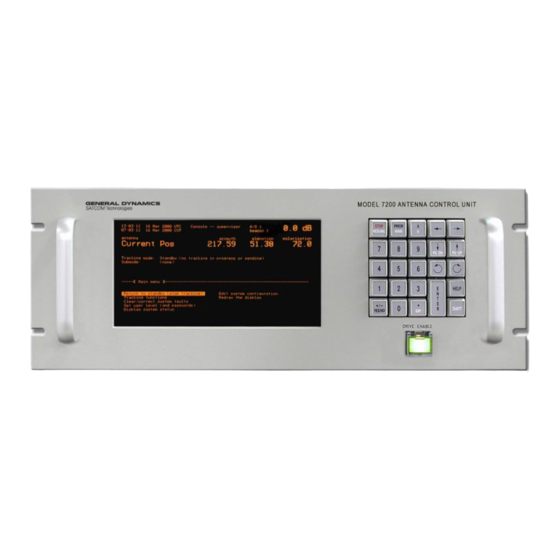
- Page 27 2.4.1.2 User Interface One of the most striking and advanced features of the 7200 ACU is the user interface, which combines an 8-inch by 4-inch electroluminescent display with a custom 24-station keypad to provide the most straightforward, powerful, and user- friendly operating platform in the industry.
- Page 28 Overview TABLE 2-7 7200 DIGITAL I/O SPECIFICATIONS DIGITAL INPUTS DESCRIPTION Logic Level High Voltage Range: (+4.5 to +26.7 VDC) Voltage Levels Logic Level Low Voltage Range: (0 to +1 VDC) Input Impedance 10 K Ohms (Nominal) Electrostatic discharge (ESD) as defined in IEC 1000-4-2,...
- Page 29 The external time source sends an IRIG-B compliant signal to the J3 BNC connector on the rear of the 7200 ACU. This signal is routed to the Time and Frequency Processor Board (TFP). The VCPU board acquires only the year from the on-board real-time clock while the rest of the time/date information is taken directly from the TFP board.
-
Page 30: Antenna Drive Cabinet Hardware
Nominal power requirements for the ACU are 75 VA at 100 to 240 VAC, 50 or 60 Hertz (Hz). The power supply used in the 7200 ACU has an automatic shutdown feature in case over-current conditions occur. The system also has a line fuse on the rear power entry module in case of a ground fault. - Page 31 Overview A functional block diagram of the drive cabinet is shown in Figure 2-7. Figure 2-7 Drive Cabinet Block Diagram The drive cabinet consists of the following major components: • Portable Maintenance Control Unit • Main and Inverter Drive Circuit Breakers •...
- Page 32 The MAIN CIRCUIT BREAKER controls the main power to the drive motors, the limit switches, and the drive cabinet, but does not provide power to the 7200 ACU. Each inverter has an individual circuit breaker for protection. This circuit breaker will cut off mains power to the cabinet, but mains power can also be installed in such a way that it can be cut off external to the cabinet if necessary.
- Page 33 2.4.2.1 AZ and EL Drive Inverters One of the critical advantages of the 7200 ACS over many other systems is the use of variable frequency drive inverters to control the speed of standard three- phase induction motors for AZ and EL antenna motion. This approach has several distinct advantages over the commonly used and simplistic on/off contactor control of motor power.
- Page 34 Overview 2.4.2.4 Local Control Local (Maintenance) control of the antenna drives is facilitated through a set of switches on the PMCU in the drive cabinet. A MAINT/REMOTE switch located on the Relay PCB allows the operator to select between ACU control and local drive cabinet control.
- Page 35 2.5.1.1 The Power On/Off Switch The power on/off switch is located on the rear of the 7200 ACU in the power entry module. When the switch is set to the on position, power is applied to the power supply in the ACU.
- Page 36 24-station keypad to provide the most straightforward, powerful, and user-friendly operating platform in the industry. Figure 2-8 shows each section of the 7200 ACU display, and each section is described in detail in the following sections.
- Page 37 Overview System fault status is reported in inverse, double-size characters in the field below the Tracking mode status line. In the event of multiple fault conditions, the fault messages are scrolled continuously at approximately one-second intervals. An audible alarm (if the alarm option is turned on) accompanies any major fault and may be silenced from the front panel keypad (refer to Section 5.8.6.14 for information on...
- Page 38 Overview TABLE 2-9 7200 ACU KEYPAD CONTROLS CONTROL FUNCTION Moves the selection cursor up. In one-screen menus, the up arrow moves the cursor from the bottom item in the right column to the top of the left column, but does not wrap from the top of the left ↑...
-
Page 39: Drive Cabinet Controls And Indicators
FUNCTION The MAINT/REMOTE switch is located on the Relay PCB. When set to the REMOTE position, transfers control to the 7200 ACU. When set to MAINT> the PMCU has control MAINT/REMOTE of the system. The remote mode is selected when the switch is in the UP position. -
Page 40: System Functions
The 7200 ACS offers a full complement of standard antenna position control modes as well as a number of advanced tracking modes. For automatic tracking, the 7200 ACS incorporates a new approach to control system operation with a unique target- oriented environment, which provides for the establishment of unique system characteristics for multiple targets (satellites). - Page 41 Overview 2.8 Manual Control Via Portable Maintenance Control Unit (PMCU) Manual control of antenna position is provided from the drive cabinet PMCU or the ACU user interface. Figure 2-10 shows the PMCU without and with the optional display. Figure 2-10 Portable Maintenance Control Units 2-27...
-
Page 42: Manual Antenna Control From The Drive Cabinet
The 7200 ACU provides immediate tracking modes as described in the following sections. These tracking modes are accessed from the Main menu by selecting Tracking functions..., Immediate tracking…. For more information on these tracking modes, refer to Section 5.8.2.4. -
Page 43: Star Tracking
Steptrack Steptrack mode provides automatic periodic positioning of the antenna for maximum receive signal strength as measured at the ACU tracking signal input. The 7200 ACU utilizes the General Dynamics Adaptive Steptrack (AST) algorithm to perform the function of conventional steptrack peak signal optimization, eliminating the random "guessing"... -
Page 44: Orbital Element Track (Optional)
Two built in propagators are available in the 7200 series controllers. The first is a two-body propagator based on Keplarian motion. The second is a multi-body propagator that includes the effects of Moon and Sun gravitational forces and a 4x4 Geopotential model. -
Page 45: Orbit Prediction Tracking
Overview 2.10 Tracking Functions The 7200 ACU allows a user to configure up to 50 targets for establishment of target-specific databases (refer to Section 5.8.2.6). The following tracking modes are available: • Move to longitude (refer to Section 2.9.1) •... - Page 47 3.1.1 Orbit Prediction OPT is the algorithm used by the 7200 ACS to predict the position of a spacecraft based upon its previous motion. The basic principle proposes that if the spacecraft's position, velocity, and the forces acting upon it are known, its position can be predicted at any time in the future.
-
Page 48: Orbit Determination
Theory 3.1.2 Orbit Determination An orbital element set is composed by making an initial guess of the orbit and then generating positions from this guess using the propagators described previously. These positions are compared with the positions gathered by AST. The differences between AST data and propagator-generated data are used to determine a correction to the orbit. -
Page 49: Orbit Scan Theory
It is assumed that the satellite owners are attempting to hold nominal longitude and a near circular orbit. The 7200 ACS creates a set of orbital parameters that place the ascending node at nominal longitude and provide the estimated inclination. The resulting trajectory will follow the most likely path for a satellite in this type of operation. -
Page 50: Orbit Scan Operation
Theory NOMINAL LONGITUDE NORTH LATITU INCLINATION SEARCH DIRECTION SOUTH LATITU Figure 3-1 Orbit Scan Theory 3.2.2 Orbit Scan Operation To use Orbit scan it is necessary to have correct site information loaded in the site parameters. When an OPT target is built, the user must provide the nominal longitude (degrees east) and an estimated inclination. -
Page 51: Installation And Initial Setup Of System
4.1 Overview This section of the manual provides the information necessary for the installation and initial setup of the 7200/7150 ACS for all modes of operation, including connection details for the remote serial interface. The system installation and setup instructions are presented in the following general order. -
Page 52: Installing The 7200 Acu
4. Using a set of knockout punches, punch conduit holes in the bottom of the drive cabinet to facilitate conduit entry. Install conduits. 4.2.3 Installing the 7200 ACU Determine the location of the 7200 ACU in the rack. Refer to Figure 4-1 for details of rack mounting. Figure 4-1 Mounting the 7200 ACU 1. - Page 53 7. Fully tighten all hardware. 8. There is a stud on the rear panel of the 7200 ACU that is marked with the protective earth (ground) symbol. A proper grounding wire from the rack that this piece of equipment is installed into should be attached to this stud, making sure that the end of the grounding wire has good metal-to-metal contact with the rear panel of the ACU.
- Page 54 ACS. Cables must be connected from the antenna to the drive cabinet, from the drive cabinet to the 7200 ACU, and from the antenna directly to the 7200 ACU. Power must also be provided from CFE power distribution points to the drive cabinet and ACU.
-
Page 55: Drive Cabinet Main Power Connection
Installation 4.3.1 Drive Cabinet Main Power Connection Always follow applicable local electrical safety codes when installing wire and cables. 1. If conduit is not installed, use chase nipples with bushings or other suitable means to protect the wire and cables. 2. -
Page 56: Connecting The Drive Motors To The Drive Cabinet
Installation 5. Tag the neutral wire with white electrical tape and connect the wire to one of the large terminals marked N on TB1 in the lower right corner of the drive cabinet. 6. Tag the ground wire with green and yellow electrical tape and connect the wire to one of the large green terminal blocks labeled with a G or a ground symbol on TB1. -
Page 57: Limit Switch Connections
Installation If 4-axis system, perform steps 1-13. 6. Connect the wire from terminal 1 of the POL motor to the TB1 terminal labeled POL CW in the drive cabinet. 7. Connect the wire from terminal 3 of the POL motor to the TB1 terminal labeled POL CCW in the drive cabinet. -
Page 58: Installing The 7200 Acu Control Cable
1. Connect one end of the 25-conductor control cable (Belden 8459 or equivalent) to the 25-pin connector labeled DRIVE INTERFACE (J10) on the back of the 7200 ACU (refer to Figure 4-4). Refer to Table 4-4A for a pin-out and the function of each conductor. - Page 59 Connect one pair of the two twisted pair control cable (Belden 8162 or equivalent) to the 25-Pin connector labeled (J16) EIA/TIA422 on the back of the 7200 ACU (refer to Figure 4-4). Refer to Table 4-4B for a pin-out and function of each conductor.
- Page 60 Installation Connect the other end of the same pair of the two-twisted pair cable to terminal strip TB1 inside the drive cabinet (Refer to Table 4-4B). 4.3.4.3 Portable Maintenance Control Unit (PMCU) With Position Display Option Installation The PMCU with Optional Position Display is provided for local control at the antenna. It is located inside the 7150 drive cabinet.
-
Page 61: Resolver And Encoder Connections
TB1 in the drive cabinet. Refer to Table 4-4B for connection description. Refer to Table 4-12 for a complete EIA/TIA422 pin-out of port J16. 2. From the 7200 ACU Main Menu, select Edit System Configuration…, Remote Port Configuration. Setup the following parameters. Please be aware that these port configuration changes must be saved before the new settings become valid. - Page 62 Installation * Shielding pairs: R1-R2, S1-S3, S2-S4. 4-12...
- Page 63 800499-02 is the assembly with optional Position Display Unit (PDU), which shows position feedback even without an ACU. 18-bit encoders connect directly to the ACU and do not use a J-box. See Table 4-8C. TABLE 4-7 OPTICAL ENCODER CONNECTIONS 7200 – J7, J8 FUNCTION 800499-02 800499-01...
- Page 64 Installation +24V RTN 4-14...
- Page 65 7200 PIN OUT YELLOW GREEN CLKN PINK GRAY DATN WHITE (Large) +24V BROWN (Large) VIOLET BLUE Note: Shield must be terminated on pins 17 & 23 for CLK and DATA respectively on the 7200 side for noise reduction purposes. 4-15...
-
Page 66: Analog Input Connections
4.3.6 Analog Input Connections One analog input port is provided on the 7200 ACU via J21 on the rear panel (refer to Figure 4-4). Internally, the analog input connects to an A/D converter circuit that provides tracking signal inputs to the main processor. - Page 67 AGC mode. Should field calibration be necessary, refer to General Dynamics Document #CG-0283 4.3.7...
-
Page 68: Remote Communications Connections
It includes all setup and operational commands as well as some diagnostics. See General Dynamics Document # CG-6045. Refer to Section 5.8.6.12, Remote Port Configuration, for additional interfaces. The standard 7200 ACU is capable of EIA/TIA-232E, EIA/TIA-422B, and Ethernet communications. 4-18... - Page 69 The top switch controls J14, and the bottom switch controls J15. Both switches are in the left position (off) by default. General Dynamics offers the following fiber optic modems (optional): BFM001 - 25 pin D (powered by pin 9) BFM002 - 25 pin D (externally powered)
- Page 70 4.3.9 Remote Beacon Select and Summary Fault Connections TB1 on the 7200 ACU rear panel provides a summary fault output (normally closed dry contacts) and four contact closures for remote beacon selection. The fault contacts have continuity between them under normal conditions but provide an open circuit under fault conditions.
-
Page 71: Initial Power-Up And System Setup
20 * LP Position Ind (Return) * Optional CP/LP switching firmware must be installed in the 7200 ACU for TB1 pins 13 to 20 to have these assigned functions. Pins 4, 6, 8, and 10 are tied together and connect to the COM terminal on the General Dynamics tracking receivers. - Page 72 Installation 4.4.1 Drive Cabinet Power-Up and Initialization The inverters have no internal adjustments; therefore, before power-up the covers of the inverters should be in place. 4.4.1.1 Initial Power-Up 1. Verify that the following conditions exist at the respective drive cabinet controls: a.
- Page 73 Installation DIGITAL OPERATOR JVOP-140 FREF FOUT IOUT MNTR LO/RE PRGM DATA STOP ENTER RESET Figure 4-5 GPD315 Digital Operator Indicator and Key Description 4-23...
- Page 74 Installation By pressing the DSPL key on the Digital Operator, the operator can step to each of the seven Function LEDS and its associated display/setting function: Press Press Press Press DSPL DSPL DSPL DSPL FREF FOUT IOUT MNTR Press Press Press DSPL DSPL...
- Page 75 Installation V1000 INVERTER DRIVE OPERATION Figure 4-7 V1000 Keys, Displays, and LEDs 4-25...
- Page 76 Installation Menu Structure for Digital LED Operator Figure 4-8 V1000 Digital LED Operator Screen Structure 4-26...
- Page 77 Installation Changing Parameter Settings or Values on V1000 Drives Figure 4-9 V1000 Drive Parameter Settings or Values 4-27...
- Page 78 Installation 4.4.1.2.2 Inverter Drive Setup (Function Parameters) All parameters are set at the factory. GDST has modified some of these parameters. TABLE 4-18 GPD315 DRIVE PARAMETERS PARAM. DESCRIPTION SETTING HELP n002 Control Method This parameter must be set to 1. n003 Operation Mode This parameter must be set to 1.
- Page 79 Installation TABLE 4-19 V1000 DRIVE PARAMETERS PARAM. DESCRIPTION SETTING HELP A1-02 Control Method This parameter must be set to 2. B1-02 Operation Mode This parameter must be set to 1. B1-01 Reference Select This parameter must be set to 1. Most motors are rated for either 50 or 60 Hz operation.
- Page 80 Installation 4.4.1.3 Drive Motor Phasing Because all axis drives are bi-directional, the actual direction of antenna axis rotation should correspond to the direction commanded by the control system. The following procedures should be followed to ensure this correspondence (make all control commands at the PMCU;...
- Page 81 Installation 4.4.1.3.3 POL Motor and 4th Axis Motor Phasing 1. Hold the POL switch to CW for a few seconds and then to CCW for a few seconds. The CW drive command should result in clockwise rotation of the feed assembly as viewed from the rear of the antenna structure;...
-
Page 82: Acu Power-Up And Initialization
The procedures that follow prepare the system for site acceptance tests. Set the drive cabinet MAINT/REMOTE switch to REMOTE to transfer control to the 7200 ACU. Refer to Section of this manual for operation of the 7200 ACS, especially Section 5.6, Power-Up Procedures. 4-32... - Page 83 Appendix D, Tracking Tutorial for Operators, may also be useful. 1. From the 7200 ACU command the antenna CW, UP, and POL CW. 2. Observe the Current Position display for increasing angles on each axis (refer to Figure 2-9).
-
Page 85: The 7200 Acs Menu System
All key names are presented in square brackets ([]). The 7200 ACU has a Simulation mode that can be used for training purposes or for becoming familiar with the system before beginning system operation. For more information on the ACU simulator, refer to Section 5.8.6.7. -
Page 86: Multiscreen Menus
Operation Figure 5-1 shows a representation of the (Main Menu) screen as it appears on the 7200 ACU display. See Appendix G for 7200 Menu Tree software flow charts. Figure 5-1 7200 ACS Basic Menu System 5.2.1 Multiscreen Menus Each screen can display up to 5 lines of text or 10 menu items (5 per column). If more information than can fit on one screen needs to be displayed, there will be a message in the screen title as shown in Figure 5-2. -
Page 87: Menu Items
Figure 5-3 Tracking Functions Menu System 5.3 The Help System The 7200 ACU provides easy-to-use, on-line help. Pressing [HELP] will provide assistance for whatever parameter or menu is highlighted. When in a menu, pressing [HELP] twice enters the Introductory Help, which explains general system... - Page 88 Figure 5-4 ACS Help Screen (Parameter Help Screen) The 7200 help system includes information on all system functions, parameters, and menus. Help screens may contain explanations of a parameter or a function and any requirements for executing that function (e.g., the user level necessary to execute the function).
- Page 89 5.4.1 Error Messages for Incorrect Entries The 7200 ACS not only provides value ranges in system prompts when the user is editing parameters, but it also provides error messages when an out-of-range value is entered. For example, if the user is editing the parameter shown in Figure 5-6 above and enters a value of 365.000000, the following system prompt will...
-
Page 90: Confirmation Messages
Installation and Initial Setup of System, has been followed to install, set up, and configure the system. To power up the 7200 ACS, use the following procedures. 1. On the 7150 Drive Cabinet, pull the EMERGENCY STOP switch to the out... -
Page 91: Manual Movement Of The Antenna
Set the Main Circuit Breaker to ON b. Set all remaining Circuit Breakers to ON c. Set MAINT/REMOTE switch to MAINT 3. On the 7200 ACU back panel, set the on/off switch to the on position. 5.7 Manual Movement of the Antenna 5.7.1... -
Page 92: The 7200 Acs Main Menu
ACU. 5.8 The 7200 ACS Main Menu All operation of the 7200 ACU is through the Main Menu. See Appendix G for 7200 menu tree flow charts. The Main Menu gives the operator a choice to select a function for the 7200 ACU to perform or to select another menu where more functions are available or where parameters can be changed. -
Page 93: Return To Standby (Stop Tracking) Function
Operation NOTE: To return to the Main menu from any screen, press the [Shift] key and hold it while pressing the [PRIOR] key. The following sections describe each of these functions and menus. 5.8.1 Return to Standby (Stop Tracking) Function Selecting Return to standby (stop tracking) places the system in Standby mode. - Page 94 To track a target in the target selection menu, use the following procedures: 1. From the Main menu, select Tracking functions..., and Track a target..2. Using the arrow keys on the 7200 ACU keypad, move the cursor to the desired target and press [ENTER].
- Page 95 Operation When commanded to begin tracking the target, the system will move the antenna to the target's position and maintain that position. The name of the target remains on the display under the antenna name. 5.8.2.3 Modify Current Target Menu From this menu, the user can modify the target currently being tracked.
- Page 96 Operation Although the screen in Figure 5-9 is titled Manual antenna control, only biasing can be performed from this screen. Paragraph 5.8.2.5 explains how to manually control the antenna from the ACU. For a target with a tracking mode of Move to look angles, Move to longitude, Intelsat-11 element, and Star tracking, the bias can be thought of as a "target- specific offset".
- Page 97 Operation If Shell is set to DTR, the parameters in Table 5-1 will appear. If the Shell is set to 253_REC the parameters in Table 5-2 will appear. If Shell is set to TRL, the parameters in Table 5-3 will appear. For all other Shell settings (Disabled, Printer, M&C, Visual, etc.), the parameters in Table 5-4 will appear.
- Page 98 Operation 1. From the Main menu, select Tracking functions...; then select Modify current target... and Tracking signal parameters..2. Using the arrow keys, move the cursor to the parameter to be edited and press [ENTER]. Using the numeric keys, enter a value within the range specified in the system prompt and press [ENTER].
- Page 99 Operation 5.8.2.4 Immediate Tracking Menu Immediate tracking allows the user to begin tracking without first configuring a target. This method of tracking is useful for testing purposes and moving the antenna to odd locations. To track a satellite for operational use, a target should be configured for that satellite -- refer to Section 5.8.2.6 for details on configuring...
- Page 100 Operation TABLE 5-5 STEPTRACK PARAMETERS PARAMETER DEFAULT DESCRIPTION Limits the number of AZ and EL cycles (attempts) that the steptrack Maximum no. of algorithm makes in finding the peak signal. Nominal value is 5, but the cycles value should be decreased for a very fast target as steptrack assumes target is fixed for duration of steptrack operations.
- Page 101 Operation TABLE 5-5 STEPTRACK PARAMETERS PARAMETER DEFAULT DESCRIPTION Sun outage protection works by inhibiting steptrack whenever the current look angles are within a specific angle from the center of the sun. The Sun outage Enabled angle used is the -3 dB beamwidth plus the radius of the sun's disk. A protection delay of up to 10 minutes may result.
- Page 102 Figure 5-10 Manual Antenna Control Screen 5.8.2.5.1 7200 ACU Keypad Momentary and Sticky Modes There are two modes for use of the keypad in the Manual antenna control function: Momentary mode and Sticky mode. In Momentary mode, the axis is driven only as long as a direction key (arrow key) is pressed.
- Page 103 Operation 5.8.2.5.2 Antenna Speed Selection Control from the ACU The [SHIFT] key toggles between track (low) speed and slew (high). POL is one speed and therefore the [SHIFT] key has no effect on its speed. To operate the antenna manually, use the following procedures: 1.
- Page 104 Operation Once configured, tracking for a target is initiated by selecting the name of the target under the menu Track a target..The target name will also be displayed when the target is being tracked. Refer to Section 5.8.2.2 for information on tracking a target in the target-oriented environment.
- Page 105 Operation 5.8.2.6.1.2 Editing a Target Name To edit an existing target name, use the following procedures: 1. From the Main menu, select Tracking functions...; then select Edit a new or existing target..2. On the target selection menu, move the cursor to the target to be edited and press [ENTER].
- Page 106 Operation 5.8.2.6.2 Tracking Mode Parameter NOTE: All noninitialized targets (shown as "------------") have a tracking mode of "Unused". Use the following procedures to change the tracking mode of a target: 1. From the Main menu, select Tracking functions...; then select Edit a new or existing target..
- Page 107 Operation 5.8.2.6.3 Edit Target Parameters Menu The items in the Edit target parameters... menu vary according to the tracking mode of the target (refer to the previous Section 5.8.2.6.2 for the tracking modes). The following Sections describe the parameters for each available tracking mode.
- Page 108 Operation 5.8.2.6.3.2 OPT Tracking Mode Parameters The Edit target parameters... screen for targets with tracking modes set to OPT contains three menus and one function: • Spacecraft parameters... • Steptrack parameters... • OPT parameters... • Reset OPT target Table 5-5 describes the Steptrack parameters, while Tables 5-7, 5-8, 5-9, and 5- 10 describe Spacecraft parameters...
- Page 109 For "analog receivers" (that is, a tracking receiver that feeds an analog signal into the ACU's point A/D inputs,) as well as a General Dynamics TRL receiver, adjust the receiver's output voltage to 6-8 VDC when peaked on the spacecraft. Once this is done, proceed to "Set -3 dB point."...
- Page 110 Operation CAUTION Improper modification of the parameters listed in Table 5-9 will severely degrade OPT performance. TABLE 5-10 ADVANCED OPT PARAMETERS PARAMETER DEFAULT DESCRIPTION Represents the fraction of the -3 dB beamwidth at which OPT will start the ST discard process to invalidate the current short-term solution.
- Page 111 Improper use of these parameters will severely degrade OPT performance. General Dynamics recommends that the user contact a General Dynamics engineer before attempting to modify these parameters. TABLE 5-11 NON-GEOSYNCHRONOUS SUPPORT PARAMETERS...
- Page 112 Operation 5.8.2.6.3.3 Intelsat 11-Element Tracking Mode Parameters Table 5-12 describes the Intelsat 11-element (IESS412) parameters. TABLE 5-12 INTELSAT 11-ELEMENT PARAMETERS PARAMETER DESCRIPTION Year portion of the epoch time on which the ephemeris is based; value must be Year a four-digit number (1990; 2001). Month portion of the epoch time on which the ephemeris is based;...
- Page 113 Operation 5.8.2.6.3.4 Move to Longitude Tracking Mode Parameters The Move to longitude parameters are described in Table 5-13. TABLE 5-13 MOVE TO LONGITUDE PARAMETERS PARAMETER DEFAULT DESCRIPTION E. Longitude of target [deg] E. longitude of target to which antenna will move Read-only item that shows look angles (Look angles [deg]) corresponding to the E.
- Page 114 Operation 5.8.2.6.3.6 Orbital Element Tracking (OPTIONAL) Table 5-15 describes the Orbital Element Tracking parameters. TABLE 5-15 ORBITAL ELEMENT TRACKING PARAMETERS PARAMETER FORMAT DESCRIPTION Test element set This command tests the Orbital element set for validity. This test is run automatically in the visual shell when this menu is exited. Run from the M&C shell, returns the following code: 1: >= 1 invalid terms (test couldn’t be more specific.) Year...
- Page 115 Operation 5.8.2.7 Target Scheduler Menu The Target scheduler... menu allows the user to program up to 200 targets with corresponding dates and times at which tracking begins for each target. This allows fully automatic tracking of a number of targets, each with its own preconfigured mode of tracking.
- Page 116 Operation 5.8.2.7.2.1 View/Edit Existing Entries Menu View/Edit Existing Entries Menu displays all entries in the schedule. There is one entry displayed per line, in the following format: date: dd Mmm yyyy time: hh:mm:ss target: target_name To view entries in the schedule, use the following procedures: 1.
- Page 117 Operation 3. For parameters requiring numeric values, use the numeric keys on the keypad to enter the desired value and press [ENTER]. If the parameter has a predefined list of choices, (e.g., the date), use the up and down arrow keys to toggle through the preset choices.
- Page 118 Operation 5.8.3 Clear/Correct System Faults Function Clear/correct system faults clears all faults that can be cleared, and acknowledges faults that the ACU cannot correct. If there are unacknowledged faults: • All faults are displayed in reverse video (even if some faults had been previously acknowledged).
- Page 119 Indicates that the antenna has jogged beyond the limit set by the west box limit in West box limit violation the steptracking configuration of a target. System error: unused A firmware error has occurred; call General Dynamics upon the indication of this fault fault. 5-35...
- Page 120 • Change supervisor password 5.8.4.1 7200 ACS User Levels The 7200 ACS has three user levels: • Monitor level: At Monitor level, the user can examine all system parameters but cannot edit the parameters or command the antenna. • Operator level: At Operator level, the user can command the antenna to a new target or use manual mode, but cannot edit system parameters.
- Page 121 • Box limits • Power-up test report • Background tasks • Firmware version information • Simulated target • Network Diagnostics These functions are not normally used in everyday operation, but are useful in debugging the 7200 ACS, especially during installation. 5-37...
- Page 122 (EM STOP, MAINT, SUM LIM, AZ DRIVE FLT, AND EL DRIVE FLT). If all five inputs are in the 1 state, the 7200 ACU interprets this condition as a no-power condition at the drive cabinet.
- Page 123 US1 and US2 are unused states 1 and 2, and UM is unused mode, but all should show 1's. The status and mode information are not useful to the user; they are provided for General Dynamics engineers' use only and are not documented here. 5.8.5.1.6 VCPU Hardware Diagnostics This diagnostic is fully functional even in simulation mode.
- Page 124 • +24 Volt Source Fault - This fault means the +24 volt power source has fallen below 22.24 Volts. The ACU power supply sources this voltage which feeds the optical encoder (optional feedback device) and the 7200 ACU cooling fans. • Low Battery Warning - The warning means the battery voltage has fallen below 2.7 Volts.
- Page 125 Operation 5.8.5.2 Position Loop Diagnostics Position Loop Diagnostics shows the states of the position loop task in real time. The status (awake or asleep) of the position loop is displayed. If the loop is awake, the antenna is being actively commanded to a position (or the system is actively holding the current position).
- Page 126 5.8.5.4 OPT Statistics OPT statistics provides useful information only when OPT is in operation. The statistics are described in Table 5-19. Information on this screen is intended for use by General Dynamics personnel. TABLE 5-19 OPT STATISTICS FIELD DESCRIPTION The short-term versus AST delta is the calculated radial error in percentage of...
- Page 127 Operation 5.8.5.5 Orbit Data Orbit data provides information from the current target OPT solutions. This information can be useful in setting up or checking Box limits. Three solutions may exist for each OPT target: Short-term, Long-term (2b), and Long-term (mb). If data is not available for a given solution, Not available will be displayed.
- Page 128 Operation When an east/west limit is intersected and no other problem exists, open limits by increasing the Estimated inclination and/or the Longitude range value. The box center longitude should be verified to be at the normal longitude for the satellite. This nominal longitude can be obtained from the satellite operator or may be estimated on the Orbit data screen if the axis is very small.
- Page 129 Operation 5.8.5.8 Simulated Target Simulated Target is useful only in SIMULATION mode. When in SIMULATION, this shows the simulated target's current position and error and basic orbit information. 5.8.5.9 Star Viewing Windows The Star Viewing Windows screen shows the windows of visibility (when the star is within the software travel limits of the antenna) for a star.
- Page 130 Operation 4. To display the "viewing windows" for the selected star, select Display viewing windows..The dates and times (in UTC) at which the star will be visible to the antenna are listed. The up and down arrow keys may be used to scroll forward or backward through the visibility dates.
- Page 131 • Serial TRL Diagnostics The screens show "raw" status values being transmitted by the respective tracking receiver to the ACU. It is normally only of interest to General Dynamics engineers troubleshooting the serial link. While this screen is still available for viewing in...
- Page 132 Operation 5.8.5.11.2 Serial 253 Diagnostics TABLE 5-24 SERIAL 253 DIAGNOSTIC FIELDS FIELD DESCRIPTION # good reads # of successful transactions with the 253. # aborts # of bad/partial responses from receiver Link # cksum fail # of incorrect checksums in packets from receiver # timeouts # of timeouts with 253 ( no response from receiver) Frequency...
- Page 133 (PCB) revision, complex programmable logic device (CPLD) version, bootloader EEPROM version, and network controller version. The 7200 ACU firmware has both a version number and a configuration. The configuration is displayed on the line below the version information as a 32 bit HEX coded label called “ACU-CONFIG”.
- Page 134 Operation DTR firmware version information appears if the DTR shell is enabled and shows the firmware version information obtained from the DTR. If the DTR is disconnected or powered off, this screen will show "Version information not available." This information is read at start-up, then re-read once each time communication is lost and restored with the DTR.
- Page 135 Operation While the network subsystem is being loaded, a message of "Booting n of N" will be displayed at the bottom of the screen, where n is the current byte, and N is the total bytes to be loaded. When the network subsystem has finished booting, the message will change to display the time and date the boot upload completed.
- Page 136 Operation 5.8.6 Edit System Configuration Menu WARNING Any of the system configuration parameters may be viewed at any time, but modifying these parameters after installation may cause the ACU to malfunction. The Edit system configuration... menu contains the following menus and function: •...
- Page 137 (frequency, attenuation, and RF input) are sent from the 7200 to the receiver. If the receiver is in local control, a Tracking receiver in local control alarm is issued. The 7200 will continue to track with the signal sent from the receiver even when this alarm is in effect.
- Page 138 (the offset) is a constant throughout the range of motion of the antenna. In addition, the 7200 ACU has the ability (in software) to reverse the direction in which the encoders count; that is, when the encoder indicates movement in the CW direction of its shaft but the ACU reports CCW direction, and vice versa.
- Page 139 Operation TABLE 5-28 SUPPORTED ENCODER TYPES (POSITIION FEEDBACK DEVICES) ENCODER TYPE General Dynamics SIDE VIEW TOP VIEW PARAMETER SETTING Part # Resolver AZ/EL Size 11 DRE003 (EL) DRE005 (AZ) (Standard accuracy – 2500 Hz) Resolver AZ/EL 2-speed DRE008 (2-speed resolvers)
- Page 140 Operation The following additional parameters appear under Position Encoder Configuration… as Encoder Type parameter options. These settings are only used for field repair situations. • Optical AZ ROC-417 SSI Binary EL ROC-417 SSI Gray • Optical AZ ROC-417 SSI Gary EL ROC-417 SSI Binary •...
- Page 141 Operation Table 5-29 describes the Motion limits... parameters. TABLE 5-29 MOTION LIMITS PARAMETERS PARAMETER DEFAULT DESCRIPTION These are normally enabled. If the antenna needs to be moved to its limit Soft limits Enabled switches (from the ACU) for maintenance purposes, the soft limits should be temporarily disabled.
-
Page 142: Soft Limits
Operation To edit any of the parameters under this menu, use the following procedures. 1. From the Main menu, select Edit system configuration... and then select Motion limits..2. To change Soft limits or Motion errors, use the arrow keys to move the cursor to the parameter to be edited and press [ENTER]. - Page 143 Operation Motion is allowed, moving up/CW, from the lower/CCW limit to the upper/CCW limit. For the defaults shown in Table 5-29, the antenna may move CW in AZ starting from 130.00 to 230.00 degrees. This is a typical setting in the Northern Hemisphere for an antenna with ±50.00 degrees of motion in AZ from a centerline of due south (180.00 degrees).
- Page 144 Runaway angle parameter. If this error is detected, the drive enable line to the ACU is opened, which inhibits motion on all axes (the 7200 ACU does not have individual axis enable lines for each axis).
- Page 145 Operation 5.8.6.6 Position Loop Parameters The parameters listed in Table 5-31 control how the antenna is moved to the target position and the precision of the antenna's position. TABLE 5-31 POSITION LOOP PARAMETERS PARAMETER DESCRIPTION This parameter determines the accuracy of the position loop. The position loop will Positioning continue to move the antenna from the current position to the target until the antenna is deadband [deg]...
- Page 146 M&C interface. The high rates allow the ACU to move to a new target rapidly. For training purposes, General Dynamics advises that the rates be set to more realistic values. NOTE: The resolver excitation signals are active in Simulation mode (i.e., the resolvers are powered).
- Page 147 Operation TABLE 5-32 ANTENNA SIMULATOR PARAMETERS PARAMETER DEFAULT DESCRIPTION AZ = 8.00 Determines how fast the simulator drives the Antenna slew rate [deg/s] 4.00 simulated antenna in slew (high) speed. POL = 0.00 0.20 Determines how fast the simulator drives the Antenna track rate [deg/s] 0.20 simulated antenna in track (slow) speed.
- Page 148 Operation To edit the parameters under this menu, use the following procedures. 1. From the Main menu, select Edit system configuration..., Built-in simulator setup, and then select Spacecraft simulator setup..2. Use the arrow keys to move the cursor to the parameter to be edited and press [ENTER].
- Page 149 Operation 6. To enter the date and time into the system, select Await mark... and the following message appears: System UTC date and time will be set to hh:mm:ss dd Mmmm yyyy (the date and time entered above will be displayed) when [ENTER] is hit. Press [PRIOR] to cancel.
- Page 150 TABLE 5-34 SITE DATA PARAMETERS PARAMETER DESCRIPTION This is the name displayed in the Current pos field of the 7200 ACU display. The antenna name may be up to 12 characters in length and may be changed by the Antenna name user.
- Page 151 Operation 5.8.6.10 RF/Geometry... The RF/Geometry... enables/disables POL control and contains the parameters described in Table 5-35. If POL is controlled by the ACU, set this parameter to enabled. If this parameter is disabled (for 2-axis systems), POL will not appear on the real-time display or in any menus.
- Page 152 Operation To edit any of the parameters under this menu, use the following procedures. 1. From the Main menu, select Edit system configuration... and then select RF/geometry..2. To change Polarization axis or Antenna droop correction, use the arrow keys to move the cursor to the parameter to be edited and press [ENTER].
- Page 153 Operation 5.8.6.11 Network Configuration This menu is used to set the communications and protocol parameters for the network ports on the unit. 5.8.6.11.1 Test configuration Parameter This command tests the network configuration for validity. This test is run automatically in the visual shell when this menu is exited. Run from the M&C shell, it returns a hexadecimal code.
- Page 154 Operation The IP address specified must be supplied to M&C clients that will interface with this ACU by way of the network. When the IP Address is configured, the subnet mask must also be configured. In general, neither the network portion nor the host portions of the IP address (defined by the subnet mask) are allowed to be made up entirely of one or zero bits.
- Page 155 Operation If the ACU is to communicate with any device that is not on the same subnet, the gateway address parameter must be set to the IP address of a router. Consider a setup where IP address=192.168.0.1 & Subnet mask=255.255.255.0 This means that the ACU is a member of the 192.168.0.0 network and that the network infrastructure allows the ACU to communicate directly with any client that has an IP address in the range 192.168.0.1 through 192.168.0.254.
- Page 156 Operation 5.8.6.11.5 TCP Port TCP port numbers are used to allow clients to attach to specific services that are offered by a host with a given IP address. Conceptually, this allows the host to offer a variety of different services over a single network connection. The TCP port number is an integer that ranges from 0 to 65535.
- Page 157 5.8.6.12 Remote Port Configuration The parameters in the Remote port configuration... menu control remote communications with the 7200 ACU via its serial port(s). The standard ACU has seven ports: two EIA/TIA-232E ports; (J4 and J15) and five EIA/TIA-422B ports (J16-J20).
- Page 158 • PMCU - This is for the 7150 PMCU (optional) display. It is used on the EIA/TIA- 422B Interface. Its use is not supported with any other device. • ACU2ACU – This is an optional shell used to connect a General Dynamics 7200 ACU to another General Dynamics 7200 ACU to have Targets stay in sync.
- Page 159 This specifies the user interface for the specified port. If a port is not being used, this parameter should be set to disabled**. Options are: • M&C - command line interface • Visual - menu-driven user interface used by the console; requires a 7200 See Section Remote Control Unit 5.8.2.3.2,...
- Page 160 Operation The following parameters may be changed by selecting the parameter, and using the up and down arrow keys to toggle between preprogrammed choices: • bps (baud) • Parity • Shell • Echo • Checksums • Newline • Handshake To change the other parameters, Port, Data bits, Stop bits, and Screen lines select a parameter and enter the desired value within the range specified in the system prompt.
- Page 161 If this field is "Disabled", the ACU proceeds without confirmation. General Dynamics recommends leaving this option Enabled. If this field is set to "Enabled", then the ACU will ask for confirmation whenever the user leaves an edit menu after making changes to any of the data. If the user selects "NO", the changes are undone.
- Page 162 Operation TABLE 5-38 USER INTERFACE OPTIONS SETTINGS OPTION DEFAULT DESCRIPTION The audible alarm is a tone (different from the warning bell tone) which is continuously sounded whenever the ACU has a fault condition that has not been acknowledged. Normally, this is left on, as it will alert an operator that a fault condition is in effect, even if the operator cannot see the display.
- Page 163 Operation The parameters under this menu may be changed by selecting the desired parameter, and using the up and down arrow keys, toggling through the preprogrammed choices. When the desired setting is highlighted, press the [ENTER] key. To save the changes, press [PRIOR] and answer yes when prompted to save the changes.
- Page 164 Operation This parameter controls the delay between a tracking mode or target change. Whenever the tracking mode is changed (except for returning to Standby), or a new target is selected, the ACU waits for the amount of time of this parameter before initiating tracking. Also, output 1 on ACU Tracking terminal TB1 is closed and remains closed while tracking.
- Page 165 Answer yes to proceed with the test. Press [ENTER]. 3. A representation of the 7200 ACU keypad is drawn in the lower section of the display. Press any key and notice that the label of the key's representation on the display is shown in reverse video;...
- Page 166 The I/O loopback tests function is used to verify operation of the I/O board during factory tests. The tests require the use of the 7200 Test Bed Unit (TBU), which is only available at the factory; therefore this test cannot be performed outside of the factory.
- Page 167 Operation TABLE 5-40 MESSAGE PRINTER OPTIONS PARAMETERS PARAMETER DESCRIPTION When Enabled, a message is printed on the message printer whenever the ACU begins tracking a new target or when the ACU is placed in Standby. Target change/standby The target name is printed, along with the target number [the position of the target in the Track a target menu (target 1 is the first target in the first column, target 6 is the first target in the second column)].
- Page 169 6.1 Air Filter The air filter on the back of the 7200 ACU (refer to Figure 6-1) should be cleaned at least every six months. If the ACU is in an environment that is exposed to a large amount of dust and dirt frequently, the filter should be checked for excessive dust accumulation at least once a month.
- Page 170 Maintenance 6.2 Battery 6.2.1 Checking the Battery The battery is a long-life lithium battery, but it is important to monthly monitor the strength of this battery. See Table 2-6 for more specific information about the VCPU battery. If the battery sufficiently discharges, all NVRAM parameters will be lost including the following: •...
- Page 171 Baseline AZ/EL Assembly (208 VAC) Model 7150 Series III 201158 Baseline AZ/EL Assembly (380-415 VAC) Model 7150 Series III 201357 Antenna Control Unit Assembly and Wiring Model 7200 Stock Level 201379 7200 ACU Top Configuration Level 201464 Brake Parts Kit, AZ & EL Brakes 7150 Series III...
- Page 172 Engineering Drawings THIS PAGE INTENTIONALLY LEFT BLANK...
- Page 173 ACRONYMS/ABBREVIATIONS APPENDIX A - ACRONYMS AND ABBREVIATIONS The following is a list of acronyms and abbreviations that are used by VertexRSI Control Systems and may appear in this manual. Amperes Alternating Current Antenna Control System Antenna Control Unit Analog-to-Digital Antenna Drive Unit Automatic Gain Control Acquisition of Star ASCII...
- Page 174 ACRONYMS/ABBREVIATIONS EEPROM Electrically Erasable Programmable Read-Only Memory Electronic Industries Alliance Encoder Input Circuit Elevation Electromagnetic Interference EPROM Erasable Programmable Read-Only Memory Electrostatic Discharge E STOP Emergency stop Fast Fourier Transform Fault Finite State Machine Forward Gigahertz Ground GPIB General Purpose Interface Bus High Byte Hexadecimal horsepower...
- Page 175 ACRONYMS/ABBREVIATIONS Meter Media Access Control Maximum M&C Monitor and Control Milliamperes Multibody (propagator) Megahertz Minimum Millisecond Menu Tree (M&C) Not applicable No connection National Electrical Code NEMA National Electrical Manufactures Association NORAD North American Air Defense Command NVRAM Nonvolatile Read-Only Memory O&M Operations and Maintenance Orbit Prediction Tracking...
- Page 176 ACRONYMS/ABBREVIATIONS Two-body (propagator) Tracking Band Translator Test Bed Unit TCXO Temperature Compensated Crystal Oscillator True Equinox and Equator Time and Frequency Processor Telecommunications Industry Association TT&C Telemetry, Tracking, and Control Coordinated Universal Time Volts Volts AC VCPU VertexRSI Central Processing Unit Volts DC VITA VMEBUS International Trade Association...
- Page 177 1 Phillips screwdriver for #6-32 screws • 1 trimming tool or small flathead screwdriver On the front of the 7200 ACU, set the DRIVE ENABLE switch to disable the drives. Using a large flathead screwdriver, remove the four screws holding the 7200 ACU in the rack.
- Page 178 7200 PASSWORD PROTECTION Note the hinge on the right side of the 7200 ACU. Lift the cover of the 7200 ACU and lock it in place by pulling forward on the joint of the hinge. The slide mount can also be used to tilt the entire ACU in 45-degree increments for easier access.
- Page 179 26. Slide the 7200 ACU back into position and secure the front panel to the rack with four #10-32 screws. 27. On the rear of the 7200 ACU set the power switch to the on position. Verify that password protection has been set correctly.
- Page 180 7200 PASSWORD PROTECTION THIS PAGE INTENTIONALLY LEFT BLANK B - 4...
- Page 181 Appendix E, Troubleshooting Guide Paragraph 5.0, of this manual. Turn off the power to the 7200 ACU and slide it forward from the rack. Remove the four #6-32 screws holding the front of the top lid and lift the lid, locking it in place with the hinge found on the right side of the sub-rack inside the unit.
- Page 182 TWO--SPEED RESOLVER CALIBRATION Two-Speed Internal Alignment The resolver system used in the standard 800225-05 option package for the 7200 ACU is an electrical two-speed resolver type. Due to finite manufacturing tolerances, cable length differences, and other variables, the coarse and fine resolver 0 points may not necessarily coincide.
- Page 183 The 7200 has an easy-to-use context-sensitive help system that may be referenced at any time during this procedure by simply pressing the [HELP] key. To quickly begin tracking a target with the 7200 ACS, use the following procedures. The first step is to tell the ACS about the location of the antenna on the earth, its site.
- Page 184 TRACKING TUTORIAL To enter the date and time into the system, select Await mark... and the following message appears: System UTC date and time will be set to hh:mm:ss dd Mmm yyyy (Note: the time and date just entered will be displayed.) when [ENTER] is hit.
- Page 185 Now that the antenna is pointing to a known position, the position encoder offsets can be configured. 6. The 7200 ACU will calculate the look angles for a given longitude if the site data has been set properly. From the Main menu, select Tracking functions..., Immediate tracking..., Edit immediate target…...
- Page 186 TRACKING TUTORIAL 11. Select Receive -3 dB beamwidth [deg] and enter the value obtained above. 12. Select Step size [deg]. This parameter should be set to approximately 8 percent of the -3 dB beamwidth, but no less than 0.02 on systems with standard resolvers.
- Page 187 D. After completing this procedure, you may have to fine-tune these speeds to obtain a track speed that is the best speed for Step Track and OPT. Consult with General Dynamics for help with this setup if needed. In normal environments, no other steptrack defaults require modifications from the preset values.
- Page 188 TRACKING TUTORIAL 17. From the Main menu..., select Tracking functions..., Edit a new or existing target..18. Select a noninitialized item (represented as "------------") on the target selection menu and press [ENTER]. 19. The Edit target data screen will appear. This screen contains Target name and Tracking mode parameters, and the submenu Edit target parameters..
- Page 189 30. Press [PRIOR] and answer yes to the prompt to save the changes. Press [PRIOR] twice to return to the Main menu. The 7200 ACU must be properly calibrated to the slope of the tracking signal in order to provide optimum performance of the Steptrack feature.
- Page 190 Move the antenna in EL by half the 3 dB beamwidth. On the General Dynamics Model TRC-14 or TRK-14 Receivers, use the level adjust to drop output voltage 1.5 V (this is close to a 3 dB drop).
- Page 191 7200 TROUBLESHOOTING APPENDIX E - 7200 Troubleshooting Guide Table 1-1 lists the paragraph number for the probable causes and corrective action for each fault/error topic addressed in this guide. TABLE 1-1 FAULT/ERROR TOPICS FAULT/ERROR PARAGRAPH NUMBER Drive Cabinet Unresponsive/Inverter Display Blank...
- Page 192 7200 TROUBLESHOOTING Drive Cabinet Unresponsive/Inverter Display Blank NOTE: This error can occur even if the ACU has not been installed. If the drive cabinet does not respond to drive commands from local controls and the inverter display is blank (the inverters are not energized), follow these steps.
- Page 193 7200 TROUBLESHOOTING Overcurrent [oC] If overcurrent is detected [OC] will appear on the inverter display. The following conditions may be the cause of this error: 1. Excessive load inertia. 2. Acceleration time is too short -- increase it. 3. Starting frequency is set too high.
- Page 194 7200 TROUBLESHOOTING 7200 ACU Power-Up Failures No Audible Beep at Power-Up If an audible beep is not heard upon power up of the ACU, check the following: 1. Verify that power is available at the unit. 2. Check the fuse in the power entry module.
- Page 195 "talking" to the card(s). To determine which board has a problem, from the Main menu, select Display system status... and Power-up test report. 2. Verify all cards are properly installed in the 7200 ACU. 3. Contact VertexRSI for support. Soft and Hard Travel Limits Axis Immobile With Summary Limit (Hard Limit) This error occurs when the ACU has reached a travel limit.
- Page 196 7200 TROUBLESHOOTING Resolver Errors For all resolver errors, check the cable first and make sure that D-subconnector is securely connected to the back of the ACU. Also verify that shield lines are connected to the ACU, but OPEN at the resolver. Shield lines should not short to each other.
- Page 197 7200 TROUBLESHOOTING Resolver Readouts Erratic with Antenna Motion If the resolver readouts become erratic with antenna motion, (i.e., the readout functions properly through a certain angular range, but begins to flicker and roll, large jumps occur, etc), a bad connection is usually the cause.
- Page 198 7200 TROUBLESHOOTING 7200 ACU Error Messages Axis Fault (Applies to: AZ, EL) Description: This fault occurs when an axis fault device such as a motor handcrank interlock or an elevation reflector hatch is activated. Electrical power is removed from the faulted axis motor controller(s).
- Page 199 7200 TROUBLESHOOTING Bus error “card name and number” (Applies to: All systems) Description: This fault occurs when a card inside the VME card cage fails to respond when addressed by the CPU. It means the CPU is not able to communicate with the card that displays the bus error.
- Page 200 Intelsat pre-epoch prediction (Applies to: All systems tracking Intelsat targets) Description: This fault occurs when the Intelsat data set in the 7200 ACU is valid in the future but not at the present moment. Using the future data set given, the 7200 ACU automatically back calculates the satellites current location and points the antenna in that direction.
- Page 201 To Correct: Ensure that the tracking receiver signal amplitude is adequate for tracking purposes. Remote control panel link failure (Applies to: Systems with two or more 7200’s) Description: This fault occurs when a remote 7200 ACU serial link connection is broken.
- Page 202 SYSFAIL line - timeout (Applies to: All systems) Description: This fault occurs when one of the 7200 VME cards declares a failure. To Correct: Determine which card in the VME bus is the cause of the failure;...
- Page 203 7200 TROUBLESHOOTING Tracking Receiver fault (Applies to: Systems with TRL Tracking Receivers) Description: This fault occurs when the TRL tracking receiver detects a fault (i.e. Local Oscillator fault, Analog input board failure, phase lock loop failure etc.) within itself. To Correct: Check the TRL display to find out which internal problem has caused the fault at the ACU.
- Page 204 7200 TROUBLESHOOTING Tracking signal input saturated (Applies to: All systems) Description: This fault occurs when the signal received from the tracking receiver reaches 10 VDC. This fault is a latching fault and will not clear without user intervention. To Correct: On a clear day (no clouds in antenna direction), peak the antenna on the target and then set the "0 dB"...
- Page 205 7200 TROUBLESHOOTING Axis Reversed An Axis reversed error may be caused by the following conditions: 1. At installation time, the motor phasing was reversed -- check the phasing and correct if necessary. 2. A sudden slew from one direction to the other could be caused by a low setting of the Immobile/reversed timeout [ms] -- reset the parameter.
- Page 206 7200 TROUBLESHOOTING Too Long to Reposition to a New Satellite If the system is taking too long to reposition to a new satellite: 1. Turn slew speed potentiometer in drive cabinet to maximum. 2. Decrease Slew ->track transition [deg] parameter to optimize slewing motion (default value drops out of slew long before the target is acquired).
- Page 207 7200 TROUBLESHOOTING 9.3 "Excessive Tracking Signal Noise" Error Displayed This is a notification, NOT a fault. If no other faults are occurring, the system is still functioning nominally. 9.4 Large Signal Fluctuation During AST Operations If a large signal fluctuation occurs during AST operations, check the low speed potentiometer at the drive cabinet, and verify that the antenna is not overshooting.
- Page 208 If a password is lost, it must be cleared and a new password must be entered because the 7200 ACU has no provision to recover a lost password. Follow the procedure in Appendix B of this manual to clear the password and enter a new one.
- Page 209 SITE TEST PROCEDURE APPENDIX F – SITE TEST PROCEDURE This appendix contains the Site Acceptance Test Procedure. F - 1...
- Page 210 SITE TEST PROCEDURE THIS PAGE INTENTIONALLY LEFT BLANK F - 2...
- Page 211 1.1 Preliminary Information This test procedure is intended to serve as the final proof of performance document for the 7200 ACS, subsequent to field installation and set-up. Prior to the performance of these tests, the system must have been installed and adjusted as described in Section 4.0 of this manual.
- Page 212 SITE TEST PROCEDURE Inside the drive cabinet set the MAIN CIRCUIT BREAKER to _______(Check) Verify that the EMERGENCY STOP button is in the out position. _______(Check) Turn all circuit breakers to the ON position and verify that the green LED in the on the Relay PCB is illuminated. _______(Check) Verify that the CONTROL switch is in the MAINT position.
- Page 213 ______ (Record) 1.4 Miscellaneous Error and Fault Messages In the drive cabinet, set the DRIVE CIRCUIT BREAKER to OFF. Verify that the 7200 ACU display shows NO POWER AT DRIVE CABINET. _______(Check) In the drive cabinet, set the DRIVE CIRCUIT BREAKER to ON.
- Page 214 Drive the antenna using the JOG AZ CW switch until the limit switch stops the movement of the antenna. _______(Check) b. Check the 7200 ACU display for a SUM LIMIT message. _______(Check) c. Record the AZ angle at which the limit occurred.
- Page 215 Drive the antenna using the JOG EL UP switch until the limit switch stops the movement of the antenna. _______(Check) b. Check the 7200 ACU display for a SUM LIMIT message. _______(Check) c. Record the EL angle at which the limit occurred.
- Page 216 SITE TEST PROCEDURE 1.6 Manual Antenna Control Tests From the Main menu, select Tracking functions... and then Manual antenna control. _______(Check) Jog AZ CCW and observe that Azimuth: CCW and Speed: Track (low) are highlighted and that the AZ angle decreases.
- Page 217 SITE TEST PROCEDURE 12. Hold the [SHIFT] key down and jog EL DOWN and observe that Elevation: Down and Speed: Slew (high) are highlighted and that the EL angle decreases. _______(Check) 13. Hold the [SHIFT] key down and jog EL UP and observe that Elevation: Up and Speed: Slew (high) are highlighted and that the EL angle increases.
- Page 218 7200 ACU or the remote link causes obstructed visibility of the antenna. Test the function and setting of each soft limit by driving the antenna from the 7200 ACU using Manual antenna control. Record the tested Motion Limit parameters in the following table.
- Page 219 SITE TEST PROCEDURE 12. Record the EL angle at which the limit occurred. ______(Record) 13. Drive the antenna down in EL to check that the antenna will back out of the soft limit. _______(Check) 14. Drive the antenna down in EL until the soft limit stops the movement of the antenna.
- Page 220 Observe the beacon level on the 7200 display with the antenna parked at beam center for at least one minute and record the signal variation in the following table.
- Page 221 2dB. Activate Steptrack and allow the system to repeak the antenna and record the resulting signal level from the 7200 ACU display below in the TRACK LEVEL column. Return to Manual antenna control and manually peak the antenna and record the resulting signal level in the MANUAL LEVEL column.
- Page 222 SITE TEST PROCEDURE 1.8.3 Orbit Prediction Tracking (OPT) Configure an OPT target, based upon the simulated satellite nominal location and inclination and record the information in the following table. VALUE MENU TARGET # TARGET NAME TARGET MODE TARGET PARAMETERS SPACECRAFT PARAMETERS Box Center (deg East) Longitude range (deg) Est.
- Page 223 SITE TEST PROCEDURE 1.9 System Parameter Recording TRACKING RECEIVER SETUP Receiver Controller 0 dB Setting A/D Slope STEPTRACK DEFAULTS Cycle Time Receive -3 dB Beamwidth (deg) Step Size (deg) Position Deadband (deg) Maximum No. of Cycles Cycle To Start Rate Estimates Peaking Correction Limit (%BW) Weight Adjustment Value Low Tracking Signal Level (dB)
- Page 224 SITE TEST PROCEDURE Lower/CCW soft limits (deg) Upper/CW soft limits (deg) Motion Errors (enabled, disabled) Immobile/reversed timeout (ms) Immobile/reversed tolerance (deg) Runaway Angle (deg) POSITION LOOP PARAMETERS Azimuth Elevation Positioning deadband (deg) Slew rate (Enabled or Disabled) Slew -> track trasition (deg) Slew ->...
- Page 225 SITE TEST PROCEDURE RF GEOMETRY Polarization Axis (enabled, disabled) Antenna Droop Correction (enabled, disabled) Amplitude Droop Correction (deg) Elevation Alignment (deg) XEL Correction (enabled, disabled & value) ACU REMOTE PORT CONFIGURATION (PORTS 1-4) Port # bps (Baud) Parity Data Bits Stop Bits Shell Echo...
- Page 226 SITE TEST PROCEDURE USER INTERFACE UTC Display (enabled, disabled) Local Time Display (enabled, disabled) UTC Date Format (dd Mmm) Local Date Format (dd Mmm) Tracking Signal display (enabled, disabled) Signal Units (dB, V) User Level Display (enabled, disabled) Confirm Tracking (enabled, disabled) Confirm Edits (enabled, disabled) Warning Bell (enabled, disabled) Audible Alarm (enabled, disabled)
- Page 227 SITE TEST PROCEDURE TRACKING RESTORATION OPTIONS Standby after boot (enabled, disabled) Standby on emergency stop (enabled, disabled) Standby on motor controller fault (enabled, disabled) Standby on maintenance override (enabled, disabled) Standby on ADU power loss (enabled, disabled) Tracking initiation delay (ms) MESSAGE PRINTER OPTIONS Target Change/Standby (enabled, disabled) Faults (enabled, disabled)
- Page 228 SITE TEST PROCEDURE COMMENTS ________________________________________________________________________________________________ ________________________________________________________________________________________________ ________________________________________________________________________________________________ ________________________________________________________________________________________________ ________________________________________________________________________________________________ ________________________________________________________________________________________________ ________________________________________________________________________________________________ ________________________________________________________________________________________________ ________________________________________________________________________________________________ ________________________________________________________________________________________________ ________________________________________________________________________________________________ ________________________________________________________________________________________________ ________________________________________________________________________________________________ ________________________________________________________________________________________________ ________________________________________________________________________________________________ ________________________________________________________________________________________________ ________________________________________________________________________________________________ ________________________________________________________________________________________________ ________________________________________________________________________________________________ F - 20...
- Page 229 SITE TEST PROCEDURE VertexRSI COPY PROVISIONAL ACCEPTANCE The site acceptance test of the Model 7200 Antenna Control System is complete except for the discrepancies as noted below. Control of the system is now transferred to the customer. This discrepancy list is considered to be final.
- Page 230 CUSTOMER COPY PROVISIONAL ACCEPTANCE The site acceptance test of the Model 7200 Antenna Control System is complete except for the discrepancies as noted below. Control of the system is now transferred to the customer. This discrepancy list is considered to be final.
- Page 231 MENU TREE APPENDIX G – GRAPHICAL MENU TREE This appendix contains the Graphical Menu Tree. G - 1...
- Page 232 MENU TREE THIS PAGE INTENTIONALLY LEFT BLANK G - 2...
- Page 237 VENDOR DATA APPENDIX H - VENDOR DATA This appendix contains the O & M Manual for the Inverter Drives. This file is not included in the PDF version of this manual, but can be downloaded from: http://www.gdsatcom.com/controls.php under the “Supplemental Information” link.
- Page 238 VENDOR DATA THIS PAGE INTENTIONALLY LEFT BLANK H - 2...
- Page 239 Appendix J FIELD PROCEDURE(s) TO INSTALL CTB055 STANDARD METHOD 1. Strip the insulation from the Resolver wire (Approx 3/8”) 2. Strip the insulation from the connecting cable (Approx 2/8”) 3. Twist the two wires tightly together 4. Solder the two wires 5.
- Page 240 7. Using a heat gun or alternate appropriate heat source, heat the shrink tubing so that the entire exposed soldered wires are appropriately covered.
- Page 241 In turn, these element sets are provided to users. The purpose of the "NORAD tracking" function in the 7200 ACU is to use the NORAD TLE sets to provide the user with a means of propagating these element sets in real time and point the antenna under control of the ACU at the space object.
- Page 242 NORAD Tracking publicly available). Columns with a '+' can have either a plus sign, a minus sign, or a space and columns with a '-' can have either a plus or minus sign (if the rest of the field is not blank). Data for each satellite consists of three lines in the following format: AAAAAAAAAAAAAAAAAAAAAAAA 1 NNNNNU NNNNNAAA NNNNN.NNNNNNNN +.NNNNNNNN +NNNNN-N +NNNNN-N N NNNNN...
- Page 243 (not noon) and that all times are measured mean solar rather than sidereal time units. The 2-line element data can be entered into the 7200 ACU by use of the front panel or the M&C system. For most users the M&C is the best and most efficient way to setup and maintain NORAD targets.
- Page 244 NORAD Tracking The ACU will display each required parameter that must be read from the two-line element set. Parameter: " Year" Limits: 2000 to 2099 Description: Year is the year portion of the Epoch time on which the element set is based. Note: The input value MUST be a 4 digit number.
- Page 245 NORAD Tracking Parameter: " Arg. of Perigee [Degrees]" Limits: 0.0 to 360.0 Description: Earth Centered Inertial Argument of Perigee in a True Earth Mean Equinox (TEME) reference fixed at the time of Epoch. Units: degrees Parameter: " Mean Anomaly [degrees]" Limits: 0.0 to 360.0 Description: Earth Centered Inertial Mean Anomaly in a True Earth Mean Equinox (TEME)
- Page 246 NORAD Tracking BSTAR 54-61 Inclination 09-16 RAAN 18-25 Eccentricity 27-33 ARGP 35-42 Mean Anomaly 44-51 Mean Motion 53-63...
- Page 247 CP/LP PATH Option Notes Appendix L CP/LP PATH Option Notes For 7200 with CP/LP-PATH option ONLY: Changes to user interface: Real time display provides status of feed switches in the following compact format: TX=transmit; RX=receive; CP=circular polarization; LP=linear polarization H or V = Horizontal or Vertical for LP alignment...
- Page 248 CP/LP PATH Option Notes Target Editing Changes: Modify current target… Set feed mode… Add “Feed path” ITEMTITLE= " Feed path" MACNAME= FEEDPATH OPERATOR =SECURE Help These parameters set the path for RX and TX. For each selection: Path 1 = LCP or VLP Path 2 = RCP or HLP Format: RX: xxx/xxx TX: xxx/xxxx...
- Page 249 CP/LP PATH Option Notes M&C support The “MT M&C” support is for Path selection is provided by parameter MACNAMEs listed above. The Path status is provided as part of the existing “G” Keyword. G [F] -- returns global system status. Arguments: F (optional): transmit full status report Default: transmit only changes since last G command.
- Page 250 CP/LP PATH Option Notes R370 requests feed status. Returns three hex digits, bit-mapped: Returns three hex digits (FFF), bit-mapped: Bit 0: 1 = AT_LP Bit 1: 1 = AT_CP Bit 2: 1 = LP_CMP Bit 3: 1 = CP_CMD Bit 4: 1 = AT_TX_LP Bit 5: 1 = AT_TX_CP Bit 6: 1 = TX_LP_CMD Bit 7: 1 = TX_CP_CMD...
- Page 251 CP/LP PATH Option Notes Bit 10: 1 = SW2 TX LV Bit 11: 1 = SW2 TX RH This information overlaps status provided in R370 but is more complete. It is recommended for a CP/LP-PATH system that R371 be utilized in place of R370.
- Page 252 CP/LP PATH Option Notes SW6 TXLP = Switch 6 in LP position “Display system status…’ “Hardware diagnostics…” “Output states…” Status of commands to the CP/LP-PATH controller are displayed in the “Output states” Switch indications displayed are: LP_CMD = Command feed to LP configuration CP_CMD = Command feed to CP configuration TX-P2-CMD = Command TX to RCP/HLP path TX-P1-CMD = Command TX to LCP/VLP path...
Need help?
Do you have a question about the 7200 and is the answer not in the manual?
Questions and answers