Bose VideoWave III Setup Manual
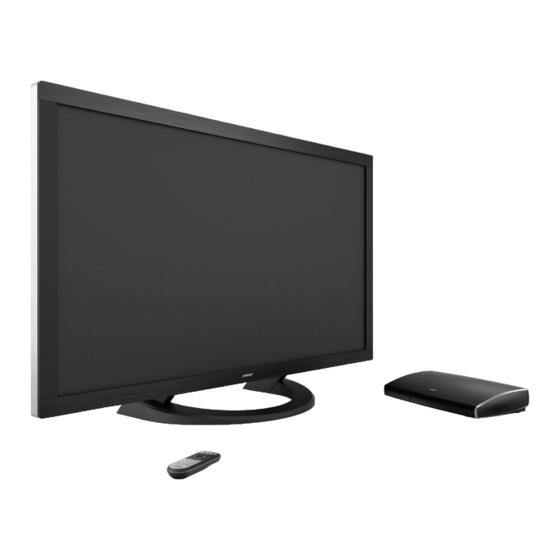
Entertainment system
Hide thumbs
Also See for VideoWave III:
- Operating manual (38 pages) ,
- Owner's manual (221 pages) ,
- Owner's manual (14 pages)

Related Manuals for Bose VideoWave III


Summary of Contents for Bose VideoWave III
- Page 1 Setup Guide Guía de instalación Guide d’installation VideoWave ® entertainment system...
-
Page 2: Safety Information
• Never place the equipment on an unstable surface. The equipment may fall, All Bose products must be used in accordance with local, state, and federal law, causing serious personal injury or death. Many injuries, particularly to children, ®... -
Page 3: Important Safety Instructions
Safety Information Important Safety Instructions CAUTIONS: • Make no modifications to the system or accessories. Unauthorized alterations 1. Read these instructions. may compromise safety, regulatory compliance, and system performance, and 2. Keep these instructions. may void the warranty. 3. Heed all warnings. •... - Page 4 HDMI and the HDMI logo are trademarks or registered trademarks of HDMI Licensing LLC in the United States and other countries. ©2013 Bose Corporation. No part of this work may be reproduced, modified, distributed, or otherwise used without written permission.
-
Page 5: Table Of Contents
Contents Introduction Interactive Setup Welcome ................. Starting the system ............. 16 Product overview ..............Unpacking ................Physical Setup Monitor placement and connections........ Monitor placement recommendations ..... Placing the monitor with the stand ......Installing the anti-tip straps ........10 Wall-mounting the monitor ........12 Control console placement and connections .... -
Page 6: Welcome
If any part appears damaged, do not attempt to use it. Notify Bose or your authorized Bose dealer immediately. For Bose contact information, refer to the address sheet included in the Bose... -
Page 7: Physical Setup
3–10 ft. (0.9–3.0 m) sound (0.9–3.0 m) Monitor placement recommendations Much like a live performance in a concert hall, the Bose ® VideoWave III entertainment system relies on the reflective sur- ® faces of the room to deliver a spacious home theater experience. -
Page 8: Placing The Monitor With The Stand
Anti-tip strap screws (4) * The supplied monitor cable is not rated for in-wall use. In-wall monitor Monitor Monitor cables are available from Bose or a Bose authorized dealer. support support You also need the stand, screws, and wrench: Hex wrench... - Page 9 Physical Setup On the rear panel of the monitor, firmly pull out on the Place the monitor on a flat, stable surface capable of bottom of the connector cover (A), and pull down (B) to supporting the combined weight of the stand and the remove it.
-
Page 10: Installing The Anti-Tip Straps
Plug the AC power cord from the monitor into a live AC (mains) outlet. Restore the connector cover. Bolts to remove CAUTION: Bose strongly recommends installing the supplied ® two anti-tip straps that, when properly installed, provide an extra measure of security in the event that the monitor accidentally starts to tip over. - Page 11 Physical Setup Using the same bolts, attach the two straps to the back of Hold the bracket on the end of each strap against the wall the monitor. a minimum of 18 in. (46 cm) or maximum of 24 in. (61 cm) above the tabletop.
-
Page 12: Wall-Mounting The Monitor
Physical Setup Wall-mounting the monitor Push the monitor back to within 1–4 in. (2.5–10 cm) from the wall. The VideoWave III entertainment system is compatible with any ® VESA certified bracket that uses a 400 mm x 400 mm screw pattern. - Page 13 Physical Setup Attach the monitor cable and AC power cord to the monitor Lift the monitor out of its packing material. as shown. WARNING: The 46 in. monitor weighs 120 lbs. (54 kg). The You do not need to re-attach the connector cover. Hiding 55 in.
-
Page 14: Control Console Placement And Connections
Physical Setup Control console placement To place and connect the control console: Place the control console on a flat, stable surface near and connections the monitor. • Make sure the supplied monitor cable (3 m) can reach Here is what you need from Box 1: from the control console to the monitor. - Page 15 Physical Setup Plug the free end of the monitor cable into the Plug the AC power cord into the power supply. Fully insert A/V OUT to Monitor connector on the rear panel of the the plug in as far as it can go. control console.
-
Page 16: Starting The System
The USB flash drive can be used Here is what you need from Box 2: to update the system software. (See the operator’s guide for more information on software updates.) Bose click pad remote ADAPTIQ audio HDMI™... - Page 17 Shutting down, or off and charg- ing iPod or iPhone dock (dock available for purchase from Bose). Note: When the system starts up, the monitor emits a start-up tone and displays the Bose logo with a progress bar. English - 17...
- Page 18 When the system is started up for the first time the following Follow the onscreen instructions to complete your system instruction appears on the monitor: setup. “Press and hold the OK button on the Bose remote control The Unify intelligent integration system guides you through ®...
-
Page 19: If You Have Setup Problems
® III entertainment system Operating Guide. For help in trying to resolve any problems, see the troubleshooting table in the operating guide. Contacting customer service For additional assistance, contact Bose Customer Service. See the included contact list. English - 19... - Page 20 ©2013 Bose Corporation, The Mountain, ® Framingham, MA 01701-9168 USA AM370618 Rev. 00...
Need help?
Do you have a question about the VideoWave III and is the answer not in the manual?
Questions and answers