
Related Manuals for Meade POLARIS SERIES


Summary of Contents for Meade POLARIS SERIES
- Page 1 MEADE INSTRUCTION MANUAL POLARIS SERIES Polaris Series German Equatorial Telescopes...
- Page 2 WARNING! Never use a Meade Telescope to look at the Sun! ® Looking at or near the Sun will cause instant and irreversible damage to your eye. Eye damage is often painless, so there is no warning to the observer that damage has occurred until it is too late.
- Page 3 (Refractors only) counterweight •Prepare the mount The Polaris Series of telescope includes •Attach the optical tube to the mount optical tubes of different sizes and design. Some optical tubes use lenses to focus the •Attach the red dot viewfinder incoming light and are called refractors.
- Page 4 FIGURE 1A Figure 1A: Meade Polaris Reflecting Telescope Inset A: Accessory Tray Inset B: Red Dot Viewfinder Assembly. Inset C: Tripod Leg 1. Tripod legs 26. Eyepiece holder slots (see Inset A) 2. Large Equatorial Mount 27. Right Ascension setting circle 3.
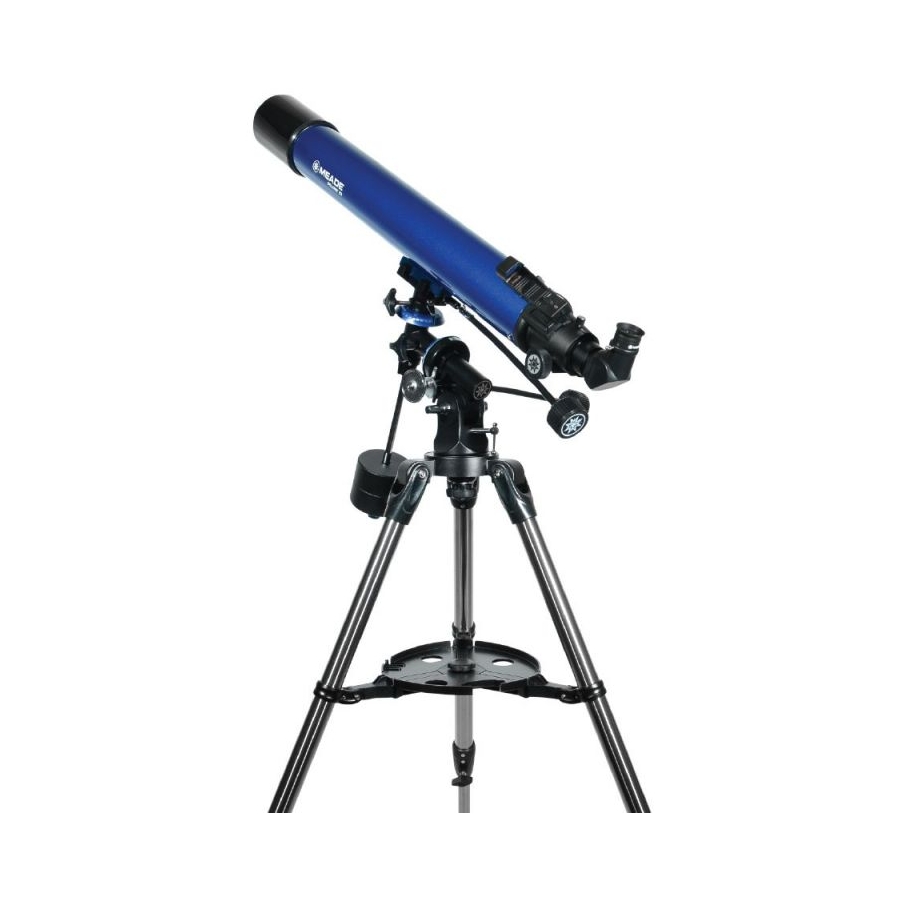
- Page 5 FIGURE 1B Figure 1B: Meade Polaris Refracting Telescope Inset A: Accessory Tray Inset B: Red Dot Viewfinder Assembly. Inset C: Tripod Leg 1. Tripod legs 26. Eyepiece holder slots (see Inset A) 2. Small Equatorial Mount 27. Right Ascension setting circle 3.
- Page 6 3. Hold the counterweight (5) firmly in one 1.Spread the tripod legs out evenly apart. hold eyepieces and other Meade accessories hand and slide the counterweight onto the while observing, such as the Barlow lens.
- Page 7 PREPARE THE MOUNT Fig. 3 ATTACH THE RED DOT VIEWFINDER 1. Attach the flexible cables (3) and (4). An eyepiece (19) has a narrow field of These cables are secured in place with view. The red dot viewfinder (24) has a firm tightening of the thumbscrews a wider field of view, which makes it located at the attachment ends of each...
- Page 8 locking screw (16, Fig 5). 3. Then, slide the MA25mm eyepiece (19) SUN WARNING! directly into 90 degree erect image prism (14, NEVER USE YOUR TELESCOPE Fig. 4 Fig 1B). TO LOOK AT THE SUN! 4. Tighten the 90 degree erect image prism LOOKING AT OR NEAR THE SUN WILL thumbscrew (15, Fig 1B) to hold the eyepiece CAUSE INSTANT AND IRREVERSIBLE...
- Page 9 object, such as the Moon or a bright star, and astronomical objects. Another technique lock knob (7) before rotating the RA axis use the viewfinder’s alignment screws to for locating objects is to use the setting to prevent the counterweight from sliding make any necessary refinements.
- Page 10 Declination. For example: You can locate Rotation Los Angeles, California, by its latitude of the THE MEADE 4M COMMUNITY Earth (+34°) and longitude (118°). Similarly, you Dec. can locate the Ring Nebula (also known as You haven’t just bought a telescope, you have em- “M57”) by its Right Ascension (18hr) and its...
- Page 11 MOUNT motion is caused by Earth’s rotation). During 1. Slightly loosen the Azimuth lock (30) of the To line up the Meade Polaris German any 24 hour period, stars make one complete Azimuth base, so that the entire telescope- revolution about the pole, circling with the with-mounting may be rotated in a horizontal pole at the center.
- Page 12 is centered in the telescope’s red You will enjoy your telescope even more In Reflecting telescope models, objects will dot viewfinder. Then center it in the as you learn more about it. But don’t be appear upside down and backwards in this MA25mm eyepiece.
- Page 13 Moon, making it appear flat and chosen. uninteresting. Meade as an optional accessory and enhance Try out the slow-motion flexible cable control: Look for different features on the Moon. The contrast to improve your observation of lunar Practice using the right ascension control most obvious features are craters.
- Page 14 SURF THE WEB astronomer Galileo, who observed them for in your telescope. the first time. If you’ve never watched the • The Meade 4M Community: http://www.meade4m.com Galilean moons in your telescope before, Venus is seen before dawn or after sunset, •...
- Page 15 Optional color filters help bring out detail and Almost all the stars you can see in the contrast of the planets. Meade offers a line of Fig. 10 sky are part of our galaxy. A galaxy is a inexpensive color filters.
- Page 16 And if you’re lucky, every so often a bright Meade offers a complete line of eyepieces for fun, and the more rewarding your telescope comet appears in the sky, presenting an your telescope.
- Page 17 that the object to be viewed is again placed due to temperature differences between movement is caused by the rotation of the at the edge of the field, ready to be further inside and outside air. Also, it is a Earth and makes an object move through observed.
- Page 18 Objective lens diameter....90mm (3.5”) Focal ratio……………......….f/10 SPECIFICATIONS ASTRONOMY RESOURCES Mount………..…..Large German Equatorial POLARIS 70 • The Meade 4M Community 27 Hubble, Irvine, CA 92618 Optical tube design………....Refractor • Astronomical League POLARIS 114 Executive Secretary Optical tube focal length…....900mm 5675 Real del Norte, Las Cruces, NM 88012 Optical tube design……....….Reflector...
- Page 19 how fast the photographic speed Fig. 11 POLARIS 127 of a telescope is. The lower the Optical tube design……....….Reflector focal ratio number, the faster the exposure. F/5 is faster than f/10. Optical tube focal length…....1000mm The slower the focal ratio, the longer Monture Primary mirror diameter…....127mm (5.0”) Miroir Diagonal...
- Page 20 can triple or further increase the power of objects 100 times. It will rarely, if ever, require factory servicing an eyepiece. To find out how much your calculate much or maintenance. Follow these guidelines to magnification is when you use a 2x Barlow, magnification an eyepiece will have with keep your telescope in the best condition: multiply your eyepiece’s magnification by two.
- Page 21 A. CORRECT COLLIMATION The properly collimated (aligned) mirror system in the Meade Polaris telescope assures the sharpest images possible. This occurs when the primary mirror and secondary Secondary Mirror Misalignment Correct Collimation mirror are tilted so that the focused image Fig.
- Page 22 To inspect the view of the mirror collimation, look down the focuser draw tube with the eyepiece removed. The edge of the focuser drawtube (1, Fig. 14), will frame the reflections of the primary mirror with the 3 mirror clips (2, Fig.
- Page 23 lower end of the main tube. grasping the secondary holder with your third magnitude) star, then center the hand, tilt the secondary mirror holder until you star image in the telescope’s field-of- To adjust the primary mirror tilt screws (2, Fig see the primary mirror become as centered view.
- Page 24 Then slightly move the Contact your Meade Dealer or see the Meade telescope using the flexible cable controls to catalog for more information. Visit us on the center the star disk image in the center of the web at www.meade.com.
- Page 25 Goods Authorization (RGA) number must ©2014 MEADE INSTRUMENTS CORP. particulars as to the nature of the problem, be obtained from Meade by writing, or by as well as your name, address, and daytime calling (800) 626-3233. Each returned part telephone number. The great majority of...
- Page 26 OBSERVATION LOG OBSERVER: OBJECT NAME: DATE & TIME OBSERVED: CONSTELLATION: EYEPIECE SIZE: SEEING CONDITIONS: EXCELLENT GOOD POOR NOTES: DRAWING OF IMAGE...
- Page 27 OBSERVATION LOG OBSERVER: OBJECT NAME: DATE & TIME OBSERVED: CONSTELLATION: EYEPIECE SIZE: SEEING CONDITIONS: EXCELLENT GOOD POOR NOTES: DRAWING OF IMAGE...
- Page 28 1-800 92618 Meade Instruments Corp. 27 Hubble, Irvine, California...
Need help?
Do you have a question about the POLARIS SERIES and is the answer not in the manual?
Questions and answers