Advertisement
Table of Contents
- 1 Table of Contents
- 2 Camera Kit Contents
- 3 System Requirements and Compatibility
- 4 General Information
- 5 Battery Life
- 6 Quick Start Guide
- 7 Camera Overview
- 8 Installation
- 9 Battery and Memory Installation
- 10 Viewing and Deleting Files
- 11 Advanced Instructions / Camera Setup and Programming
- 12 Cancam Features and Specification
- Download this manual
Advertisement
Table of Contents

Related Manuals for ESP CanCam


Summary of Contents for ESP CanCam
- Page 1 CanCam Manual_Layout 5 05/09/2013 12:21 Page 1 Rapid deployment surveillance system...
-
Page 2: Table Of Contents
CanCam Manual_Layout 5 05/09/2013 12:21 Page 2 Table of contents Camera Kit Contents ................. 2 System Requirements and Compatibility ..........3 General Information .................. 3 Battery Life ....................3 Quick Start Guide..................4 Camera Overview ..................5 Installation ....................8 Battery and Memory Installation ............ -
Page 3: System Requirements And Compatibility
This will damage the unit and void the warranty. • Do not attempt to enter the internal workings of CanCam as this could cause serious damage and invalidate the warranty. •... -
Page 4: Quick Start Guide
This guide is designed to get the camera up and running in a matter of moments. To get the most out of the CanCam and obtain a full understanding of its wide range of options, please read the manual thoroughly before operating. -
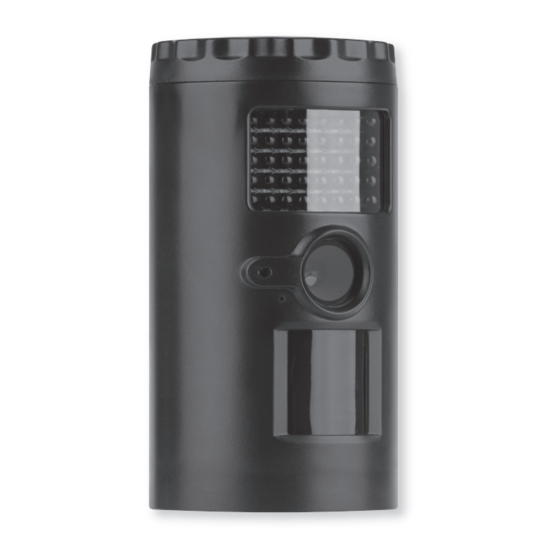
Page 5: Camera Overview
CanCam Manual_Layout 5 05/09/2013 12:21 Page 5 Camera Overview Front View Batteries Cover : Turn to open the cover to install the batteries. To replace cover line up the arrows on the cover and main body of CanCam, open then press down and rotate the cover in a clockwise direction. - Page 6 CanCam Manual_Layout 5 05/09/2013 12:22 Page 6 Bottom view Open the Bottom Cover to show camera’s interface. LCD display : displays the menu’s option and modes. USB port : Connects the camera to a PC via USB cable to view stills or video clips.
- Page 7 CanCam Manual_Layout 5 05/09/2013 12:22 Page 7 LCD Display • : Indicates the camera is in still image mode. VIDEO • : Indicates the camera is in video mode. • : Indicates the camera is in burst mode or video length mode.
-
Page 8: Installation
CanCam Manual_Layout 5 05/09/2013 12:22 Page 8 Installation STRAP MOUNTING WALL MOUNTING EFFECTIVE RANGE EFFECTIVE ANGLE Listed below are some helpful pointers on how to use your camera to get the best results. • Mount the camera between 1.5~2M (5~6 feet) high with the camera pointed at a slight downward angle. -
Page 9: Battery And Memory Installation
SD card. Removing batteries or memory card while the camera is ON may damage the camera. Your CanCam is designed to operate using two different types of battery power options. Batteries “C” cell The internal battery compartment accepts 4 “C” cell batteries. Be sure to use high quality brand name alkaline batteries. -
Page 10: Viewing And Deleting Files
The LCD display on bottom of the housing will show the number of stills stored on the SD card. Viewing files by computer Your CanCam is a plug and play USB storage device for users of Windows XP / Vista / Windows 7 operating systems. This camera is compatible with MAC 10.6 and above. - Page 11 CanCam Manual_Layout 5 05/09/2013 12:22 Page 11 • At this point there are several options: – To view images or play videos: Click on the Removable Storage device and then select the file you want to see. – To save images and videos: Highlight the file or files you want to save and drag them to your hard drive.
-
Page 12: Advanced Instructions / Camera Setup And Programming
CanCam Manual_Layout 5 05/09/2013 12:22 Page 12 TV Out System Settings: • Press the [M] button once. • The word “ tu ” on the camera’s internal screen will be blinking. • Press the [OK] once and now you’ll see “ tu – n “ blinking. - Page 13 • Press [M] button to exit. Setting the Image Resolution in PIR mode: The CanCam can be programmed to 3 different image resolutions: 3 Stars is 8Mp, 2 Stars is 5Mp and 1 Star is 3Mp. • Slide the switch to the CAM position, LCD display will show the camera status screen.
- Page 14 [OK] button to enter time out setting or press [M] button to exit. Setting the Video Resolution in PIR mode: The CanCam can be programmed to 2 different video resolutions: 2 Stars is HD 720, 1 Star is VGA 640 x 480 pixels.
- Page 15 CanCam Manual_Layout 5 05/09/2013 12:22 Page 15 Setting the Time Out in PIR mode: The CanCam can be programmed to set the amount of time in seconds or minutes the camera will sleep between PIR triggers. • Slide the switch to the CAM position, LCD display will show the camera status screen.
- Page 16 CanCam Manual_Layout 5 05/09/2013 12:22 Page 16 • Press [UP] or [DN] to increase or decrease the Month value (1 - 12). • Press [OK] to save your selection and enter Day setting. • The DAY digits will be blinking.
- Page 17 CanCam Manual_Layout 5 05/09/2013 12:22 Page 17 • Press [UP] or [DN] to increase or decrease the hour value (00 – 23). • Press [OK] to save the “Start Time” setting and move to the “End Time” setting. • After completing the start time setting, camera will go into TLS Mode "End Time"...
- Page 18 CanCam Manual_Layout 5 05/09/2013 12:22 Page 18 To Capture Videos, make sure display reads VIDEO: • Once in CAM mode, if the display does not read VIDEO then, • Press the [M] button once. • If the LCD display does not show word VIDEO in blinking.
-
Page 19: Cancam Features And Specification
CanCam Manual_Layout 5 05/09/2013 12:22 Page 19 CanCam Features and Specification • High precision multi-layer glass lens with coating. • Effective viewing angle: 50 degrees • Infrared LED effective Range for picture up to 18M (50 ft). • Infrared LED effective Range for Video clip up to 18M (50 ft). - Page 20 CanCam Manual_Layout 5 05/09/2013 12:22 Page 20 Elite Security Products Telephone: 01527 515150 Unit 7, Target Park, Shawbank Rd Fax: 01527 515143 Lakeside, Redditch B98 8YN email: info@espuk.com...
Need help?
Do you have a question about the CanCam and is the answer not in the manual?
Questions and answers