Efergy E2 Instruction Manual
Wireless electricity monitor
Hide thumbs
Also See for E2:
- User manual (40 pages) ,
- Instruction manual (12 pages) ,
- Instructions manual (11 pages)
Table of Contents
Advertisement
At the end of its serviceable life, this product should not be treated as household general waste. It should be handed
over to the applicable collection point for the recycling of electrical equipment, or returned to the supplier for disposal.
*All values shown in this manual are only examples. Actual figures will vary depending on your consumption.
E2
WIRELESS
ELECTRICITY
MONITOR
INSTRUCTION
MANUAL
Advertisement
Table of Contents

Related Manuals for Efergy E2


Summary of Contents for Efergy E2
- Page 1 WIRELESS ELECTRICITY MONITOR At the end of its serviceable life, this product should not be treated as household general waste. It should be handed over to the applicable collection point for the recycling of electrical equipment, or returned to the supplier for disposal. INSTRUCTION MANUAL *All values shown in this manual are only examples.
-
Page 2: Table Of Contents
Ask George Setting the Time and Date If you have any questions about using your efergy monitor or if you’d like further advice on Setup Instructions monitoring electricity at home, please feel free to contact us, or visit the website for up to date Dual Tariff Mode information, downloads and frequently asked questions. -
Page 3: In The Box
CT sensor Transmitter product. 1 x mini CT Sensors When installing the efergy monitor you should find that everything is relatively 1 x Transmitter • Wireless Energy Monitor straightforward. However, there are a number of important health and safety issues which you need to be aware of. -
Page 4: Hardware Installation
HARDWARE INSTALLATION HARDWARE INSTALLATION MOUNTING INDIVIDUAL OR MULTIPLE CIRCUITS MOUNTING INDIVIDUAL OR MULTIPLE CIRCUITS CONTINUED Dual Tariff Meters Locate Your Electrical Panel Dual Tariff meters (shown in Fig. 3) will often have an auxiliary cable running between cable 3 Locate your electricity meter and determine its type. You and cable 4. - Page 5 HARDWARE INSTALLATION MONITOR SETUP INSTALLING THE MINI CT SENSOR LINKING THE TRANSMITTER AND MONITOR The sensor needs to be fitted to the live feed cable. Sensors are suitable for cables up to Step 1 - Ensure three AA batteries are inserted in the transmitter link If the is completed...
-
Page 6: Monitor Setup
& you will exit the function setting mode. Set the time and date as follows: monitor needs to know the unit cost per kWh charged by your electricity supplier, efergy Step 1 along with voltage and alarm settings. The following steps will move through each of these On the reverse of the display you will find the time set settings (See page 15 for Dual Tariff Settings). -
Page 7: Dual Tariff Mode
MONITOR SETUP MONITOR SETUP DUAL TARIFF MODE Step 3 - Single Tariff Set Up If you have a dual or multiple tariff rate meter you may want to setup the dual tariff function. On release you will see the symbol tariff period 1 will be highlighted. If you are charged one single tariff push unit set button to confirm. -
Page 8: How To Change Functions
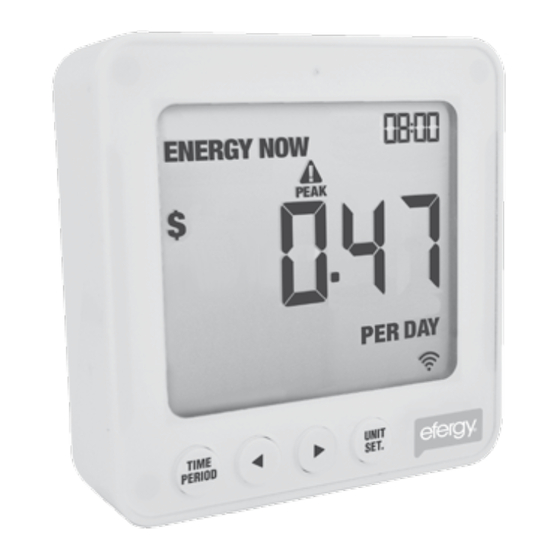
Note - Hourly data is stored in the e2 for 240 days. This can be viewed when the data is transferred onto your computer using the elink software. -
Page 9: How To Change Modes
MONITOR SETUP MONITOR SETUP HOW TO CHANGE MODES CONTINUED HOW TO CHANGE MODES Mode Step 5 - Time Period Button Press unit set button to change the unit displayed. Press time period button to change from daily, to weekly and to monthly data during AVERAGE or HISTORY mode. -
Page 10: Faqs
The LED backlight will be activated Installed By ___________________________________________________ from 18:00Hrs to 6:00Hrs. Number of CTs ___________________________________________________ For more information about the e2 and the elink software go to www.efergy.com Voltage Set Point ___________________________________________________ Tariff Settings ___________________________________________________...
Need help?
Do you have a question about the E2 and is the answer not in the manual?
Questions and answers