MOOSE Z900 User Manual
Hide thumbs
Also See for Z900:
- How to use manual (26 pages) ,
- User manual (35 pages) ,
- Quick start manual (3 pages)
Table of Contents
Advertisement
THESE SYSTEMS HAVE BEEN DISCONTINUED
Table Of Contents
1.
1.1
System Orientation . . . . . . . . . . . . . . . . . . . . . . . . . . . . . ..1-1
1.2
Arming . . . . . . . . . . . . . . . . . . . . . . . . . . . . . . . . . . . . . . . . .1-3
Timing The System Prior To Leaving . . . . . . . . . . . . . . . ..1-3
Arming The System Without Leaving . . . . . . . . . . . . . . . . .1-4
Automatic Interior Off/Delay Off . . . . . . . . . . . . . . . . . . 1-5
Two Digit Arming. . . . . . . . . . .. . . . . . . . . . . . . . . . . . . .1-5
System Will Not Arm (READY Light Off). . . . . . . . . . . . . . 1-5
1.3
Disarming . . . . . . . . . . . . . . . . . . . . . . . . . . . . . . . . . . . . .1-6
Disarming Upon Entering The Premises . . . . . . . . . . . . . .1-6
1.4 Alarm Conditions . . . . . . . . . . . . . . . . . . . . . . . . . . . . . . . . . 1-7
What To Do If An Alarm Occurs . . . . . . . . . . . . . . . . . . . . . . .1-7
To reset the alarm: . .. . . . . . . . . . . . . . . . . . . . . . . . . . . .1-7
False Alarms. . . . . . . . . . . . . . . . . . . . . . . . . . . . . . . . . . . . . . 1-7
1.5 The Keypad Panic Alarms . . . . . . . . . . . . . . . . . . . . . . . . . . 1-8
Alarm Activation . . . . . . . . . . . . . . . . . . . . . . . . . . . . . . . . . . . 1-8
Resetting the Alarm . . . . . . . . . . . . . . . . . . . . . . . . . . . . . . . . 1-8
1.6 Special Features . . . . . . . . . . . . . . . . . . . . . . . . . . . . . . . . . .1-9
Chime Mode Operation . . . . . . . . . . . . . . . . . . . . . . . . . . . . . 1-9
To Turn CHIME On . . . . . . . . . . . . . . . . . . . . . . . . . . . . .1-9
To Turn CHIME Off . . . . . . . . . . . . . . . . . . . . . . . . . . . . .1-9
Force Arming. . . . . . . . . . . . . . . . . . . . . . . . . . . . . . . . . . . . . .1-9
Bypassing Zones . . . . . . . . . . . . . . . . . . . . . . . . . . . . . . . . .1-10
To Bypass A Zone. . . . . . . . . . . . . . . . . . . . . . . . . . . . . 1-10
To Cancel A Zone Bypass. . . . . . . . . . . . . . . . . . . . . . .1-10
To Cancel All Zone Bypasses . . . . . . . . . . . . . . . . . . . .1-11
To Bypass All Faulted Zones Simultaneously . . . . . . . .1-11
User Manual
Z900 and Z950
i
Advertisement
Table of Contents

Related Manuals for MOOSE Z900


Summary of Contents for MOOSE Z900
-
Page 1: Table Of Contents
THESE SYSTEMS HAVE BEEN DISCONTINUED Table Of Contents Z900 and Z950 Operating Your System System Orientation .......1-1 Arming . - Page 2 Key Switch Operation ......1-11 Arming ........1-11 Disarming .
-
Page 3: Operating Your System
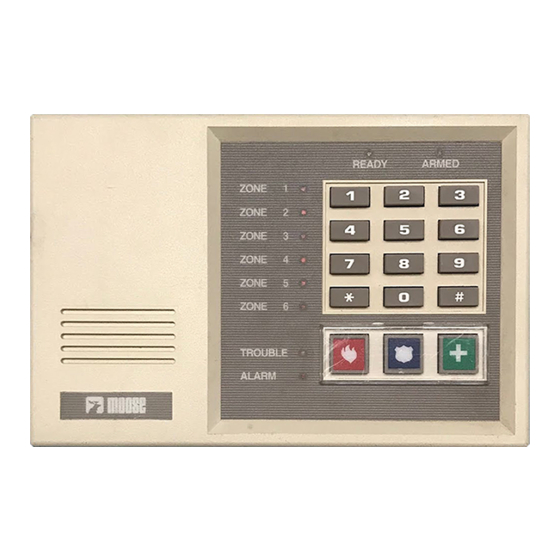
Operating Your System 1.1 System Orientation NOTE Your security system may consist of either 8 zones, 8 users or 6 zones, 6 users. Please verify the number of zones and users with your Security Company Representative. The keypad for your security system is illustrated in FIGURE 1-1 on Page 1-2. The keypad is the most important and most used component in your security system. - Page 4 each key and its programming are explained on Page 1-8. User's Manual...
-
Page 7: Arming
1.2 Arming Arming The System Prior To Leaving Before your security system can be armed, all of the intrusion zones must be secure as indicated by the green READY indicator. If the READY indicator is off, one or more zones are faulted. The indicator(s) corresponding to the faulted zone(s) will light. -
Page 8: Arming The System Without Leaving
Arming The System Without Le aving Your security system is divided into two areas of protection: PERIMETER - The first line of defense. Consists of one or more zones which detect intrusion through doors and windows. INTERIOR - The backup or second line of defense. Consists of one or more zones that detect intruders that have already entered the building. - Page 9 User's Manual...
-
Page 10: Automatic Interior Off/Delay Off
Automatic Interior Off/Delay Off Your system may have been programmed to automatically turn the interior zones off if you arm and do not leave the premises before the exit delay time expires. The entrance delay may also be programmed to automatically turn off at this time. -
Page 11: Disarming
1.3 Disarming Disarming Upon Entering The Premises Your system is programmed with one or more entrance delay zones which allow time to enter the premises without causing an alarm. Each delay door may have one of two different entry times. Be sure to check with your installer. If your system has the "Interior Follower"... - Page 12 User's Manual...
-
Page 13: Alarm Conditions
1.4 Alarm Conditions What To Do If An Alarm Occurs Whenever an alarm occurs, the ALARM indicator will light, the audible alarm will sound (if applicable), and the control will communicate with the Central Station (if this option was purchased). WARNING IF UPON RETURNING TO THE PREMISES, IT IS DISCOVERED THAT AN ALARM HAS OCCURRED, DO NOT ENTER THE PREMISES. - Page 14 User's Manual...
-
Page 15: The Keypad Panic Alarms
1.5 The Keypad Panic Alarms Your system may have been purchased with up to three keypad panic alarms. These may be used to activate an alarm in the event of a Fire, Hold-up, or other condition, as programmed by your installer. Each alarm is activated by pressing the appropriate panic key (located below the numeric keys). - Page 16 User's Manual...
-
Page 17: Special Features
1.6 Special Features Chime Mode Operation The CHIME mode allows audible monitoring of zones while the system is dis - armed. When the CHIME mode is active, the keypad sounder will beep when ever a perimeter burglar defined zone (door, window, etc.) indicator is opened. For example, the CHIME feature will cause the keypad to beep two times whenev- er the front door has been opened. - Page 18 User's Manual...
-
Page 19: Bypassing Zones
Bypassing Zones The Bypass (#) key is used to bypass selected zones in your system. A bypassed zone will NOT be capable of activating an alarm as it is temporarily removed from your system. Bypassing (also referred to as shunting) is most commonly used to allow free movement of an area (zone or group of zones) while arming the rest of the system or to temporarily remove a zone or zones that require service, allowing partial use of the system until repaired. - Page 20 1-10 User's Manual...
-
Page 21: To Cancel All Zone Bypasses
To Cancel All Zone Bypasses Press the Bypass (#) key followed by key “9" 2. All ZONE indicators will stop flashing. The zones are returned to operation. To Bypass All Faulted Zones Simultaneously (Not available in U.L. Listed Systems) 1. The system must be disarmed. Press the Bypass (#) key, then press the "0"... - Page 22 User's Manual 1-11...
-
Page 23: Access
Access (U.L. Note: The control is not listed to Standard U.L. 294 Access Control Units.) If your system was purchased with the ACCESS feature, the keypad can be used to switch other devices on and off or as a timed switch. This feature is most commonly used to activate an electric door release or switch lights on and off. - Page 24 1-12 User's Manual...
-
Page 25: Audible Zone Testing With Bell Test And Dialer Test
Audible Zone Testing With Bell Test and Dialer Test NOTE The bell test and dialer test are not available on the Z900. The TEST mode commands the keypad to beep continuously and light the corresponding zone indicator, each time a zone is violated. The zone indicator of each tested zone will remain lighted while each succeeding zone is tested. - Page 26 User's Manual 1-13...
- Page 27 Violate a detection zone (open a door, window, etc.). The keypad will beep continuously and the indicator of the corresponding zone will light. Secure the zone (close the door, window, etc.). The keypad beeping will cease. The interior detection devices will also cause the keypad to beep if entering those protected areas when testing unless the INTERIOR is...
- Page 28 1-14 User's Manual...
-
Page 29: Fire Detection
1.7 Fire Detection Your system may or may not include fire detection, depending upon the options purchased and the local codes and regulations for your area. Fire alarm systems are active 24 hours a day and cannot be turned off. All fire systems require regular testing and maintenance. - Page 30 User's Manual 1-15...
-
Page 31: Testing The Fire System
Fire Supervisory/Trouble (Resetting Smoke Detectors) Many smoke detectors "latch on" and illuminate a built-in indicator when trig- gered. This feature allows you to determine which detector caused the alarm. If a smoke detector remains latched after resetting a fire alarm activation, the yellow TROUBLE indicator will be lit. - Page 32 1-16 User's Manual...
-
Page 33: Evacuation Plan
Evacuation Plan 2.1 Developing An Evacuation Plan Preparation and education are of prime importance in the prevention of fire. An evacuation plan should be established BEFORE a severe situation arises. Your security system may or may not contain fire detection and notification equipment. Make sure your security company representative fully explains the configuration of your system. - Page 34 User's Manual...
-
Page 35: Fire Prevention And Escape
2.2 Fire Prevention And Escape The purpose of heat and smoke detectors is to detect a fire in its earliest stages and sound an alarm, giving you more time to exit the premises before smoke reaches a dangerous level. Know Fire Hazards No detection device can protect life in all situations;... - Page 36 User's Manual...
-
Page 37: Be Prepared
Be Prepared Perform fire drills regularly. Use them to assure recognition of an alarm signal. For your protection, simulate different circumstances (smoke the hall, living room, etc.). Then have everyone react to the situation. Draw a floor plan and show two exists from each room. - Page 38 User's Manual...
- Page 39 SYSTEM USER REFERENCE User Code #1 __________ User Code #2 __________ User Code #3 ___________ User Code #4 __________ User Code #5 __________ User Code #6 ___________ User Code #7 __________ User Code #8 __________ Code #6/8 Usage ? Permanent ? Temporary (Check One) Duress Code - - - - (Check if used) AUXILIARY PANICS ? Auxiliary A ? Auxiliary B ? Auxiliary C (Check if enabled)
- Page 40 NOTE: Once every minute the Z900ST performs a self diagnostic test which causes the LCD display to momentarily blink. This is normal operation and should not cause concern. User's Manual...
-
Page 41: Programming
Programming Certain features of your system are programmable through the keypad. The pro- gramming mode is entered by pressing key 9 and holding for three seconds, then entering the Master User Code. Other programming functions may be possible that are not detailed in this section. Consult your security company representative for a list of the user programmable features of your system. -
Page 42: Changing User Codes
(see remote programming note on Page 3 - Press a key (2-8) for Z950/Z880 or (2-6) for Z900 which corresponds to the User Code you wish to program, or press key 1 to change the Master User Code. - Page 43 User's Manual...
-
Page 44: Deleting A Code
(see remote programming note on Page 3-1). Press key 1, then, for the Z950/Z880, press key 2 or, for the Z900, press key 0. Next, press the Bypass (#) key which instructs the control that you wish to delete a code. - Page 45 indicators will blink in sequence with each other when the program ming mode is successfully entered (see remote programming note on Page 3-1 ). User's Manual...
- Page 46 Repeat steps 2 and 3 to re-enter the programming mode. Press key 7 for the Z900 control or key 9 for the Z950/Z880 control plus the Bypass (#) key to instruct the control that you wish to program the number valid uses for User Code 8.
- Page 47 User's Manual...
-
Page 48: Glossary
Glossary Alarm Memory: A history of the alarm that last occurred. Arm: To turn the intrusion detection system on. Bypass: To temporarily remove a zone from operation. To Shunt a zone. Control Station: The remote station used to enter instructions to the control panel such as to arm, disarm and bypass. - Page 49 Master User Code (Master User Authorization Code): A code which functions identically to the User Codes; also may be used to enter the programming mode. Perimeter: The first line of defense. Consists of one or more zones which detect intrusion through doors and windows. Program: To set the operating characteristics of the main system electronics such as the code which is used to arm and disarm.
-
Page 50: Index
Index Access ........1-12 Hardwire ........1-7 Alarm Conditions ......1-7 Alarm Indicator ......1-7 Armed Status Indicator . . . 1-1, 1-2 Interior ........1-4 Arming ........1-3 Interior Follower ....... 1-6 Automatic Interior Off ....1-5 Key Switch Operation ....1-11 Bypass Key ......1-1, 1-2 Bypassing Zones .... - Page 51 Shunting ........1-10 Smoke Detectors Resetting ....1-16 Supervisory/Trouble ..1-16 Testing ....1-13, 1-16 1-15, 1-16 Trouble Indicator .
Need help?
Do you have a question about the Z900 and is the answer not in the manual?
Questions and answers