Table of Contents
Advertisement
Advertisement
Chapters
Table of Contents
Troubleshooting

Related Manuals for Sonoro Elements W


Summary of Contents for Sonoro Elements W
- Page 1 Instruction Manual...
- Page 2 GmbH & Co. KG Unter Goldschmied 6 50667 Köln Germany fon +49 221 - 16 79 29 - 0 fax +49 221 - 16 79 29 - 290 info@sonoro-audio.com www.sonoro-audio.com Current as of 01/09 The manufacturer is constantly working on the improvement of all types and models.
-
Page 3: Table Of Contents
Table of Contents Preliminary notes Safety information Symbols used in these instructions Appropriate use Persons with limited perception Power supply Batteries eDock (optionally available) Transportation Environmental conditions Operation 2.10 Using headphones 2.11 Defects 2.12 Cleaning 2.13 Disposal Scope of delivery Supported formats Unpacking and activating the device Unpacking the device... - Page 4 Saving energy 10. General functions of the audio playback 10.1 Setting the volume 10.2 Muting the playback 10.3 Selecting the playback mode 11. FM-Radio playback 11.1 Searching for a station 11.2 Storing a station 11.3 Storing a station with the remote control 11.4 Accessing stored stations (on the device) 11.5...
-
Page 5: Preliminary Notes
Preliminary notes Thank you for deciding to purchase a sonoro elements W. This instruction manual will provide you with all the information needed for the flawless and safe operation of the device. • Read this instruction manual in its entirety before using the device. -
Page 6: Safety Information
Safety information 2.1 Symbols used in these instructions Important information regarding your safety is specially marked. Please be sure to pay attention to this information in order to avoid accidents and damages to the device: DANGER This warns you about dangers to your health and indicates possible risks of injury. -
Page 7: Power Supply
2.4 Power supply The device is operated with electrical power, which means that there is the fundamental danger of receiving an electric shock. Therefore pay particular attention to the following: • Never touch the power plug with wet hands. • If you want to pull the power plug out of the power socket, always pull directly on the power plug. -
Page 8: Transportation
2.7 Transportation • When driving in a car, store the device in such a way that the passengers are not endange- red. • If you ship the device, store it in its original package. Save the package for this purpose. 2.8 Environmental conditions The safe operation of the device presumes that the environmental conditions are appropriate for the device. -
Page 9: Defects
noise or background sound in your ears (ringing), reduce the volume or discontinue using the headphones. • Even if your headphones are designed in such a way that you can continue to perceive ex- ternal sounds, you should never set the volume so high that you are unable to still perceive your environment. -
Page 10: Scope Of Delivery
Scope of delivery The scope of delivery of the sonoro elements W includes numerous accessories that you need to receive the radio frequencies and to connect additional devices. • sonoro elements W • Power adapter • FM antenna • AUX cable •... -
Page 11: Unpacking And Activating The Device
Unpacking and activating the device Only those connection cables and external devices may be used that correspond to the current device in respect to safety, electromagnetic compatibility and shielding quality. This device ful- fils all relevant standards and guidelines in respect to CE conformity. If the device is altered in a way that has not been coordinated with the manufacturer, the compliance with these standards and guidelines is no longer guaranteed. -
Page 12: Creating A Power Supply
3. Insert the power plug into a power socket. 5.4 Connecting the antenna The sonoro elements W has an internal antenna for radio reception in the FM frequency range. If the reception at the device’s location is insufficient or if you would like to receive additional... -
Page 13: Connecting The Headphones
3. Slowly increase the volume. You can do so by pressing the VOL+ button. The control elements of the sonoro elements W enable quick and simple access to all func- tions. The operating functions can also be accessed with the remote control. -
Page 14: Control Elements And Connections
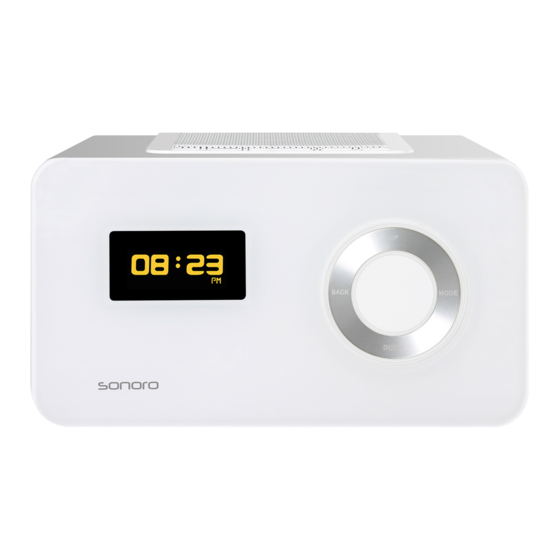
Control elements and connections Front of the elements W: 1 On/off touch sensor To switch the device on/off. Briefly touch the Sonoro lettering. Then the device will switch on or off. 2 OLED display When the device is switched off, it shows the current time of day;... - Page 15 Top of the elements W: 1 Speaker Speaker opening. 2 ALARM Press briefly: switch the alarm function on/off; deactivate the alarm. Press for a longer time: open the alarm settings menu to select the alarm functions. 3 FAVOR Station memory.
- Page 16 3 Headphones Headphone connector socket 4 AUX IN Connector socket for external audio devices. 5 LINE OUT Connector socket to connect the elements W with external audio devices. 6 iPod Connector socket for iPod eDock 7 Battery compartment Two batteries (1.5 V AA) ensure that the clock continues to function if there is a power failure.
- Page 17 Remote control: 1 UP FM: Station scanning in the next higher frequency range; iPod: menu navigation to the top. 2 Menu button Press briefly: open/confirm the indicated menu entry. Press for a longer time: open the setup menu; iPod: play- back button and pause button;...
-
Page 18: Preparing The Remote Control
Battery compartment of the remote control (on the back). Preparing the remote control The remote control of the sonoro elements W already contains a battery. The protective film has to be removed before the first use. Carefully pull out the insulation strip protruding from the battery compartment at the lower... -
Page 19: Setting The Basic Functions
Setting the basic functions 1. Switch on the device by briefly touching the sonoro lettering. 2. Press the menu button of the elements W or the remote control for a long time until the setup menu appears. The display shows the following information in the setup menu:... -
Page 20: Setting The Brightness Of The Display And Navigation Ring
1. Press the menu button of the elements W or the remote control for a long time until the se- tup menu appears and select the dimmer entry with the UP or DOWN buttons. Confirm your selection by pressing the menu button. -
Page 21: Setting The Time
The time shown in the display can be set through the setup menu. This function is also available in the stand-by mode of the device. 1. Press the menu button of the elements W or the remote control for a long time until the setup menu appears. -
Page 22: Setting The Time (In Iradio Mode)
In addition to the already mentioned option of setting the time, the iRadio mode also gives you the option of setting the time automatically through the Internet. 1. Press the menu button of the elements W or the remote control for a long time until the setup menu appears. -
Page 23: Setting The Sleep Timer
Activating the sleep timer of the device 1. Press the menu button of the elements W or the remote control for a long time until the setup menu appears. 2. Select the SLEEP TIMER entry by pressing the UP or DOWN buttons and confirm the selec- tion by pressing the menu button. -
Page 24: Restoring The Factory Settings Of The Device
If desired, all of the settings you have customized, such as language and time formats and stored stations, can be switched back to the factory settings. 1. Press the menu button of the elements W or the remote control for a long time until the setup menu appears. -
Page 25: Alarm Function
Alarm function With the sonoro elements W, you can be woken up with the radio, iPod or iRadio . All settings are performed through the alarm settings function, which you can access through the ALARM button at the top of the device or directly on the remote control. Alternatively, you can also select the alarm setting function in the setup menu. -
Page 26: Alarm Function Through Fm-Radio, Ipod, Iradio Or Buzzer
8.2 Alarm function through FM-radio, iPod, iRadio or buzzer 1. Press the ALARM button at the top of the device until the alarm setting function appears. 2. Select the entry source with the UP or DOWN buttons and confirm the selection by pressing the menu button. -
Page 27: Turning The Alarm On And Off
Volume 3. To increase or reduce the volume, press the VOL+ or VOL- buttons and confirm the selection by pressing the menu button. NOTE The audio playback always begins at a minimum volume and is slowly increased to the set volume. 4. -
Page 28: Turning Off The Alarm After The Alarm Sound
8.5 Turning off the alarm after the alarm sound • To turn off the alarm, press the ALARM button. Alternatively you can also turn off the alarm by pressing the menu button or touching the on/off sensor. Then the alarm is skipped until the next day. -
Page 29: General Functions Of The Audio Playback
Switching the energy savings function on or off results in the following differences Energy savings ON • In this mode, your elements W has the lowest amount of power consumption (approx. 1.5 watts) • Starting the iRadio function during the switching on and change from other modes takes about 45 seconds. -
Page 30: Selecting The Playback Mode
(FM radio, iRadio) or is at the most recently heard position in the most recently heard track (iPod mode). External devices (AUX) are not controlled through the elements W and therefore always start in the position that the device is currently at. -
Page 31: Fm-Radio Playback
11. FM-Radio playback 1. Switch on the device by briefly touching the sonoro lettering. The device always starts at the most recently heard radio station. 2. If the device starts in another mode, e.g. because it was switched off in another mode through the sleep timer, press the MODE button and select the FM mode. -
Page 32: Searching For A Station
If the reception is too weak even with the plugged-in antenna, realign the anten- na or place the device in a different location. 11.2 Storing a station The sonoro elements W offers ten program memory presets. Storing a station in the device 1. Set the station that you would like to store. -
Page 33: Accessing Stored Stations (On The Device)
1. Set the station that you would like to store. 2. Press the program button (button 1-5) at which you would like to store the station until the display shows the message “stored”. 11.4 Accessing stored stations (on the device) NOTE Only the program presets 1-5 can be accessed with the remote control. -
Page 34: Iradio
Downloading these data result in increased data traffic through your connection. Depending on your contract, this can result in additional charges. 1. Switch on the device by briefly touching the Sonoro lettering. The device always starts at the most recently heard iRadio station. - Page 35 1. If you switch the device to the iRadio mode for the first time or previously switched it back, the device first has to be set up for Internet radio reception. 2. This is mostly an automated process. But there are situations in which user entries are required.
-
Page 36: Selecting A Station (Internet Radio)
the cable connection. Initially no entries by the user are required here. If there are difficul- ties or problems in establishing a connection, please read the information below under “other possible settings”. 8. Now the device will try to establish a connection to the network that was just set (Connect to network/connection to “network name”). -
Page 37: Genre
6. Select the desired station by pressing the UP or DOWN buttons and confirm your selection by pressing the menu button. 7. Your elements W will now try to establish a connection to the desired station. This is signaled by the station name and establishment of a connection on the display. If a compatible data stream is available, your elements W will shortly start playing back the desired station. -
Page 38: Search
6. Select the desired station by pressing the UP or DOWN buttons and confirm your selection by pressing the menu button. 7. Your elements W will now try to establish a connection to the desired station. This is signaled by the station name and establishment of a connection on the display. If a compatible data stream is available, your elements W will shortly start playing back the desired station. -
Page 39: Storing A Station With The Remote Control
DOWN button you can select the desired memory preset. If the current memory preset is already taken, the name of the station stored at this position appears behind the display text RDS NAME. Beneath this, the currently set frequency appears next to the display text FM. If no station is stored in this position, the word FREE will be displayed here instead of the frequency. -
Page 40: My Stuff
12.4 Media player The menu item media player enables you to play back music files from data carriers that are accessible through the network or PCs on the elements W. There are various options for doing this, which are explained below. - Page 41 Access the directory containing the folder you would like to share and click with the right mouse button on the respective folder icon. When the context menu opens, select Properties. Select the Sharing tab and then select Advanced Sharing. Now select the field Share this folder and confirm this selection by clicking on the Apply field.
- Page 42 If no folder is found although you have set up a share, this function may not be supported by your network hardware. Another possibility is that an active firewall is blocking it. Operating system Microsoft Windows XP (HOME) Access the directory containing the folder you would like to share (here music) and click with the right mouse button on the respective folder icon.
- Page 43 In the window that follows, select the sharing variant without assistant in the network share field. Confirm your entry by clicking on the Apply field and select Enable file sharing in the query that follows. Confirm the selection by clicking on OK. If this display looks different on your system, please just continue with the following item.
- Page 44 Activate the two fields Share this folder on the network and Network users can change files. Under share name, enter the name that you would like to be displayed on your elements W. Confirm the entry by clicking on OK. Now the folder icon of the folder you would like to share has changed.
-
Page 45: Upnp Server
Share my media in the following window. Confirm your entry by clicking on the OK button. Now select the menu item UPNP Server on your elements W and confirm your selection by pressing the menu button. The device will now try to connect to your Media Player. But first device sharing has to be enabled for a successful connection. - Page 46 Now the device icon will change and you can perform global settings through Settings and device-specific settings about the files to be played back through Customize. If desired, change the settings according to your preferences and confirm the entry by clicking the OK button.
-
Page 47: Playback Options
• The line [Add to playlist] will allow you to load the entire selected list into the memory of the device at once. • As soon as a title has been selected, the device begins with the playback. • The following selected titles are added to the playlist. •... -
Page 48: Clearing The Playback
• Select YES to leave this function with the setting of an automatic IP assignment. Now your elements W will try to establish a connection to a network. • Select NO for the manual entry of an IP address. Confirm your selection by pressing the menu button. - Page 49 After the DNS server has been entered, the device will try to establish a connection with the entered data. • If the entered data are correct, your elements W will connect to the network. If the entered data are incorrect, you will receive the corresponding error message. Cable/WLAN This menu item allows you to perform settings about the desired type of network connection.
-
Page 50: Version
W will then store in the folder My stuff. You also need the serial number of your elements W for the registration. You can find this under the menu item Version (section 12.5.2). -
Page 51: Ipod Playback
13. iPod playback 1. Switch on the device by briefly touching the Sonoro lettering on the front and place the iPod into the docking station. 2. Press the MODE button and select the iPod mode. The display will show the iPod symbol. The iPod’s battery is charged at the same time. -
Page 52: Aux Playback
Stop 14. AUX playback You can connect and play additional audio devices, such as MP3 players, to the sonoro ele- ments W through the AUX connection at the back of the device. 1. Switch on the device by briefly touching the Sonoro lettering on the front. -
Page 53: Troubleshooting
15. Troubleshooting All electronic devices can experience errors. This does not necessarily mean that there is a defect in the device. You should therefore check the table below to see if you can remedy the error by yourself. Error Possible cause Remedy The device The power adapter isn’t... - Page 54 A firewall or Mac filter is Set the respective devices or programs in activated on the network such a way that access is possible. Your elements W communicates through the UDP and TCP ports 80, 554, 1755, 5000, 6000 and 7070. No WLAN...
-
Page 55: Technical Data
16. Technical data Name of device sonoro elements W AU-4100; AU-4101 Dimensions (WxDxH) approx. 210 mm x 155 mm x 120 mm approx. 8.27 inch x 6.1 inch x 4.72 inch Weight approx. 1,9 kg / 4.18 lb Weight incl. packaging approx. - Page 56 Connect the device to another electrical outlet so that the device and the receiver are on different branch circuits. • Ask your dealer or an experienced radio/TV technician for help. Any changes or modifications that were not expressly authorized by sonoro audio GmbH & Co.
- Page 57 KG might void the user’s authorization for the operation of the device. You can request the complete declaration of conformity at sonoro@aixtema.de. Disposal Device Please consider that your device is subject to the European Directive 2002/96/EC for the reduc- tion of electronic waste.
-
Page 59: Warranty
17. Warranty The following is applicable – without restricting your legal rights – when a guarantee claim is raised: • Guarantee claims can only be raised within a time period of max. two years, starting with the date of purchase. •... - Page 60 0941-601-29...
- Page 61 Instruction Manual...
- Page 62 GmbH & Co. KG Unter Goldschmied 6 50667 Köln Germany fon +49 221 - 16 79 29 - 0 fax +49 221 - 16 79 29 - 290 info@sonoro-audio.com www.sonoro-audio.com Current as of 01/09 The manufacturer is constantly working on the improvement of all types and models.
- Page 63 Table of Contents Preliminary notes Safety information Symbols used in these instructions Appropriate use Persons with limited perception Power supply Batteries eDock (optionally available) Transportation Environmental conditions Operation 2.10 Using headphones 2.11 Defects 2.12 Cleaning 2.13 Disposal Scope of delivery Supported formats Unpacking and activating the device Unpacking the device...
- Page 64 Saving energy 10. General functions of the audio playback 10.1 Setting the volume 10.2 Muting the playback 10.3 Selecting the playback mode 11. FM-Radio playback 11.1 Searching for a station 11.2 Storing a station 11.3 Storing a station with the remote control 11.4 Accessing stored stations (on the device) 11.5...
-
Page 65: Preliminary Notes
Preliminary notes Thank you for deciding to purchase a sonoro elements W. This instruction manual will provide you with all the information needed for the flawless and safe operation of the device. • Read this instruction manual in its entirety before using the device. -
Page 66: Safety Information
Safety information 2.1 Symbols used in these instructions Important information regarding your safety is specially marked. Please be sure to pay attention to this information in order to avoid accidents and damages to the device: DANGER This warns you about dangers to your health and indicates possible risks of injury. -
Page 67: Power Supply
2.4 Power supply The device is operated with electrical power, which means that there is the fundamental danger of receiving an electric shock. Therefore pay particular attention to the following: • Never touch the power plug with wet hands. • If you want to pull the power plug out of the power socket, always pull directly on the power plug. -
Page 68: Transportation
2.7 Transportation • When driving in a car, store the device in such a way that the passengers are not endange- red. • If you ship the device, store it in its original package. Save the package for this purpose. 2.8 Environmental conditions The safe operation of the device presumes that the environmental conditions are appropriate for the device. -
Page 69: Defects
noise or background sound in your ears (ringing), reduce the volume or discontinue using the headphones. • Even if your headphones are designed in such a way that you can continue to perceive ex- ternal sounds, you should never set the volume so high that you are unable to still perceive your environment. -
Page 70: Scope Of Delivery
Scope of delivery The scope of delivery of the sonoro elements W includes numerous accessories that you need to receive the radio frequencies and to connect additional devices. • sonoro elements W • Power adapter • FM antenna • AUX cable •... -
Page 71: Unpacking And Activating The Device
Unpacking and activating the device Only those connection cables and external devices may be used that correspond to the current device in respect to safety, electromagnetic compatibility and shielding quality. This device ful- fils all relevant standards and guidelines in respect to CE conformity. If the device is altered in a way that has not been coordinated with the manufacturer, the compliance with these standards and guidelines is no longer guaranteed. -
Page 72: Creating A Power Supply
3. Insert the power plug into a power socket. 5.4 Connecting the antenna The sonoro elements W has an internal antenna for radio reception in the FM frequency range. If the reception at the device’s location is insufficient or if you would like to receive additional... -
Page 73: Connecting The Headphones
3. Slowly increase the volume. You can do so by pressing the VOL+ button. The control elements of the sonoro elements W enable quick and simple access to all func- tions. The operating functions can also be accessed with the remote control. -
Page 74: Control Elements And Connections
Control elements and connections Front of the elements W: 1 On/off touch sensor To switch the device on/off. Briefly touch the Sonoro lettering. Then the device will switch on or off. 2 OLED display When the device is switched off, it shows the current time of day;... - Page 75 Top of the elements W: 1 Speaker Speaker opening. 2 ALARM Press briefly: switch the alarm function on/off; deactivate the alarm. Press for a longer time: open the alarm settings menu to select the alarm functions. 3 FAVOR Station memory.
- Page 76 3 Headphones Headphone connector socket 4 AUX IN Connector socket for external audio devices. 5 LINE OUT Connector socket to connect the elements W with external audio devices. 6 iPod Connector socket for iPod eDock 7 Battery compartment Two batteries (1.5 V AA) ensure that the clock continues to function if there is a power failure.
- Page 77 Remote control: 1 UP FM: Station scanning in the next higher frequency range; iPod: menu navigation to the top. 2 Menu button Press briefly: open/confirm the indicated menu entry. Press for a longer time: open the setup menu; iPod: play- back button and pause button;...
- Page 78 Battery compartment of the remote control (on the back). Preparing the remote control The remote control of the sonoro elements W already contains a battery. The protective film has to be removed before the first use. Carefully pull out the insulation strip protruding from the battery compartment at the lower...
-
Page 79: Setting The Basic Functions
Setting the basic functions 1. Switch on the device by briefly touching the sonoro lettering. 2. Press the menu button of the elements W or the remote control for a long time until the setup menu appears. The display shows the following information in the setup menu:... -
Page 80: Setting The Brightness Of The Display And Navigation Ring
1. Press the menu button of the elements W or the remote control for a long time until the se- tup menu appears and select the dimmer entry with the UP or DOWN buttons. Confirm your selection by pressing the menu button. -
Page 81: Setting The Time
The time shown in the display can be set through the setup menu. This function is also available in the stand-by mode of the device. 1. Press the menu button of the elements W or the remote control for a long time until the setup menu appears. -
Page 82: Setting The Time (In Iradio Mode)
In addition to the already mentioned option of setting the time, the iRadio mode also gives you the option of setting the time automatically through the Internet. 1. Press the menu button of the elements W or the remote control for a long time until the setup menu appears. -
Page 83: Setting The Sleep Timer
Activating the sleep timer of the device 1. Press the menu button of the elements W or the remote control for a long time until the setup menu appears. 2. Select the SLEEP TIMER entry by pressing the UP or DOWN buttons and confirm the selec- tion by pressing the menu button. -
Page 84: Restoring The Factory Settings Of The Device
If desired, all of the settings you have customized, such as language and time formats and stored stations, can be switched back to the factory settings. 1. Press the menu button of the elements W or the remote control for a long time until the setup menu appears. -
Page 85: Alarm Function
Alarm function With the sonoro elements W, you can be woken up with the radio, iPod or iRadio . All settings are performed through the alarm settings function, which you can access through the ALARM button at the top of the device or directly on the remote control. Alternatively, you can also select the alarm setting function in the setup menu. -
Page 86: Alarm Function Through Fm-Radio, Ipod, Iradio Or Buzzer
8.2 Alarm function through FM-radio, iPod, iRadio or buzzer 1. Press the ALARM button at the top of the device until the alarm setting function appears. 2. Select the entry source with the UP or DOWN buttons and confirm the selection by pressing the menu button. -
Page 87: Turning The Alarm On And Off
Volume 3. To increase or reduce the volume, press the VOL+ or VOL- buttons and confirm the selection by pressing the menu button. NOTE The audio playback always begins at a minimum volume and is slowly increased to the set volume. 4. -
Page 88: Turning Off The Alarm After The Alarm Sound
8.5 Turning off the alarm after the alarm sound • To turn off the alarm, press the ALARM button. Alternatively you can also turn off the alarm by pressing the menu button or touching the on/off sensor. Then the alarm is skipped until the next day. -
Page 89: General Functions Of The Audio Playback
Switching the energy savings function on or off results in the following differences Energy savings ON • In this mode, your elements W has the lowest amount of power consumption (approx. 1.5 watts) • Starting the iRadio function during the switching on and change from other modes takes about 45 seconds. -
Page 90: Selecting The Playback Mode
(FM radio, iRadio) or is at the most recently heard position in the most recently heard track (iPod mode). External devices (AUX) are not controlled through the elements W and therefore always start in the position that the device is currently at. -
Page 91: Fm-Radio Playback
11. FM-Radio playback 1. Switch on the device by briefly touching the sonoro lettering. The device always starts at the most recently heard radio station. 2. If the device starts in another mode, e.g. because it was switched off in another mode through the sleep timer, press the MODE button and select the FM mode. -
Page 92: Searching For A Station
If the reception is too weak even with the plugged-in antenna, realign the anten- na or place the device in a different location. 11.2 Storing a station The sonoro elements W offers ten program memory presets. Storing a station in the device 1. Set the station that you would like to store. -
Page 93: Accessing Stored Stations (On The Device)
1. Set the station that you would like to store. 2. Press the program button (button 1-5) at which you would like to store the station until the display shows the message “stored”. 11.4 Accessing stored stations (on the device) NOTE Only the program presets 1-5 can be accessed with the remote control. -
Page 94: Iradio
Downloading these data result in increased data traffic through your connection. Depending on your contract, this can result in additional charges. 1. Switch on the device by briefly touching the Sonoro lettering. The device always starts at the most recently heard iRadio station. - Page 95 1. If you switch the device to the iRadio mode for the first time or previously switched it back, the device first has to be set up for Internet radio reception. 2. This is mostly an automated process. But there are situations in which user entries are required.
-
Page 96: Selecting A Station (Internet Radio)
the cable connection. Initially no entries by the user are required here. If there are difficul- ties or problems in establishing a connection, please read the information below under “other possible settings”. 8. Now the device will try to establish a connection to the network that was just set (Connect to network/connection to “network name”). -
Page 97: Genre
6. Select the desired station by pressing the UP or DOWN buttons and confirm your selection by pressing the menu button. 7. Your elements W will now try to establish a connection to the desired station. This is signaled by the station name and establishment of a connection on the display. If a compatible data stream is available, your elements W will shortly start playing back the desired station. -
Page 98: Search
6. Select the desired station by pressing the UP or DOWN buttons and confirm your selection by pressing the menu button. 7. Your elements W will now try to establish a connection to the desired station. This is signaled by the station name and establishment of a connection on the display. If a compatible data stream is available, your elements W will shortly start playing back the desired station. -
Page 99: Storing A Station With The Remote Control
DOWN button you can select the desired memory preset. If the current memory preset is already taken, the name of the station stored at this position appears behind the display text RDS NAME. Beneath this, the currently set frequency appears next to the display text FM. If no station is stored in this position, the word FREE will be displayed here instead of the frequency. -
Page 100: My Stuff
12.4 Media player The menu item media player enables you to play back music files from data carriers that are accessible through the network or PCs on the elements W. There are various options for doing this, which are explained below. - Page 101 Access the directory containing the folder you would like to share and click with the right mouse button on the respective folder icon. When the context menu opens, select Properties. Select the Sharing tab and then select Advanced Sharing. Now select the field Share this folder and confirm this selection by clicking on the Apply field.
- Page 102 If no folder is found although you have set up a share, this function may not be supported by your network hardware. Another possibility is that an active firewall is blocking it. Operating system Microsoft Windows XP (HOME) Access the directory containing the folder you would like to share (here music) and click with the right mouse button on the respective folder icon.
- Page 103 In the window that follows, select the sharing variant without assistant in the network share field. Confirm your entry by clicking on the Apply field and select Enable file sharing in the query that follows. Confirm the selection by clicking on OK. If this display looks different on your system, please just continue with the following item.
- Page 104 Activate the two fields Share this folder on the network and Network users can change files. Under share name, enter the name that you would like to be displayed on your elements W. Confirm the entry by clicking on OK. Now the folder icon of the folder you would like to share has changed.
-
Page 105: Upnp Server
Share my media in the following window. Confirm your entry by clicking on the OK button. Now select the menu item UPNP Server on your elements W and confirm your selection by pressing the menu button. The device will now try to connect to your Media Player. But first device sharing has to be enabled for a successful connection. - Page 106 Now the device icon will change and you can perform global settings through Settings and device-specific settings about the files to be played back through Customize. If desired, change the settings according to your preferences and confirm the entry by clicking the OK button.
-
Page 107: Playback Options
• The line [Add to playlist] will allow you to load the entire selected list into the memory of the device at once. • As soon as a title has been selected, the device begins with the playback. • The following selected titles are added to the playlist. •... -
Page 108: Clearing The Playback
• Select YES to leave this function with the setting of an automatic IP assignment. Now your elements W will try to establish a connection to a network. • Select NO for the manual entry of an IP address. Confirm your selection by pressing the menu button. - Page 109 After the DNS server has been entered, the device will try to establish a connection with the entered data. • If the entered data are correct, your elements W will connect to the network. If the entered data are incorrect, you will receive the corresponding error message. Cable/WLAN This menu item allows you to perform settings about the desired type of network connection.
-
Page 110: Version
W will then store in the folder My stuff. You also need the serial number of your elements W for the registration. You can find this under the menu item Version (section 12.5.2). -
Page 111: Ipod Playback
13. iPod playback 1. Switch on the device by briefly touching the Sonoro lettering on the front and place the iPod into the docking station. 2. Press the MODE button and select the iPod mode. The display will show the iPod symbol. The iPod’s battery is charged at the same time. -
Page 112: Aux Playback
Stop 14. AUX playback You can connect and play additional audio devices, such as MP3 players, to the sonoro ele- ments W through the AUX connection at the back of the device. 1. Switch on the device by briefly touching the Sonoro lettering on the front. -
Page 113: Troubleshooting
15. Troubleshooting All electronic devices can experience errors. This does not necessarily mean that there is a defect in the device. You should therefore check the table below to see if you can remedy the error by yourself. Error Possible cause Remedy The device The power adapter isn’t... - Page 114 A firewall or Mac filter is Set the respective devices or programs in activated on the network such a way that access is possible. Your elements W communicates through the UDP and TCP ports 80, 554, 1755, 5000, 6000 and 7070. No WLAN...
-
Page 115: Technical Data
16. Technical data Name of device sonoro elements W AU-4100; AU-4101 Dimensions (WxDxH) approx. 210 mm x 155 mm x 120 mm approx. 8.27 inch x 6.1 inch x 4.72 inch Weight approx. 1,9 kg / 4.18 lb Weight incl. packaging approx. - Page 116 Manufacturer: sonoro audio GmbH & Co. KG We hereby declare that due to its conception, design and construction, the sonoro elements W conforms with the basic requirements of the EMC Directive 2004/108/EC, the Low Voltage Directive 2006/95/EC and the R&TTE Directive 1999/5/EC including all of the modifications valid at the time of this declaration.
- Page 117 Any changes or modifications that were not expressly authorized by sonoro audio GmbH & Co. KG might void the user’s authorization for the operation of the device. You can request the complete declaration of conformity at sonoro@aixtema.de. FCC RF exposure warning This equipment complies with FCC RF radiation exposure limits set forth for an uncontrolled environment.
-
Page 119: Warranty
17. Warranty The following is applicable – without restricting your legal rights – when a guarantee claim is raised: • Guarantee claims can only be raised within a time period of max. two years, starting with the date of purchase. •...
Need help?
Do you have a question about the Elements W and is the answer not in the manual?
Questions and answers