Table of Contents
Advertisement
Quick Links
Kit SP-A
Super Pro Automatic
INSTRUCTION MANUAL
and WARRANTY
Kit SP-A
includes:
Super Pro Automatic
2015
1x
2110
1x
Rider's noise cancelling stereo headset with plug-in ambient noise sensor
2113
1x
Passenger's noise cancelling stereo headset
2138
2x
Coiled headset extension leads
2422
1x
Deluxe bike fitting kit with on-bike socket holders and dust caps
2176
1x
Standard 2000mm phone leads
2245
1x
Standard 2000mm stereo music lead
PLEASE ASK your supplier to personally check with you that this kit contains ALL the parts listed
above before you leave the shop!
Autocom UK has carefully checked that all of the parts listed above are supplied in this kit at the
time of packing and shipping; however we also train our suppliers to check and confirm with you (in
the shop) that you have all of these listed parts supplied in your kit before leaving the shop. Because
of this thorough triple check quality control method Autocom UK cannot accept any claims for
missing parts once you have left the shop.
This product is intended for sale ONLY from authorised retail premises by trained authorised
Autocom dealers, where your supplier has provided you with high quality hands on demonstration
and advice about the products before you purchase. This product is not to be sold/purchased via
mail order etc or from any dealer who has not/or cannot provide you with high quality face to face
hands on demonstration and after sales service and support.
If this product was supplied to you by mail order, we ask that you please contact
enquiries@autocom.co.uk or telephone: +44 (0)1926 431249 and let us know who your supplier
was, such that we can ensure that ALL of our customers receive the highest standards of supply and
support that our customers, products and brand deserves.
Please fill in and return the product registration on the inside back cover.
It is very important that you fully read and understand all of
these instructions before installation and use.
This system is designed for domestic motorcycle use only.
, bike powered, logical mixing and control hub unit
IMPORTANT NOTE:
HUB
Advertisement
Table of Contents

Related Manuals for autocom Kit SP-A

Summary of Contents for autocom Kit SP-A
- Page 1 Autocom UK has carefully checked that all of the parts listed above are supplied in this kit at the time of packing and shipping; however we also train our suppliers to check and confirm with you (in the shop) that you have all of these listed parts supplied in your kit before leaving the shop.
-
Page 2: Safety First
Please take the time to fully read and understand these instructions before installation and use and feel free to ask your Autocom dealer for advice, or call our help-line if anything is not perfectly clear and understandable. Telephone: +44 (0)1926 431249 (UK). Email: enquiries@autocom.co.uk... - Page 3 CONNECTIVITY • LOGICAL MIXING AND CONTROL A range of optional accessories lets you personalise your expandable system. Aux 1 • designed for Bike-to-Bike Both rider and passenger’s speech automatically transmits the bike-to-bike radio thanks to the I-VOX, providing easy and safe hands free use. Incoming bike to bike audio on Aux 1 automatically reduces the stereo audio levels on Aux 2 and Aux 4 to 50% to improve speech clarity.
-
Page 4: Getting Started
The rider will use one of the coiled headset extension leads (supplied in kit SP-A) to connect between the riders headset and the bike mounted socket (providing two safety release points in case of an emergency or should you ever forget to unplug when leaving the bike). - Page 5 CONNECTING THE POWER LEAD TO THE BIKE Always connect the BLACK (negative) wire directly to the battery negative terminal using the crimped eyelet supplied, as this is the best earth on the bike. Not using the battery earth/NEGATIVE is the most likely cause for electrical interference issues.
- Page 6 MICROPHONE LOUD SPOT POSITIONING AND USE The microphone has a critical loud-spot which is the point where it produces the maximum energy from your speech into the system with the least amount of effort. The system has been carefully designed and tuned around using the loud-spot (as part of its superior noise cancellation design) so it is important that you understand and use this loud-spot correctly.
-
Page 7: Speaker Positioning
SPEAKER POSITIONING WARNING; because the system is capable of being VERY LOUD for use with earplugs CAUTION should be used when turning the volume control clockwise above the mid-way position unless you are using conventional earplugs. Ideally you want to play one of your most favourite pieces of music through the system that has rich sounds and plenty of bass, being something you can identify with later when testing the helmet installation. -
Page 8: Headset Installation
HEADSET INSTALLATION Because Autocom systems work so much better than other brands, it is easy for people to think its working great even when it’s not set up and used properly and only giving you perhaps 30% of what is really has to offer. This is why we recommend that you to test the headset out of the helmet with some music, so that after installation you can hear if it sounds right and adjust as required. - Page 9 Most full face helmets do not have the cheek pads glued in and are just a compression fit, which makes them much easier to remove (although some are quite tight). For more details of open face or flip front helmets please see our website www.autocom.co.uk Three Part Inner Helmet Design...
- Page 10 MICROPHONE AND AMBIENT NOISE SENSOR (ANS) INSTALLATION Decide which side of the helmet you would prefer the lead and plug to hang from (normally the left side) and then release and remove that side’s cheek pad so as to allow you fit the boom microphone and main speaker harness behind it, with the boom coming up from behind the cheek...
-
Page 11: Speaker Installation
Please visit our website: www.autocom.co.uk for further helmet fitting instructions. - Page 12 If passing an approved Autocom dealer you can ask them if you can compare your headset installation with their ear-defender demo/test headsets in the shop. It is a good idea to do this at least once every six months just to check your speakers haven’t move over time through putting the...
- Page 13 VOX setting. If your helmet does not have one you can either buy them from some shops of make one. See www.autocom.co.uk for tips on how to do this.
- Page 14 USING BIKE-TO-BIKE TRANSCEIVERS IMPORTANT POWER OUTPUT WARNING ONLY use our new 2009 bike to bike interface leads which have a white 9 pin connector (and NO grey din connectors fitted) with this Super Pro Automatic system. YOU MUST NOT USE our old part 1402 (bike powered Kenwood interface lead) OR ANY OTHER bike powered bike to bike radio interface leads that have a...
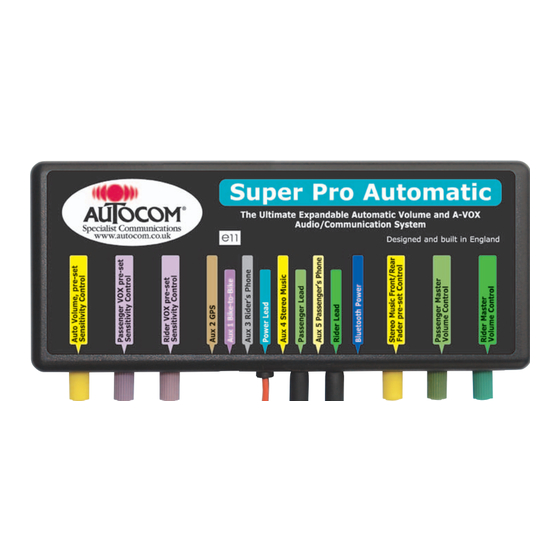
- Page 15 CONNECTING A BIKE-TO-BIKE RADIO TO YOUR SYSTEM Remove the two Pozi-Drive screws from the back of the SP-A Pozi-drive screws hub (A), turn it over with the label side up and carefully lift off the lid. NOTE you should lightly press down on wires and front panel while carefully lifting the lid off.
- Page 16 INTERNAL SWITCHES/CONNECTIONS/SETTINGS/ADJUSTMENTS Please note; all adjusters are shown set to factory settings which suit most user’s preferences. Aux 1 pre-set audio output level control More Auto Volume Pre-set Sensitivity Control Less Harder Passenger VOX Pre-set Sensitivity Control Softer 12 Volt Power Lead Harder and Connector Rider VOX Pre-set...
- Page 17 Always turn the power off before connecting or disconnecting any audio lead. If you use a standard wired interface lead between a bike powered Autocom system and a bike powered audio device you will cause earth loops (or ground/negative loops) which will cause undesirable noise and in many cases also cause your audio devices independent earth audio output amplifier to short and over-heat, which could result in a damage to the audio devices, or fire.
-
Page 18: Troubleshooting Guide
All Autocom products are warranted for a period of 12 months from the date of original purchase, to the original purchaser, from an authorised Autocom retailer. This warranty covers faulty materials or workmanship, subject to the goods being used only as stated, and only for the purpose as described in the instruction manuals. - Page 19 The information collected will be used for marketing purposes by Autocom and our authorised distributors only. We may contact you either in relation to the products you already have or other Autocom products which may be of interest to you.
- Page 20 Unit 4, Tachbrook Link, Tachbrook Park Drive, Warwick CV34 6RH. England Tel: +44 (0)1926 431249 • Fax: +44 (0)1926 431250 Email: enquiries@autocom.co.uk Website: www.autocom.co.uk...
Need help?
Do you have a question about the Kit SP-A and is the answer not in the manual?
Questions and answers