Panasonic AV-HS410N Operating Instructions Manual
Live switcher
Hide thumbs
Also See for AV-HS410N:
- Brochure & specs (8 pages) ,
- Operating instructions manual (144 pages)
Table of Contents
Advertisement
Before operating this product, please read the instructions carefully and save this manual for future use.
How the Operating Instructions are configured
<Basics> (this manual):
This <Basics> describes the procedure for connection with the required equipment and for installation.
Before installing this unit, be sure to take the time to read through <Basics> to ensure that the unit will
be installed correctly.
This manual <Basics> is also contained as a PDF file on the CD-ROM supplied with the unit.
<Operations and Settings>:
The <Operations and Settings> describes how to operate the unit and how to establish its settings.
The <Operations and Settings> is contained as a PDF file on the CD-ROM supplied with the unit.
®
®
Adobe
Reader
is required to read PDF files.
It can be downloaded from the home page of Adobe Systems.
SS1111TY1042 -FJ
Printed in Japan
Operating Instructions
AV-HS410N
Model No.
<Basics>
Live Switcher
ENGLISH
VQT3U71-1(E)
Advertisement
Table of Contents

Related Manuals for Panasonic AV-HS410N


Summary of Contents for Panasonic AV-HS410N
-
Page 1: Operating Instructions
Operating Instructions <Basics> Live Switcher AV-HS410N Model No. Before operating this product, please read the instructions carefully and save this manual for future use. How the Operating Instructions are configured <Basics> (this manual): This <Basics> describes the procedure for connection with the required equipment and for installation. - Page 2 Public License (LGPL), and users are hereby informed that they have the right to obtain, change and redistribute the source codes of this software. To obtain the source codes, go to the following home page: http://pro‑av.panasonic.net/ The manufacturer asks users to refrain from directing inquiries concerning the source codes they have obtained and other details to its representatives.
-
Page 3: Read This First
AC plug. Please contact any liquid containers on top of the equipment. either a local or foreign Panasonic authorized service center for assistance in selecting an alternate AC plug. -
Page 4: Important Safety Instructions
Read this first! FCC NOTICE (USA) This device complies with part 15 of the FCC Rules. Operation is subject to the following two conditions: (1) This device may not cause harmful interference, and (2) this device must accept any interference received, including interference that may cause undesired operation. -
Page 5: Table Of Contents
Contents Read this first! ..........3 2. Preparations .......... 28 2-1. Turning the unit’s power on and off ..... 28 Before use ............ 6 Overview ................6 2-2. Basic menu operations.......... 29 Concerning the ratings display ........6 2‑2‑1. Menu configuration and operations ....29 Disclaimer of warranty ............ -
Page 6: Before Use
If the unit is connected to equipment whose segments are different, events dependent upon the settings inherent IN NO EVENT SHALL Panasonic Corporation BE LIABLE to the network equipment, for instance, may occur so TO ANY PARTY OR ANY PERSON, EXCEPT FOR... -
Page 7: Features
Features Sophisticated multi view display function Compact design, wide variety of input/output signals p One channel is provided for the multi view display function. p HD/SD‑SDI input and output signals are supported as The user can select whether the screen is to be split into a standard option, and a frame synchronizer (FS) is 16, 10, 9, 6, 5 or 4 sections. - Page 8 *: The converter can be obtained from “Service and Support” on the home page whose address is provided below: http://pro-av.panasonic.net/ For the installation procedure, follow the steps in the directions which are contained in the download file. This unit comes with a built-in 178.0 mm (7-inch)* color display.
-
Page 9: Accessories
Accessories Check that the following accessories are present and accounted for. p After removing the product from its container, dispose of the packing materials in an appropriate manner. CD‑ROM ................1 p Operating Instructions <Basics> p Operating Instructions <Operations and Settings> p ... -
Page 10: Precautions For Use
Precautions for use Handle carefully. Built-in display (LCD monitor) Leaving the built‑in display on with the same image over Do not drop the product, or subject it to strong shock or vibration. a long period of time may result in temporary afterimage Do not carry or move the product by the fader lever. -
Page 11: Installation And Connections
Installation and connections w Installation precautions q In addition to heeding the points presented in the “Read this first!”, observe the following precautions as well. Connecting the power supply Handle carefully! p Be absolutely sure to use only the power p ... -
Page 12: How To Install The Option Boards
Installation and connections (Be sure to ask your dealer.) w How to install the option boards For details, refer to the operating instructions of the option board concerned. p The instructions set forth in the operating instructions of the option boards listed below describe the steps to take when the boards are to be installed in the AV‑HS400AN or AV‑HS400AE. - Page 13 Installation and connections (Be sure to ask your dealer.) 1 Turn off the power of the unit, and disconnect the power cable. 2 Loosen the two screws of SLOT A or SLOT B at the back of the unit, and remove the blank panel. SLOT B SLOT A Screw...
-
Page 14: Connections With Other Devices
Installation and connections w Connections with other devices q Block diagram Black BKGD Color CUT, MIX, WIPE, DVE SDI OUTPUT SDI Output SDI IN BKGD1, 2 1-1, 1-2 1-1, 1-2 (*3) 1 to 4 VPrc ColorBar CUT, MIX, WIPE, DVE DbyD STILL1, 2 SDI Input... - Page 15 Installation and connections q Connections when implementing gen-lock (frame synchronizer OFF) Sync Generator HD SDI HD SDI HD camera HD camera HD SDI HD SDI HD camera Live Switcher DVI-D AV-HS410 Computer POWER SV NM EDITOR TALLY/GPI 2 TALLY/GPI 1 BOOT ~AC IN IN/OUT B2...
- Page 16 Installation and connections q Connections when not implementing gen-lock (frame synchronizer ON) Example where the option board is used SLOT A: Analog Input Board (AV‑HS04M2) HD camera HD SDI HD Component HD camera HD camera HD Component DVD player HD SDI Live Switcher DVI-D AV-HS410...
-
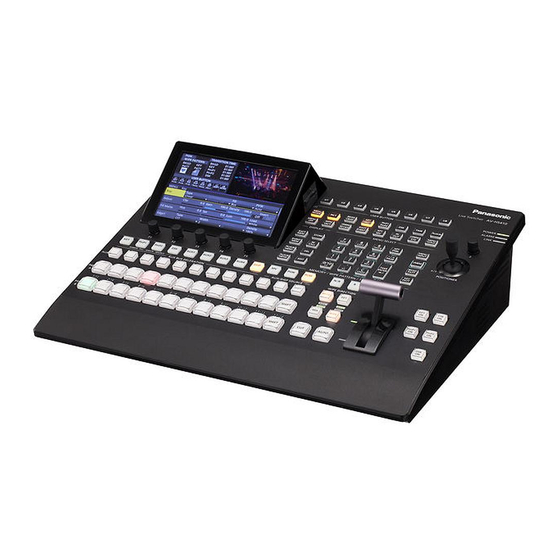
Page 17: Parts And Their Functions
1. Parts and their functions 1-1. Control panel Memory card area User button area Positioner area Live Switcher AV-HS410 POWER ALARM USER BUTTON LINK MENU BKGD PinP1 PICT TIME PLUGIN MODE CBGD CHRKEY PinP2 VMEM SHOT CONFIG MENU MENU HOLD... -
Page 18: Crosspoint Area
1. Parts and their functions 1-1-1. Crosspoint area PinP1 PinP2 AUX1 AUX2 AUX3 AUX4 DISP AMBER : FILL / GREEN : SOURCE AUX BUS DELEGATION AUX/DISP SOURCE SHIFT SHIFT 1/13 2/14 3/15 4/16 5/17 6/18 7/19 8/20 9/21 10/22... - Page 19 1. Parts and their functions 7 AUX bus crosspoint buttons These buttons are used to select the source of the bus which was selected by the AUX bus selector button (6). Buttons 1 to 24 can be selected using the [SHIFT] button. ...
-
Page 20: Memory/Wipe Pattern/Number Key Area
1. Parts and their functions 1-1-2. Memory/wipe pattern/number key area SHOT MENU STORE DSBL INPUT COPY PASTE STILL 1 STILL 2 TRIM IN EVENT � VMEM CALL PAGE CLIP 1 CLIP 2 TRIM OUT STOP PLUGIN BKGD MEM1 PATT... -
Page 21: User Button Area
1. Parts and their functions 1-1-3. User button area User buttons (USER BUTTON) [U1 to U8] These are used to assign some functions of the menu settings to the [U1] to [U8] buttons on the Config menu. Refer to “3‑3‑1. Setting the user buttons” (<Operations and Settings>... - Page 22 1. Parts and their functions [AUTO] button Wipe direction selection buttons This is used to automatically execute transitions (auto (WIPE DIRECTION) [N/R], [R] transition) using the transition time which has been set on These buttons are used to select the direction in which to the Time menu.
-
Page 23: Display Area
1. Parts and their functions 1-1-5. Display area Live Switcher AV-HS410 USER BUTTON BKGD PinP1 MENU PICT TIME PLUGIN MODE CBGD CHRKEY PinP2 VMEM SHOT CONFIG MENU MENU EVENT HOLD VECT SD Card DISPLAY MENU SELECT SHOT MENU STORE... - Page 24 1. Parts and their functions Menu selection buttons (MENU SELECT) [MENU OFF]: This button clears the menu display and switches to the Each time one of these buttons is pressed, the menu of image‑only display. the function indicated at the top or bottom of the button is selected.
-
Page 25: Positioner Area
1. Parts and their functions 1-1-6. Positioner area POSITIONER Positioner (POSITIONER) [X/Y] Rotary encoder [Z] These are used when performing the settings below. This is used to set the PinP size, flying key size or to select ... -
Page 26: Memory Card Area
SDHC (from 4 GB to 32 GB) For the latest information not available in the Operating Instructions, visit the following Web sites. http://pro‑av.panasonic.net/ p Memory cards must not be used or stored in an environment where they may be •... -
Page 27: Rear Panel Area
1. Parts and their functions 1-2. Rear panel area POWER SV NM EDITOR TALLY/GPI 2 TALLY/GPI 1 BOOT ~AC IN IN/OUT B2 IN/OUT B1 IN/OUT A2 IN/OUT A1 SLOT B SLOT A DVI - D OUT DVI - D IN... -
Page 28: Preparations
2. Preparations 2-1. Turning the unit’s power on and off q Turning on the power q Turning off the power Set the power switch to the ON position. Set the power switch to the OFF position. When power is supplied to the unit, the POWER indicator The unit’s power is turned off, and the POWER indicator lights. -
Page 29: Basic Menu Operations
2. Preparations 2-2. Basic menu operations This section describes the basic operations of the menus which are displayed on the built‑in display. For more details, refer to <Operations and Settings>. For the menu configuration, refer to “5. Setting menu table” in <Operations and Settings>. 2-2-1. - Page 30 2. Preparations Numeric value input box: List box: Turn a rotary encoder [F2] to [F5] to change the numeric value. When a rotary encoder [F2] to [F5] is held down, the 1 Press [F2] to [F5] to display the list box. numeric value is returned to its initial value.
-
Page 31: Keyboard Screen Operations
2. Preparations 2-2-3. Menu delegation function 2-2-2. Keyboard screen operations When the buttons listed below are double‑clicked, the When a name such as the name of the input signal material, specified menu is selected. (The menu delegation function) name of the memory or name of the data to be saved on an The operation corresponding to the button pressed is also memory card is to be changed, display the keyboard screen, executed. -
Page 32: Setting The System Format
2. Preparations 2-2-5. Setting the date and time 2-2-4. Setting the system format The user can set the date and time to be used as the memory One system format (input/output signal) can be selected. 1 Press the s button to light its indicator, and display the card’s time stamp. -
Page 33: Appearance
3. Appearance Unit: mm (inch) 158 (6‑7/32) 120 (4‑23/32) Live Switcher AV-HS410 POWER ALARM USER BUTTON LINK BKGD PinP1 MENU TIME PLUGIN PICT MODE CBGD CHRKEY PinP2 MENU VMEM SHOT CONFIG MENU HOLD VECT SD Card EVENT DISPLAY MENU SELECT SHOT MENU STORE... -
Page 34: Specifications
4. Specifications Power supply: AC 100 V to 240 V, 50/60 Hz Power consumption: 88 W indicates safety information. Video inputs Standard SDI: 8 signal lines (SDI INPUT 1 to SDI INPUT 8) BNC 8 (13 signal lines, maximum) p The up‑converter function can be used for the SDI INPUT 5 to SDI INPUT 8 connectors. - Page 35 4. Specifications SDI outputs HD‑SDI: HD Serial digital (SMPTE 292M) SD‑SDI: SD Serial digital (SMPTE 259M) 5 signal lines, standard: OUT1 2; OUT2 to OUT5 1 each 9 signal lines, maximum: OUT A1, OUT A2, OUT B1, OUT B2 (When two AV‑HS04M7 boards are used) HD: SMPTE 292M (BTA S‑004B) standard complied with •...
- Page 36 4. Specifications DVI-D input/output Digital RGB: XGA (1024768), WXGA (1280768), SXGA (12801024), WSXGA+ (16801050), UXGA (16001200), WUXGA (19201200) Vertical frequency: 60 Hz Video format inputs: Digital RGB: 1080/50p, 1080/59.94p Vertical frequency: Same as system formats Video format outputs: Digital RGB: 1080/50p, 1080/59.94p, 1080/50i, 1080/59.94i, 720/50p, 720/59.94p p ...
- Page 37 4. Specifications Control I/O Used to control an external device D‑sub, 9‑pin, female RS‑422 control connector Communication format (selected using a menu) p Mode: 1 (default setting) Baud rate : 9600 bps Character length : 8 bit Parity : None Stop bit : 1 bit Flow control...
-
Page 38: Index
Index AUX bus crosspoint button ........19 Memory card ............26 Memory operation button .......... 20 Menu ................. 29 Menu selection buttons ........24, 29 BKGD, KEY pattern selector button ......20 PGM/A bus crosspoint button ........18 COM ................. 37 Positioner .............. - Page 39 Memo...
- Page 40 Web Site: http://panasonic.net © Panasonic Corporation 2011...