
Related Manuals for Dulux PaintPod

Summary of Contents for Dulux PaintPod
- Page 1 user guide Please read this user guide for important health & safety instructions and to get the best results every time. Retain it for future reference.
-
Page 2: Important Information
• Ensure children and animals are kept away at all times whilst operating the PaintPod. • Always place and use the PaintPod on a flat, stable and horizontal surface. • Always unplug the PaintPod after use. • Keep power lead away from water, heat, oil, sharp MAiNs CONNeCTiON edges and moving parts. -
Page 3: Getting To Know Your Paintpod
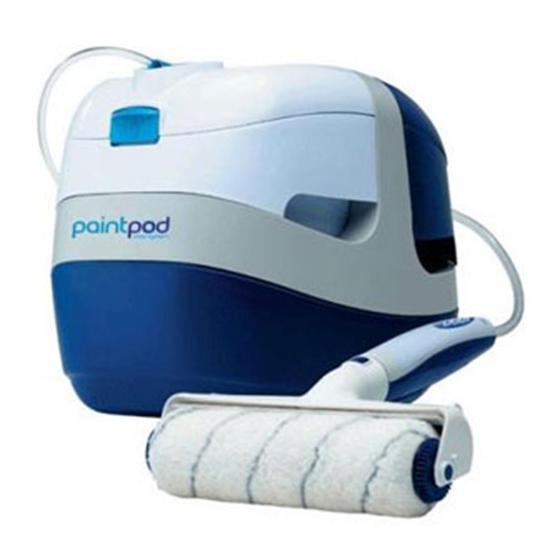
TO KNOW YOur PAINTPOD Carry handle Control panel Dip tube cover Blue chamber Lid release White chamber (front) Blue chamber handle White chamber handle Power lead input Control panel Power supply unit PAINT PAUSE DRAIN CLEAN Paint pack Clean... - Page 4 THe fAsT, eAsY ANd CLeAN WAY TO deCOrATe The PaintPod is a power assisted roller system that enables you to control the flow of paint onto the roller at all times. It has a unique triangular edging brush which makes light work of edges and corners before walls are painted with the roller.
-
Page 5: Table Of Contents
CONTeNTs seCTiONs PAges IMPORTANT INFORMATION GETTING TO KNOW YOUR PAINTPOD 2 – 3 USING YOUR PAINTPOD Setting up Painting edges and corners Painting walls and ceilings with the roller Taking a break Moving to a new location Inserting a new paint pack CARING FOR YOUR PAINTPOD 10 –... -
Page 6: Using Your Paintpod
If dip tube hole on the paint pack is NOT facing the front of the white chamber the paint pack warning light will illuminate when the ‘paint’ button is pressed and the PaintPod will not operate. If this happens, lift lid and re-insert paint pack in the correct position. -
Page 7: Painting Edges And Corners
YOur PAINTPOD PAiNTiNg edges ANd COrNers For best results use the triangular brush to paint the edges and corners before using the roller. Spout (hidden by brush) Spout ridge Triangular brush Edging Using both hands lift blue lid as Remove spout, triangular brush Insert the spout onto roller handle. -
Page 8: Painting Walls And Ceilings With The Roller
YOur PAINTPOD PAiNTiNg WALLs ANd CeiLiNgs The PaintPod makes painting easy, fast and clean. However it may take a little time to perfect your painting technique. Practice using the roller before starting. Ensuring roller head connector is Lift the handle upwards and Ensure ‘paint’... -
Page 9: Taking A Break
‘paint’ button to continue. Carry PaintPod to new location and push handle down. IMPORTANT: The PaintPod and paint pack can weigh up to 12.5kgs. LIFT WITH CARE. Lift with Care... -
Page 10: Inserting A New Paint Pack
‘SETTING UP’. IMPORTANT: Ensure paint pack Press ‘paint’ button to resume is facing the right direction. painting. If a different paint colour is to be used, the PaintPod should be drained and cleaned. Follow instructions on pages 10, 11 and 12. -
Page 11: Caring For Your Paintpod
Ensure drain cycle is completed before paint pack is removed or before starting cleaning process. Draining Press ‘drain’ button to drain paint Cleaning Leaving paint pack in PaintPod, back into paint pack – this takes Lift dip tube cover and twist dip place roller head and roller handle about 30 seconds and stops tube anti-clockwise to unlock. - Page 12 Any paint left on the roller head Using handles, lift blue chamber thorough clean as described on out of the PaintPod and take to connector should be removed page 12. This will ensure that you with a rag.
-
Page 13: Storage
‘roller head’ and remove the roller roller head). sleeve and clean. sTOrAge Ensure PaintPod and all parts After storing PaintPod in are completely clean and dry extremely cold temperatures, before storage. allow it to reach room temperature before use. -
Page 14: Replacing The Dip Tube And Delivery Tube
CAriNg fOr YOur PAINTPOD rePLACiNg THe diP TuBe ANd deLiVerY TuBe Roller head Battery compartment cover connector Battery compartment release button Remove the battery compartment Whilst holding the delivery tube, Insert the new roller head cover by pressing the battery... -
Page 15: Replacing The Battery
CAriNg fOr YOur PAINTPOD rePLACiNg THe BATTerY Replacement CR2032 3v batteries can be purchased from leading retailers. Delivery tube Battery compartment cover Metal holding clip Battery compartment release button Rubber cover Release the battery by pushing Remove the battery compartment Move the delivery tube aside. -
Page 16: Trouble Shooting
Mains power is not turned on. Turn on mains socket (page 5). Power lead is damaged. Replace power lead. No paint pack in the PaintPod. Place paint pack into the white chamber and follow user Paint pack warning light guide (page 5). -
Page 17: Accessories
Replace dip tube. pumping of water. Cold water used. Repeat cleaning cycle using warm water (page 11). Visit either www.dulux.co.uk/paintpod or www.dulux.ie/paintpod for more technical advice. ACCessOries sPAre PArTs A range of spare parts are available for you to order For convenience when painting ceilings and other high either on line or by telephone. - Page 18 PaintPod roller system record 1 diP TuBe rePLACeMeNT IMPORTANT: The dip tube contains a pump which has an optimum performance life of 10 packs (approximately 50 litres of paint). After this time, the pump performance will begin to deteriorate and should be replaced.
Need help?
Do you have a question about the PaintPod and is the answer not in the manual?
Questions and answers