Table of Contents
Advertisement
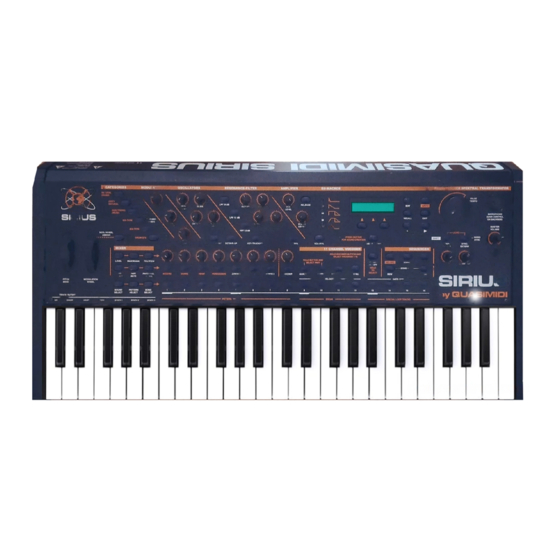
SIRIUS
Operating Instructions
CATEGORIES
MODULATOR
NATURAL
BASS-
DRUMS
SOUNDS
DIRTY
DIRTY
NATURAL
BASS
ELECTRONIC
PAD-
DRUMS
SOUNDS
SIRIUS
PLUCKED
909-TYPE
SOUNDS
808-TYPE
MOD.-WHEEL
ASSIGN
DRUM-SFX
MIXER
LEVEL
PANORAMA
FX1/FX2
PART
PART
PART/SEQ.
SELECT
MUTE
TO MIDI
PITCH
MODULATION
BEND
WHEEL
SOUND
PATTERN
SONG
SELECT
SELECT
SELECT
TRACK-MUTING
BD
SNARE
HIHAT
PERC.
SYNTH 1
SYNTH 2
SYNTH 3
OSCILLATORS
RESONANCE-FILTER
LPF 24 dB
MOD.-
WAVE-
GLIDE
CUTOFF
MACRO
MACRO
LPF 12 dB
MOD.-
DETUNE
FILTER-
Q-FACTOR
DEPTH
OVERDRIVE
SOLO-
SOUNDS
HPF 12 dB
EFFECT-
SOUNDS
MOD.-
RATE
OCTAVE-DOWN
OCTAVE-UP
KEY-TRACKING
KICK/BD
SNARE
HIHAT
PERCUSSION
SYNTH 1
SYNTH 2
1
2
3
4
5
6
PATTERN
AMPLIFIER
EG-MACROS
0
RELEASE
32
ENV.-MOD
VCA
LEVEL
64
96
VCF-EG
VCA-EG
MACRO
MACRO
127
PRESS BUTTON
FOR SOUND-CREATION
VCF-DYN.
VCA-DYN.
11 CHANNEL VOCODER
HOLD BUTTON AND
SELECT PART
SYNTH 3
VOCODER
ANALYSE
CARRIER
CARRIER-EXT.
MICRO.
7
8
9
10
11
12
BREAK
QUASIMIDI
PHONETISCHER SPEKTRAL TRANSFORMATOR
VALUE
TEMPO
EDIT
WRITE
RECALL
EXIT
DEMO
PAGE/BANK
SHIFT
RANDOM-SOUND
TAP-
SYNC.
TEMPO
EXTERN
SEQUENCER
ARPEG.
RECORD
START
STOP
SPECIAL-LOOP
OVERBLAST
ON/OFF
TRACK-FADER
HOLD
SONG-STEP
TO
SELECT
REW
FWD
SIRIUS
13
14
15
16
by QUASIMIDI
SPECIAL LOOP TRACKS
MICROPHONE
CONNECTOR
MASTER
VOLUME
AUDIO
SYNC
PHONES
32 OHM
32 OHM
Advertisement
Table of Contents

Summary of Contents for Quasimidi Sirius
-
Page 1: Operating Instructions
SIRIUS Operating Instructions CATEGORIES MODULATOR OSCILLATORS RESONANCE-FILTER AMPLIFIER EG-MACROS PHONETISCHER SPEKTRAL TRANSFORMATOR NATURAL BASS- DRUMS SOUNDS VALUE TEMPO DIRTY DIRTY NATURAL BASS LPF 24 dB RELEASE EDIT WRITE MOD.- WAVE- GLIDE CUTOFF ENV.-MOD MACRO MACRO LEVEL ELECTRONIC PAD- DRUMS SOUNDS... -
Page 2: Table Of Contents
A Song develops ....57 patterns of the Sirius ....21 To Store a Song ....58 Playing a Song . - Page 3 How to Data-Dump ....110 How does the Data-Dump get back to the Sirius? ..... 112 The Sirius and Cubase .
-
Page 4: Important Safety Instructions
The lightning flash with arrowhead symbol, within an equilateral triangle, is intended to alert the user to pres- ence of uninsulated "dangerous voltage" within the prod- uct's enclosure that may be of suf ficient magnitude to constitute a risk of electric shock to persons. The exclamation point within an equilateral triangle is intended to alert the user to the presence of important operating and maintanance (servicing) instructions in the... -
Page 5: Important Notes
The heat generated by the mains adapter is completely normal. Whenever you intend to connect the Sirius to other units, first turn off all units. This will prevent possible malfunctions and damage to speakers and other equipment. -
Page 6: Additional Precautions
Important Notes Storage Protection: The memory of the unit is secured with a Lithium battery (CR 2025). The storage contents will remain even when the unit is switched off. Depending on how it is treated, the battery will last for several years. -
Page 7: Introduction
This is a fact which we paid a lot of attention to when designing the Sirius. To this end, we have combined several exciting machines into one all-purpose unit. -
Page 8: Unpacking And Connecting
After you have removed the mains adapter you can then carefully take off the polystyrene inlays and take the Sirius out of the plastic bag. Now you can install the Sirius in its fu- ture place of work. -
Page 9: Connecting The Goose Neck Microphone
How do I connect the Sirius? On the back of the Sirius you will find two 6,3mm (1/4") jack sockets, the stereo output pair. These sockets are marked audio-left and audio-right. The amplifier, stereo system or mixing desk will be connected to these outputs. -
Page 10: Connecting The Sirius To A Mixing Desk
Slide the stereo mix faders of the mixing desk back to MINIMUM. Now turn on first the Sirius and then the mixing desk. Press both the demo Keys of the Sirius at the same time (located below the large round VALUE/TEMPO-dial on the right of the front panel) and chose a demo song using one of the Number-Keys marked 1-16, which you will find directly above the Keyboard. - Page 11 In addition there are two more 6,3 mm (1/4") jack sockets marked CARRIER-IN and ANALYSE-IN on the rear panel of your Sirius. These sockets can be used to run the Vocoder of the Sirius with an ex- ternal sound source (for example drum computer, synthesizer, sampler etc.) Either of the two sockets See pages 70, 78 can also be used to carry the trigger signal for the beat-recognition system.
-
Page 12: Getting Started
(In future you will only have two reasons to initialise your Sirius: 1. When the Sirius Service Depart- ment tells you to do so or, 2. If you want to reset the Sirius to its original factory settings.) When you turn on the Sirius for the first time you should hold down the WRITE-Key and turn on the POWER ON/OFF switch on the rear panel. - Page 13 Getting started After pressing the two Keys the normal display of the Sirius says good bye with an elegant wave and disappears to the right. The display now shows that the Sirius is in demo mode: *** DEMO *** 1: Saturn Now you only need to listen.
-
Page 14: A Round Trip On The Front Panel Of Your Sirius
A round trip of the front panel of your Sirius: The individual control panels on the front panel of the Sirius are clearly divided. The following dia- gram gives you an overview of the most important functions of the Sirius. - Page 15 The EXIT-Key quits the edit menu you were just working in. The PAGE/BANK-Keys allow you to scroll through the pages in the edit menu. In addition you can chose from the Sound libraries of the Sirius with these Keys when you're not working in any of the edit menus.
- Page 16 See page 136 functions which do not have their own designated Key by using the other Sirius Keys . A list of these functions can be found in the appendix of this manual. The TAP-TEMPO KEY allows you to adjust the tempo or pace of the sequencer by tapping it four times at the desired tempo.
- Page 17 Part-Keys and Number-Keys, the mixer consists of seven dials above each Part-Key, each dial with its respective Part-Key works as a pair. Each part (track) of the Sirius is controlled by one of these pairs. The dial controls allow you to set the volume, the pan position as well as the value for the FX-sends of a Part (track).
- Page 18 CONNECTOR The Footswitch Socket: Although this socket is not located on the front panel of the Sirius we would like to briefly go into it at this point. The reason for this is that a footswitch is a so called 'performance aid' with which the sound of the Sirius can be influenced in real time.
-
Page 19: The Modulation Wheel
Getting started The two wheels on the left of the front panel of the Sirius are often referred to as performance aids. They allow you to change the sound while playing, particularly useful in a live situation. Each wheel has its own functions. -
Page 20: Playing The Sounds Of The Sirius
Getting started Playing the Sounds of the Sirius: By now you must be starving to hear the sounds of the Sirius. Once you have left the demo-mode by pressing the EXIT-Key you will see the following on the display: A71:SyncSynt 160... -
Page 21: How Do I Listen To The Pre-Programmed Patterns Of The Sirius
You can also use the separate motifs of these ROM patterns to create new ones. These patterns also give you an excellent overview of the musical and stylistic versatility of the Sirius. In order to listen to the patterns systematically proceed as follows: Press the EDIT-Key next to the display. -
Page 22: The Synthesizer
Creating sounds: We showed you how to access the factory sounds in the section "Playing the sounds of the Sirius". Now we will show you how to create your own sound with the synth parts 1,2 & 3 (Part-Keys 5-7 on the mixer section). - Page 23 Edit Synt1-Sound <4> Glide: On page 5 of the menu you can determine if this Part in the Sirius should be played polyphonically or monophonically. Polyphonic is the term used for a sound which can be played with many notes simultaneously, suit- able for playing chords - monophonic is a sound which can only be played one note at a time.
-
Page 24: The Filter-Section
The last parameter of the oscillator section is the VCF-drive. It produces an overload of the filter stage which leads to those wonderfully distorted and aggressive overdrive-sounds. Each filter in the parts of the Sirius therefore has its own distortion unit - very useful for, for instance, acid bass lines, aggressive solo sounds etc. - Page 25 You either choose page 16-19 to enter values for attack, decay, sustain and release or you use the VCF-EG-MACRO control. There you will find 127 different waveform envelopes to control the na- ture of the sound (waveform). The front panel of the Sirius has diagrams showing the order in which the various waveform envelopes are placed.
-
Page 26: The Amplifier-Section
The Synthesizer Please note that the EG-MACROS for both filter and amplifier sections are not identical but are placed in order using specific criteria. You can of course fine edit the opened macro in its single parameters: Attack: Edit Synt1-Sound <16>... -
Page 27: The Modulator-Section
The modulator section allows you to set the type, intensity, frequency and destination of the modula- tor. Every Part of the Sirius contains a low frequency oscillator (LFO) with which you can programme automatic pitch changes (vibrato), sound colour changes (filtersweeps) and volume changes (trem- olo). -
Page 28: Pitch-Wheel And Hold-Pedal
Random Sound: Those of you who like surprises will love the Sirius. Simply press the RANDOM-SOUND-Key below the display, and, based on special algorithms, the Sirius will generate a totally new sound. You can then, of course, edit this sound. -
Page 29: Storing The Sound
See page 108 memory number. If you want to assign a sound to one of the 7 Parts (tracks) in the Sirius, you must store the sound while the sequencer is active. Just press the WRITE-Key and confirm with [ok]. Now name it, press [ok] and choose a storage space. -
Page 30: Overview Of The Sound-Parameters
The Synthesizer Overview of the Sound-Parameters: Kick, Snare, Hihat, Synth-1, Synth-2, Synth-3: (An overview of the parameters of the Percussion-Part you can find on page 32) Edit Sound The paramters marked with a * can also be influenced by control-dials or keys on the front panel. KICK/BD SNARE-Drum HIHAT... -
Page 31: The Percussion-Sets
(waveforms). You have the same possibilities to change your sound with the SOUND-menu or in real time via the dials and Keys of the Sirius. Any parameter changes made in the sound EDIT-menu will effect all the instruments in the percussion set at the same time. When the PERCUSSION-part-Key is active the WAVE-MACRO-control allows you to jump between the 20 percussion sets in the memory. -
Page 32: Overview Of The Sound And Setup Parameters
Choosing instruments: When you are in the SET-menu you can determine with the keys of the Sirius keyboard which of the 12 different percussion instruments you want to edit. Apart from an overall view of the percussion section, the above diagram also shows you the order of the instruments on the keyboard. - Page 33 The effect of the settings in the Edit-SET-menu are also dependant on the settings you have chosen in the MIX-menu or selected with the dials on the MIXER section of the Sirius for the overall percussion Part. The parameters of the MIX-menu are superior. In SET however they take care of the fine-tuning of the parameter for each instrument.
-
Page 34: The Write-Menu
Menu page 1 (storing sound) Here you will find the store-function for home-created (customised) sounds to store on one of the User storage spaces. For the 7 parts of the Sirius you have the following number of sound storage spaces available:... -
Page 35: The Quick-Save Function
The Quick-Save Function: There is a further function available to you which will help to speed up your work with the Sirius: The Quick-Save-Function. It is recommended for instance if you have slightly modified a factory- sound to your liking and you quickly want to store it in the same storage space. -
Page 36: Save Songs
The Write-Menu If you want to store a pattern, press the F1-Key.The following sub-menu will open: to Pattern P43 [ok] [cancel] You have 100 storage spaces available to save a pattern. Choose the desired storage space with the VALUE/TEMPO-dial and confirm with F1. If you press the F3-Key you will cancel the storage proce- dure. -
Page 37: Initialise Sounds
Initialise: With the following INIT-functions you can literally "hide" sounds, patterns and songs. This is very prac- tical if you want to return to the Sirius' original factory settings in order to program or edit a sound. Important: Please note that sounds, patterns or complete songs will not automatically be deleted once they are initialised. -
Page 38: Copying Motifs
Press the F1-Key to execute the copy command. F3 allows you to cancel it. Data-Dumping The Sirius offers you 4 different ways of dumping data. At this point we will only be giving you a brief See page 110 overview of the dumping functions. - Page 39 Notes...
-
Page 40: The Sequencer
It also memorizes the movements you make on the dials and wheels of the Sirius, such as the Pitch Bender or the EG-MACROS. When you replay your 'recording' the sequencer will play back the same keys you pressed during the time of the recording. -
Page 41: Patterns, Bars And Motifs
What is a Motif? In the Sirius a motif is a musical theme lying on a single sequencer track and is between one and max. 8 bars long. For instance you can put a one bar motif on the bass-drum-track (kick-track) and a 4-bar motif on the snare track and so on. -
Page 42: What Is Being Saved In A Pattern
It goes without saying that you have the option to compose complete songs and store up to 16 of them in Sirius' memory block. One song can be made up from up to 100 'steps', called Song-steps. For every Song-step you define which pattern is to be heard in the step and how long it is to last (a max. -
Page 43: Random Motifs
Hold down the SHIFT-Key and press one of the 7 PART-Keys. The random generator sort of throws the dice and produces a new sound and a different motif for the selected part. The Sirius does not write a new motif but picks out one of the many stored ROM patterns at random. The random motif is called up with the respective sound. -
Page 44: Moving Or Deleting User Memory Spaces
Following the dial twiddling and dice throwing we come to the most exciting part of the Edit-motif menu: the recording and editing of your own ideas. Depending on the part you have selected with your 7 part-Keys (from kick to synth-3) the Sirius has 3 different recording modes available: 1. -
Page 45: Realtime Recording
The Sequencer Deleting one motif only: If you want to delete only one motif from one track select page 3 of the Edit-pattern-menu and then press the F2-key. Edit P09 T:Synt1 |3> [clear] Now the motif is empty because the values of the notes have been deleted. With the VALUE/ TEMPO-dial you can enter a new motif length between 1 and 8 bars in the display . -
Page 46: Overdub Recording
The Sequencer You haven't started recording yet, but when you press the RECORD-key once more or the F2 key un- der the display you will hear a one bar count-in (pre-count) from the metronome. Expert's advice: You can adjust the volume of the metronome with the SPECIAL-LOOP-TRACK- FADER. -
Page 47: The Groove-Factor
For such cases the sequencer of the Sirius has a function which can pull the separate notes into place on a given grid. How fine this grid is to be set can be determined on page 7 of the menu. -
Page 48: Recording Drum-Motifs With The Drumgrid
The Sequencer Recording drum-motifs with the drumgrid: To make a recording with the drumgrid proceed as follows: first select a drum part with the Part-key of the mixer section. Only the orange coloured parts (parts 1-4) can use the Drumgrid Record mode. We will use the percussion part in our example. - Page 49 You can also verify how many drum instruments are placed in the same position in the bar. The 16 divisions of the Sirius' drumgrid are represented by the number keys 1-16 above the keyboard.
-
Page 50: The Step Sequencer For The Synthesizer-Parts
Edit P09 T:Synt1 <4> [stepRecord] The step sequencer of the Sirius functions much the same way as the old analogue units which came out in the early Eighties. As it was with these antique units, experimenting with the step-sequencer of the Sirius will keep on surprising you. - Page 51 The Sequencer One requirement to ensure your first success with the step sequencer is an empty synth motif. Should the sequencer not be switched on yet, press the START-key. Now press the F2 or F3 key to en- ter the step sequencer. Step: 1:1:1/16 V: 64 G:...
-
Page 52: The Mixer-Settings
The Sequencer Play around with the step sequencer and try out its different step-parameters. As already explained the results are not always predictable. But is this not part of the attraction of electronic music? Once you have worked out your own system with the step sequencer you wont want to miss it anymore. Expert’s advice: You can at any time quantize or add a groove factor to your new motif. -
Page 53: Allocating The Sequencer Tracks
This menu allows you to command each Part (track) of the sequencer to either drive the respective part of the Sirius (here the synth-1 Part) or to send out MIDI information only - or both. You can set this parameter with the VALUE/TEMPO-dial. Watch the LED display in the part keys when turning the VALUE/TEMPO-dial. -
Page 54: Saving A Pattern
(prior to saving the pattern) under a new sound number, i.e in a different User-memory space. Patterns in a Live-Performance: The sequencer of the Sirius can not only record and replay patterns but can do a lot more things you might have missed in other sequencing devices. Particularly with the live performer in mind, the Sirius offers you the chance to get in on the action. -
Page 55: The Number-Keys Or 'Pads
The Sequencer The Number-Keys or 'Pads': In this section we call the 16 Number-keys above the keyboard 'pads'. You can assign different functions to the pads which later can be called up at any time during a live gig. The favourite patterns: The Number-keys 1-8 can store 8 patterns per song. -
Page 56: Mute Und Transpose Tracks
On page 15 of the System-menu set the track-mute-parameter to the ON-position: Edit System/Midi <15> TrkMute: ON The keyboard of your Sirius was given another two functions. Apart from the Mute Part-keys you can now very comfortably mute and re-activate the single tracks TRACK-MUTING... -
Page 57: A Song Develops
The Sequencer The second octave of the keyboard can be used to transpose the Synth-1-3 Parts in realtime while the pattern is playing. Why not just try this function. You will be amazed how many ideas for com- plete songs will open up to you. A Song develops: With the patterns created by you you can arrange a complete song with up tp 100 separate steps called Song-steps. -
Page 58: To Store A Song
This page allows you to name your song. Turn the VALUE/TEMPO-dial to change the letters. The next letter you will get to with the right PAGE/BANK-key. You can also use the keyboard to name your song. The following diagram shows you where to find the letters, numbers and signs on the 'Sirius' keyboard & Space You can abort all this with the F3 key [cancel]. -
Page 59: Playing A Song
The Sequencer Playing a song: To play a song press the SONG-SELECT-key and select the song using one of the Number-keys 1-16. Press the START-key to start your song. One song-step will be played after the other. If during play you press the start key once again the LED will blink in the START-key and indicates that the actual song-step has been frozen. -
Page 60: The Arpeggiator
SIRIUS where you are able to „edit” the variety of change-possibilities and the rhythmic that is given. In the opposite to the most common arpeggiator-types, the SIRIUS is also able to create poly- phonic note-pattern. There are even more special features like for instance the chord-trigger-mode and the gater-function. -
Page 61: The Arpeggiator-Freeze-Function
: If you are very happy about a well done arpeggiator-pattern and want to hear it with another stored sound you just need to change the sound in the MIX-menu of the Sirius. In this case only the tone changes and the arpeggio-settings stay the same. - Page 62 The Arpeggiator Menu-page 1: Arpeggiator - mode selection Edit Arpeggiator I 1 > mode. ARPEG Here you can select the basic-functions of the arpeggiator. Besides the arpeggiator here you will also find the functions „GATER” and „CHORD-TRIGGER”. We will take a look at these functions later. Please don’t change anything on this page, yet.
- Page 63 The Arpeggiator Menu-page 6: Gate-time (note-length) Edit Arpeggiator <6> Gate: This parameter decides if a note is played with staccato (=0, very short) or legato (=127, connected to next note). You can change this parameter in 128 steps. Menu-page 7: Motion Edit Arpeggiator <7>...
-
Page 64: How To Use The Gater Und The Chord Trigger
The Arpeggiator Menu-page 8: Octaves Edit Arpeggiator <8> Octaves: Here you can select how many octaves the arpeggio-pattern should go through while playing. In the position „Octaves: 1” the notes will be only replayed in the original-soundlevel. In the position „Octaves: 2”... -
Page 65: Saving The Arpeggiator-Settings
This shouldn’t be a problem with the more than 100 ROM-pattern of the Sirius. If you now start the SIRIUS and play a chord you should be able to hear the influence of the rhythm track on the chord you play. - Page 66 Motion-Loop-Parameter, at menu-page 12 you can select the single steps one by one. As with all the other parameter for this action you use the PAGE/BANK-button. In order to edit the first step, please select menu-page 12: Edit Arpeggiator <12>Step01:+O% Most of the parameters are on the numbered-buttons 1-16 on the SIRIUS.
- Page 67 The Arpeggiator How to punch in the notes of the selected step: With the numbered-buttons 1-8 you can activate single notes for this step or you can switch them off. „1” means the lowest on the keyboard played note will be replayed. If you activate the numbered - buttons „1”...
-
Page 68: How To Record The Arpeggiator Into The Intern Sequencer
In the following we put our main interest on realtime-record-function. The sequencer of the Sirius doesn’t care if you are the artist playing virtuous notes into the sequencing program or if it is the arpeggiator. This means while real-time-recording you always can turn on the arpeggiator and record it into the sequencer. - Page 69 Notes...
-
Page 70: The Beat-Recognition-System
SIRIUS to it. If during a rhythm pause there is no kick-drum for a long period the Sirius will continue with the tempo it has calculated. In most cases the Sirius will continue even after a pause in the exact syn- chronous tempo. -
Page 71: Connection To A Mixing Desk
Use the Aux-send/FX-send of the mixing desk to send the signal of the CD- player to the Sirius. Open up this aux-send on the mixing desk for the CD-player only - close it for the Sirius. Then connect the outputs of the FX/AUX-sends to the Carrier- or Analyse input of the Sirius. - Page 72 You may also want to synchronise music pieces with a more demanding groove than a pure Four-on- the-Flour pattern. You will have to tap the quarter beats of the music piece to start the Sirius with the TAP-key. With the information from both the tapping and the analysed kick-drum the Sirius will than calculate the ac- tual tempo.
-
Page 73: For Difficult Cases: The Beat-Offset
External synchronisation - synchronising additional units with the Audio-signal: If the SIRIUS is running sync. to the beat of the Audio-signal the clock-signal generated can then be used to synchronise another synthesizer or sequencer to the SIRIUS using MIDI. You only have to connect the MIDI-OUT-socket of the Sirius to the MIDI-IN-socket of the Midi-device you wish to syn- chronise. -
Page 74: The Effects
How to direct the Parts of the Sirius to the two effects processors? The Mixer-section offers you the possibility to direct the sound of a Part straight to one of the Sirius' effects processors. To the left of the mixer-section control panel you can see a key marked FX1/FX2. -
Page 75: The Effect Processor Fx2
The Effects Chamber: The Chamber-Reverb has the sound character of a large empty room. Hall: The sound characteristics of this parameter are similar to those of a larger hall. Cathedrl: The longest Reverb-effect in this section. It recreates the reverb character of a church and is suitable for long echoing effects. - Page 76 The Effects Flanger: This effect allows you to create very spacy sounds. The flanger is based on the same princi- ple as the chorus but creates a stronger modulation. The flanger will sound particularly interesting on the Hihat-track. Check it out with bass sounds too!! These 'modulation' effects have the following parameters available: Level(0-127): Here the level sent into the effect can be set.
- Page 77 Notes Notes...
-
Page 78: The Sirius-Vocoder
In 1979 the "Elektor" electronics magazine (Dec. 79) predicted that "in a few years, keyboards would be fitted with a "Vocoder"-switch". Well, this prediction did not come true. But now the era of the home keyboard is far behind us, and the Vocoder in the Sirius hails the dawning of a new age. -
Page 79: Features Of The Sirius-Vocoder
- the overall volume of the Sirius or the volume of the amplifier of your audio-system is set too high. Feedback at high volume can damage your hearing. We therefore advise you to use the lowest possi- ble volume level when using a microphone or to work on headphones. -
Page 80: The Vocoder
Presetting the Gain-Control: The Gain-control allows you to determine the input sensitivity of the built-in microphone pre- amplifier. The control is located on the right of the rear panel of the Sirius. Turn the Gain-control to the middle setting (12 o´clock position). - Page 81 While you still hold down the Vocoder-key press the number key 1 - as shown in the photo. Than say a couple of words into the Goose-neck microphone of the Sirius. You should put your mouth quite close to the microphone (see drawing!!!)
-
Page 82: Basic Functions Of The Vocoder
The output-level of the Vocoder you can change in the usual way using the MIXER-panel of the can be stored in the SONG SIRIUS. Switch on the LEVEL-key in the Mixer. Now you can set the volume with the VOCODER- dial. LEVEL-Key The volume-changes are sent and received using MIDI information. - Page 83 'Bands'. By the way QUASIMIDI will offer further Vocoder programmes in future. After selecting a basic program we now feed different sounds into the Vocoder. You will soon be con- vinced that the SIRIUS Vocoder is much more than just a voice mutator.
-
Page 84: How Can I Select Analyze-Signals And Carrier
Selecting Sirius-Parts as the Analyse-signal: A turned off Ana- In order to select one or more parts of the Sirius as the Analyse-signal, first hold down the ANALYSE- lyse-function does not mean that this key of the VOCODER-panel. The lit keys under the dials will indicate which Parts have been selected PART is muted. - Page 85 Before you switch on, set the Gain-control to the right of the rear panel of the Sirius to the middle set- ting (12 o´clock position). If you are using an audio-unit such as a stereo system or instrument ampli- fier, turn down the volume control of the amplifier to minimum.
-
Page 86: Using Other External Sound Sources For The Vocoder
…simply connect the audio source to the relevant 6,3mm (1/2") jack socket on the rear panel of the Sirius: A sound source that is to be used as the Carrier-signal should be connected to the CARRIER-IN socket. A sound source that is to be used as the Analyse-signal should be connected to the ANALYSE-IN. -
Page 87: Changing The Level Of The Individual Vocoder Tracks
MICRO.-key on the MIXER-panel also switches the external Analyse-signal on and off. By the way - the Sirius-Vocoder allows you to mix internal Parts, microphone signals and external au- dio sources almost randomly - this is for the Analyse-signal as well as the Carrier-signal. One excep- tion: If you have connected an audio cable to the ANALYSE-IN-socket, the MICROPHONE CON- NECTOR on the front panel will be disabled. -
Page 88: How Does The Filter Bank Work
How does the Filter Bank work? You will find the filterbank-programs on the Number-keys 15 and 16. When they are used the Sirius- Vocoder behaves like an equalizer with nine Bands. Because of the steepness of the filter you can... -
Page 89: How Can I Set Effects And Pan
The procedure you already know from the description of the MIXER-panel. Above the FX1/FX2-keys SONG. of the Mixer you can select between two effects units of the Sirius. When the key is permanently lit you have selected FX1. When the key is blinking, FX2 is active. Now the dial of the Vocoder allows you to mix in the currently selected effect in real time. -
Page 90: The Vocoder Menu
Most Parameters of the Vocoder-menu can also be set using the dials and keys on the front panel of the Sirius. There are however some parameters which can only be set in the Edit-Vocoder menu. The menu-pages of these restricted parameters are marked with a (*) in the following description of the Edit-Vocoder menu procedure. - Page 91 Analyse-Signals of the Sirius (ie. the internal Parts of the Sirius which are being sent to the Vocoder). When for example you modulate a pad with a drumloop, you can mix in the original pad-sound with a controllable volume of 0-127.
-
Page 92: Where Are The Vocoder Settings Stored
Vocoder-menu in a SONG. The Bypass-functions as well as the complete signaling of the SIRIUS-Vocoder is explained in the dia- gram on the following page. Where are the Vocoder settings stored? Important: The different basic settings of the Vocoder are stored in different storage areas. Whereas, for instance, the settings of the Bands are stored in the Song, the Vocoder-routing is stored in the Pat- tern. -
Page 93: Configuration Diagram Of The Vocoder
The Vocoder Configuration Diagram of the VOCODER: SOURCES: MICROPHONE/ ANALYSE-IN LEVEL socket (optional) Highpass ANALYSE LEVEL Lowpass PART 1-7 LEVEL Band 1 LEVEL Band 2 LEVEL CARRIER Band 3 LEVEL Band 4 CARRIER-IN socket LEVEL Band 5 LEVEL Band 6 PART 1-7 LEVEL Band 7... -
Page 94: The System Menu
<2> M.Tune: Here you can fine tune the Sirius. If the value is set to +63 the Sirius will sound one semi-tone higher than normal. If the value is set to -64 it will sound a semi-tone lower than normal. In most cases you can ignore this parameter because the Sirius has the standard western tuning as a factory setting. -
Page 95: Local-Off
Sirius with an external sequencer. Edit System/Midi <4> Local: The factory settings of this parameter are set to ON - the only sensible setting all the time the Sirius is being used as a stand-alone unit. Edit System/Midi <4> Local: If the Parameter is switched to OFF the following happens: The keyboard is separated from the sound sources within the Sirius. -
Page 96: Midi-Synchronization
3 functions on the front panel of the Sirius. This key is marked SYNC.EXTERN/AUDIO.SYNC. If this key is not lit it means you are in the 'INT' mode. If the key is lit, the Sirius is in the 'EXT' mode. If the key is blinking the Beat-Recoginition-System is activated. - Page 97 In the ON-setting (factory setting) the Sirius will send sound parameters in the form of MIDI-control commands to external MIDI-devices. In the Off-setting the Control commands (for instance dial and wheel movements on the front panel of the Sirius) are not passed on to the MIDI-Out socket. Menu-page 11 (Transmit Clock): Edit System/Midi <11>...
-
Page 98: Sysex-Speed
Edit System/Midi <13> PotSnap:OFF This parameter is about the behaviour of the dial controls on the front panel of the Sirius. Just experi- ment with the setting options of this parameter. These functions allow you to increase ease of opera- tion of the Sirius and to customise it to your special requirements. -
Page 99: Track-Mute
When you have come this far in the manual you will surely have noticed that the two lower octaves of the Sirius-keyboad allow you to mute and un-mute tracks as well as transpose them. The parame- ter on this page allows you to turn this function off. The factory setting makes this function active, and so the parameter is set to ON. -
Page 100: The Sirius And Midi
In a MIDI system you can send and receive on all channels simultaneously. The Sirius works on 7 MIDI-channels. It is therefore possible that the Sirius can play 7 different sounds with different melodies and rhythms at the same time. We say the Sirius has a 7-part multimode. -
Page 101: Examples Of Midi-Connections To The Sirius
The following diagram shows you how to connect the Sirius and other audio-equipment using a mixing desk and an amplifier. The CD-player in our example can of course be replaced or supplemented by an expander, a sound card or another synthesizer. - Page 102 You can select different settings on the devices depending on your requirements. First select a Part of the Sirius which you want to use to play the sound you have selected in your ex- pander. For instance, use the SYNTH-3 part. If this part is selected on the Sirius the keyboard of the Sirius is sending midi information on MIDI-channel 7 (factory setting).
-
Page 103: Sirius And Computer
SYNTH 2 SYNTH 3 Should the midi TX of the sequencer track of the Sirius correspond to the Midi RX of the selected part of the external device, simply activate the "Part/Sequence to MIDI"-function of the Sirius for the relevant Part. - Page 104 The Sirius and MIDI MIDI-Sequencing Software: If you don´t have it yet, you will of course need a suitable sequencer-software to run the Sirius with a computer-setup. Here the selection is enormous. There are however certain standards in the Mu- sic-scene.
- Page 105 In order for the computer to send data not only to the Sirius but also to the Expander you have to connect it to the socket MIDI-THRU on the rear panel of the Sirius. The MIDI-THRU socket passes on all Midi-data received through the MIDI-IN socket to the expander without changing it.
- Page 106 It is, for example, not possible to record the dial or wheel movements of the Sirius because the MIDI-OUT of the Sirius is not connected with the MIDI-IN of the computer. It is the same for the data storage using MIDI-Data-Dump. If you absolutely depend on this connection-setup you will have no choice but to change the connections before a data-Dump can be performed.
-
Page 107: Midi-Problems And Solutions
MIDI-outputs. If you have chosen the MIDI-output which relates to the sound creator of the sound card, you will not be able to hear the Sirius anymore. In order to hear the Sirius you will have to select the MIDI-output to which you have connected the Sirius. -
Page 108: Changing Sound Banks And Sound Programs With Midi
Example 1: In our first example we want to select the synthesizer sound programme B48 of the Sirius for a com- plete Cubase track. In our case this is track no. 5 called "Synth-1". We assume that you have not yet created a Cubase-part, so settings apply to the complete track. - Page 109 When you now enter new values into the windows of this box they will only apply to the selected Part. In this way you can select different sounds of the Sirius for each Cubase-Part. NB: Information in the partinfo box is also copied when you copy a whole...
-
Page 110: Data-Dumping-Storing Your Data
How to Data-Dump: In the following section we will explain to you step by step how you can Data-Dump Sirius data onto a computer using Cubase. This procedure should be much the same for all good-quality sequencing software, as the principle is the same. - Page 111 If your Cubase is set the way it is in our diagram, you are primed for Data-Dump. A Data-Dump of the Sirius consists of so-called system-exclusive MIDI-data. It is therefore vital for an error-free Data-Dump that Cubase is in a position to take on such data. You will have to click the en- try 'MIDI-filter' to be found in the Cubase-menu "Options".
-
Page 112: How Does The Data-Dump Get Back To The Sirius
System-Exclusive message received That´s it! You will not have to set anything to receive a data-Dump on the Sirius. Just make sure that you are receiving on the same system channel you used for data-Dumping. Setting the system chan- See page 94... -
Page 113: The Sirius And Cubase
Synchronisation of the Sirius to Cubase: From time to time it is necessary to synchronise the Sirius with another MIDI-device (for instance a Computer with Cubase or a drum computer). This means that the connected devices will be working to one midi-clock and will therefore run at the same tempo. - Page 114 Cubase at the beginning of the song. The tempo is now set in the transport window of Cubase because Cubase is the Master. This set-up is totally geared to synchronising a sequence of a song or a pattern in the Sirius to a Song created in Cubase.
- Page 115 When you now press the PLAY-key on the Sirius, Cubase is automatically started as well. Try and turn the TEMPO-dial of the Sirius or tap in a new tempo into the Sirius. You can now watch how the tempo indicator of Cubase is changing in sync with the display informaton of the Sirius. As soon as...
-
Page 116: Recording Sirius-Pattern And -Songs Into An External Sequencer
To record patterns of the Sirius with Cubase it is first of all important that you synchronise both de- vices to each other. This is best done by selecting the Sirius as Master like we did in our previous ex- ample. - Page 117 The X mutes the Parts All the recorded tracks of the Sirius are now in one Part. To give every track its own part Cubase of- fers a practical function: Remix or demix. This function can be found in the structure-menu. To apply the function first select the Part (see background diagram) and click the function as displayed in the foreground diagram.
-
Page 118: Saving And Storing
Realtime-Record and the Step-Record functions of the Sirius and activate the next available User-motif storage space for the selected Part. A User- motif is also the place where realtime controller sequences, like for example a recorded performance with the pitch-bend Wheel, are stored. - Page 119 Vocoder, namely a full understanding of System-Exclusive-data. A list of the sys- tem exclusive data formats of the Sirius can be found in the Annex of this Manual. Caution: When you programme the Vocoder you will always change the Vocoder Preset (programme) you have currently selected.
-
Page 120: Appendix
List of Wave-Macros Kick-Wave-Macros Snare-Wave-Macros Hihat-Wave-Macros V_Sync4 Sawtoot3 V_Sync5 FatStack 606Bass 606Snar1 606HiHat V_Sync6 FatDirty 808DKick 606Snar2 808HHat1 V_Sync7 HohnerSt 808Snar1 808Kick1 808HHat2 Spectr_A SlowOrch 808Kick2 808Snar2 909HHat2 Spectr_B MoogDeep 808Kick3 808Snar3 HiHats Spectr_C DeepSine 808LKick 909Snar1 LinHHat1 Spectr_D TB_Bass1 909Kick1 909Snar2 LinHHat2... -
Page 121: List Of Percussion Instruments
List of Percussion-Instruments Percussion-Intruments 909Snar1 EfSnare2 LinnClap Ride 909Snar2 EfSnare3 LinnClp2 Ride2 12_Tom Ambient EfSnare4 LinnCong RingPer1 12_Tom_D Blecher1 EfSnare5 LinnCowb RingPer2 14_Tom Blecher2 ElHiTom LinnCrsh RomKick2 14_Tom_D CallKick ElLoTom LinnHHMC RomKick 16_Tom Camera_1 F_Drum1 LinnHHSC RomSnar1 16_Tom_D Camera_2 F_Drum2 LinnKCKF RomSnar2 606Bass... -
Page 122: List Of Drum Sounds
List of Drum-Sounds Kick-Sounds HipKick Pump909 DB Snare 808Snar2 WetKick DancKick DirtySht 808Snar3 Stopped Dutch ShortBig 808Snar4 DeepKick Daftkick NoiseSnr 808Velo Medium ZannZ BD Noname 808Snapp Dirty House 1 Machine 808Bottm AttackBD Dist-808 HighSnar 808 HP Basket 808 Kic2 LoFiSnar Scratch! Staubig ReverbKk... - Page 123 Dirty God-HH Westbam Natura Maybeam Vinylhat Bingo Modulate Modulat2 Gongs Reverse Bubbles Short909 MS 20 MS 20Pit Short HP Condensd Sirius Perc-Sounds HopSet 1 DirtyHH1 Metalic GatePerc FilterIt GroovSet MesserHH Latin LongMS FatePerc Dance Hifreq 9 Zippi ShortSet Daft1Set Crackle...
-
Page 124: List Of Synth-Sounds
List of Synth-Sounds Synth-Sounds Bank A WetBass2 Percular WaveBass SineBass Bottom Stopped CoolBass SequenzC DownSwep ModuloBX Into Spa Forte Mod2Bass AmbientT LuckyBas FatBoy ChorSeq! SaverSex WetLong <SynthiY 303Velo Wet&Bass Arpeggio Detune! DiscoBas Trancer MixBass *Atom* Goa ! ShortBas PercSine Arpeggi2 Synced! ResoBass Trancer3... - Page 125 List of Synth-Sounds EastbamC Instable LFO-Pad DA Cool Bass ??? FSOLbell HighSeq1 Bassline UFO-Fly SynSequ 309 Bass LophoLFO UpSync X-Voice SpaceAmb Syncer Koyaa Fat-Guit FatSolo StrangeP UFOworld OrcSolo Enfrhmki LFO Noiz DirtySol Rel-Pad1 Funky FX Effector D.I.Auge LFOitsch Filter^! Deep-Pad GoaFix Zipper Stoffich...
-
Page 126: List Of Midi-Controllers
List of MIDI-Controllers Sirius MIDI-Controller List The following list contains all sound parameters of the Sirius that can be remote controlled with a MIDI Controller. The column "Mod.Wheel Allocation" shows you which parameter can be allocated to the Modulation wheel. The column "internal recording" indicates which sound parameters can be recorded into the internal sequencer of the Sirius. -
Page 127: The System Exclusive Data Formats Of The Sirius
The System-Exclusive Data formats of the Sirius: The following pages contain a list of the System-exclusive data formats of the Sirius. This list is for the advanced MIDI-programmers. If you want to programme for instance a software editor, a mixer map or an environment for the Sirius, the necessary information can be found here. - Page 128 Sirius System-Exclusive Format 02 00 00 track mutes 02 01 00 reserved 04 7F 00 -"- 05 00 00 kick sound 1 parameter 05 01 00 -"- -"- 05 5F 00 -"- -"- 06 00 00 snare sound 1 parameter 06 01 00 -"-...
- Page 129 Sirius System-Exclusive Format 54 00 00 vocoder 1 band 1 coefficients 54 00 08 -"- band 9 54 0A 00 -"- reserved 54 0B 00 -"- type 54 0B 01 -"- highpass 54 0B 02 -"- lowpass 54 0B 03 -"-...
- Page 130 Sirius System-Exclusive Format COMMON-Parameter: speed 0..127 speed bit 1..7 (in BPM) groove bit 4..6: groove 0..7 (0%..100%) bit 0: speed bit 0 keyboard transpose 0,12 (0,+1 Octave) current gate pad 0..3 current velocity pad 0..3 pad velocity 1 0..127 pad velocity 2 0..127...
- Page 131 Sirius System-Exclusive Format arpeggiator byte1 bit 5..6 mode 0..2 (arp,gater,chord) bit 3..4 octaves 0..3 (1..4) bit 2 arpeg.on/off0,1 (off,on) bit 0..1 resolution 1..3 (8,16,32) arpeggiator byte2 bit 6 double (off,on) bit 5 lenghtfit (off,on) bit 4 hold (off,on) bit 0..3 motion 0..15 (up,down...mot9)
- Page 132 Sirius System-Exclusive Format modulation wheel assign5 0..127 (bit 6 is depth bit 7) mod.wheel assign5 depth 0..127 arpeggiator packed byte 1 (only on synth part) arpeggiator packed byte 2 (only on synth part) arpeggiator packed byte 3 (only on synth part)
-
Page 133: Sirius Midi-Implementation Chart
Sirius MIDI-Implementation chart Function Transmitted Recognized Basic Default Channel Changed 1-16 1-16 Default Mode 3b* Mode Messages Mode 3b, Mode 4 (M=1)* Note 36-96 36-96 Number True Voice 24-112 Velocity Note On Note Off Aftertouch Keys Channel Pitch Bend MSB (7 bit) -
Page 134: Diagramatic Overview Of The Edit Menus
Diagramatic Overview of the Edit Menus... - Page 135 Diagramatic Overview of the Edit Menus...
-
Page 136: Button Combinations
Key Combinations Key combinations: As it is not possible to provide a key or dial for every single function of the Sirius, some functions are performed by using combinations of dials and keys. The following table will give you an overview of these functions or 'shortcuts':... -
Page 137: Special Functions And Short Selection
Special Functions Special Functions and short selection: Many push buttons on the Sirius have other features next to their own task. They are used for example, for faster selection or to switch to defined functions. The following table gives you an... -
Page 138: Problems And Answers
5.) Is the Gain adjusted to your voice level? The synchronizing of external equipment or sequencers does not work: 1.) Have you made sure that the "TX-CLOCK" Parameter in the System menu of the Sirius on menu page 11 is turned on? 2.) Is the MIDI connection cable connected correctly to the external equipment? -
Page 139: Hotline
4.) Did you adjust the volume of the analyzing equipment, that you can see a "." in the display? HOT LINE If you are still having problems and if you are a registered user of QUASIMIDI products you can call our free HOT LINE. -
Page 140: Initializing Of The Sirius And Calibration Of The Controllers
The initializing should only be done on advice of the Service department. Always remember the complete data will be lost. To start the initializing you have to do the following: When the SIRIUS is turned off hold the WRITE button, then turn on the Sirius. The following message is in the display Initialize All? -
Page 141: Index
- > Program-change - banks. The Sirius has 4 different Banks with each 96 Synthesizer sounds and 2 Banks with each 96 drum sounds. The Program-change-command is not capable of calling all tones, as MIDI has only 128 different programs which can be called with this command. Therefore the Bank-change-command will always be sent before the program change to call the chosen bank. - Page 142 - > Loop Drum set - With the Sirius you can construct your own 20 different Drum sets, each containing 12 Drum, Percussion or effect sounds The drums can be found in the PERCUSSION-part ,when you turn the WAVE-MACRO control.
- Page 143 The terms “12db/oct” and “24db/oct” describe the rolloff characteristics of the filter. A filter with 12db is softer than a filter with 24db. You can try it out on the Sirius. An important parameter of the filters is the - >...
- Page 144 INDEX Initialization - If you initialize, you delete all the data of the Sirius’ internal memory. All the parameters are set to “factory standard”. Keyboard-Combo - Amplifier with built-in speakers. LFO=Low Frequency Oscillator - A LFO offers various waveforms which can be used to modulate the volume, ->...
- Page 145 That way the sound gets wider. Over blast - A function of the Sirius, which gives a kind of loudness or Bass boost to all parts of the internal sequencer. The sound will be thicker and bass will be brought out..
- Page 146 Reverb - Reverb is an effect algorithm in FX-1. Its used for the simulation of room capacity. The Sirius imitates a country church to a Cathedral and a rubber room to a wash room. ROM Sounds - ROM sounds are permanently stored in the Sirius and can not be erased or lost.
- Page 147 By listening or arranging a sequencer song you would like to silent certain parts at times to be able to concentrate on the other tracks. The Sirius has several Mute functions that you can also use in live action. The way to produce Techno excitement and breaks is purposely leaving in and taking out single tracks and motives.
- Page 148 Collective name for oscillating forms like Sinus, Sawtooth, etc. Samples are also often called waveforms. They are produced by the - >Oscillator Write menu - In the write menu you find save, copy and - >MIDI Data dump functions for the Sirius.
-
Page 149: Warranty Definitions
Fill out the Registration card and send to the preprinted address on the front of the card. How to Validate the Warranty: To validate the Warranty, fill out the Warranty card and return it to Quasimidi within ten days from the date of purchase. -
Page 150: Technical Data
Technical Data of the QUASIMIDI Sirius: What´s in the box: Sirius, 1 x external mains adapter, 1 x Goose neck microphone, 2 x 6,3mm (1/4") jack cable, 2 x 1/4" jack to phono (RCA) adapters, this Manual, Warranty form. Concept: Synthesizer with step and realtime sequencer, drum computer, vocoder with filter bank, beat recognition system, arpeggiator and 2 built-in independent effects processors.
Need help?
Do you have a question about the Sirius and is the answer not in the manual?
Questions and answers