Table of Contents
Advertisement
Quick Links
®
O W N E R ' S M A N U A L
Dedication to Quality
We warrant this product to be free from all
defects in material and workmanship when used
according to the manufacturer's instructions.
See Limited Warranty Card for details.
Save your sales receipt.
(You may wish to staple it into this manual.)
For maximum effectiveness
and safety, please review this
Owner's Manual, view the Video,
and for healthy eating tips refer
to the Jump Start Section.
10/27/09 DR
Advertisement
Table of Contents

Related Manuals for Fitness Quest Pilates Power Gym


Summary of Contents for Fitness Quest Pilates Power Gym
- Page 1 ® O W N E R ’ S M A N U A L Dedication to Quality We warrant this product to be free from all defects in material and workmanship when used according to the manufacturer’s instructions. See Limited Warranty Card for details. Save your sales receipt.
-
Page 2: Table Of Contents
Cardio Workout Tracking Sheets ........39-40 JUMP START DIET ............41-46 Progress Charts ............47-48 ® ©2007, ©2008 and ©2009 Fitness Quest Inc. All rights reserved. Made in China. Pilates Power Gym is a trademark of Kaswit, Inc. U.S. Patent 7,163,498. ™ Fitness Quest is a registered trademark of Fitness Quest Inc. -
Page 3: Important Safety Information
Failure to follow these instructions could result in serious when folding, setting up, or using the equipment. injury or death. 16) To prevent the Pilates Power Gym from tipping and ™ 6) USE CARE when getting on and off the equipment. -
Page 4: Equipment Warning/Caution Labels
JUMP START DIET EQUIPMENT WARNING/CAUTION LABELS IMPORTANT: See below for placement of the following Warning/Caution Labels on your equipment. EVENING SNACK WARNING LABEL 1 WARNING LABEL 2 WARNING LABEL 3 (2 locations) (2 locations) (CHOOSE JUST ONE OPTION) WARNING WARNING WARNING Keep hands away from Failure to read and follow the safety instructions stated in the Owner’s... -
Page 5: Introduction
2 sliced carrots 1/2 cup noodles with 2 tbsp. gravy from pork chop We’re so sure that you will be completely satisfied with your Pilates Power Gym that we ™ 1 cup green beans... -
Page 6: Set-Up Instructions
Parts Department to order replacement parts. Refer 1 tsp. grated cheese IMPORTANT: Please read this owner’s manual before beginning your workout for to page 4, Ordering Replacement Parts. important instructions on how to use your Pilates Power Gym exerciser. -------- --------... -
Page 7: Parts List
PARTS LIST JUMP START DIET BREAKFAST CHOICES MORNING SNACK ITEM PART# DESCRIPTION QTY. ITEM PART# DESCRIPTION QTY. (CHOOSE JUST ONE OPTION) (CHOOSE JUST ONE OPTION) 0600007 Foot Strap Cable 0100113 Small Pulley Bracket 0100098 Frame Guide 0700018 Headrest Bracket 0100097 M4 x 16mm Phillips Screw 8 oz. -
Page 8: Exploded Views
JUMP START DIET EXPLODED VIEW Introduction This program is designed to "jump start" you on your way to better health and fitness. In just 2 weeks, just 14 short days, you will begin to form habits to help you reach your fitness goals faster and easier than ever before. The Jump Start Diet This 2-week menu plan is based on 1200 to 1300 calories. - Page 9 EXPLODED VIEW JUMP START DIET Using Healthy Eating Choices optional Table of Contents Introduction ......42 The Jump Start Diet .
-
Page 10: Assemblies
ASSEMBLIES OPTIONAL HOW LONG HOW HARD ACTIVITY DATE HEART RATE (minutes) (RPE)* Push Up Bar 19758 Height Adjustment Assembly 0400011A Foot Rest Bar HOW LONG HOW HARD ACTIVITY DATE HEART RATE (minutes) (RPE)* 0400036 Base Frame Assembly 0400002 *RPE = rating of perceived exertion; this means you match up a numerical rating (RPE) of 1-10, with how you feel (RPE descriptive rating in chart above). -
Page 11: Getting Started
This data will help you chart future fitness goals as you continue to improve. position to more challenging inclines. There are a total of 11 different Fig. Glideboard positions that will allow you to customize the resistance on your Pilates Power Gym exerciser to your exact fitness level. The ™ HOW LONG... -
Page 12: Tension Cord Adjustments
175 possible resistance settings. This will allow you to start at and 2 - 3 5 - 15 40 - 50 2 - 4 Somewhat easy to somewhat hard progress to your optimal fitness level with the Pilates Power Gym exerciser! ™ Fig. E 2 - 3 10 - 17... -
Page 13: Headrest Adjustments
Headrest Adjustment Benefits of Aerobic Training Cool Down and Stretching Headrest There are two positions for the Headrest, flat and raised. The Headrest is in the Your workout should be followed by a cool down. The (raised position) Health benefits of aerobic exercise include the following: flat position when unit is first received. - Page 14 For the first week or so, you may feel some muscle You can use the following calculation to determine what soreness. This is quite normal and should disappear percentage of your heart rate you are working at: in a matter of days. If you experience major discomfort, % heart rate = (220 - age) x %.
-
Page 15: Warm-Up & Cool Down Stretches
WARM-UP & COOL DOWN STRETCHES PILATES POWER GYM WORKOUT TRACKING SHEETS Use the chart below and the chart on the following page to keep track of your progress over time. When performing these stretches, your movements should be slow and smooth, Before writing on them, make as many copies as you think you'll need. - Page 16 Layout 4. Back Stretch Sit facing sideways on the Glideboard with the left side of your body next to the Foot Rest Bar Assembly. Stand with your legs shoulder width apart and your knees slightly Bend your left knee and pull your left heel in towards the groin. Your right leg is bent in a hurdler position. bent.
-
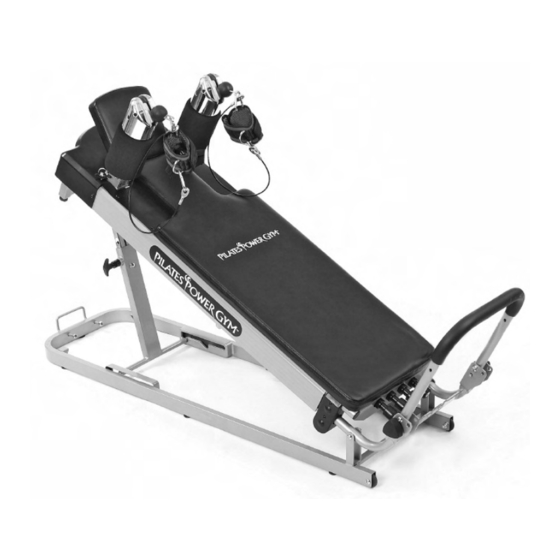
Page 17: Pilates Power Gym System
Glideboard in a “crunch” motion and straighten your legs to a 45-degree position. See FIG. 27b. Inhale and goes hand in hand with an overall healthy lifestyle. This goals. Please refer to the Pilates Power Gym ™ open your legs to a “V” position. Exhale and cross your arms in the center between your thighs, keeping... - Page 18 #1 or #2 as many exercises as you are able to do with good Advanced #1, #2 and/or #3 B or C form and technique. Your Pilates Power Gym system ™ includes the Pilates Power Gym workout DVD. The ™...
-
Page 19: Week Workout Progression Chart
These recommendations will vary depending on your fitness level. If you feel comfortable, move up one level, or if you prefer to stay at the same level for an additional week(s) listen to your body and do so. The Pilates Power Gym Workout can be followed beyond the 8 week workout progression by ™... -
Page 20: Tm Exercises
Lie on your back with your head on the Headrest. Attach a Foot Strap securely to each foot. Extend your legs to a 45-degree position and rest your arms at your sides. Keep your legs straight, heels together with position by lowering the Height Adjustment Assembly from The Pilates Power Gym Workout was designed to ™... - Page 21 Narrow Squat Seated High Row Lie on your back with your head on the Headrest and your arms resting at your sides. Place the heels of Sit on the Glideboard with your back near the Foot Rest Bar Assembly, facing the handles. Place your legs your feet centered on the Foot Rest Bar Assembly with your legs together, knees bent and feet flexed so in a straddle position with your feet on the floor, or extend your legs and place your feet by the Headrest.
- Page 22 Press Down Prance Lie on your back with your head on the Headrest. Attach a Foot Strap to each foot. Bring your legs as vertical Lie on your back with your head on the Headrest and your arms resting at your sides. Place your toes on the as possible and in line with your hips.
- Page 23 Arm Circles Seated Low Row Lie on your back with your head on the Headrest. Bend your knees with ankles crossed in a relaxed position Sit on the Glideboard with your back near the Foot Rest Bar Assembly, facing the handles. Place your legs or align your knees over your hips with calves parallel to the Glideboard, legs together and toes pointing up.
- Page 24 Press Away Arm Pullover Place your hands firmly on the Foot Rest Bar Assembly, shoulder width apart and carefully kneel on the Lie on your back with your head on the Headrest. Bend your knees with ankles crossed in a relaxed position Glideboard with your feet resting against the pulley arms.
- Page 25 Zorro SPECIAL INSTRUCTIONS: Do the following four exercises: Front Sit centered and sideways on the Glideboard in a cross-legged position. Grasp the front handle with the Press, Torso Rotation, Zorro and Side Leg Press all on one side, then hand farthest from the handle, palm facing your chest. Bend your elbow with your arm lifted to chest height as if you were holding a bow and arrow.
Need help?
Do you have a question about the Pilates Power Gym and is the answer not in the manual?
Questions and answers