
Related Manuals for ADT Pulse iCamera-1000-ADT


Summary of Contents for ADT Pulse iCamera-1000-ADT
- Page 1 ADT Pulse Interactive Solutions ® iCamera-1000-ADT Indoor Low-Light Camera Installation Guide...
-
Page 2: Table Of Contents
Front Panel ......................3 Rear Panel ......................4 Configuring and Installing the iCamera-1000-ADT ..........5 Adding the iCamera-1000-ADT to your ADT Pulse Wireless Network ... 6 iCamera Wall Mounting Instructions ..............11 PIR Video Motion Detection ................... 14 Enabling Motion Detection via the ADT Security System ....... 15 APPENDIX A SPECIFICATIONS ................ -
Page 3: Welcome
Overview The iCamera-1000-ADT monitors your home or business in a low light or dark environment. The iCamera can be used as either a wired or wireless camera using Wi-Fi connectivity that easily installs to your ADT Pulse wireless network. -
Page 4: Package Contents
ADT Pulse Interactive Solutions iCamera-1000-ADT Indoor Low-Light Camera ® Installation Guide Package Contents 1. The iCamera-1000-ADT Indoor Low-Light Camera 2. Stand 3. Y-Cable 4. PoE Cable 5. 12V Power Adapter 6. Assembly Back Plate with three screws (packaged separately) 7. Wall Mount Plate 8. -
Page 5: Physical Details - Icamera-1000-Adt
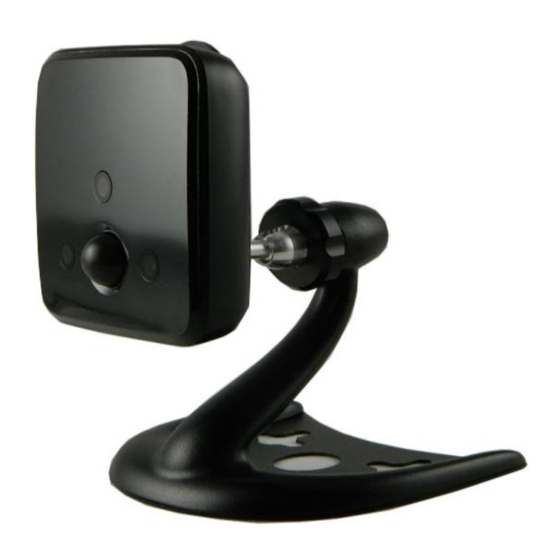
ADT Pulse Interactive Solutions iCamera-1000-ADT Indoor Low-Light Camera ® Installation Guide Physical Details – iCamera-1000-ADT Front Panel Figure 1: Front Panel 1. Light Sensor Detects lighting conditions. 2. IR LEDs The LEDs help you see clearly at night or in a dark environment. -
Page 6: Rear Panel
Rear Panel Figure 2: Rear Panel 1. LAN Port Use in conjunction with the supplied LAN cable to connect your iCamera to the ADT Pulse Gateway. 2. Stand Mount The stand mount connects the stand to the iCamera. 3. Reset Button The reset button has two (2) functions: Reboot. -
Page 7: Configuring And Installing The Icamera-1000-Adt
Configuring and Installing the iCamera-1000-ADT The following instructions provide details of configuring and installing the iCamera-1000-ADT Indoor Low-Light Camera to your ADT Pulse network. Initial setup is done only one time to configure the iCamera’s wireless settings to the ADT Pulse Gateway. -
Page 8: Adding The Icamera-1000-Adt To Your Adt Pulse Wireless Network
ADT Pulse Interactive Solutions iCamera-1000-ADT Indoor Low-Light Camera ® Installation Guide Adding the iCamera-1000-ADT to your ADT Pulse Wireless Network 1. Open your web browser. In the address bar, type: https://Portal.ADTPulse.com. 2. Type your Username and Password, and then click the Sign In button. - Page 9 ADT Pulse Interactive Solutions iCamera-1000-ADT Indoor Low-Light Camera ® Installation Guide 4. In the Manage Devices Assistant, click Cameras. 5. Click the picture of the iCamera or select it from the drop-down list, and then click the Continue button.
- Page 10 ADT Pulse Interactive Solutions iCamera-1000-ADT Indoor Low-Light Camera ® Installation Guide 6. Assign the iCamera a unique name (this is usually based on the location of the iCamera) in the space provided, and then type the iCamera’s MAC ID or Server Name.
-
Page 11: Installation Guide
ADT Pulse Interactive Solutions iCamera-1000-ADT Indoor Low-Light Camera ® Installation Guide 9. Connect the supplied 12V power adapter to power up the iCamera, and then click the Continue button. Please wait several minutes while the iCamera is being added to the network. -
Page 12: Poe Cable
Installation Guide 10. Click Finish after installation is complete. Figure 4: Installation Using POE Cable 11. Unplug the Y-cable from the ADT Pulse Gateway, and then power off the camera. IMPORTANT IF CAMERA WILL BE INSTALLED AS A ‘WIRED’ CAMERA, USE THE LAN CABLE AND THE Y-CABLE. -
Page 13: Icamera Wall Mounting Instructions
ADT Pulse Interactive Solutions iCamera-1000-ADT Indoor Low-Light Camera ® Installation Guide iCamera Wall Mounting Instructions Ensure that the iCamera is properly configured and added to the network before mounting the camera.* NOTE 1. Stand Placement Locate an area where you want the iCamera to be mounted. Using the wall plate as a template, make two small marks inside the mounting holes of the wall plate. - Page 14 ADT Pulse Interactive Solutions iCamera-1000-ADT Indoor Low-Light Camera ® Installation Guide iCamera Wall Mounting Instructions (Cont’d) 4. Hook the two mounting holes on the stand into the mounting screws. 5. Attach the iCamera Stand Locate the stand mount on the back of the iCamera. Fasten the stand by turning the iCamera counterclockwise until secured.
- Page 15 ADT Pulse Interactive Solutions iCamera-1000-ADT Indoor Low-Light Camera ® Installation Guide iCamera Wall Mounting Instructions (Cont’d) 8. Connect the Power Adapter Connect the supplied power adapter to the PoE cable and power up. 9. Check the LEDs The Power LED turns on briefly, and then starts blinking for approximately 15 to 20 seconds.
-
Page 16: Pir Video Motion Detection
ADT Pulse Interactive Solutions iCamera-1000-ADT Indoor Low-Light Camera ® Installation Guide PIR Video Motion Detection The motion event will be captured when a significant image changes within the Window of Interest. The Window of Interest is defined below. The following installation hints should be noted: 1. -
Page 17: Enabling Motion Detection Via The Adt Security System
ADT Pulse Interactive Solutions iCamera-1000-ADT Indoor Low-Light Camera ® Installation Guide Enabling Motion Detection via the ADT Security System 1. Click the Automations tab, and then click the Add Automation button. 2. Select a trigger for this automation from the Trigger drop-down list. - Page 18 ADT Pulse Interactive Solutions iCamera-1000-ADT Indoor Low-Light Camera ® Installation Guide 8. Click OK. 9. Click Save.
-
Page 19: Appendix A Specifications
ADT Pulse Interactive Solutions iCamera-1000-ADT Indoor Low-Light Camera ® Installation Guide Appendix A Specifications Model iCamera Dimensions 72mm (W) x 72mm (H) x 20mm (D) (without stand) Operating Outdoor: -20 C to 45 C Temperature Indoor: 0 C to 45 C Video compression H.264, MPEG4 and MJPEG... -
Page 20: Ce Approvals
ADT Pulse Interactive Solutions iCamera-1000-ADT Indoor Low-Light Camera ® Installation Guide CE Approvals The iCamera and the Ethernet iCamera meet the guidelines of the European Union and comply with the 99/5/EEC and RTTE 99/5EG directives, including the following standards: EN60950...
Need help?
Do you have a question about the iCamera-1000-ADT and is the answer not in the manual?
Questions and answers