Table of Contents
Advertisement
Harmony Remote User Manual
600 Series
Congratulations on the purchase of your Harmony remote! True system control is now at your
fingertips. This User Manual will introduce you to the basic setup, customizations and main features of
your Harmony remote.
The Harmony remote web site and web wizards are constantly updated to improve your experience. At
times the information in this manual may be out of date. If in doubt, follow the information and
instructions on the web site. Select a topic from the following list to learn more about your Harmony
remote:
INTRODUCTION
• Getting to Know Your Harmony Remote
SETTING UP YOUR HARMONY REMOTE
• Before You Begin the Online Setup Process
! Step 1: Unpack and prepare the remote.
! Step 2: Complete the Entertainment Device Worksheet
! Step 3: Install the Harmony Software
• Begin the Setup Process
! Step 1: Create your Harmony Login
! Step 2: Complete the Online Setup Process
! Step 3: Synchronize Your Harmony Remote
USING YOUR HARMONY REMOTE
• Selecting an Activity
• Switching Between Activities
• Resynchronizing Your Harmony Remote
• Using Sound and Picture Modes in an Activity
! Sound Mode
! Picture Mode
• Using Device Mode
Advertisement
Table of Contents

Related Manuals for Harmony 688


Summary of Contents for Harmony 688
- Page 1 The Harmony remote web site and web wizards are constantly updated to improve your experience. At times the information in this manual may be out of date. If in doubt, follow the information and instructions on the web site. Select a topic from the following list to learn more about your Harmony remote: INTRODUCTION •...
- Page 2 ! Add a custom-labeled button to send a command to more than one device at a time: • Teaching Infrared (IR) Commands ! Using the Infrared Sensor ! Naming an Infrared Command ADDITIONAL HELP ! Finding Answers to Your Questions ! Troubleshooting Your Harmony Remote...
-
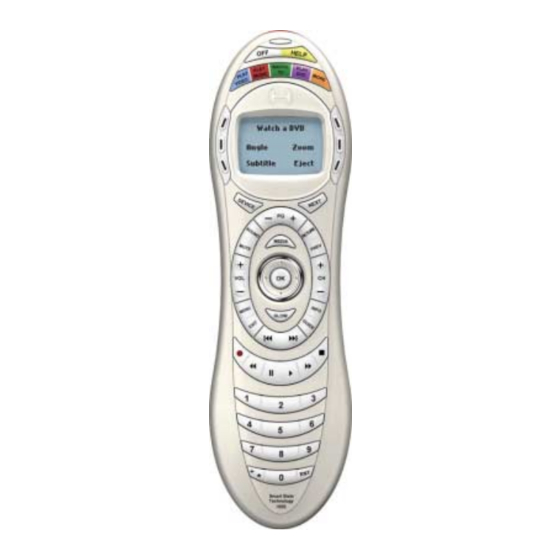
Page 3: Getting To Know Your Harmony Remote
• The web wizard allow you to describe the entertainment devices you want to control, how they are set up, and your preferences for controlling them. • If one of your devices is not in the Harmony Remote web site's database, the web wizard will learn about your device and add it to your configuration. - Page 4 • Next: Shows more choices in the LCD. • Sound: Controls special sound features. • Picture: Controls special picture features. • Glow: Backlight glow. • Infrared Learning Port: Use this port to teach the Harmony remote commands from your original remote.
- Page 5 Setting up Your Harmony Remote This section describes the setup process for the Harmony remote. The setup process has been broken down into two stages: the first stage requires you to complete some simple steps to prepare for the setup process; the second stage requires you to begin the setup process online. Much of the setup process is completed online.
- Page 6 Log in to the Internet using the account and password provided by your Internet Service Provider (ISP). d. Insert the Harmony Client Software CD into the CD-ROM drive of your computer. After 10 seconds the installation program will automatically start. If the installation does not automatically start, click the Start menu on the taskbar and then click Run.
- Page 7 Step 2: Complete the Online Setup Process Once you have created your Harmony login, the online setup process begins. You will be directed by a web wizard, which will guide you through a series of question-and-answer steps to complete each of the 5 main steps of the online setup process: 1.
- Page 8 2. Use the Activity buttons on your Harmony remote to choose an activity you would like to try. 3. If your Harmony remote did not turn on the correct devices for the activity, or if an input or setting is not correct (e.g. you do not see a picture on your TV or do not hear sound) press the HELP button on your Harmony remote.
-
Page 9: Using Your Harmony Remote
The Harmony remote is then "out of sync" with your devices (e.g. it thinks one of your devices is on, but it is turned off). Some of the reasons the Harmony remote can become "out of sync" with your system are: •... -
Page 10: Sound Mode
This is known as the Activity mode. Within each activity you can change how the Harmony remote behaves by switching into one of 3 alternative modes:... - Page 11 Harmony Remote. At any time, press the DEVICE button to switch into this mode. Once in Device mode, the Harmony remote will display a list of all the devices you have in your configuration. Select a device from the list and the Harmony remote will only control the device features.
-
Page 12: Customizing Your Harmony Remote
Activity buttons. To customize your Activity buttons, go to your Harmony home page and click Customize Activity Buttons. Click the label for the button you want to change and then click the activity that you want to start when the button is pressed on the remote. -
Page 13: Changing The Behavior Of Buttons Within An Activity
Based on our knowledge of how each of your devices is controlled, the Harmony remote will make its best effort to match all the buttons you need to control an activity. However, there may be some commands you want to add to buttons or display on the LCD. -
Page 14: Adding Custom Labeled Buttons
2. Add as many custom-labeled buttons as you like. Click More Custom Labels to add labels one at a time. 3. When you update your Harmony remote, click NEXT to view all of your custom-labeled buttons a page at a time. -
Page 15: Using The Infrared Sensor
3. The web site will try to find a matching pattern for the infrared signal. 4. If no pattern is found, the signal will be stored as-is in its original format. 5. If a pattern is found, the Harmony Remote web site converts the signal into a format for convenient storage. - Page 16 • Do not use spaces or other special characters such as /, & or * in the name. • Capitalize the start of words (e.g. NextDisc, ModeDigital). • Start the command name with its main function (e.g. VolumeRearUp, VolumeRearDown, VolumeFrontUp, VolumeFrontDown). This helps group related commands in lists. •...
-
Page 17: Additional Help
If you cannot find the answer to your question(s) or troubleshoot your problem(s), contact your Harmony Support Team at 1-866-291-1505 (Monday through Friday 9 A.M. to 10 P.M., Saturday and Sunday 12 P.M. to 6 P.M. Eastern Standard Time).
Need help?
Do you have a question about the 688 and is the answer not in the manual?
Questions and answers