Table of Contents
Advertisement
Smoke and Carbon
Monoxide Alarm
User Guide
Model: KN-COSM-IBACA (900-0119)
120 V AC Operated with 2-AA Front-Loading Battery Backup
ATTENTION: Please take a few minutes to thoroughly read this
user guide, which should be saved for future reference and
passed on to any subsequent owner.
User Guide P/N 2544-7202-00-EN 6/2013
SINGLE AND/OR MULTIPLE
STATION SMOKE ALARM
SINGLE AND/OR MULTIPLE
STATION CARBON
MONOXIDE ALARM
Advertisement
Table of Contents

Related Manuals for Kidde KN-COSM-IBACA (900-0119)


Summary of Contents for Kidde KN-COSM-IBACA (900-0119)
- Page 1 SINGLE AND/OR MULTIPLE SINGLE AND/OR MULTIPLE STATION CARBON STATION SMOKE ALARM MONOXIDE ALARM Smoke and Carbon Monoxide Alarm User Guide Model: KN-COSM-IBACA (900-0119) 120 V AC Operated with 2-AA Front-Loading Battery Backup ATTENTION: Please take a few minutes to thoroughly read this user guide, which should be saved for future reference and passed on to any subsequent owner.
-
Page 2: What To Do When The Alarm Sounds
What to do When the Alarm Sounds! Carbon Monoxide Alarm Procedure WARNING: Activation of the CO Alarm indicates the presence of Carbon Monoxide (CO) which can kill you. If the alarm sounds 4 quick “beeps”, 5 seconds off: 1) Immediately move to fresh air – outdoors or by an open door/window. -
Page 3: What To Do If The Alarm Sounds
What to do When the Alarm Sounds! NEVER IGNORE THE SOUND OF THE ALARM! Determining what type of alarm has sounded is easy with your Combination Smoke/CO Alarm. The voice message warning system will inform you of the type of situation occurring. Refer to the Features section on pages 4-5 for a detailed description of each alarm pattern. - Page 4 What to do When the Alarm Sounds! • Before opening inside doors look for smoke seeping in around the edges, and feel with the back of your hand If the door is hot use your second exit. If you feel it’s safe, open the door very slowly and be prepared to close immediately if smoke and heat rush in.
-
Page 5: Table Of Contents
Table of Contents Introduction ......Page 1 Product View ......Pages 2-3 Features . -
Page 6: Introduction
Station (24 devices) alarm. This alarm has a ten-year limited warranty. IMPORTANT: This unit is only approved to interconnect with the Kidde line of products. It is not approved to interconnect with any other manufacturer’s products. Please take a few minutes to thoroughly read this user guide which should be saved for future reference. -
Page 7: Product View
Product View Front Green & Red LED (Light Emitting Diode) Test/Reset/Hush ® Button Alarm Sounder Voice Speaker Battery Compartment... - Page 8 Product View Back Tamper-Resist Feature AC Connector Pins...
-
Page 9: Features
• Powered by 120V AC (60 Hz, 45 mA max) wire-in connector and two AA battery backup. • Interconnectable to other Kidde smoke and CO alarms (see page 16 for details). • Alarm/Voice message warning system that alerts you of the... - Page 10 Features – Only for smoke alarm Hush System announces “HUSH MODE CANCELLED” when unit resumes normal operation after Hush Mode has been cancelled. – Only if button is pushed System announces “CARBON MONOXIDE PREVIOUSLY DETECTED” when the unit has detected CO concentrations of 100 ppm or higher.
-
Page 11: Smoke Alarm
Home fires develop in different ways and are often unpredictable. For maximum protection, Kidde recommends that both Ionization and Photoelectric alarms be installed. • A battery powered alarm must have a battery of the specified type, in good condition and installed properly. -
Page 12: Co Alarm Response Times
Features • If the alarm is located outside the bedroom or on a different floor, it may not wake up a sound sleeper. • The use of alcohol or drugs may also impair one’s ability to hear the smoke alarm. For maximum protection, a smoke alarm should be installed in each sleeping area on every level of a home. -
Page 13: Installation Instructions
CO inspections. Some may charge for this service. It’s advisable to inquire about any applicable fees prior to having the service performed. Kidde will not pay for, or reimburse, the owner or user of this product, for any repair or dispatch calls related to the alarm sounding. - Page 14 Installation Instructions 10 cm (4”) CEILING MINIMUM FIGURE 1A NEVER HERE BEST PLACEMENT ACCEPTABLE PLACEMENT SIDE WALL FIGURE 1B NOT IN THIS AREA ANYWHERE IN THIS AREA 0.9 m (3’) 0.9 m (3’) HORIZONTAL DISTANCE FROM PEAK NOT IN FIGURE 1C THIS AREA ANYWHERE IN THIS AREA...
- Page 15 Installation Instructions Sloped Ceiling Installation: Install smoke alarms on sloped, peaked or cathedral ceilings at, or within 0.9 m (3’) of the highest point (measured horizontally). NFPA 72 states “Smoke alarms in rooms with ceiling slopes greater than 0.3 m – 2.4 m (1’ to 8’) horizontally shall be located on the high side of the room”.
-
Page 16: Locations To Avoid
Installation Instructions WARNING: This product is intended for use in ordinary indoor locations of family living units. It is not designed to measure compliance with commercial or industrial standards. B. Locations to Avoid: WARNING: Do not install in garages, kitchens, furnace rooms or bathrooms! INSTALL AT LEAST 1.5 M (5’) AWAY FROM ANY FUEL BURNING APPLIANCE. -
Page 17: Step 2: Wiring Instructions
Installation Instructions Step 2: Wiring Instructions Wiring Requirements • This smoke alarm should be installed on a CSA listed or recognized junction box. All connections should be made by a qualified electrician and all wiring used shall be in accordance with codes having jurisdiction in your area. The multiple station interconnect wiring to the alarms must be run in the same raceway or cable as the AC power wiring. - Page 18 Installation Instructions • A maximum of 24 Kidde Safety devices may be interconnected in a multiple station arrangement. The interconnect system should not exceed the NFPA interconnect limit of 12 smoke alarms and/or 18 alarms total (smoke, CO, Smoke/ CO Combination, heat, etc.). This Smoke/CO combination alarm must be counted as a smoke alarm when determining the number of units on an interconnect line.
-
Page 19: Step 3: Mounting Instructions
Installation Instructions Step 3: Mounting Instructions CAUTION: YOUR SMOKE/CO ALARM IS SEALED AND THE COVER IS NOT REMOVABLE! 1. To help identify the date to replace the unit, a label has been affixed to the side of the alarm. Write the “Replace by” date (10 years from initial power up) in permanent marker on the label. -
Page 20: Step 4: Testing The Alarm
Installation Instructions 6. Install the alarm on the mounting bracket and rotate the alarm in the direction of the “ON” arrow on the cover until the alarm ratchets into place (this ratcheting function allows for aesthetic alignment). Note: The alarm will mount to the bracket in 4 positions (every 90 degrees). -
Page 21: Operating Instructions Interconnect Feature
Operating Instructions Interconnect Feature IMPORTANT: This unit is only approved to interconnect with the Kidde line of products. It is not approved to interconnect with any other manufacturer's products. • When compatible smoke alarms and heat alarms are interconnected to this alarm, they will only respond to a smoke related event. -
Page 22: Reset Feature
Operating and Installation Instructions Your Smoke/CO Alarm will automatically reset after approximately 9 minutes. When the unit returns to normal operation after being in HUSH mode, it will verbally announce “HUSH MODE CANCELLED”, and sound the alarm if smoke is still present. -
Page 23: Led Indicator Operation
Operating and Installation Instructions LED Indicator Operation Red LED The red LED will flash as described below under the following conditions: – During smoke or CO alarm, with every beep – During testing (same as alarm) – Low battery, single flash with chirp –... -
Page 24: Tamper Resist Feature
Operating and Installation Instructions Posts FIGURE 4A FIGURE 4B Tamper Resist Feature To make your smoke/CO alarm tamper resistant, a tamper resist feature has been provided. Activate the tamper resist feature by breaking off the four posts in the square holes in the trim ring (see figure 4A). -
Page 25: Alarm Removal
Alarm Removal IF TAMPER RESIST FEATURE HAS BEEN ACTIVATED, REFER TO TAMPER RESIST FEATURE DESCRIPTION ABOVE FOR REMOVAL INSTRUCTIONS. Remove the alarm from the mounting bracket by rotating the alarm in the direction of the “OFF” arrow on the cover. If any form of battery failure is detected the red LED light will flash and the unit will “chirp”... -
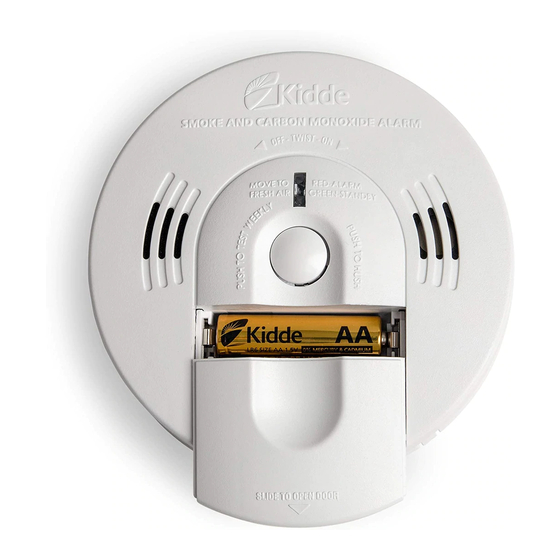
Page 26: Battery Replacement
Battery Replacement Replace batteries with one of the following approved brands: Duracell MN1500, MX1500 or Energizer E91. These batteries Battery can be purchased at your local finger retailer. WARNING: Use only the batteries specified. Use of different batteries may have a FIGURE 6 detrimental effect on the Smoke/CO alarm. -
Page 27: General Alarm Maintenance
General Maintenance To keep your Smoke/CO Alarm in good working order, please follow these simple steps: • Verify the unit's alarm and LED lights operation by pushing the test/reset button once a week. • Remove the unit from mounting bracket and vacuum the alarm cover and vents with a soft brush attachment once a month to remove dust and dirt. -
Page 28: Carbon Monoxide Safety Information
Carbon Monoxide Safety Information General CO Information Carbon monoxide (CO) is a colorless, odorless, and tasteless poison gas that can be fatal when inhaled. CO inhibits the blood’s capacity to carry oxygen. Possible Sources CO can be produced when burning any fossil fuel: gasoline, propane, natural gas, oil and wood. -
Page 29: Symptoms Of Co Poisoning
Carbon Monoxide Safety Information Always install appliances according to manufacturer’s instructions and adhere to local building codes. Most appliances should be installed by professionals and inspected after installation. Regularly examine vents and chimneys for improper connections, visible rust, or stains, and check for cracks in furnace heat exchangers. -
Page 30: Fire Prevention
Fire Safety Information Escape Plan Familiarize everyone with the sound of the smoke alarm and train them to leave the home when they hear it. Practice a fire drill at least every six months, including fire drills at night. Ensure that small children hear the alarm and wake when it sounds. -
Page 31: Fire Safety Information Escape Plan
Fire Safety Information Install and maintain fire extinguishers on every level of the home and in the kitchen, basement and garage. Know how to use a fire extinguisher prior to an emergency. Second level and higher occupied rooms with windows, should have an escape ladder. Industry Safety Standards NFPA (National Fire Protection Association) Required Number of Smoke Alarms... -
Page 32: National Fire Protection Association
Kidde. If you have questions, call Kidde Product Support Line at 1-800-880-6788. Kidde warrants that the enclosed alarm (but not the battery) will be free from defects in material and workmanship or design under normal use and service for a period of ten years from the date of purchase.
Need help?
Do you have a question about the KN-COSM-IBACA (900-0119) and is the answer not in the manual?
Questions and answers