
Related Manuals for Profile Auto-dial


Summary of Contents for Profile Auto-dial
- Page 1 Auto-dial Alarm System Intelligent GSM Auto-Dial Alarm System Profile For a better understanding of this product, please read this user manual thoroughly before using it. Auto-dial Alarm System 2013.2.V1.0...
-
Page 2: Table Of Contents
CONTENTS CONTENTS Function Instruction]………………… ……………………1 … 18.SMS Receiving Number Setting………………………………12 [Alarm Host Diagram] …………………………………………2 19.Delete SMS Receiving Number………………………………13 ……………………………… Main panel front schematic diagram 20.Defense Zone Programming…………………………………13 LCD display…………………………………………………………………2 21.Home Arm Defense Zone Setting……………………………14 Back cover schematic diagram………………………………………3 22.Voice Recording……………………………………………………15 Wired ports………………………………………………………………3 23.Arm/ Disarm Siren Sound Setting……………………………15 [Function Settings]……………………………………………4... -
Page 3: [Function Instruction]
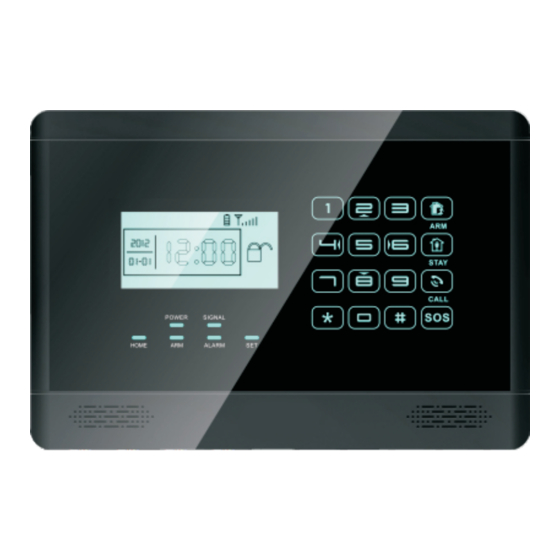
Function Instruction Alarm Host Diagram [Function Instruction] Alarm Host Diagram] 4 wired and 99 wireless defense zones; In order to make the main unit get the wireless signal well for all LCD screen with time clock display; wireless accessories, please put the alarm host at the central place of Voice prompt for all operations;... -
Page 4: Back Cover Schematic Diagram
Alarm Host Diagram Function Settings Back cover schematic diagram: 12 GND Ground 13 Z3 Wired sensor 3 (zone number: 97) Tamper Alarm Button 14 GND Ground Fix Bracket 15 Z4 Wired sensor 4 (zone number: 98) Power Switch DC 12V Input SIM Card Socket Lead Wire Slot Wired Ports... -
Page 5: Exit Settings
Function Settings Functions Settings Note: A indicates: 1~8 remote controllers number. You can add maximum 8 In setting status, press [ ] button can delete the numbers CALL remote controllers. input. LCD display: The system default password is [8888]. Operating method: [XXXX] XXXX indicates the 4-digit password. -
Page 6: Change Password
Functions Settings Functions Settings In setup state, use keypad to input [24], then input the defense zone LCD display: number you want to delete [01~99], and then input [#] to confirm. The main unit emits a long beep and the defense zone indicator flickers once. -
Page 7: Timely Disarm
Functions Settings Functions Settings BB indicates: the minute of the setting time 12.Wireless Transmission Control For example: set the arm time as 10:45pm In setup status, use keypad to input [41], then input the number [1/0], Operating method: [33] [22] [45] and then input [#] to confirm. -
Page 8: Time Setting Of Out Arm Delay
Functions Settings Functions Settings 14.Time Setting of Out Arm Delay (Default: 60 sec) 16.Alarm Number Setting In setup state, input [51] ~ [56], then input the voice alarm-receiving In setup status, use keypad to input [44], then input delay time [01] ~ number (mobile number or telephone number), and then press [#] to [99], and then input [#] to confirm. -
Page 9: Delete Sms Receiving Number
Functions Settings Functions Settings In setup state, input [57] ~ [59], then input the SMS receiving number, Operating method: [60] [AA] and then press [#] button to confirm. The main unit will make a beep, AA: defense zone number [01~99] means zone 1 to zone 99; the [Signal] indicator will flicker once and you will hear “setting B: defense zone type completed”, which indicate setup successfully. -
Page 10: Voice Recording
Functions Settings Functions Settings Operation:[61] [12] 24.Siren Setting in “Emergency Help” Mode After this setting, when you “home arm” the system, sensor in defense Press “Emergency/SOS” button on the remote controller or the keypad, zone 55 will not work. the system will make alarm immediately. You can choose to activate the siren sound or not. -
Page 11: Arm/ Disarm Voice Prompt
Functions Settings Functions Settings 26.Arm/ Disarm Voice Prompt the system will make alarm at the same time. This product has this function: when you arm/ disarm it, it will give In setting status, first input [87], then press [0/1] and finally press [#] to voice prompt “system armed/ disarmed”. -
Page 12: Remote Controller Operation
Operating Instructions Operating Instructions Disarm: defense zone 1~99 will not alarm when detector triggered LCD display: (except 24 hours defense zone) System setup status: In this status, all defense zones will not alarm when detectors are triggered. 2.Remote Controller Operation 4.Home Arm Users can use remote controller to set system as Out Arm, Home Arm, It means, for the safety, while somebody is at home, you need to... -
Page 13: Emergency Help
Operating Instructions Operating Instructions LCD display: If the password is wrong, you will hear a prompt voice “wrong password, please re-enter”. Press [1]: arm, if finished successfully, you will hear a voice prompt “System armed”. Press [2]: disarm, if finished successfully, you will hear a voice prompt 6.Emergency Help “System disarmed”. -
Page 14: Gsm Signal Checking
Operating Instructions Technical Parameters and then display the alarming time: [Technical Parameters] Power supply: AC=220V±10% DC=12V (Built-in NI-HI) rechargeable battery Standby Current: <60mA Alarming Current: <450mA GSM band: 850/ 900/ 1800/ 1900MHz Wireless Frequency: 315/ 433/ 868MHz±0.5MHz You can also check the alarm records by SMS (Max: Latest 9 records). Wireless receiving sensitivity: 5mV/m SMS Check Command: Remote Control Password (Default: 1234) + [3] Anti-interference: 1V/m (Frequency range: 20-1000MHZ) -
Page 15: [Components List]
Components List Care and Maintenance Check the SIM card: [Components List] 1.Check the use of SIM card, such as network signal, balance, etc. Main panel 1pc, 2.Make sure the PIN code verification of the SIM card is closed. Remote controller 2pcs, 3.Please keep the password and SIM card number safe, in case that Siren... -
Page 16: Optional Accessories
Optional Accessories Function Setting Commands The following accessories are optional: Function Operation Remarks Commands Description [Program Enter settings Default password: 8888 Password] + [#] Enter settings [*] + [#] [20]+[1~8] Coding of Remote Max 8 remote controllers + [#] Signal booster Controller [21]+[1~8] Delete Remote... - Page 17 Function Setting Commands Function Setting Commands Delete Phone Number [51]~[56] + [#] [95175308246] + [#] Factory Reset Use with caution [57]~[59] + Phone SMS Receiving [operation Arm by SMS 3 groups of SMS receiving number Default operation password: 1234 Number Setting number + [#] password] + [1] [operation...
Need help?
Do you have a question about the Auto-dial and is the answer not in the manual?
Questions and answers