Table of Contents
Advertisement
Quick Links
Advertisement
Table of Contents

Related Manuals for Numark NV


Summary of Contents for Numark NV
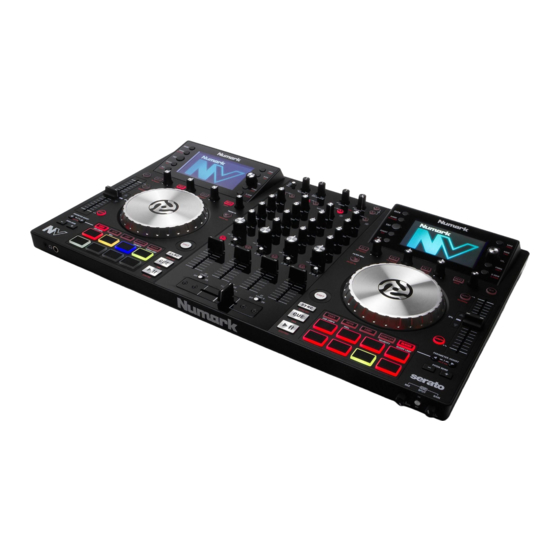
- Page 1 User Guide English...
-
Page 2: Quick Start
When ending a session, turn off (1) output devices, (2) NV, (3) input sources. Connect the NV to your computer with the USB cable (included) and to your headphones. Open Serato DJ and go! For more information on how to use Serato DJ with NV, visit serato.com/dj/support... -
Page 3: Top Panel
Touch Mode: Press this button to toggle through the Touch Modes, which let you access the touch-capacitive functions of NV's FX 1 Knob, FX 2 Knob, and FX 3 Knob and the EQ Knobs (Channel Treble, Channel Mid, and Channel Bass). These functions are momentary, not "latching."... -
Page 4: Mixer Controls
Mixer Controls Gain Trim: Adjusts the pre-fader, pre-EQ audio level of the corresponding channel in the software. LED Meters: Monitors the audio levels of the corresponding channel. Channel Treble: Adjusts the high (treble) frequencies. When Touch Mode is activated, touching this knob will mute the corresponding channel's high frequencies (an "EQ kill"). Channel Mid: Adjusts the mid-range frequencies. -
Page 5: Playback Controls
Playback Controls 20. Platter: Controls the playhead in the software. 21. Play / Pause: This button pauses or resumes playback. Press and hold Shift and then press this button to "stutter-play" the track from the last set Cue Point. 22. Cue: When the Deck is paused, you can set a Temporary Cue Point by moving the platter to place the playhead at the desired location and then pressing the Cue Button. -
Page 6: Pad Mode Controls
Pad Mode Controls 26. Pads: These pads have different functions on each Deck depending on the current Pad Mode. They are velocity-sensitive (in certain modes only), durable, and easy to play. In this section, when referring to specific pads, it will refer to the numbers as shown here. Pad 2 Pad 3 Pad 4... - Page 7 29. Auto / Roll: This Pad Mode button puts the pads in two modes: Auto-Loop Mode and Loop Roll Mode. When the button is unlit, the first press will always select Auto-Loop Mode. Note: The pad layouts here match the software's default Auto-Loop time division layout. If you shift the range of time divisions displayed in the software, the pad layout will change to match it.
- Page 8 31. Sampler: This Pad Mode button switches the pads between two modes: Sample Player Mode and Sample Velocity Trigger Mode. When the button is unlit, the first press will always select Sample Player Mode. • Sample Player Mode: Pads 1-6 each trigger a sample, which you can assign in the software (the volume level is also set in the software).
-
Page 9: Flip Controls
Flip Controls If you have purchased the Serato Flip Expansion Pack, you can create and control your Flips using these commands: • In Hot Cue Mode or Hot Cue Auto-Loop Mode (press Cues to enter either mode): To record-arm or -disarm Flip recording, press the Parameter < button. To activate or deactivate Flip looping, press and hold Shift and then press the Parameter <... -
Page 10: Track Controls
38. Takeover LEDs: When you select the other Deck with the Deck Select switch, the position of the NV's Pitch Fader may not match the Pitch setting for that Deck in the software. Slowly move the Pitch Fader in the direction indicated by the Takeover LED arrow until it turns off. -
Page 11: Navigation Controls
Press and hold Shift and then press this button to toggle through the Files, Browse, Prepare, and History panels. 47. D. View / S. View: Press this button to toggle through the available NV display modes. Press and hold Shift and then press this button to toggle through the available software display modes. - Page 12 53. Channel Filter: Turn this knob to adjust the filter on the corresponding channel. The type of filter it adjusts will depend on the Filter Mode button. 54. Filter Mode: Press this button to toggle through the Filter Modes, which affect the Channel Filter knobs: Off, Filter-Roll Mode, or Filter-FX Mode.
-
Page 13: Rear Panel
Power In: Use the included power adapter (12 V DC, 2 A, center-positive) to connect NV to a power outlet. While the power is switched off, plug the cable into NV first, then plug the cable into a power outlet. -
Page 14: Performance View
Display NV's full-color displays provide real-time feedback of the software with different views of each deck. The three available views are Performance View 1, Performance View 2, and Library View. To move to the next view, press the D. View button. - Page 15 Performance View 1 This view contains information about the current track, effects, hot cues, and loops. Deck: This is the currently selected Layer in the software controlled by that hardware deck. Press the Deck button to switch between the Layers. Deck A controls Layer 1 or 3; Deck B controls Layer 2 or 4.
- Page 16 11. Auto-Loop Buttons: These eight buttons correspond to the deck's eight pads while in Auto-Loop Mode. In that mode, press one of the pads to trigger an auto-loop of the corresponding length. See Top Panel > Pad Mode Controls > Auto / Roll to learn more.
- Page 17 Performance View 2 This view provides an alternative display of information about the current track, effects, hot cues, and loops. Deck: This is the currently selected Layer in the software controlled by that hardware deck. Press the Deck button to switch between the Layers. Deck A controls Layer 1 or 3; Deck B controls Layer 2 or 4.
- Page 18 11. Auto-Loop Button: This button is the deck's current auto-loop length. In Auto-Loop Mode, press one of the pads to trigger an auto-loop of a specific length, which will be shown here. See Top Panel > Pad Mode Controls > Auto / Roll to learn more.
- Page 19 Library View This view lets you browse through your library, including crates and subcrates, and load a track to the current deck. To move through the list of tracks, turn the Sel Knob. To load the currently selected track, press the Load button. Important: Because Library View does not indicate the current deck, make sure you have selected the desired deck before pressing Load to load a track to it.
-
Page 20: Technical Specifications
Specifications are subject to change without notice. Trademarks and Licenses Numark are trademarks of inMusic Brands, Inc., registered in the U.S. and other countries. Serato, Serato DJ, and the Serato logo are registered trademarks of Serato Audio Research. All other product or company names are trademarks or registered trademarks of their... - Page 21 Manual Version 1.0...
Need help?
Do you have a question about the NV and is the answer not in the manual?
Questions and answers