Jura IMPRESSA J5 User Manual
Jura user's manual coffeemaker impressa j5
Hide thumbs
Also See for IMPRESSA J5:
- Manual (104 pages) ,
- Quick reference manual (11 pages) ,
- Disassembling manual (18 pages)
Table of Contents

Related Manuals for Jura IMPRESSA J5


Summary of Contents for Jura IMPRESSA J5
-
Page 1: The Impressa J5 Manual
The IMPRESSA J5 Manual The ‘IMPRESSA Manual’ has been awarded the seal of ap- proval by the independent German Technical Inspection Agency, TÜV SÜD, due to its easy-to-understand style, its thoroughness and coverage of safety aspects. -
Page 2: Table Of Contents
Model variants ... 14 Symbol description ... 14 Welcome to the world of IMPRESSA! IMPRESSA J5 – Perfect Enjoyment, Perfect Aesthetics Coffee that fulfils your wildest dreams ... 16 Perfect Enjoyment, Perfect Aesthetics ... 16 JURA on the Internet ...17 Knowledge Builder ...17... - Page 3 Pre-ground coffee ... 43 Warm milk ... 44 Hot water ... 45 Permanent settings according to cup size Permanent settings in programming mode Buttons ...47 Energy save mode... 48 Time ... 49 Programmable switch-on time ... 49 Programmable automatic switch-off time ... 50 Units amount of water/time format ...
-
Page 4: Important Safeguards
Important Safeguards Important Safeguards Important Safeguards Save these instructions Save these instructions Follow the basic safety Follow the basic safety precautions precautions These safeguards apply for machines with UL safety test (see rating plate and Chapter 15, ‘Technical data and guide values’). When using electrical appliances, basic safety precautions should always be followed, to reduce the risk of fire, electric shock, and/or injury to persons, including the following:... - Page 5 Special cord set instructions Special cord set instructions Warning Warning Caution Caution A short power supply cord is provided to reduce the risk result- ing from becoming entangled in or tripping over a long cord. Longer extension cords are available and may be used if care is exercised in their use.
- Page 6 Important Safeguards NEVER DO NEVER DO (or you will void your (or you will void your warranty protection): warranty protection): Never fill instant coffee, chocolate mix etc. into the grinder or ground coffee funnel (grunder by-pass). It will damage the functioning of the brewing chamber Never fill sugar coated coffee beans into the bean hopper.
- Page 7 Important Safeguards...
-
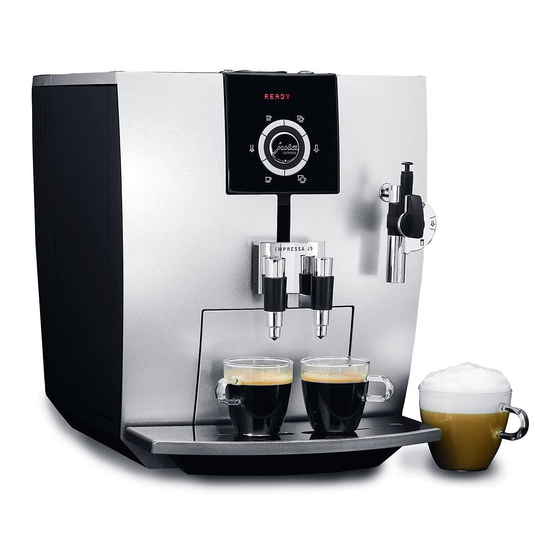
Page 8: Control Elements And Accessories
Control elements and accessories Control elements and accessories Figure: IMPRESSA J5 Pianowhite 1 Bean container with aroma preservation cover 2 Plain text display 3 Water tank 4 Height/width-adjustable coffee spout 5 Coffee grounds container 6 Drip tray 7 Cup platform... - Page 9 Surface of the machine On/Off button ö Rotary Switch Maintenance button Control elements and accessories Display 1 Espresso button 2 Espressi button Hot water button Steam button 1 Coffee button 2 Coffees button...
-
Page 10: Proper Use
Important information Proper use Proper use For your safety For your safety The machine has been designed and built for domestic use. It should only be used to prepare coffee and to heat milk and water. Use for any other purpose will be deemed improper. JURA cannot accept any responsibility for the consequences of improper use. - Page 11 Be careful to ensure that the appropriate nozzle is installed and clean. The nozzle or parts of the nozzle might come off if the parts are not assembled correctly or a blockage occurs. A defective machine is not safe and could cause injury or fire. To avoid damage and any associated risk of injury or fire: Never allow the power cable to loosely hang down.
- Page 12 Important information...
-
Page 13: The Impressa J5 Manual
The IMPRESSA J5 Manual The IMPRESSA J5 Manual You are holding the manual for your IMPRESSA J5 in your hand. It will help you to familiarize yourself with your IMPRESSA safely and quickly and teach you the full range of facilities it offers. -
Page 14: Model Variants
Model variants Model variants Symbol description Symbol description The IMPRESSA J5 Manual covers all J series IMPRESSA models. Warnings Always take note of any information marked with the CAUTION or WARNING symbol. The signal word WARNING points out potential CAUTION risks of injury, and the signal word CAUTION potential risk of material damage. -
Page 15: Welcome To The World Of Impressa
Welcome to the world of IMPRESSA! Welcome to the world of IMPRESSA! Dear customer, We thank you for the trust that you have placed in us by purchasing a JURA IMPRESSA coffee machine. The machines, which are pro- duced in Switzerland, have already impressed independent, critical testers of goods and design award juries. -
Page 16: Impressa J5 - Perfect Enjoyment, Perfect Aesthetics
It delivers this through a unique, intelligent pre-brew system combined with loving attention to detail and years of experience. The uncompromising all-round design of the IMPRESSA J5 indulges the eyes as well as the taste buds. Gourmets will start to rave when they live out their coffee fantasies and experience a new dimension of enjoyment with Ristretto, Espresso, Café... -
Page 17: Jura On The Internet
At www.jura.com you will find interesting and up-to-date information on your IMPRESSA and on every aspect of coffee. You can familiarize yourself with your IMPRESSA J5 in a fun way on the PC. The Knowledge Builder awaits you at www.jura.com. The interactive assistant, LEO, will support you and explain the benefits of and how to use your IMPRESSA. -
Page 18: Preparing And Using Your Impressa For The First Time
The following items are supplied as standard: Your JURA IMPRESSA fully automatic coffee machine The Welcome Pack, which includes: The IMPRESSA J5 Manual IMPRESSA J5 Quick Reference Guide CLARIS plus filter cartridge Filter cartridge extension Grinding key Milk pipe JURA cleaning tablets Aquadur®... -
Page 19: Filling The Water Tank
Filling the water tank Filling the water tank Filling the bean Filling the bean container container CAUTION CAUTION 2 Preparing and using your IMPRESSA for the first time To enjoy perfect coffee, we recommend that you change the water every day. Only use fresh, cold water to refill the water tank and never milk, mineral water or other liquids. -
Page 20: First-Time Use
2 Preparing and using your IMPRESSA for the first time First-time use First-time use WARNING WARNING If the machine is operated with a defective power cable, there is a danger of electric shock. Never use a machine which has a defective power cable. Precondition: The water tank must be full. -
Page 21: Fill Beans
Inserting filter and Inserting filter and activating activating 2 Preparing and using your IMPRESSA for the first time Place a receptacle under the coffee spout. Press the maintenance button. The machine will rinse itself, stopping automatically. appears on the display. Your IMPRESSA is ready to READY use. -
Page 22: Filter Rinsing
2 Preparing and using your IMPRESSA for the first time Determining water Determining water hardness and adjusting hardness and adjusting Press the Rotary Switch to confirm this setting. appears briefly on the display to confirm the setting. , the maintenance button INSERT Remove the CLARIS plus filter cartridge and the filter car- tridge extension from the Welcome Pack. - Page 23 2 Preparing and using your IMPRESSA for the first time The water hardness can be adjusted between 1° dH and 30° dH. This can also be deactivated, which means that the IMPRESSA won’t let you know when it has to be descaled. You can find out what the water hardness is by using the Aquadur®...
-
Page 24: Adjusting Grinder
2 Preparing and using your IMPRESSA for the first time Adjusting grinder Adjusting grinder CAUTION CAUTION You can adjust the grinder to suit the roast of your coffee. Our recommendations: Select a fine setting for a light roast. Select a coarse setting for a darker roast. If you adjust the fineness of grind when the grinder is not operating, the fineness of grind switch could be damaged. -
Page 25: Switching On
Switching on Switching on Switching off (standby ) Switching off (standby ) 2 Preparing and using your IMPRESSA for the first time When the IMPRESSA is switched on, a prompt to perform a rinse operation automatically appears. Precondition: Your IMPRESSA is switched on at the power switch and the On/Off button is illuminated (standby). -
Page 26: Familiarising Yourself With The Control Options
3 Familiarising yourself with the control options 3 Familiarising yourself with the control options 3 Familiarising yourself with the control options Preparing drinks at the Preparing drinks at the touch of a button touch of a button With the IMPRESSA, you can prepare an excellent coffee speciality at the touch of a button. -
Page 27: One-Off Settings Before And While Your Drink Is Being Prepared
One-off settings before One-off settings before and while your drink is and while your drink is being prepared being prepared Adjust the coffee strength Adjust the coffee strength before your drink is before your drink is prepared prepared Adjust the amount of water Adjust the amount of water while your drink is being while your drink is being... -
Page 28: Permanent Settings According To Cup Size
3 Familiarising yourself with the control options Permanent settings Permanent settings according to cup size according to cup size Ä l Turn the Rotary Switch until The set amount of water flows into the cup. The preparation stops automatically. READY It is easy to make permanent settings for the amount of water for all coffee specialities, the hot water and steam according to cup size. -
Page 29: Permanent Settings In Programming Mode
Permanent settings in Permanent settings in programming mode programming mode Programme item Subitem RINSE RINSE FILTER CLEAN DE-SCALE BUTTONS SELECT BUTTON YES √ FILTER - √ NO - (is only HARDNESS INACTIVE displayed when the 1° dH filter is not activated) SAVE - ENERGY - √... -
Page 30: Select Button
3 Familiarising yourself with the control options Programme item Subitem LANGUAGE DEUTSCH ENGLISH FRANCAIS ITALIANO EXIT Explanation Select your language. – Exit programming mode. Settings in programming mode always follow the same model. Example: To change the temperature of 1 Espresso from proceed as follows: HIGH Precondition:... -
Page 31: Query Information And Care Status
Query information and Query information and care status care status Query information Query information Care status query Care status query 3 Familiarising yourself with the control options Under the programme item information: Number of prepared coffee specialities, steam and hot water Care status and number of executed maintenance pro- grammes (cleaning, de-scaling, filter change) Precondition:... - Page 32 3 Familiarising yourself with the control options Press the Rotary Switch. The number of executed cleanings appears on the display. You can switch between the number of executed mainte- nance programmes and the respective care status by turning the Rotary Switch. The filled out fields show the care status.
- Page 33 3 Familiarising yourself with the control options...
-
Page 34: Recipes
4 Recipes 4 Recipes You can use your IMPRESSA to create coffee classics or extraordinary specialities in your home. You can find additional coffee recipes online at www.jura.com. Further information on how to operate your IMPRESSA can be found in Chapter 3, ‘Familiarising your- self with the control options’. - Page 35 4 Recipes...
- Page 36 4 Recipes...
- Page 37 4 Recipes...
- Page 38 4 Recipes...
- Page 39 Winter’s dream coffee Ingredients (for two people) Prepare 2 Espressi. Stir Espresso with cocoa and gingerbread seasoning and distribute into two glasses. Froth the milk and add to the Espressos. Sprinkle with small pieces of gingerbread. Latte Macchiato Frio Ingredients (for two people) Prepare Espresso and allow to cool.
-
Page 40: Preparation At The Touch Of A Button
5 Preparation at the touch of a button 5 Preparation at the touch of a button 5 Preparation at the touch of a button Barista tips Barista tips In this chapter, you will find out how to prepare coffee specialities, milk and hot water without making further settings. -
Page 41: Espresso
Espresso Espresso Coffee Coffee Cappuccino Cappuccino The classic coffee drink from Italy. There is a definite crema on the surface of the Espresso. Example: This is how to prepare an Espresso. Place an Espresso cup under the coffee spout. Press the 1 Espresso button. appears on the display. - Page 42 5 Preparation at the touch of a button Precondition: The Professional Cappuccino Frother is mounted. Take the milk pipe out of the Welcome Pack. Take the protective cap off the Professional Cappuccino Frother. Attach the milk pipe to the nozzle. Insert the other end in a milk carton/bottle or connect it to a milk container.
-
Page 43: Pre-Ground Coffee
Pre-ground coffee Pre-ground coffee To ensure that the Professional Cappuccino Frother works perfectly, you should rinse and clean it regularly. You can find more informa- tion about this in Chapter 8, ‘Maintenance – Professional Cappuc- cino Frother’. The high-quality milk containers available from JURA are a useful addition for all lovers of milk specialities. -
Page 44: Warm Milk
5 Preparation at the touch of a button Warm milk Warm milk Place one level measuring spoon of pre-ground coffee in the filler funnel. Close the cover for pre-ground coffee again. SELECT BUTTON Press the 1 Coffee button. appears on the display. After this, 1 COFFEE is briefly displayed. -
Page 45: Hot Water
Hot water Hot water CAUTION CAUTION To ensure that the Professional Cappuccino Frother works perfectly, you should rinse and clean it regularly. The description for this can be found in Chapter 8, ‘Maintenance – Professional Cappuccino Frother’. To obtain a perfect water flow, attach the exchangeable hot water nozzle. -
Page 46: Permanent Settings According To Cup Size
6 Permanent settings according to cup size 6 Permanent settings according to cup size 6 Permanent settings according to cup size It is easy to make permanent settings for the amount of water for all coffee specialities, the hot water and steam according to cup size. As in the following example, adjust the amount of water once. -
Page 47: Permanent Settings In Programming Mode
7 Permanent settings in programming mode 7 Permanent settings in programming mode Buttons Buttons Buttons Temp. 1 Espresso NORMAL 2 Espressi NORMAL 1 coffee NORMAL 2 coffees NORMAL Hot water REGULAR Steam In the following you will find out how to make permanent settings. Strength HIGH MILD... -
Page 48: Energy Save Mode
7 Permanent settings in programming mode Energy save mode Energy save mode Press the 1 Espresso button. WATER Ä L Turn the Rotary Switch until Press the Rotary Switch to enter the programme item. NORMAL Ä L Turn the Rotary Switch until Press the Rotary Switch to confirm the setting. -
Page 49: Time
Time Time Programmable Programmable switch-on time switch-on time Press the Rotary Switch to enter the programme item. SAVE - Ä L Turn the Rotary Switch until Press the Rotary Switch to confirm this selection. appears briefly on the display. ENERGY √ Ä... -
Page 50: Programmable Automatic Switch-Off Time
7 Permanent settings in programming mode Programmable auto- Programmable auto- matic switch-off time matic switch-off time Precondition: appears on the display. READY Keep the Rotary Switch pressed until Ä L Turn the Rotary Switch until Press the Rotary Switch to enter the programme item. appears on the display. -
Page 51: Units Amount Of Water/Time Format
Units amount of water/ Units amount of water/ time format time format Ä L Turn the Rotary Switch until Press the Rotary Switch to exit the programming mode. READY The unit for the amount of water is set in the factory. You can set the unit for the amount of water to The time format is set in the factory. -
Page 52: Language
7 Permanent settings in programming mode Language Language You set the language when you used the machine for the first time. You can choose among the following languages. German English French Italian Dutch Example: To change the language from proceed as follows. FRANCAIS Precondition: appears on the display. -
Page 53: Maintenance
8 Maintenance 8 Maintenance Maintenance tips Maintenance tips Rinse machine Rinse machine Your IMPRESSA has the following integrated maintenance pro- grammes: Rinse machine Changing the filter Clean machine Descale machine Clean or descale the machine or change the filter whenever the appropriate indicator is lit up. -
Page 54: Changing The Filter
8 Maintenance Changing the filter Changing the filter Change following a prompt Change following a prompt Precondition: appears on the display. READY Place a receptacle under the coffee spout. Keep the Rotary Switch pressed until Press the Rotary Switch to enter the programme item. RINSE Press the Rotary Switch to initiate the rinse operation. - Page 55 Manual filter change Manual filter change Turn the selection lever of the nozzle to the STEAM position Press the maintenance button. FILTER RINSING You can interrupt the filter rinsing at any time. To do this, press any button. The water may be slightly discoloured. This is not harmful to health, nor does it affect the taste.
-
Page 56: Cleaning Following Prompt
8 Maintenance Clean machine Clean machine CAUTION CAUTION Cleaning following a Cleaning following a prompt prompt After 200 coffee preparations or 80 switch-on rinses, the IMPRESSA will prompt you to clean it. If the wrong cleaning agent is used, the machine could be damaged and/or traces of detergent could be left behind in the water. -
Page 57: Manual Cleaning
Manual cleaning Manual cleaning Descale machine Descale machine CAUTION CAUTION CAUTION CAUTION CAUTION CAUTION CAUTION CAUTION The cleaning operation is now complete. The IMPRESSA is ready for use again. You can initiate the ‘Cleaning the machine’ operation manually. Precondition: appears on the display. READY Keep the Rotary Switch pressed until Press the Rotary Switch to enter the programme item. -
Page 58: Fill Water Tank
8 Maintenance Descaling following a Descaling following a prompt prompt The descaling programme lasts approx. 40 minutes. JURA descaling tablets are available from your stockist. If you use a CLARIS plus filter cartridge and this is activated, you will not be prompted to change the filter. You can also try out the ‘Descale machine’... -
Page 59: Rinse Professional Cappuccino Frother
Manual descaling Manual descaling Rinse Professional Rinse Professional Cappuccino Frother Cappuccino Frother Put the water tank back in. - The maintenance button PRESS RINSE Place a container under the Connector System Press the maintenance button. This causes water to flow out of the Connector System The operation stops automatically - Empty the drip tray and coffee grounds container and put them back into the machine. -
Page 60: Clean Professional Cappuccino Frother
8 Maintenance Clean Professional Clean Professional Cappuccino Frother Cappuccino Frother CAUTION CAUTION Remove the milk pipe from the milk carton/bottle or the milk container. Fill the receptacle with 250 ml of fresh water and immerse the milk pipe in it. Place a receptacle under the Professional Cappuccino Frother. -
Page 61: Disassemble Professional Cappuccino Frother
Disassemble Disassemble Professional Professional Cappuccino Frother Cappuccino Frother Turn the selection lever to the milk position. Press the steam button. HEATING READY Press the steam button again. STEAM Ä l Turn the Rotary Switch until display. - The nozzle and pipe are cleaned. STEAM Press any button as soon as the receptacle with the Auto- Cappuccino Cleaner is empty. -
Page 62: Removing Foreign Objects
8 Maintenance Removing foreign Removing foreign objects objects Cleaning the bean Cleaning the bean container container Even in the case of the best bean coffee, it can happen that foreign objects can be found in the beans. These can block the grinder. Switch your machine off with the On/Off button. -
Page 63: Descaling The Water Tank
Descaling the water Descaling the water tank tank Loosen the screw in the beam container and lift up the finger protection. Remove the remaining beans with a vacuum cleaner. Clean the bean container with a soft, dry cloth. Put the finger protection down again and screw it back tightly in place. - Page 64 8 Maintenance...
-
Page 65: Claris Plus Filter Cartridge - Water For Perfect Coffee
9 CLARIS plus filter cartridge – Water for perfect coffee 9 CLARIS plus filter cartridge – Water for perfect coffee As fresh as from the As fresh as from the spring spring – – Water Water always always pleasant and freshly pleasant and freshly filtered filtered... -
Page 66: Quality Knows No Compromises
9 CLARIS plus filter cartridge – Water for perfect coffee Quality knows no Quality knows no compromises compromises Quality from A to Z Quality from A to Z No more descaling No more descaling Interaction of organic Interaction of organic materials materials Water freshly filtered... - Page 67 Up-flow principle Up-flow principle Easy to operate Easy to operate Economical in use Economical in use Maintenance and storage Maintenance and storage 9 CLARIS plus filter cartridge – Water for perfect coffee The water flows through the filter at a constant speed, disturbing the granulate and ensuring that it is used evenly.
- Page 68 9 CLARIS plus filter cartridge – Water for perfect coffee Safe handling Safe handling CLARIS plus filter cartridges should be kept out of the reach of children. Store them dry in the sealed package. Protect them from heat and direct sunlight. Do NOT use damaged CLARIS plus filter cartridges.
-
Page 73: 10 'The Milk Makes The Difference
10 ‘The milk makes the difference’ 10 ‘The milk makes the difference’ Trendy specialities Trendy specialities with milk with milk Most modern Most modern technology technology Frothing as done Frothing as done by a professional by a professional Coffee specialities are taking the entire planet by storm. Up until a few years ago, classics, such as Espresso and Café... - Page 74 10 ‘The milk makes the difference’...
-
Page 75: Accessories And Service
11 Accessories and Service 11 Accessories and Service Machine accessories – Machine accessories – extend your coffee extend your coffee horizon horizon Professional Cappuccino Professional Cappuccino Frother Frother Easy Cappuccino Frother Easy Cappuccino Frother 2-stage frothing nozzle 2-stage frothing nozzle Hot water nozzle Hot water nozzle Stainless steel vacuum... -
Page 76: Care Products
11 Accessories and Service Care products Care products CLARIS plus filter CLARIS plus filter cartridge cartridge Cleaning tablets Cleaning tablets Descaling tablets Descaling tablets Auto-Cappuccino Cleaner Auto-Cappuccino Cleaner Service Service Original JURA care products are optimally tailored to the main- tenance programmes. -
Page 85: Messages On Plain Text Display
12 Messages on plain text display Message EMPTY TRAY FILL WATER TANK EMPTY GROUNDS TRAY MISSING FILL BEANS CLEAN DE-SCALE FILTER Cause The drip tray is full.You cannot prepare any coffee or hot water or milk products. Water tank is empty. You cannot prepare any coffee specialities or hot water or milk products. - Page 86 12 Messages on plain text display Message CLOSE COVER NOT ENOUGH PRE-GROUND TOO HOT Cause The cover for pre-ground coffee is open. There is too little pre-ground coffee in the filler funnel. The IMPRESSA stops the operation. System is too hot to begin a maintenance programme.
-
Page 87: Troubleshooting
13 Troubleshooting Problem Grinder is making a very loud noise. The frother does not produce enough milk foam. Coffee only comes out in drips when it’s being prepared. Water hardness cannot be adjusted. FILL BEANS displayed although the bean container has been filled. - Page 88 13 Troubleshooting Problem is displayed. ERROR 2 Other messages ERROR are displayed. If you have not been able to solve the problem, contact Customer Support in your country. You will find the phone number in Chapter 17, Cause Action Warm up the device at room If the device was temperature.
-
Page 89: Transport And Environmentally Neutral Disposal
14 Transport and environmentally neutral disposal 14 Transport and environmentally neutral disposal Transport / Empty Transport / Empty system system Disposal Disposal 14 Transport and environmentally neutral disposal Keep the packaging for your IMPRESSA. It is used to protect the machine during transportation. -
Page 90: Technical Data
15 Technical data 15 Technical data 15 Technical data Technical data Technical data The voltage and current vary according to the safety test. Please observe the rating plate before connecting the device. Voltage Safety test Power Power consumption SAVE - Power consumption SAVE √... - Page 91 Rating plate Rating plate Please only plug the machine into the power supply according to the technical data, which you can find on the rating plate. The rating plate is located on the bottom of your IMPRESSA. The information shown on this should be interpreted as follows: V AC = alternating current in volts W = power output in watts This product complies with all applicable EU directives.
-
Page 92: Key Technologies And Products
16 Key technologies 16 Key technologies and products 16 Key technologies and products Intelligent Pre Brew Aroma System (I.P.B.A.S. Perfect coffee is no accident. The Intelligent Pre Brew Aroma System produces the very best in flavour from every coffee blend and roast. - Page 94 IMPRESSA Z IMPRESSA S IMPRESSA J IMPRESSA F...
- Page 95 IMPRESSA C IMPRESSA X IMPRESSA X...
-
Page 97: Jura Contact Details
17 JURA contact details Australia Global Coffee Solutions Pty Ltd Customer Service Phone +61 1300 552 883 Fax +61 0242 846 099 E-mail info@globalcoffee.com.au Opening Hours Monday to Friday 8:00 am – 5:00 pm Distributor Address/ Global Coffee Solutions Pty Ltd Service Address 5/77 Jardine Street Fairy Meadow NSW 2519... - Page 98 17 JURA contact details Estonia Infomelton OÜ Customer Service Phone +372 651 88 55 +372 651 88 50 E-mail lavazza@lavazza.ee Opening Hours Monday to Friday 09:00 – 17:00 Distributor Address/ Infomelton OÜ Service Address Weizenbergi 27 Tallinn 10150 Finland Home Appliance Brokers HAB Oy Customer Service Phone +358 207 300 090 E-mail info@haboy.fi...
- Page 99 Israel J.Feffer l.t.d. Customer Service Phone +972 353 350 38 Fax +972 353 305 54 E-mail feffer-j@barak-online.net Opening Hours Sunday–Thursday 08:00 – 18:00 Friday 09:00 – 13:00 Distributor Address/ J.Feffer l.t.d. Service Address 9,Simtat Ma‘ale Hachoma Ind. Zone Or-Yehuda 60370, Israel Korea HLI Company Limited Customer Service...
- Page 100 17 JURA contact details New Zealand Euro Espresso Ltd Customer Service Phone +64 9 277 1334 Fax +64 9 277 9375 E-mail info@euroespresso.co.nz Opening Hours Monday to Friday 8.30 am – 5:00 pm Distributor Address/ 6 Mepal Place, Manukau City, Service Address Auckland PO Box 76–342, Manukau City,...
-
Page 101: United Arab Emirates
South Africa International Coffee Equipment CC Customer Service Phone +27 11 708 2481 E-mail info@icesa.za.net Opening Hours Monday to Friday 08.00 – 17.00 Saturday 08.00 – 13.00 Office Address International Coffee Equipment CC JURA Corner Building, Showroom 475/3 Hans Strydom Drive KYA Sand Service Address International Coffee Equipment CC... -
Page 102: Index
Index Index Accessories 75 Activating Filter 21 Adjust Amount of water 46 Adjusting Amount of water 47 Coffee strength 47 Energy-saving mode 48 Grinder 24 Strength 47 Temperature 47 Water hardness 22 Amount of water Adjust 46 Aroma preservation cover 8 Bean container 8 Cleaning 62 Filling 19... - Page 103 Machine Clean 56 Descaling 57 Rinse 53 Set up 18 Switching off 25 Switching on 25 Machine accessories 75 Maintenance 53 Milk 73 Milk pipe 8 Warm 44 Nozzle Hot water nozzle 45 Number Buttons, prepared 31 Maintenance programmes, executed 31 Plain text Display 16 Preground...
-
Page 104: Technical Changes
89/336/EEC of 3 May 1989, Electromagnetic Compatibility, incl. Amending Directive 92/31/EEC. We reserve the right to make technical changes. The illustrations used in the IMPRESSA J5 Manual show the IMPRESSA J5 Pianowhite model. Your IMPRESSA could incorporate minor changes. Your opinion is important to us! Use the contact link at www.jura.com.
Need help?
Do you have a question about the IMPRESSA J5 and is the answer not in the manual?
Questions and answers