Table of Contents
Advertisement
Advertisement
Table of Contents

Related Manuals for Xtrend ET9000


Summary of Contents for Xtrend ET9000
-
Page 2: Table Of Contents
Contents (A) Safety Instructions ..........................4 (B) Packaging Contents ........................... 5 (C) Product Descriptions .......................... 6 (D) Conditional Access ..........................7 (E) Remote Control ..........................9 (F) Main Features ........................... 11 (G) Technical Data..........................11 I. Installation of ET 9000........................12 1. - Page 3 9. Timeshift ............................ 30 10. Recording ..........................31 11. Recording Play ......................... 36 12. Managing Recording Files ....................... 37 13. Media Player ..........................38 14. Plug-ins ............................ 39 15. Sleep Timer ..........................40 IV. System Configuration ........................41 1. Main Menu ..........................42 2.
-
Page 4: (A) Safety Instructions
(A) Safety Instructions ET9000 has been designed and manufactured in compliance with EU consumer safety requirements (CE). Please read the following safety precautions carefully 1. Connecting Power This product operates only in the range of AC 100V~250V and 50Hz/60Hz. Please check first your power •... -
Page 5: (B) Packaging Contents
This will help prevent harm to the environment or human health from uncontrolled waste disposal. (B) Packaging Contents Please check all package contents before using your product. • ET9000 • Remote Control • Batteries • HDMI cable •... -
Page 6: (C) Product Descriptions
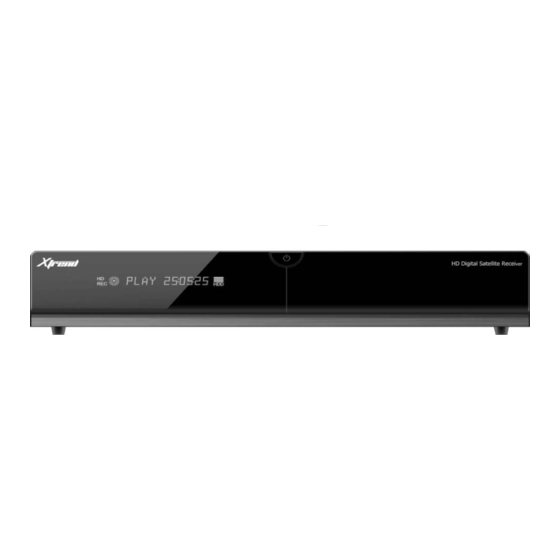
(C) Product Descriptions Front Panel Display : Displays the current menu information. 12 character dot matrix VFD ~ VOL / VOL : Volume control OK: Select ~ CH / CH : Switches channel Menu: Shows main menu Cancel: Cancel the menu CI Module Slot Smartcard slot USB Host: Connect a USB storage device... -
Page 7: (D) Conditional Access
Powers on/off. (D) Conditional Access Amongst the channels that are scanned via ET9000, some channels can be properly tuned in only with the corresponding Smartcard and/or CAM (Conditional Access Module). ET9000 provides two Smartcard Reader slots and two Conditional Interface slots and users need to purchase those Smartcards and CAMs that are required for viewing such subscription based services. - Page 8 Smartcard Insertion of CAM (Conditional Access Module) There are several Conditional Access Systems (CAS) that ET 9000 supports. To be able to watch channels that are encrypted in such CAS as Nagravision, NDS, Irdeto, Viaccess, etc, users need to purchase a CAM that is corresponding to each CAS, as well as Smartcard to decrypt those encrypted channels.
-
Page 9: (E) Remote Control
(E) Remote Control 1. Power : To switch the receiver in and out of stand-by mode. 2. STB, TV, DVD, AUX: STB: To switch the remote control to receiver mode. TV: To switch the remote control to Television mode. DVD: To switch the remote control to DVD mode to operate your DVD player. AUX: To switch the remote control to operate your audio system. - Page 10 33. subtitle: Displays the subtitle of the current channel if the channel provides subtitle. 34.AUDIO:Displays the audio track option to choose (e.g. ACS, Stereo) 35. Help: Displays major important operation methods of ET9000. This provides users with a quick guide of using ET9000.
-
Page 11: (F) Main Features
(F) Main Features • 400 MHz MIPS Processor • Linux Operating System • Media Player • Downloadable Plug-ins supported • 2 x Smartcard Readers • 2 x Common Interface • MPEG2 / H.264 Hardware Decoding • DVB-S2 Twin Tuners • 12 character Dot Matrix VFD •... -
Page 12: (G) Technical Data
Weight (without HDD) NOTE: i means Remote control operation order. I. Installation of ET 9000 This chapter will guide you through the whole installation process of ET9000. Please read each section carefully to make sure that the system run properly. -
Page 13: Connecting Satellite Cables
1. Connecting Satellite Cables ET9000 is integrated with twin satellite tuners, and one of the first steps is to connect satellite cable(s) to ET9000 in order to gain optimal signal quality. You can either choose one of the following connection methods depending on the equipment you have. - Page 14 B. Connecting TV via Component Cable The secondly recommend TV connection for digital TV is via component cable (YPbPr). However, unlike the HDMI connection which delivers audio and video signal at the same time, YPbPr connection requires additional audio connection either via RCA cable (Stereo L/R) or S/PDIF as follows. NOTE : When you have an A/V receiver with S/PDIF digital audio input, this connection is recommended to enjoy the best audio quality, especially for the Dolby Digital sound.
-
Page 15: Connecting Power
It takes a longer time to boot the system if you turned it off by this switch. Standby Mode POWER key is normally used to turn the power of ET9000 on or off. If you press POWER, it instantly switches your ET9000 off or on. In this mode, the system is not completely shutdown and thus it takes a shorter time to turn it on and off. -
Page 16: First Time Installation (Using Wizard)
II. First Time Installation (using Wizard) When you turn on ET9000 for the first time after purchase, an installation wizard will begin step by step. NOTE : OK key is used for confirmation and turns to the next step. Pressing EXIT key to return to the previous page. -
Page 17: Step 2. Configuring Satellite Connection
Step 2. Configuring Satellite Connection From now on you need to configure the satellite connection. You have two options: • Use wizard to set up basic features • Exit wizard You are strongly recommended to use wizard as it is designed to guide you through the configuration process. - Page 18 A. Configuring Tuner Using LEFT/RIGHT key, you can choose one of the following Configuration Modes: • Nothing connected • Simple • Loop through to: mode to make the LNB1 be internally connected to the LNB2 in. • Equal to: mode to use the same configuration as that of Tuner B. •...
- Page 19 • Single This option is used to receive a single satellite with a single LNB. The cable from LNB is directly connected to ET 9000. • Toneburst A/B This option is used if you want to receive two satellites using a Toneburst switch. •...
- Page 20 • DiSEqC A/B/C/D This option allows you to configure four satellites in Port A, Port B, Port C and Port D. • Positioner This option is used when you have a motorized satellite antenna.
-
Page 21: Step 3. Installing Default Satellite List
B. Configuring Tuner B This step is for the configuration of Tuner B (LNB 2 Input), and the process is same as that of Tuner A. For further information please refer to the above “Configuring Tuner A” section. Step 3. Installing Default Satellite List Here you will be asked following questions :- Do you want to install default sat list? (YES/NO) And by pressing OK, then following message will appear. -
Page 22: Basic Operations
III. Basic Operations 1. Switching Channel [ i: Press , CHANNEL key / Press to move to the next channels] ET 9000 offers various channel zapping methods. You can switch the current channel by pressing • UP/DOWN key If you press UP or DOWN key, Channel Selection menu appears. You can move up and down to select the channel that you want to tune into... -
Page 23: Volume Control
• LEFT/RIGHT key If you press LEFT or RIGHT key, the previous or subsequent channel of the current channel is tuned in. • CHANNEL +/- key If you press CHANNEL + or - key, this will call up the Channel Selection menu. •... -
Page 24: Selecting Audio Track
*Mute icon is on when the audio is muted. 3. Selecting Audio Track [ i: Press AUDIO key] You can check what audio tracks are available to choose by pressing AUDIO key. -
Page 25: Subtitle
By using UP/DOWN key and Color key, you can select a different audio language or Stereo sound. NOTE : Available options on this menu will differ depending on the service. 4. Subtitle [ i: Press SUBTITLE key or Press MENU > Subtitle] You can view the subtitle of the current program if the program provides the subtitle. -
Page 26: Program Information (Infobar)
If you want to reduce the page size, press VOLUME - key. 6. Program Information (Infobar) [ i: Press OK key] Whenever you change the channel, infobar is always displayed for 5 seconds (default setting). Infobar is designed to provide you comprehensive information of the channel that you are currently watching. •... - Page 27 Four types of the channel lists are available to help you manage your channel selection. • RED displays the list of all scanned channels. • GREEN displays the list of all satellites scanned. Per each satellite, channels are arranged according to Services, Provider, and New.
- Page 28 • YELLOW displays the list of providers. • BLUE displays the list of your favorite channels. In order for you to add certain channels to this Favourites list, 1 Call up the Channel Selection list by Pressing UP or DOWN key. 2 Go to the list of All channel by pressing RED.
-
Page 29: Electronic Program Guide (Event View)
5 Choose “add service to favourites” and press OK. 6 Go to the Favourites list by pressing BLUE to confirm that the selected channel is correctly included in the list. 8. Electronic Program Guide (Event View) [ i: Press EPG key] The Electronic Program Guide (EPG) displays the program information of each channel, if provided, in time and date order. -
Page 30: Timeshift
• Select Record for recording reservation. - Repeat Type • Select Once for one time of zapping or recording reservation. • Select Repeated for repeated zapping or recording reservation. • Repeats - This option is given only when you selected "Repeated" in the Repeat Type. You can reserve zapping or recording per Daily / Weekly / Mon-Fri / User-defined. -
Page 31: Recording
*elapsing time information In this state, Timeshifted recording is running until you press either PLAY or PAUSE again. You can restart viewing of the program. If you want to stop Timeshifted recording and to return to the live mode, press STOP key. You will be asked of Yes or No to stop Timeshift. - Page 32 same time. There are two ways to operate and manage recording. 1 Instant Recording [ i: Press RED or REC key] Press RED or REC key to start the recording of the current program. Five recording options are given. - Add recording (stop after current event) This option is used when you want to end recording when the current program ends.
- Page 33 - Add recording (enter recording end time) This option is used when you want to define a certain date and time when the recording is to stop. - Add recording (indefinitely) This option is used when you want to keep recording running without a specific end time. Recording will continue unless you stop it.
- Page 34 In this menu, color keys are assigned for each different function. - RED (Delete) This option is used to delete a timer. - GREEN (Add) This option is used to add a timer. - YELLOW (Disable) This option is used to disable the timer and X mark will appear.
- Page 35 NOTE : if you want to enable the disabled timer, press YELLOW again. - BLUE (Cleanup) This option is used to remove those finished timers from the Timer List. NOTE : Make sure that the HDD on your ET 9000 has enough free space available for recording. If the free space on the HDD is not sufficient, recording might stop before the defined end time.
-
Page 36: Recording Play
11. Recording Play : Press File list key] You can view recorded files on the Recorded files menu. Press File list to activate this menu. Select the file that you want to play. It will instantly replay the file and display the recording infobar. -
Page 37: Managing Recording Files
This infobar gives you the following information of the recording. Title of the recording Total duration of recording Remaining time Progressive bar Elapsed time 12. Managing Recording Files [ i: Press File list key > Press MENU key] If you want to delete a recording file, press MENU key while Recorded file menu is on. -
Page 38: Media Player
Select “Delete” and confirm OK to delete. Other than “delete”, in this menu, you have options in sorting and listing of the recording files. - Sort by date - List style default - List style compact with description - List style compact - List style single line - Hide extended description. -
Page 39: Plug-Ins
If you play Media Player, the following player will appear. 1. Go into any directory of the HDD or plugged USB. 2. Select a file to play and press OK * Supported formats are mainly JPG, MP3, AVI, etc. 3. In the same way, you can play the recording files stored on the HDD. 14. -
Page 40: Sleep Timer
4 Select a plug-in to download. 5 You can check if the download is done properly on the Plugin browser From this site, you can check available plug-ins to download as below. 15. Sleep Timer [ i: MENU > Standby/ Restart > Sleep Timer] You can set a specific time when your ET 9000 goes into Standby mode or Deep Standby mode, using this menu. -
Page 41: System Configuration
This option is used to choose between Standby mode and Deep Standby mode. 3 YELLOW This option is used to choose whether to be asked of confirmation before system shutdown. IV. System Configuration ET 9000 is a very sophisticated device designed to allow users a variety of system setting options as detailed as possible. -
Page 42: Main Menu
1. Main Menu [i: Press MENU] The main menu of ET 9000 consists of the following sub menus. 1 Subtitles Displays Subtitle selection menu of the current program. 2 Media player Activate Media player of ET 9000 . For more information, please refer to the page 38 3 VCR scart Switches to VCR scart connection. -
Page 43: System Setup
2. System Setup [ i: Press MENU> Select Setup] The Setup menu consists of the following sub-menus. 1 Service Searching 2 System 3 Common Interface 4 Parental Control 5 Default settings 6 Factory reset... -
Page 44: Service Searching
2-1. Service Searching [ i: Press MENU> Setup > Service Searching] Here you set up the tuners of your ET 9000 and run channel scanning automatically or manually. A. Tuner Configuration [ i: MENU > Setup > Service Searching > Tuner Configuration] If you run the First Time Installation process (refer to the II. - Page 45 [ i: MENU > Setup > Service Searching > Default Service List] In case there are service lists available for certain satellites, for example, Astra or Hotbird, you can install the lists in the channel list of your ET 9000 . If default service lists are not available, you can run the service scan automatically or manually to add TV and radio channels to the channel list of your ET 9000 .
- Page 46 YES is used when you want to delete the existing channel list before you start the automatic scan. If you want to keep the existing list, select NO. • Scan Tuner A (DVB-S2) (or together with Tuner B) If Tuner A and B are configured for the same satellite(s), only Tuner A will appear. If not, both Tuner A and B will appear, asking you which one you want to scan.
- Page 47 For DVB-S (Standard Definition) Amongst other things, the below parameters are what you need to decide prior to performing manual scan. 1 Tuner You need to decide which tuner you want to use for manual scan. 2 System Here you have two options between DVB-S (SD) and DVB-S2 (HD). 3 Frequency...
- Page 48 You need to enter the exact frequency of the transponder that you want to scan. 4 Symbol Rate You need to enter the exact symbol rate of the transponder that you want to scan 5 Polarity Here, you have options for Horizontal, Vertical, Circular Left and Circular Right. You need to know the polarity of the transponder that you want to scan.
-
Page 49: System Configuration
2-2. System Configuration [ i: Press MENU> Setup > System] Here you can find most of the necessary settings that you might need to optimize your ET 9000 in the way you like it. Please read the followings carefully. A. A/V Settings [ i: MENU >... - Page 50 Amongst the parameters given in this menu, the following ones are generally what you need to decide for the audio and video. 1 Video output Here you need to decide which video output you want to use between your TV and ET 9000 . The available options are as below.
- Page 51 C. Customization [ i: MENU > Setup > System > Customize] In this menu you will find various customization options and this menu can be displayed in three different formats: Simple, Intermediate, and Expert.
- Page 52 NOTE : RED is for cancel and GREEN is OK. OK key of RCU is not working in this mode. Amongst the options given in this menu, the following ones are generally what you may need to know. 1 Recording always have priority YES option is used to set the recording to have a priority over any existing timer.
- Page 53 5 Enable multiple bouquets If you set this option at YES, it will enable multiple bouquets. D. Selecting Time Zone [ i: MENU > Setup > System > Timezone] You can set your time zone in this menu. Using LEFT/RIGHT key, you can find a time zone that you want to use for your ET 9000 . After selecting a time zone, press GREEN to confirm and save the changed setting.
- Page 54 E. Hard Disk Set Up [ i: MENU > Setup > System > Harddisk > Harddisk setup] You can set the duration of time after which HDD is to be put into standby mode. Here, you can choose from No standby 10 or 30 seconds 1, 2, 5,10, 20, 30 minutes 1, 2, 4 hours.
- Page 55 Brightness You can change the brightness of the front VFD display using LEFT/RIGHT key when the set is in use. Standby You can change the brightness of the front VFD display using LEFT/RIGHT key when the set is in standby mode. Once you completed this option, press GREEN key to confirm the change.
- Page 56 In the Network Configuration menu, you will see five sub menus as follows: 1 Adapter settings Through this menu, you can set the basic Ethernet configuration. User Interface YES is used to activate the Ethernet. If you set this option at NO, the Ethernet will not work. Use DHCP YES is used to use DHCP (Dynamic Host Configuration Protocol).
- Page 57 2 Nameserver settings This option is required if you selected not to use DHCP. You need to enter the address of the Nameserver. 3 Network test When you are not sure whether the network configuration has been done correctly or not, you can run this test.
- Page 58 4 Restart Network This option is used when you want to reboot the Ethernet of your ET 9000 . H. Skin [ i: MENU > Setup > System > Skin] ET 9000 is a Linux based set top box and there are a lot of Skins available for Linux set top box. Using this menu, you can use a different Skin other than the default one.
-
Page 59: Checking Cam
2-3. Checking CAM [ i: MENU > Setup > Common Interface] To be able to watch CAS channels, you need to have a proper CAM and a Smartcard. ET 9000 is integrated with two Common Interface slots. If you have two CAM modules and keep them inserted in your ET 9000, it will reduce the trouble of changing CAM. - Page 60 1 Go to Parental Control menu by pressing MENU > Setup > Parental Control. 2 Set the parental control option at YES using LEFT/RIGHT key. The menu will change as below. Protect setup If you set this option at YES, you will be asked to enter PIN code when you enter this Parental setup menu.
- Page 61 Change setup pin If you want to change the existing PIN code for Parental setup, you can do so using this menu. You need to enter a new PIN code twice. Protect services You need to set this option at YES, if you want to lock certain channels with PIN code. Parental control type This option will be activated only if you set Protect services at YES.
- Page 62 Change service pin Here you can define a PIN code required to change services to be included in the parental control list. NOTE: PIN code here is used for Change service and thus you are recommended to use a PIN code different from that used for Protect services.
-
Page 63: Factory Reset
below. NOTE : It is very important not to lose this PIN code. 2-5. Factory Reset [ i: MENU > Setup > Factory Reset] If you want to erase all installed service list as well as all configurations, run the Factory Reset process. Select YES in the below menu to run the factory reset. -
Page 64: Checking H/W & S/W Information
2-6. Checking H/W & S/W Information [ i: MENU > Information] If you want to check the H/W or S/W system of your ET 9000, this is the menu that you need to use. Also, here you can check very detailed information of a specific service. A. - Page 65 3 Transponder 4 Tuner Status...
-
Page 66: Copyright - Gnu Gpl
B. System Information [ i: MENU > Information > About] This menu is for you to check the current system of your ET 9000. You can see the following information: 1 S/W version 2 Detected NIMs for both Tuner A & B 3 Detected HDD V. - Page 67 Version 2, June 1991 Copyright (C) 1989, 1991 Free Software Foundation, Inc. 51 Franklin Street, Fifth Floor, Boston, MA 02110-1301, USA Everyone is permitted to copy and distribute verbatim copies of this license document, but changing it is not allowed. Preamble The licenses for most software are designed to take away your freedom to share and change it.
- Page 68 another language. (Hereinafter, translation is included without limitation in the term "modification".) Each licensee is addressed as "you". Activities other than copying, distribution and modification are not covered by this License; they are outside its scope. The act of running the Program is not restricted, and the output from the Program is covered only if its contents constitute a work based on the Program (independent of having been made by running the Program).
- Page 69 a) Accompany it with the complete corresponding machine-readable source code, which must be distributed under the terms of Sections 1 and 2 above on a medium customarily used for software interchange; or, b) Accompany it with a written offer, valid for at least three years, to give any third party, for a charge no more than your cost of physically performing source distribution, a complete machine-readable copy of the corresponding source code, to be distributed under the terms of Sections 1 and 2 above on a medium customarily used for software interchange;...
- Page 70 If any portion of this section is held invalid or unenforceable under any particular circumstance, the balance of the section is intended to apply and the section as a whole is intended to apply in other circumstances. It is not the purpose of this section to induce you to infringe any patents or other property right claims or to contest validity of any such claims;...
-
Page 71: Menu Structure
VI. Menu Structure Main menu level level level level level Subtitle selection Subtitles Window Media player Media Player Timer Timer List VCR scart Switch to VCR scart Service Service info Information About About Plugins Plugin browser Service Searching Tuner A Tuner Configuration Tuner B Default Service lists... -
Page 72: Universal Remote Control
• Check if the video cable is properly connected between TV and ET 9000. • Check if the satellite cable is properly connected to ET 9000. • Check if the selected channel is currently on air. • Check if the selected channel is encrypted and if you have a corresponding access smartcard. 2. -
Page 73: Setup Method
Setup method 1. Initial Settings 1.1 Device Default: STB 1.2 Remote Control Default Setting Code 1) STB: 001 2) TV: 001 3) DVD: 001 4) AUX: 001 2. Settings method 2.1 3-DIGIT Setup Method 1) Turn on the device that you want to setup (for example turn on TV) 2) Press and hold [DEVICE] + [OK] button more than 2 seconds until the device LED blinks. -
Page 74: Tv Brand/Code List
setting number will be output. (LED blinks) It does not answer against key input other than [OK], [0~9], [CH+], [CH-], [Power] key. 4) Press [OK] button to save and exit the setup model. (LED will blink 2 times and off) 3. -
Page 91: Viiii. Glossary
VIIII. Glossary 8PSK 8-PSK is usually the highest order PSK constellation deployed. With more than 8 phases, the error-rate becomes too high and there are better, though more complex, modulations available such as quadrature amplitude modulation (QAM). Although any number of phases may be used, the fact that the constellation must usually deal with binary data means that the number of symbols is usually a power of 2 —... - Page 92 Electronic Program Guide is a digital guide to scheduled broadcast television or radio programs, typically displayed on-screen with functions allowing a viewer to navigate, select, and discover content by time, title, channel, genre, etc. by use of their remote control, a keyboard, or other input devices such as a phone keypad.
- Page 93 compressed digital audio as defined by the standard IEC 61937. This mode is used to connect the output of a DVD player to a home theater receiver that supports Dolby Digital or DTS surround sound. Another common use is to carry uncompressed digital audio from a CD player to a receiver.
Need help?
Do you have a question about the ET9000 and is the answer not in the manual?
Questions and answers