
Related Manuals for Grundig DR 3400 DD

Summary of Contents for Grundig DR 3400 DD
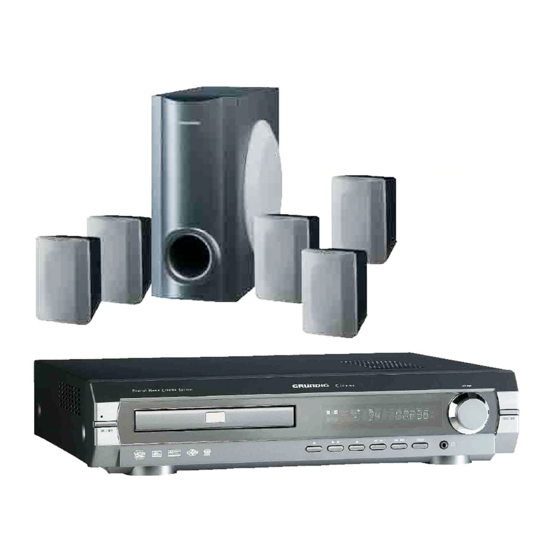
- Page 1 HOME CINEMA SYSTEM Cinemo DR 3400 DD DEUTSCH ENGLISH FRANÇAIS ITALIANO PORTUGUÊS ESPAÑOL...
-
Page 2: Table Of Contents
CONTENTS ____________________________________________ Cinemo DR 3400 DD Special features of your home cinema system Packing contents Dolby Pro Logic II, Dolby Digital and DTS Set-up and safety 6-11 Overview The front of the DVD receiver The displays of the DVD receiver... - Page 3 CONTENTS ____________________________________________ 29-30 Disc features Disc formats DVD features 29-30 VCD/S-VCD features MP3/WMA CD features Audio CD features JPEG/Kodak picture CD features 31-38 Disc mode Playback functions Selecting titles or chapters Selecting titles or chapters (in DVD mode) 32-33 PBC playback (in Video CD mode) Picture settings 33-34 Displaying information...
-
Page 4: Cinemo Dr 3400 Dd
DVD Rs and DVD RWs with video data and CD Rs and CD RWs with audio or image data (JPEG/Kodak pictures). Packing contents Cinemo DR 3400 DD DVD receiver Remote control 2 Batteries, 1.5 V, type AA i g i t a l... -
Page 5: Set-Up And Safety
SET-UP AND SAFETY ___________________________ Please note the following information when setting up the home cinema sys- tem: °C °C The DVD receiver and loudspeakers are designed for playing back video and audio signals at home. Any other use is expressly prohibited. i g i t a l o m e i n e m a... -
Page 6: Overview
OVERVIEW ____________________________________________ The front of the DVD receiver i g i t a l o m e i n e m a y s t e m i n e m o VOLUME ON / OFF FUNCTION DSP MODE S U R R O U N D Switches the device to standby mode and back on again, ON/OFF using the last signal source selected. -
Page 7: The Displays Of The Dvd Receiver
OVERVIEW ____________________________________________ The displays of the DVD receiver TITLE TRK TUNED CHP PROG RDS REPEAT 1 A-B ProLogic II 00 0 00 00 DIGITAL STEREO VCD Displays various function conditions and settings, as well 00 0:00:00 as the name or frequency of the radio station. In combination with the frequency display for AM (medium wave) reception. -
Page 8: The Back Of The Dvd Receiver
OVERVIEW ____________________________________________ The back of the DVD receiver SPEAKER AC IN S-VIDEO OPTICAL VIDEO SCART Ω FM 75 Ω Ω 8-16 LOOP IMPEDANCE RESET AUDIO Power cord. ~AC IN Terminals for connecting the supplied SPEAKER loudspeaker cables for the subwoofer, centre SW C RS LS R L speaker, right surround speaker, left surround speaker, right front speaker and left front speaker. -
Page 9: The Remote Control
OVERVIEW ____________________________________________ The remote control Switches the DVD receiver to standby mode and from standby mode using the last signal source selected. Opens and closes the disc compartment. Selects the DISC input source. MODE DISPL Selects the AV IN, SCART IN and DIGITAL IN (Aux) input sources. - Page 10 OVERVIEW ____________________________________________ Selects various camera angles for certain scenes or passages on the DVD during playback. For selecting and displaying subtitles on the DVD during playback. Switches between the original and dubbed MODE language during DVD playback DISPL Enlarges scenes during playback (zoom). In CD mode –...
- Page 11 OVERVIEW ____________________________________________ Press once to pause playback (freeze frame). Press repeatedly to move forward frame by frame. Press once to interrupt disc playback (resume), press twice to end playback (stop). Starts playback. MODE During disc playback, selects the previous or next title DISPL or section.
-
Page 12: Connection And Preparation
CONNECTION AND PREPARATION _________ Connection diagram for the loudspeakers Surround Surround left right ubwoofer Centre INPUT SPEAKER Front left Front right AC IN S-VIDEO OPTICAL VIDEO SCART Ω FM 75 Ω Ω 8-16 LOOP IMPEDANCE AUDIO RESET Setting up the loudspeakers If possible, set up the front loudspeakers in line with the TV set, angled slightly towards the listener. -
Page 13: Connecting The Loudspeakers
CONNECTION AND PREPARATION _________ Connecting the loudspeakers Note: To connect the loudspeakers, switch off the DVD receiver and dis- Loudspeakers connect the mains. When you connect the loudspeaker cables, do not let frayed ends Front left Black White protrude, as this can cause short circuits. Front right Black Surround left... -
Page 14: Connecting Digital External Devices
CONNECTION AND PREPARATION _________ Connection using a EURO-AV (Scart) cable Plug the EURO-AV cable supplied into the »SCART« socket of S-VIDEO VIDEO SCART the DVD receiver and into the corresponding socket on the tele- vision, flat screen or projector. Ω FM 75 LOOP AUDIO... -
Page 15: Connecting The Antennas
CONNECTION AND PREPARATION _________ Connecting the antennas Plug the cable of the rooftop antenna into the FM antenna socket »FM 75Ω«. S-VIDEO SCART Note: If no rooftop antenna is available, use the auxiliary antenna Ω FM 75 LOOP RESET supplied. This antenna provides reasonably good reception of local FM (VHF) stations. -
Page 16: Additional Information For Units Sold In The Uk
“E”, earth symbol “ ”, coloured green, or green & yel- low. Replacement mains lead sets can be obtained from your local dealer, or by contacting Grundig Consumer Relations (01788 570088) Moulded 3-pin lead set, suitable for UK use: Ref: Leadset UK 8290-991-224... -
Page 17: Settings
SETTINGS ______________________________________________ General information You can make the settings required for operating the system in the set-up menu which appears on the television screen. To do this, switch on the television and switch it to the channel on which the DVD is set. -
Page 18: Setting The Video Functions
SETTINGS ______________________________________________ Setting the video functions Setting the picture format Select the »Video« menu item with » « or » « and press »OK« to confirm. Language Video Audio Rating Select »TV Shape« by pressing » « or » « and press »OK« to confirm. -
Page 19: Setting The Loudspeaker Configuration
SETTINGS ______________________________________________ Setting the loudspeaker configuration Switching on Switch on the DVD receiver from standby by pressing »9« on the remote control or »ON/OFF« on the device. Setting the distance to the listening position Ideally, all the speakers in a home cinema system, should be set up at equal distances from the listener. - Page 20 SETTINGS ______________________________________________ Select »Pink noise« with » « or » « and press »OK« to con- Language Video Audio Rating firm. In the third column, select »On« with » « or » « and press MP3/WMA »OK« to confirm. Others –...
-
Page 21: Setting The Dynamic Range
SETTINGS ______________________________________________ Setting the audio functions Setting digital audio signal output You can make the setting for the optical output for connection to an external device here. Language Video Audio Rating Select the »Audio« menu item with » « or » «... -
Page 22: Language Settings
SETTINGS ______________________________________________ Language settings The default for all language settings is »English«. Setting the preferred subtitle language Select the »Language« menu item with » « or » « and press Language Video Audio Rating »OK« to confirm. English OSD Menu Select »Subtitle«... -
Page 23: Setting The Parental Lock
SETTINGS ______________________________________________ Setting the parental lock Age restrictions for viewing can be set on some DVDs. The parental lock allows you to define age limits on several levels in the setup menu. »Off« is the default setting. If the DVD is not suitable for an age group you have defined, then the DVD receiver will not play the DVD. -
Page 24: Tuning And Storing Radio Stations
SETTINGS ______________________________________________ Tuning and storing radio stations ... You can store up to 30 FM radio stations and 30 AM radio stations. You can see the displays for this in the DVD receiver..using the automatic station search (ASP) Switch on the DVD receiver from standby by pressing »9«... -
Page 25: Restoring All Default Settings
SETTINGS ______________________________________________ Press »M« on the remote control to select the memory function. – Display: »SAVE TO -- «, » -- « for the preset position. SAVE TO -- Note: If no button is pressed within 5 seconds, the DVD receiver auto- matically quits the memory function. -
Page 26: General Functions
GENERAL FUNCTIONS ________________________ Switching on and off Switch on the home cinema system from standby by pressing »9« on the remote control or »ON/OFF« on the device. WELCOME – DVD receiver display: briefly »WELCOME«. – The system switches on with the most recently selected input source. -
Page 27: Removing Discs
GENERAL FUNCTIONS ________________________ Removing discs Press » « to open the disc compartment. Remove the disc. Adjusting the volume Alter the volume of the whole system by pressing »VOLUME« on the DVD receiver or »– +« on the remote control. VOLUME 23 –... -
Page 28: Switching Between Two-Channel And Multi-Channel Mode
GENERAL FUNCTIONS ________________________ Switching between two-channel and multi-channel mode The DVD receiver has a Dolby Pro Logic II Decoder, which changes the stereo signal into a Dolby surround signal during disc playback, thus providing a high quality surround sound effect. Pro Logic II has two playback modes, namely music and movie. -
Page 29: Disc Features
DISC FEATURES ____________________________________ Disc formats Your DVD receiver can play DVD R/DVD RW in DVD video format and CD R and CD RW in CD-DA Format or MP3/WMA format. Due to difference in quality of the recording media and the quality of the recording itself, it can occasionally happen that a home-made DVD R/DVD RW or CD R and CD RW with audio data cannot be read. -
Page 30: Mp3/Wma Cd Features
DISC FEATURES ____________________________________ You can control and direct playback of the VCD/S-VCD using the menu of the DVD receiver on the television screen. S-VCDs can contain different dubbed languages and subtitles. PBC (playback control) VCDs/S-VCDs can be created using the PBC (playback control) system for track navigation. -
Page 31: Disc Mode
DISC MODE ___________________________________________ Playback functions In DVD mode, playback starts automatically after the disc has been scanned. A menu may also appear on the screen where you can start disc playback. A menu also appears on the screen with VCDs/S-VCDs where you can control the playback of the disc interactively if you activate the PBC function (see page 32). -
Page 32: Selecting Titles Or Chapters (In Dvd Mode)
DISC MODE ____________________________________________ Selecting titles or chapters (in DVD mode) ..using the title or DVD menu If a DVD contains several titles or chapters, you can select these in the title or DVD menu, if the DVD itself offers this function. Press »... -
Page 33: Picture Settings
DISC MODE ____________________________________________ To deactivate the PBC function, press » « on the remote con- trol during playback. – »PBC OFF« appears briefly on the television screen. PBC OFF – Normal playback starts automatically. Note: In MP3 mode, » « switches between playback of a file, an album and the entire disc. -
Page 34: Additional Playback Functions
DISC MODE ___________________________________________ ... in MP3 mode Press »DISPL« repeatedly on the remote control. – You will receive information concerning: – The elapsed playing time of the current file – The remaining playing time of the file ... in audio CD mode Press »DISPL«... - Page 35 DISC MODE ___________________________________________ Selecting the camera angle for particular scenes or passages Many DVDs contain scenes or passages which were filmed by various cameras from different angles. You can choose from among these different angles. On DVDs which offer this function, the multi-angle symbol appears on the television screen, for example »...
-
Page 36: Zero Setting (Go To)
DISC MODE ___________________________________________ Selecting and displaying subtitles If the DVD provides subtitles, they can be displayed on your TV screen. When subtitles are available in several languages, you can select your preferred language. Press » « during playback. – Display: for example, » 1/21 English«... -
Page 37: Repeat Functions
DISC MODE ___________________________________________ Select the title or chapter number display with » « or » « on the remote control. Using the numerical buttons »1 … 0« on the remote control, enter the title or chapter number and press »OK« to confirm. –... -
Page 38: Creating A Track Memory - Playing Back Titles Or Tracks In Selected Order
DISC MODE ___________________________________________ Creating a track memory – playing back titles or tracks in selected order You can store and then play back up to 12 titles or tracks in a par- ticular order from the disc. A track may be stored more than once. The DVD receiver must be in the stop position. -
Page 39: Other Modes
OTHER MODES _____________________________________ Tuner mode Selecting the tuner input source Select the input source by pressing »AM FM« on the remote control or »FUNCTION« on the DVD receiver. – The most recently selected radio station is played (Last Station Memory). FM 100.60 –... - Page 40 OTHER MODES _____________________________________ Searching for RDS stations To search for an RDS station, press » « or » « repeatedly until »RDS« appears in the display indicating that an RDS station is being received. ENERGY – After a short time the station name sometimes appears if the reception is sufficiently strong.
-
Page 41: Sleep Timer Mode
OTHER MODES _____________________________________ Sleep timer mode Setting the sleep timer The sleep timer switches the system off at the set time. To activate the function, keep pressing » « on the remote SLEEP OFF control until »SLEEP OFF« appears in the display. To set the switch-off time (»10«, »20«, »30«, »60«... -
Page 42: Information
INFORMATION _____________________________________ Technical data This device is noise-suppressed according to the applicable EU directives. This product fulfils the European directives 89/336/EEC, 73/23/EEC and 93/68/EEC. This device conforms to the safety regulation DIN EN 60065 (VDE 0860) and therefore the international safety regulation IEC 60065. Never open up the DVD receiver. -
Page 43: General Instructions For Laser Devices
INFORMATION _____________________________________ Dimensions and weight Loudspeakers DVD receiver Music/rated load: W x H x L: 360 x 80 x 380 mm Nominal: 6.4 kg 5 x 25 W (4 Ω), 1 x 50 W (Subwoofer) Front loudspeakers Frequency range: W x H x L: 90 x 130 x 120 mm Front and surround loudspeakers: 0.6 kg 150 ... -
Page 44: Rectifying Minor Problems
INFORMATION _____________________________________ Rectifying minor problems Not every picture or sound problem is caused by a defect in your DVD receiver. Defects can also be caused by leads having been accidentally pulled out, damaged discs and worn out batteries in the remote control.
Need help?
Do you have a question about the DR 3400 DD and is the answer not in the manual?
Questions and answers