Table of Contents
Advertisement
Quick Links
ASSEMBLY, CARE & USE MANUAL WARNING & SAFETY INFORMATION
PROPANE SMOKER MODELS 20050511, 20051112
THIS PRODUCT IS FOR OUTDOOR USE ONLY
Masterbuilt Manufacturing, Inc.
1 Masterbuilt Ct.
Columbus, GA 31907
Customer Service 1-800-489-1581
www.masterbuilt.com
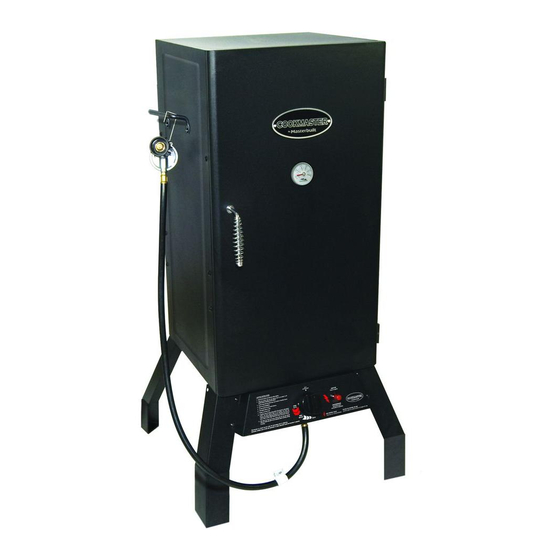
*Actual product may differ from picture shown
Tools needed for assembly: Adjustable Wrench, Phillips Head Screwdriver
CARBON MONOXIDE HAZARD
WARNING
This manual contains important
Burning wood chips gives off carbon
information necessary for the proper assembly
monoxide, which has no odor and can cause death.
and safe use of the appliance.
DO NOT burn wood chips inside homes,
Read and follow all warnings and
vehicles, tents, garages or any enclosed areas.
instructions before assembling and using
the appliance.
Use only outdoors where it is
well ventilated.
Follow all warnings and instructions when
using the appliance.
Keep this manual for future reference.
Failure to follow these warnings and instructions properly could result in fi re or explosion, which
could cause property damage, personal injury, or death.
Advertisement
Table of Contents

Related Manuals for Cookmaster 20050511

Summary of Contents for Cookmaster 20050511
- Page 1 ASSEMBLY, CARE & USE MANUAL WARNING & SAFETY INFORMATION PROPANE SMOKER MODELS 20050511, 20051112 THIS PRODUCT IS FOR OUTDOOR USE ONLY Masterbuilt Manufacturing, Inc. 1 Masterbuilt Ct. Columbus, GA 31907 Customer Service 1-800-489-1581 www.masterbuilt.com *Actual product may differ from picture shown...
-
Page 2: General Warnings And Safety Information
MASTERBUILT SMOKIN’ RECIPES MASTERBUILT SMOKIN’ RECIPES MASTERBUILT SMOKIN’ RECIPES MASTERBUILT SMOKIN’ RECIPES DANGER DANGER If you smell gas: 1. Never operate this appliance unattended. 1. Shut off gas to the appliance. 2. Never operate this appliance within 10 feet SMOKED FILET MIGNON SMOKED LEG OF LAMB 2. - Page 3 MASTERBUILT SMOKIN’ RECIPES MASTERBUILT SMOKIN’ RECIPES MASTERBUILT SMOKIN’ RECIPES MASTERBUILT SMOKIN’ RECIPES GENERAL WARNINGS AND SAFETY INFORMATION • Use 20LB (9kgs) gas cylinder that has protective collar (cylinder not included with unit). • Installation of unit must conform with local codes or in the absence of local codes, with National Pork or Baby Back Ribs MAPLE GLAZED HAM Fuel Gas Code, ANSIZ223.1/NFPA 54, Storage and Handling of Liquefi...
-
Page 4: Limited Warranty
LIMITED WARRANTY SOAPY WATER TEST WARNINGS & PROCEDURES Masterbuilt warrants its products to be free from defects in material and workmanship under proper WARNINGS assembly, normal use and recommended care for 90 days from the date of original retail purchase. •... -
Page 5: Smoking Chart
SMOKING CHART WARNING WOOD ITEM SIZE TEMP CHARCOAL WATER COOK TIME INTERNAL TEMP PERFORM “SOAPY WATER TEST” BEFORE EACH USE. SEE “SOAPY WATER TEST” SECTION IN CHIPS MANUAL. EXTINGUISH ALL OPEN FLAMES BEFORE CONNECTING REGULATOR TO GAS BEEF CYLINDER. TURN GAS OFF AFTER EACH USE. Pot Roast 140°F (60°C) Rare 4 - 5 lbs... -
Page 6: Parts List
DO NOT RETURN TO RETAILER WARNING STOP For Assembly Assistance, Missing or Damaged Parts Call: MASTERBUILT Customer Service at 1-800-489-1581. COMBUSTION BY-PRODUCT PRODUCED WHEN USING THIS PRODUCT CONTAINS CHEMICALS KNOWN TO THE STATE OF CALIFORNIA TO CAUSE BIRTH DEFECTS, PARTS LIST OTHER REPRODUCTIVE HARM, OR CANCER. -
Page 7: Assembly Hardware
ASSEMBLY HARDWARE REPLACEMENT PARTS LIST STEP 13 When not in use, hang REPLACEMENT PART ITEM NO regulator/hose (16) on body handle Body Kit 9905100013 (3) as shown. Door with Logo Plate 9005100033 Air Damper Kit 9904090069 M6x12 #10-16x3/8 Phillips Screw Self-tapping Screw Left Front Leg Kit 9905100026... - Page 8 ASSEMBLY ASSEMBLY • BEFORE ASSEMBLY READ ALL INSTRUCTIONS CAREFULLY. STEP 11 • ASSEMBLE UNIT ON A CLEAN, FLAT SURFACE. Insert small hook end of grease • TOOLS NEEDED: ADJUSTABLE WRENCH, PHILLIPS HEAD SCREWDRIVER clip (7) all of the way up through large hole in bottom of smoker body (1) so that it is supported on small tab.
- Page 9 ASSEMBLY ASSEMBLY SOME PARTS NOT SHOWN FOR SOME PARTS NOT SHOWN FOR CLARITY CLARITY STEP 3 Position burner box (18) over center STEP 9 hole in bottom of smoker body (1), Set water pan (23) into water pan carefully aligning venturi over valve rack (22) and slide onto rack orifi...
- Page 10 ASSEMBLY ASSEMBLY STEP 7 STEP 5 Insert temperature gauge (5) through Align damper (26) inside smoker slotted hole in smoker door (2). Secure body (1). Secure with phillips with ring (I). head screw (A) and lock nut (G). Insert door handle (4) through smoker door (2).
Need help?
Do you have a question about the 20050511 and is the answer not in the manual?
Questions and answers