Table of Contents
Advertisement
Advertisement
Table of Contents
Troubleshooting

Related Manuals for Victorio VKP250


Summary of Contents for Victorio VKP250
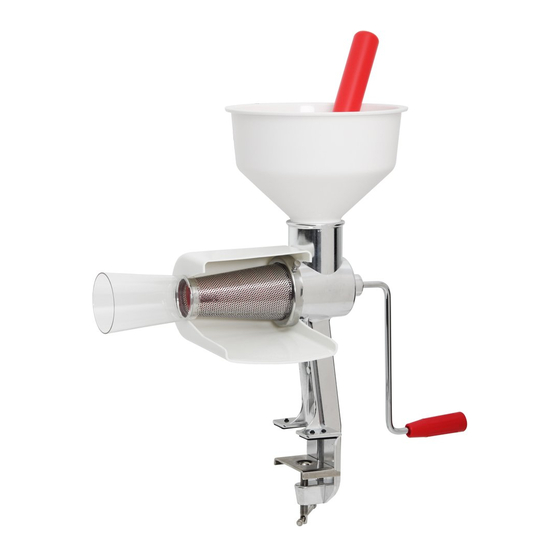
- Page 1 FOOD STRAINER VKP250 Instruction Manual *Optional Motor Instructions Pages 10-17...
-
Page 2: Table Of Contents
Motor Use Instructions .............. 14 Troubleshooting Guide .............. 17 Warranty/Contact Info ..........Back Cover *For the most up-to-date manual, or for more information regarding this product, visit our website: www.Victorio.info. Copyright © 2012 Victorio Kitchen Products, Inc. All Rights Reserved. -
Page 3: Parts Diagram
ATTENTION Before using your new Victorio Food Strainer, please read and follow all instructions. Carefully study the diagrams on the following pages to become familiar with the various parts of your Food Strainer. Parts Diagram Your strainer should come with all the parts shown and listed below:... -
Page 4: Operating Precautions
Operating Precautions WARNING! Never operate the strainer dry. This will damage the screen and spiral. Never use any tool except the food pusher in the hopper. Keep hands, hair, clothing and any other objects, except the food pusher, away from the hopper opening, at all times. -
Page 5: Product Overview
Product Overview Congratulations on your purchase of a Victorio Food Strainer! You will definitely find this to be a useful addition to your kitchen. If you are concerned about how to use your food strainer, don’t worry. This manual will give you step by step instructions to guide you through the process. -
Page 6: Preparing Specific Produce Types
Preparing Specific Produce Types While this sections teaches you how to prepare different types of fruits and vegetables, it also introduces optional accessory screens and spirals that do not come standard with the food strainer (see p. 8 for details). APPLE SAUCE It is best to use a variety of apple types. -
Page 7: Straining Tips
4. The Salsa Screen can be used on any food where an extra coarse texture is desired. Works best on foods that are seedless or when having seeds in the finished product is desired. 5. Visit our website, www.Victorio.info, for more tips. -
Page 8: Assembly Instructions
Assembly Instructions (Use with parts diagram on p. 1) View our assembly video on our website at www.Victorio.info. 1. To begin assembly, mount the Food Strainer body (2) to a table or countertop. Do not over-tighten (see diagram on p. 2). -
Page 9: Strainer Use Instructions
7. Snap the small end of the spout 8. Slide the squirt guard (17) over (15) into place on the end of the the screen from the rear so that screen. it snaps onto the body and the small end of the spout. 9. -
Page 10: Helpful Hints
VKP250-1: Berry Screen (Very Fine) has the finest holes of all the screens for removing small seeds in raspberries, strawberries, blueberries, etc. Ideal for making jams, jellies, and pie filling. -
Page 11: Troubleshooting Guide
TROUBLESHOOTING GUIDE PROBLEM SOLUTION It is hard to turn the handle when the DO NOT crank the handle while strainer is empty or dry. the food strainer is dry! Doing so will damage the screen and spiral. It is hard to turn because it is empty. -
Page 12: Features
VICTORIO FOOD STRAINER MOTOR VKP250-M (optional) *The electric motor is an optional accessory and is sold separately. Drive Shaft On / Off Switch Vents Motor Latch Overload Breaker Cord Features: Installs quickly and easy to use. Energy efficient and durable. -
Page 13: Important Safety Instructions
IMPORTANT SAFETY INSTRUCTIONS WARNING! - Failure to follow these safety instructions correctly will lead to a risk of fire, electric shock or personal injury. SAVE THESE INSTRUCTIONS When using electric appliances, basic precautions should always be followed, including the following: ... -
Page 14: Grounding Instructions
Do not cover the motor ventilation holes. Make sure the motor is attached to the food strainer properly before operating (See ‘Installation Instructions’ on p. 15). Only use electric motor (model VKP250-M) with Victorio Food Strainer (model VKP250). Do not use outdoors. ... -
Page 15: Circuit Breaker Instructions
Helpful Hint #4, on p. 8. Caution: If the breaker trips immediately after plugging in or turning on the motor, do not bypass the breaker and do not use the motor. Contact 866-257-4741. Victorio customer service at Power Switch Overload Breaker Breaker in normal... -
Page 16: Motor Use Instructions
Motor Use Instructions Make sure you have read the Important Safety Instructions on p. 12 before installing the motor. Installation Steps: 1. Remove the motor from the packaging and make sure the power switch is in the off (“O”) position (see diagram on p. 13) and the motor is unplugged. - Page 17 5. You will know the motor is correctly in place when the motor latch is secure around the strainer body (see diagram below). Make sure the motor latch is secured to the food strainer before operating the motor! 6. Make sure the power switch is still in the off (“O”) position and plug the motor cord into a correct power source (see diagram on p.
- Page 18 Removal Steps: 1. To remove the motor, make sure the power switch is in the off (“O”) position and the cord is no longer in the outlet. Twist Clockwise Firmly grasp the motor and twist in a clockwise direction to release the motor latch from the body of the strainer.
-
Page 19: Troubleshooting Guide
TROUBLESHOOTING GUIDE PROBLEM SOLUTION I cannot attach the motor. Review p. 14 on how to attach the motor, including how to correctly align the motor shaft with the food strainer shaft. I cannot remove the motor. Review the diagram on p. 16 and read how to remove the motor. -
Page 20: Product Warranty
Products used outside of the United States or Canada. Victorio Kitchen Products 1804 Sandhill Rd Orem UT, 84058 By Phone: 866-257-4741 By Email: Help@Victorio.info www.Victorio.info © Copyright 2012 Victorio Kitchen Products, Inc. All rights reserved.
Need help?
Do you have a question about the VKP250 and is the answer not in the manual?
Questions and answers