Table of Contents
Advertisement
Safety Instructions & Operator's Manual for the
22" Self-Propelled
Walk Behind Mower
Models
BTP2265HW (7800267)
NOTE: Specifications are correct at time of printing and are subject to change without notice.
* Actual sustained engine power will likely be lower due to operating limitations and environmental factors. Please refer to 'Engine Power Rating Information' for
further details.
Manual No. 7101724 (I.R. 10/23/2007)
Jefferson, WI 53549
TP 100-5296-IR-WB-J
Advertisement
Table of Contents

Related Manuals for Brute BTP2265HW


Summary of Contents for Brute BTP2265HW
- Page 1 Walk Behind Mower Models BTP2265HW (7800267) NOTE: Specifications are correct at time of printing and are subject to change without notice. * Actual sustained engine power will likely be lower due to operating limitations and environmental factors. Please refer to ‘Engine Power Rating Information’ for further details.
- Page 2 Thank You for purchasing this quality-built Brute product. We’re pleased that you placed your confidence in the Brute brand. When operated and maintained according to the instructions in this manual, your Brute product will provide many years of dependable service.
-
Page 3: Table Of Contents
Table of Contents Operator Safety ..........2 Important Operator Safety Information . -
Page 4: Operator Safety
Important Operator Safety Instructions WARNING: This powerful cutting machine is capable of amputating hands and feet and can throw objects that can cause injury and damage! Failure to comply with the following SAFETY instructions could result in serious injury or death to the operator or other persons. The owner of the machine must understand these instructions and must allow only persons who understand these instructions to operate machine. - Page 5 12. STOP engine and wait until the blade comes to com- 11. Have machine serviced by an authorized BRUTE dealer plete STOP before removing grass bag and/or clearing at least once a year and have the dealer install any new grass.
-
Page 6: Features And Controls
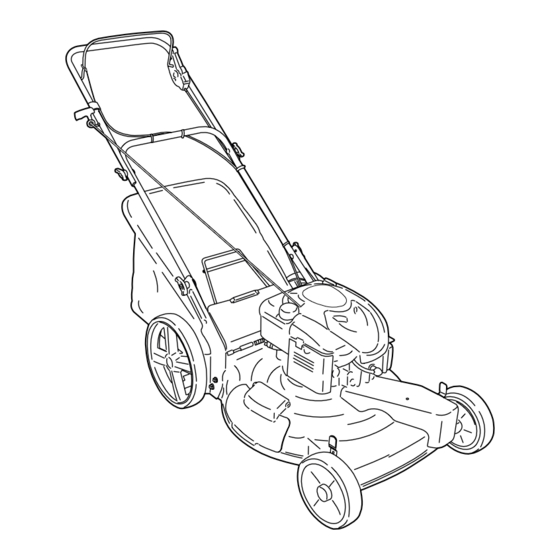
Features and Controls IMPORTANT The figures and illustrations in this manual are provided for reference only and may differ from your specific model. Contact your dealer if you have questions. Features and Controls Oil Fill Cap and Dipstick Engine Stop Lever Fuel Filler Cap Recoil Start Grip Mulcher Cover... -
Page 7: Operation
Operation Adjusting the Handle Height 1. Remove the wingnuts (A, Figure 1), washers (not shown), and bolts (B) from the right and left handle brackets (C). Note: Do not remove the lower set of handle hardware (D) . Figure 1: Removing the handle adjustment hardware 2. -
Page 8: Grass Bag
Operation (Continued) Assembling the Grass Bag Note: On some models, the side mounted discharge deflector is temporarily attached (for shipping purposes) to the rear of the mower. Before assembly of the grass bag, remove the side mounted discharge deflector. 1. Slide the frame assembly (A, Figure 3) into the ends of the support tube (B). - Page 9 Operation (Continued) Mounting the Grass Bag 1. To mount the grass bag on the mower, raise the rear door (A, Figure 6). Holding the grass bag by the han- dle (B), mount the hooks (C) on either end of the grass bag frame assembly onto the rear door pivot rod (D).
-
Page 10: Side Discharge Deflector
Operation (Continued) Attaching the Side Mounted Discharge Deflector WARNING: To prevent the engine from starting, disconnect the wire from the spark plug. For shipping purposes, the side deflector was not installed. Locate the side deflector and install as follows. 1. Raise the mulcher cover (A, Figure 8). 2. -
Page 11: How To Prepare The Engine
Operation (Continued) Preparing the Engine IMPORTANT: This unit is equipped with an internal combustion engine and must not be used on or near any unimproved forest-covered, brush-covered or grass-covered ENGINE DOES NOT CONTAIN OIL OR GASOLINE and unless the engine’s exhaust system is equipped with a spark arrester meeting applicable local or state laws (if any). -
Page 12: Engine Stop Lever
Operation (Continued) Engine Stop Lever WARNING: For safe operation, the drive system must immediately disengage when the drive lever is released. If the drive system Release the engine stop lever (A, Figure 11) and the engine does not disengage correctly, do not operate and the blade will automatically stop. -
Page 13: Starting The Engine
Operation (Continued) Starting the Engine 5. Stand behind the mower. Use one hand to hold the engine stop lever in the operating position (A, Figure 13). Use the other hand to hold the recoil-start grip (B). WARNING: The blade will rotate 6. -
Page 14: Maintenance
Maintenance Engine Maintenance Hard starting. Engine smoking. Spark plug fouling. Use the following maintenance section to keep your unit in Oil or gas saturation of the air filter. good operating condition. All the maintenance information for the engine is in the “Engine Instruction Book”. Before you start the engine, read this book. -
Page 15: Removing The Drive Belt
Maintenance (Continued) Removing the Drive Belt WARNING: Before you remove the belt, disconnect the wire from the spark plug. 1. Remove the screw that secures the belt cover (A, Figure 16). Remove the belt cover. 2. To remove the drive belt, tip the mower up. See “Engine Tipping”... -
Page 16: Adjusting The Drive Cable
Maintenance (Continued) Adjusting the Drive Cable Note: The engine design does not include a throttle control or an engine speed adjustment. The engine is set at the best speed for cutting grass, bagging grass, and for extended WARNING: Before you adjust the drive cable, engine life. -
Page 17: Blade Service
Maintenance (Continued) Blade Service WARNING: Before you inspect the blade or the blade adapter, disconnect the wire to the spark plug. If the blade hits an object, stop the engine. Disconnect the wire to the spark plug. Check the unit for damage. Frequently check the blade for wear or damage such as cracks. -
Page 18: Preparing The Mower For Storage
Maintenance (Continued) Figure 22: Sharpening the blade Preparing the Mower for Storage 5. Clean the dirt and debris from the cylinder cooling fins and the engine housing. 6. Clean the bottom of the mower housing. WARNING: Do not remove gasoline while 7. -
Page 19: Troubleshooting
Troubleshooting The engine will not start. 1. Make sure the fuel tank is filled with clean gasoline. Do not use old gasoline. 2. Make sure the wire for the spark plug is connected to the spark plug. 3. Adjust the Carburetor. Refer to the Engine Manual. 4. -
Page 20: Warranty
BRUTE Two Year Limited Warranty Brute warrants to the original purchaser that this unit shall be free from defects in material and workmanship under normal use and service for a period of two (2) Years from the date of purchase; however, this warranty does not cover engines, accessories (such as snow blowers, snow blades, grass baggers and plows), transmissions, batteries and Normal Wear Parts (except as noted below) or transaxles as the companies that manufacture these items furnish their own warranties and provide service through their authorized field service facilities. - Page 21 Slope Guide...
- Page 22 Notes www.brutepower.com...
- Page 23 Notes...
- Page 24 22” Self-Propelled Walk Behind Mower Product Specifications Common Service Parts Part Number Blade Control Cable 7101861 Deck Size (in) Wheel Drive Cable 721854 Height of Cut 1.5 - 3.5 (in) Cutter Blade 7100851 Transmission Type Single Speed / Gear Drive Belt 7101193 Ground Speed (mph)
Need help?
Do you have a question about the BTP2265HW and is the answer not in the manual?
Questions and answers