DAVIS Vantage Pro2 Console Manual
For vantage pro2 & vantage pro2 plus weather stations
Hide thumbs
Also See for Vantage Pro2 Console:
- User manual ,
- Console manual (56 pages) ,
- Installation manual (32 pages)

Subscribe to Our Youtube Channel
Related Manuals for DAVIS Vantage Pro2 Console


Summary of Contents for DAVIS Vantage Pro2 Console
- Page 1 ™ Vantage Pro2 Console Manual ™ ™ For Vantage Pro2 & Vantage Pro2 Plus Weather Stations Davis Instruments, 3465 Diablo Avenue, Hayward, CA 94545 • 510-732-9229 • www.davisnet.com...
-
Page 2: Weather Ticker
Connect the equipment into an outlet on a circuit different from that to which the receiver is connected. • Consult the dealer or an experienced radio/TV technician for help. Changes or modification not expressly approved in writing by Davis Instruments may void the warranty and void the user's authority to operate this equipment. FCC ID: IR2DWW6328... -
Page 3: Table Of Contents
Calibrating, Setting, and Clearing Variables ..........25 Highs and Lows Mode ................27 Alarm Mode ....................29 Graph Mode ....................31 Troubleshooting and Maintenance ..............34 Vantage Pro2 Troubleshooting Guide ............34 Console Diagnostic Mode ................36 Console Maintenance .................40 One Year Limited Warranty ..............40 Appendix A Weather Data ................41 Appendix B Specifications ................ -
Page 4: Welcome To Vantage Pro2 Tm
WeatherLink ® software. Vantage Pro2 stations are available in two basic versions: cabled and wireless. A cabled Vantage Pro2 station transmits outside sensor data from the Inte- grated Sensor Suite (ISS) to the console using a straight-through four-conduc- tor cable. -
Page 5: Vantage Pro2 Options
Available for Cabled and Wireless stations. Requires Sensor (# 6490) Mounting Shelf (# 6673). Note: Optional wireless stations can only be used with Wireless Vantage Pro2 Stations. ® Optional WeatherLink Software The WeatherLink software and data logger connect your Vantage Pro2... -
Page 6: Optional Accessories
Creates a dialup connection between the station and the computer. Extension Cables (# 7876) Allows you to place the Cabled Vantage Pro2 ISS further away from the con- sole using the extension cable provided by Davis Instruments. Maximum cable length is 1000’ feet (300 m). -
Page 7: Installing The Console
Wireless Vantage Pro2 Stations Wireless Vantage Pro2 consoles do not require the use of an AC adapter. You may use the included adapter if you wish, but the three C-cell batteries should power a wireless console for up to nine months. -
Page 8: Installing Batteries
3. Replace the battery cover. Connecting Cabled Stations Cabled Vantage Pro2 stations come with 100 feet (30m) of cable. This cable is used for connecting the console to the ISS. Maximum cable length from ISS to the console using Davis Instruments cables is 1000 feet. To connect the con- sole to the ISS: 1. -
Page 9: Console Location
If you have a wireless console, be aware of possible interference from cordless phones or other devices. To prevent interference, maintain a dis- tance of 10 feet between the Vantage Pro2 console and a cordless phone (handset and base). •... - Page 10 Console Location Table & Shelf Placement The console kickstand can be set to three different angles allowing five differ- ent display angles. 1. Install the two round rubber feet on the bottom of the console. The rubber feet help prevent damage to furniture and surfaces. 2.
-
Page 11: Wall Mounting
8" (203mm) apart for the #6 x 1" mounting screws. This is a representation for the mounting hole positions. This template is not true to size. If installing a cabled Vantage Pro2 console with sensor cable running inside the wall, mount the console over an empty switch box. -
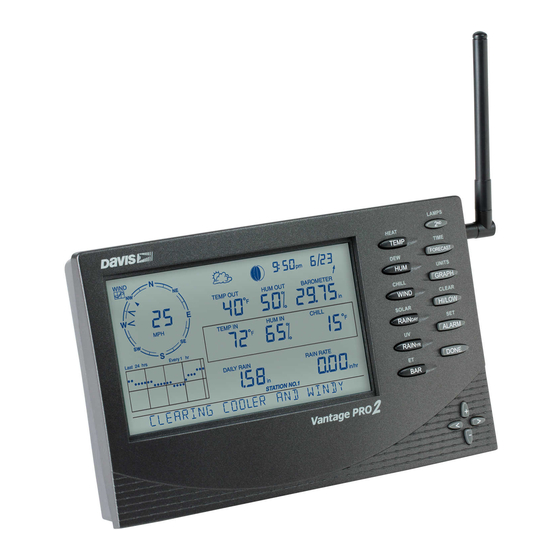
Page 12: Using Your Weather Station
Console Modes The Vantage Pro2 console operates in five different modes: Mode Description Use Setup Mode to enter the time, date, and other information required to Setup calculate and display weather data. - Page 13 Setup Mode Screen 1: Active Transmitters Screen 1 displays the message “Receiving from...” and shows the transmitters being received by the console. In addition, an “X” blinks in the lower right- hand corner of the screen every time the console receives a data packet from a station.
- Page 14 Note: Typically, you can use the default transmitter ID setting of 1 unless you are installing one of the optional transmitter stations or a nearby neighbor has a Vantage Pro2 station that uses transmit- ter ID 1 for the ISS.
- Page 15 Setup Mode 2. Use the arrows to scroll through the list of available transmitter IDs and select the ID for your console. 3. Press DONE to move to the next screen. Note: Make a note of the ID selected for retransmit. The console that receives the data from the con- sole you have selected to retransmit should be configured to receive the transmitter ID you selected.
- Page 16 Setup Mode Screen 5: Latitude • Latitude measures distance north or south of the equator. • Latitude is used with longitude to identify your position on earth. If you do not know your latitude and longitude, there are several ways to find out.
- Page 17 Royal Observatory in Greenwich, England. Hayward, California, the home of Davis Instruments, observes Pacific Standard Time. The UTC offset for Pacific Stan- dard Time is -8:00, or eight hours behind Universal Time (UTC). When it’s 7:00 pm (1900 hours) UTC, it’s 19 - 8 = 1100 hours, or 11:00 am in Hayward in winter.
- Page 18 Setup Mode Screen 9: Daylight Savings Status Use this screen to either verify the correct automatic Daylight Savings status or to set Daylight Savings manually. Screen 9: Daylight Savings Status 1. If Daylight Savings setting is MANUAL, press the up and down arrows to turn Daylight Savings Time on or off on the appropriate days of the year.
- Page 19 2. Press DONE to move to the next screen. Screen 12: Rain Collector The tipping bucket in the Vantage Pro2 rain collector has been calibrated at the factory to measure 0.01'' of rain with each tip. The ISS comes equipped with a metric adapter that, once installed, takes 0.2 mm readings for every tip of the...
- Page 20 2. Press DONE to move to the next screen. Note: This setting determines when the yearly rain total is reset to zero. Davis Instruments recom- mends a January rain season setting (the default), unless you reside in the west coast of the United States, the Mediterranean coast, experience dry winters in the Southern Hemisphere.
-
Page 21: Current Weather Mode
The baud rate setting on your console must match the serial port setting in the software on your computer. If you are using WeatherLink for Vantage Pro2, refer to WeatherLink help for instruc- tions on setting the serial port baud rate on your computer. -
Page 22: Selecting Units Of Measure
Selecting Units of Measure Note: After pressing 2ND, the 2ND icon displays on the screen for three seconds. Command key sec- ondary functions are enabled during this time. The keys return to normal operation after the icon disappears. • Select a variable and press GRAPH to graph the variable in the Current Weather Mode screen. -
Page 23: Wind Speed And Direction
Selecting Units of Measure Wind Speed and Direction 1. Press WIND to select wind speed. WIND 2. Wind speed may be displayed in miles per hour (m.p.h.), kilome- ters per hour (km/h), meters per second (m/s), and knots (knots). The 10 minute average wind speed will be displayed in the ticker. A solid arrow within the compass rose indicates the current wind direction. - Page 24 Selecting Units of Measure Humidity Press HUM to select outside humidity. Pressing HUM a second time selects inside humidity. Humidity is displayed in percent relative humidity. Each consecutive press of HUM displays humidity readings for any optional humidity, leaf wetness, and leaf temperature stations also connected to your console.
- Page 25 Selecting Units of Measure UV (Ultraviolet Radiation) Press 2ND and UV to display the current UV index. The cur- RAIN rent UV index is the amount of ultraviolet radiation the sensor is currently reading. Press 2ND and UV again to display the accumulated UV index for the day. The accumulated UV index is the total ultraviolet radiation that the sensor has read throughout the day.
- Page 26 Selecting Units of Measure Year–to–date precipitation Press RAINYR a third time to display the year–to–date precipitation record. Yearly rain displays the precipitation accumulated since the 1st of the month you’ve chosen as the beginning of your rain season in Setup Mode (See “Screen 13: Rain Season”...
-
Page 27: Displaying The Forecast
Displaying the Forecast Note: A solar radiation sensor is required to take readings listed above. See “Optional Sensors” on page 2. Lamps Press 2ND then press LAMPS to turn on the backlight for the screen LAMPS display. Press 2ND then LAMPS again to turn the backlight off. Use the backlight when the LCD is not clearly visible. -
Page 28: Calibrating, Setting, And Clearing Variables
You can calibrate inside & outside temperature, inside & outside humidity, as well as any extra temperature/humidity sensor readings you have transmitting to your Vantage Pro2. 1. Select a variable to be calibrated. See “Selecting Weather Variables” on page 18. -
Page 29: Calibrating Barometric Pressure
Calibrating, Setting, and Clearing Variables 2. Press WIND as necessary to display the wind direction in degrees. 3. Press and release 2ND, then press and hold SET. 4. The wind direction variable will begin to blink. 5. Continue holding the key until the CAL message appears in the ticker. Note: The ticker displays the current wind direction calibration value. -
Page 30: Highs And Lows Mode
Highs and Lows Mode The Vantage Pro2 records highs and lows for many weather conditions over three different periods: days, months, and years. Except for Yearly Rainfall, all high and low registers are cleared automatically at the end of each period. - Page 31 Highs and Lows Mode enter the month that you would like the Yearly Rainfall accumulation to clear. The Yearly Rainfall clears on the first day of the month you chosen. The Yearly High Rain rate clears using the same setting. The following table lists the high and low modes for all the weather variables: Day, Weather Variable...
-
Page 32: Alarm Mode
Current Weather mode. Alarm Mode The Vantage Pro2 features more than 30 alarms that can be programmed to sound whenever a reading exceeds or drops below a set value. With the exception of barometric pressure and time, all alarms sound when a reading reaches the alarm threshold. -
Page 33: Setting Alarms
Alarm Mode sound if the rate of change (in either direction) exceeds the threshold you set. This alarm is updated every 15 minutes. Time The time alarm is a standard “alarm clock” alarm. It sounds for one minute at the set time. Make sure you choose AM or PM, if you’re in 12-hour mode. UV Dose The UV dose alarm sounds when the accumulated UV dose has exceeded the dose you set. -
Page 34: Graph Mode
Yes - the alarm sounds for 1 minute. Graph Mode The Vantage Pro2 console includes a powerful Graph Mode that allows you to view over 100 graphs of different kinds right on the screen, all without con- necting to a personal computer. -
Page 35: Viewing Graphs
Graph Mode Viewing Graphs Although the graphs available may vary for each weather variable, you display the graphs in the same way. 1. Select a variable to graph. Only the date, graph, graph GRAPH TEMP OUT icon, and selected variable are visible. - Page 36 4. Press the up arrow to shorten the time range. 5. Press the down arrow to lengthen the time range. 6. Press HI/LOW to shift between highs and lows. 7. Press DONE to exit. Vantage Pro2 Console Graphs Weather Variable Available Graphs* Barometric Pressure...
-
Page 37: Troubleshooting And Maintenance
Troubleshooting and Maintenance Vantage Pro2 Troubleshooting Guide While your Vantage Pro2 weather station is designed to provide years of trou- ble-free operation, occasional problems may arise. If you are having a prob- lem with your station, please consult this troubleshooting guide before calling Davis technical support. -
Page 38: Troubleshooting Reception Problems
Troubleshooting Reception Problems While we have tested the Wireless Vantage Pro2 radio extensively, each site and each installation presents its own issues and challenges. Obstructions, particularly metallic ones, often cut down your station’s reception distance. Be sure to test reception between the console and ISS, in the locations you intend to install them, before permanently mounting your ISS or other transmitter(s). -
Page 39: Console Diagnostic Mode
Console Diagnostic Mode The console’s reception status displays at the lower right corner of the screen. • An “X” flashes for every data packet received by the console. • An “R” displays when the console is trying to re-establish a lost connection. The console tries for 10 minutes to re-establish a connection before going into L Mode.When no data packets have been received for 10 minutes, the console dashes-out any missing sensor readings. - Page 40 ‡ Note: All values with a * mark the value as being for Davis Instruments Internal use. All values with a mark values that are the same on both the Statistical and Reception Diagnostic screens. Time of day or number of times the anemometer reed switch was seen closed .
- Page 41 Console Diagnostic Mode The total number of bad data packets including missed packets and CRC errors. Missed packets are described as when a data packet is expected, but is not recognized as a data packet by the console. Percentage of good packets received. Total number of good packets received.
- Page 42 Repeater ID displayed is the repeater that the console is set to receive. If the console is not listening to repeaters, this section remains blank. Please see Application Note 25 available on the Davis Instruments Support web page for more information on using repeaters.
-
Page 43: Console Maintenance
In some cases, the problem may be that your console firmware doesn’t support what you are trying to do. Use this command to determine the firmware revi- sion level in your console. You can find more information on Vantage Pro2 console firmware versions and changes in the Weather Software Support sec- tion of our website. -
Page 44: Appendix A Weather Data
Appendix A Weather Data Refer to this appendix to learn more about the weather variables that are mea- sured, displayed, and logged by your Vantage Pro2 Station. Some weather variables require optional sensors. See “Optional Sensors” starting on page 2. Wind The anemometer measures wind speed and direction, and is part of the Inte- grated Sensor Suite (ISS). -
Page 45: Dew Point
Note: In console firmware versions May 2005 (or version 1.6) or later, Heat Index is equal to the air temperature at or below 0° F (-18° C). For console firmware versions earlier than May 2005 (or version 1.6), Heat Index is equal to the air temperature at or below 57°... -
Page 46: Barometric Pressure
Rain Vantage Pro2 incorporates a tipping-bucket rain collector in the ISS that mea- sures 0.01'' for each tip of the bucket. A metric adapter can be installed to mea- sure 0.2 mm for each tip of the bucket.Your station logs rain data in the same units it is measured in and converts the logged totals into the selected display units (inches or millimeters) at the time it is displayed. - Page 47 UV exposure. The readings do not suggest that any amount of exposure is safe or healthful. Do not use the Vantage Pro2 to determine the amount of UV radiation to which you expose yourself. Scientific evi- dence suggests that UV exposure should be avoided and that even low UV doses can be harmful.
- Page 48 Type II (Environment Canada) skin type might choose 0.75 MED as the maximum for the day; in contrast, a person with Type V (Environment Canada) Skin Type might consider 2.5 MEDs a reason- able dose for the day. NOTE: the Vantage Pro2 assumes a Fitzpatrick (Environment Canada) Skin Type of II.
-
Page 49: Leaf Wetness
Soil Moisture requires an optional Leaf & Soil Moisture/Temperature Station or Soil Moisture Station and is only available for Wireless Vantage Pro2 Stations. Time A built-in clock and calendar track the time and date. The console automati- cally adjusts for daylight savings time in most of North America, Europe and Australia (and allows manual adjustment elsewhere) and for leap years. -
Page 50: Appendix B Specifications
Appendix B Specifications See complete specifications for your Vantage Pro2 Station at our website: www.davisnet.com. Console Specifications Console Operating Temperature ..+14° to +140°F (-10° to +60°C) Display Temperature ....+32° to +140°F (0° to +60°C) Non-operating Temperature . -
Page 51: Console Data Display Specifications
Console Data Display Specifications Console Data Display Specifications Historical Data ..... Includes the past 24 values listed un- less otherwise noted; all can be cleared and all totals reset. -
Page 52: Weather Data Specifications
Weather Data Specifications Weather Data Specifications Note: These specifications include optional sensors that may not be installed in your Vantage Pro2 Station. Weather Data Specifications Nominal Accuracy Variable Required Sensors Resolution Range (+/-) 26'' to 32'' Hg; 660 to Barometric 810 mm;... - Page 53 Weather Data Specifications Weather Data Specifications Nominal Accuracy Variable Required Sensors Resolution Range (+/-) Solar Radiation Solar sensor 1 W/m 0 to 1800 W/m 5% of full scale Inside +32° to +140°F; 0 to Included in Console 0.1°F; 0.1°C 1°F; 0.5°C +60°C Temperature ISS, Temp Station...
-
Page 54: Appendix C
Not all consoles have the capability for repeater support. If your console has firmware dated earlier than May 2005, it does not have the capability to receive Vantage Pro2 wireless repeaters. To check your console’s firmware, press the DONE and up arrow (+) keys. The firmware revision date displays in the ticker tape section of the console. - Page 55 shown, the console is configured to listen directly to a station and not to a repeater. In the example below, the console is set up to receive an ISS station on transmitter ID 1 from repeater A. 6. For each station using a repeater, select the station and turn on the repeater function and select the correct repeater ID.
-
Page 56: Vantage Pro2 Console Icons
Contacting Davis Technical Support If you have any questions, or encounter problems installing or operating your Van- tage Pro 2 weather station, please contact Davis Technical Support. We’ll be glad to help. (510) 732-7814 — Monday - Friday, 7:00 a.m. - 5:30 p.m. Pacific Time. We are unable to accept collect calls.
Need help?
Do you have a question about the Vantage Pro2 Console and is the answer not in the manual?
Questions and answers
once i hit the 2nd button for back light it only stays on for a few seconds would like it stay on continuously?
The DAVIS Vantage Pro2 Console uses LED backlighting, which can be left on continuously without significant concerns about lifespan. Users have reported keeping the backlight on 24/7 without issues. To do this, simply turn on the backlight and leave it enabled. There are no specific instructions in the provided context on how to enable continuous backlighting, but it is possible based on user experience.
This answer is automatically generated