
Related Manuals for QNAP NMP-1000

Summary of Contents for QNAP NMP-1000
- Page 1 NMP-1000 Network Multimedia Player User Manual (Version: 1.1.3) ©Copyright 2009. QNAP Systems, Inc. All Rights Reserved.
-
Page 2: Table Of Contents
..................29 THER ONNECTIONS 4.2.1 Use the external disk mode (to PC mode)............29 4.2.2 Use the external storage mode (USB 2.0 host mode)........30 NMP-1000 SETTINGS MENU..................31 ....................32 IDEO AND UDIO 5.1.1 Video output ....................33 5.1.2 Audio output ....................34 5.1.3 Display settings ................... - Page 3 5.3.1 Wired network ..................... 49 5.3.2 Wireless network ..................51 5.3.3 Network service settings................52 ....................53 EMOTE 5.4.1 Auto search of QNAP NAS................54 5.4.2 Auto search for remote disk setup ..............56 5.4.3 Manual remote disk setup ................60 ....................61 REFERENCES 5.5.1 Play mode ....................
- Page 4 6.2.3 Subtitle properties ..................76 6.2.4 TV aspect ratio .................... 76 ....................77 UDIO ILES ....................78 MAGE ILES ................79 NLINE EDIA ONTENTS 6.5.1 YouTube videos ................... 79 6.5.2 Apple movie trailers..................85 6.5.3 SHOUTcast ....................87 6.5.4 Internet radio site ..................89 6.5.5 Flickr ......................
- Page 5 9.7.6 Remote Login (Telnet Connection)..............132 ....................133 YSTEM 9.8.1 System Event Logs..................133 9.8.2 System Information ..................133 WEB FILE MANAGER ..................134 OTHER SOFTWARE UTILITIES ................137 11.1 QNAP F ....................137 INDER 11.2 ..................140 EPLICATOR SYSTEM MAINTENANCE ................... 154 12.1 ..................
-
Page 6: Foreword
All brands and products names referred to are trademarks of their respective holders. DISCLAIMER In no event shall the liability of QNAP Systems, Inc. (QNAP) exceed the price paid for the product from direct, indirect, special, incidental, or consequential software, or its documentation. QNAP makes no warranty or representation,... - Page 7 Copyright and trademark notices HDMI, the HDMI logo and High-Definition Multimedia Interface are trademarks or registered trademarks of HDMI Licensing, LLC. Manufactured under license from Dolby Laboratories. Dolby and the double-D symbol are trademarks of Dolby Laboratories.
-
Page 8: Introduction
Introduction 1.1 Package Contents The NMP-1000 package contains the following items. If anything is missing, please contact your distributor or reseller. NMP-1000 Power cord Adaptor HDMI cable AV cable USB cable Ethernet cable Screw pack Quick Installation Guide CD-ROM Remote control... -
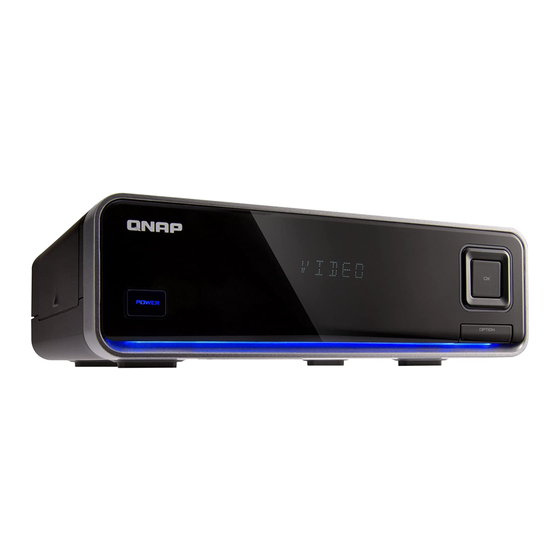
Page 9: Hardware Illustration
1.2 Hardware Illustration IR Receiver Power Button VFD Display Direction Buttons OK/ Play Button Option Button DC IN USB Device Port eSATA Device Port HDMI Composite Video S-Video Analog Stereo Out Component (Y, Pb, Pr) S/PDIF Coaxial S/PDIF Optical USB Host K-Lock Security Slot... -
Page 10: Remote Control
1.3 Remote Control 1. Power 2. Audio 3. DVD Menu 4. Zoom 5. DVD Title 6. Slow 7. Pause 8. Rewind 9. Stop 10. Home 11. Settings 12. Previous 13. Next 14. Mute 15. Subtitle 16. Angle (rotate photo) 17. Seek 18. -
Page 11: Install The Hardware
Install the Hardware 2.1 What You Need Before you start to install the NMP-1000, you may need the following: A hard disk drive (to be installed in the NMP-1000) A TV An audio amplifier (optional) A wired network with broadband Internet connection (optional)*... -
Page 12: Install The Hard Drive
This product works with 3.5" SATA hard disk drives from major hard disk brands. For the HDD compatibility list, please visit http://www.qnap.com/. QNAP disclaims any responsibility for product damage/ malfunction or data loss/ recovery due to misuse or improper installation of hard disks in any occasions for any reasons. - Page 13 4. Insert the disk tray to the multimedia player. 5. Fasten the screw to lock the disk tray. 6. Cover the lid. A click sound will be heard when the cover is closed correctly. 7. Connect the multimedia player to the power supply.
-
Page 14: Connect The Nmp-1000 To Video & Audio Output
2.3 Connect the NMP-1000 to Video & Audio Output The NMP-1000 network multimedia player is designed to play music, photos, and videos on the TV and/or the audio system. Connect the correct video and audio outputs from the NMP-1000 to the TV and/ or the audio amplifier. - Page 15 S-Video/ Composite: Connect the NMP-1000 to your TV by the S-Video (not included in the package) or Composite video cable (yellow). * The video and audio signals are carried through the same HDMI cable. No additional audio cable is required if you choose to use the HDMI interface.
-
Page 16: Audio
2.3.2 Audio Connect the NMP-1000 to the audio device by one of the following methods. S/PDIF (coaxial/ optical): Connect the NMP-1000 to the amplifier by the S/PDIF coaxial or optical cables (not included in the package). Note: If no sound is audible after connecting the optical or coaxial cable, please go to the Audio output setting of NMP-1000 and change the S/PDIF configuration. -
Page 17: Initialize The System
Initialize the System Make sure a new hard disk drive is installed on the NMP-1000 before you start to initialize the system. 1. Place the two Alkaline AAA batteries in the NMP-1000 remote control. 2. Use the remote control to turn on the NMP-1000. - Page 18 3. Select the correct signal input on your TV. (Make sure the TV input matches the video and audio input you have connected the NMP-1000 to your TV or amplifier.) Note: If you see a black screen on your TV, press the “TV out” key on the remote control of the NMP-1000.
- Page 19 After the hard drive is formatted, the home menu is shown. Go to “Settings”. Select the language and configure audio out, video out and other settings.
-
Page 20: Acquire The Digital Contents For Playback
Acquire the Digital Contents for Playback You can use the NMP-1000 to play the digital contents on the local hard drive (optional purchase) or from the local network. Select one of the following ways to acquire the digital contents for playback. - Page 21 3. Go to “Settings” > “Remote disk”. You can select “QNAP NAS” to search for all available QNAP NAS on the local network or “Auto search” to search for all the PC or NAS on the local network. For further information, see...
- Page 22 4. Select a remote disk number (1~6) and choose the network connection type (Microsoft Networking for Windows PCs or NFS for Linux PCs). For more information, see Section 5.4.
- Page 23 5. Enter the IP address/ host name of the PC or NAS. 6. Enter the network share name or path.
- Page 24 Tip: Press the “Options” key to switch to numeric or alphabetic (small or capital letters) input. 7. Enter the login name and the password. If no user name and password are required, you can leave the field blank; the default guest account will be used.
- Page 25 8. Select “Connect” and press “OK” to connect to the network share. 9. If the information entered is correct and your network connection is working properly, you will see the “Connection succeeded!” message. If you see the “Connection Failed!” message, please verify the information entered and make sure your network connection is working properly.
- Page 26 10. Play the digital contents from the network shares*. *The icon indicates that the remote disk is currently connected. If you see the icon in front of the remote disk name, when you press the right directional key to browse the contents, the system will automatically connect the remote disk for you if the remote disk is setup properly.
-
Page 27: Play From The Local Disk
Enter your NMP-1000 IP address as \\IP. b. Login the network shares on the NMP-1000 by samba (Windows or Mac) or NFS (Linux). (Default login name & password: admin/ admin) c. Copy the digital contents to the share folders of the NMP-1000. To create... - Page 28 d. Play the digital contents from the local disk.
-
Page 29: Other Connections
4.2.1 Use the external disk mode (to PC mode) a. Connect the NMP-1000 to your PC by the eSATA or USB 2.0 interface. The VFD shows “USB ON” on the front display. b. The PC recognizes the NMP-1000 as a USB mass storage device. Copy the digital contents to the NMP-1000. -
Page 30: Use The External Storage Mode (Usb 2.0 Host Mode)
If you have a hard drive installed on the NMP-1000, you can copy the media contents from the external storage into your local disk. See Section 8.3 for... -
Page 31: Nmp-1000 Settings Menu
NMP-1000 Settings Menu On the NMP-1000 settings menu, you can simply use the “Move up”/ “Move down” keys to select the settings you would like to change. Use the “Previous menu”/ “Next menu” keys to navigate and choose the option within the settings... -
Page 32: Video And Audio
5.1 Video and Audio You can configure Video, Audio and Display settings with respect to your home entertainment system. -
Page 33: Video Output
5.1.1 Video output The Video output section enables you to change your TV display settings. TV standard: Select NTSC or PAL. TV out: Select the type of video output you would like to use. TV format: Select the display resolution your TV uses. TV aspect ratio: Select the screen aspect ratio of your TV. -
Page 34: Audio Output
5.1.2 Audio output The Audio output section enables you to change your sound settings with respect to your TV or audio system. Please consult your audio system documentation or manufacturer for the correct audio features. -
Page 35: Display Settings
5.1.3 Display settings In the Display settings, you can configure the Brightness, Contrast, Saturation, and Hue values of your TV. For each option, you will see the following adjustment setup where you can see modification taking effect immediately. Simply use the Left, Right, and OK keys to make desired changes. -
Page 36: System Settings
5.2 System Settings In the System settings, you will see a list of system related features such as language, date and time, and system update. -
Page 37: Language
5.2.1 Language Select a desired language for the user interface. -
Page 38: Screen Saver
Select the screen save type that will be shown when the system is standby. Off: Turn off the screen saver. Logo: Display a floating QNAP logo. Clock: Display a floating clock. You can set the screen saver activation timer from 1, 2, 5, or 10 minutes. -
Page 39: Sleep Timer
5.2.3 Sleep timer This feature enables you to set the timer to shut down the NMP-1000. -
Page 40: Date/Time
5.2.4 Date/time You can change the date and time settings. Set date format: Select the date display format. Set date: Use the directional keys to adjust the date. Set time format: Select the hour display format. Set time: Use the directional keys to adjust the time. Show time: Select to show the date and time or not. -
Page 41: Power Button
5.2.5 Power button Customize the behavior of the power button of the NMP-1000. The “NAS mode” is to put the system into NAS behavior where no media player function will be available. The TV screen is shown blank in NAS mode. -
Page 42: System Update
5.2.6 System update You can check the system firmware version, update the system, restore the system settings to default, or reset the web login password. -
Page 43: Firmware Version
NMP-1000 or a connected USB storage device. Make sure there is at least 256MB of free space on the hard drive for the firmware file. Follow the on-screen instructions to update the system. -
Page 44: Parental Control
5.2.7 Parental Control The parental control option enables you to login and logout to manage media lock and ensure the locked contents are invisible to those who do not have access right to the data. - Page 45 You will be prompted to enter the parental control password. The default password is “111111”. Once you have entered the correct password, the status of parental control is shown as “Log in”. You can log out or change the password.
- Page 46 After you have logged in the parental control feature, you will see the “Lock” and “Unlock” items on the “Options” menu. You can lock the folder or files that you wish to be hidden from others who do not have access to parental control. Parental control can be changed from the “Settings”...
-
Page 47: Font Settings
To use your own font for system display, save the font file on the local disk of the NMP-1000 and select the font. Note: The NMP-1000 currently supports True Type Font (.ttf extension) and Open Type Font (.otf extension) font files. The font files must be saved on the internal... -
Page 48: Network
5.3 Network You can configure the network settings of the NMP-1000. You can choose to use Wired or Wireless network type. -
Page 49: Wired Network
5.3.1 Wired network The system uses dynamic IP (DHCP) by default. To use a static IP, select “Static IP”. - Page 50 Use the directional keys and number keys (0~9) on the remote control to configure the IP settings. Press “OK” to confirm the changes.
-
Page 51: Wireless Network
AP. The list of available AP will be displayed. For AP that required a network key, a lock icon will be displayed before the AP name. The NMP-1000 will prompt you to enter the network key when necessary. -
Page 52: Network Service Settings
5.3.3 Network service settings You can turn on or off the network services. The NFS server is turned off by default. After making the changes, press “Apply”. Note: The BT download service is turned on by default. When you have BT download running in the background, you will notice obvious stutter of media playback or slow response of UI navigation. -
Page 53: Remote Disk
5.4 Remote Disk The system supports up to 6 remote disk connections at the same time, including network share folders and USB storage devices. Each partition on the USB storage device is mounted as one remote disk connection. -
Page 54: Auto Search Of Qnap Nas
5.4.1 Auto search of QNAP NAS You can use this function to search for all the available QNAP NAS on the local network. - Page 55 A list of QNAP NAS will be shown. Select the server to connect to, enter the login information, and select the share folder to mount as a remote disk on the NMP-1000. Upon successful connection, you can play the multimedia contents...
-
Page 56: Auto Search For Remote Disk Setup
5.4.2 Auto search for remote disk setup The auto search can automatically search for PC or NAS with Microsoft networking connection. - Page 57 The auto search result will list the available computers or NAS.
- Page 58 Select a PC or NAS and then enter the user and password when prompted. With the proper authorization, a list of folder can be selected for setting up with remote disk connection.
- Page 59 Select a remote disk connection you would like set up with.
-
Page 60: Manual Remote Disk Setup
5.4.3 Manual remote disk setup The Microsoft networking is for Windows PCs connection where NFS is for Linux PCs connection. The only difference is that NFS does not require user/password information. See Section 4.1.1 for the example of setting up the remote disk. You can connect or disconnect each remote disk. -
Page 61: Preferences
5.5 Preferences You can customize the user interface and configure the media playback features. -
Page 62: Play Mode
5.5.1 Play mode Select the playing mode, shuffle, or repeat, for media playback. You can select to repeat the current file or repeat all. -
Page 63: File Categorization
Note: The index file of each storage device is stored on its own disk. The NMP-1000 does not store the index files of other storage devices on its local hard drive. Auto file categorization can be configured for local disk, USB storage device, and remote disks. - Page 64 Local disk Every time the device is powered on (the categorization process time will vary depending on the amount of new files added to the NMP-1000) USB storage device Every time when the USB device is connected to the NMP-1000...
- Page 65 You can also manually perform file categorization on the local disk, connected remote disks or connected USB storage devices. To remove the index, uncheck the option and apply the changes.
-
Page 66: Home Menu Style
5.5.3 Home menu style Select the background of the home menu. You can use the default background or play a slideshow of the photos or a video. -
Page 67: Video Menu
5.5.4 Video menu Select to display the categories generated from the file categorization for all your video files. Note: You must have performed file categorization before you can see the media categorization menu. -
Page 68: Music Menu
5.5.5 Music menu Select to display the categories generated from the file categorization for all your music files. Note: You must have performed file categorization before you can see the media categorization menu. -
Page 69: Photo View
5.5.6 Photo view Select to view the image files (photos) in list or thumbnail view. You can change the folder view from the “Options” menu when you are viewing the image files. -
Page 70: Slideshow Timer
5.5.7 Slideshow timer Define the number of seconds each image file (photo) is shown in a slideshow. -
Page 71: Subtitle
5.5.8 Subtitle Configure the subtitle properties and the frame rate. You can change the font size and the position of the subtitle. - Page 72 The frame rate setting is adjustable for frame rate based subtitle. It is useful when you encounter out of sync issue with different video frame rate settings.
-
Page 73: Youtube Location
5.5.9 YouTube Location Select the location content preference for YouTube. See Section 6.5 for more details. -
Page 74: Media Playback Of Nmp-1000
Media Playback of NMP-1000 When you are playing the media files, besides the standard playback features, such as fast forward, fast rewind, previous, next, play, and pause; you can press the “Options” key to bring out the option menu for additional features you can use. -
Page 75: Seeking Feature For Video And Music Playback
6.1.6 Seeking feature for video and music playback You can use the “Seek” feature to go to a specific time frame of the current playing video or music file. -
Page 76: Play Video Files
6.2 Play Video Files You can use various standard video playback features with the remote control, such as: Slow: Play the file at the speed of x1/2 or x1/4. Seek: Go to a specific time frame. Play/ Pause/ Stop: Play, pause or exit the current video file. Fast forward/ Fast rewind: Forward or rewind the file at the speed of x2, x4, x8, x16, and x32. -
Page 77: Play Audio Files
6.3 Play Audio Files You can use the remote control with the following options when playing an audio file. Seek: Go to a specific time frame. Play/Pause/Stop: Play, pause or stop the music file. Fast forward/Fast rewind: Forward or rewind at the speed of x2, and x4. Previous/Next: to go to the previous/next audio file. -
Page 78: Play Image Files
6.4 Play Image Files You can use the remote control for the following options when viewing the image files. Zoom: Zoom in; view the image file by x2, x4, or x8 Angle: Rotate the viewing angle by 90°, 180°, 270° Play/Pause/Stop: Play, pause or exit the slideshow Previous/Next: Go to the previous or next image file When you are viewing an image file, the following specific features are available in... -
Page 79: Play Online Media Contents
YouTube videos The NMP-1000 supports playing the videos on YouTube (www.youtube.com). To use this function, make sure the NMP-1000 is connected to the Internet. Select the location content preference in “Preferences” > “YouTube Location”. Go to “All media” or “Video” and select “YouTube”. - Page 80 Login YouTube Account If you have a YouTube account, it is recommended that you login your YouTube account before browsing and playing the videos. Go to “Log in/My account” from the YouTube menu on the NMP-1000. Enter the login information.
- Page 81 Upon successful login, you will be able to view your uploaded videos, favorites, and subscriptions on YouTube. You may select to save your YouTube login name and password on the NMP-1000.
- Page 82 Play videos from YouTube Use the remote control to select one of the following options and select a video. Press “OK” to play the video. Featured: View the featured videos of your YouTube location. Most viewed: View the most viewed videos of your YouTube location. Most recent: View the most recent videos of your YouTube location.
- Page 83 When playing a video, press “Options” and you will be able to select the following features. Add to favorites: Add the video to the favorites. Save to disk: Save the video to the internal hard disk drive. The downloaded video files can be located in \\NMP IP\Download\YouTube. Show more from this user: View the video files uploaded by this YouTube user.
- Page 84 You can select other options from the YouTube menu. History: This page records the YouTube videos you have previously viewed on the NMP-1000. Search: Search the videos on YouTube. Downloaded files: View the videos downloaded from YouTube.
-
Page 85: Apple Movie Trailers
6.5.2 Apple movie trailers The NMP-1000 supports playing the latest Apple movie trailers. Go to “All media” or “Video” and select “Apple movie trailers”. - Page 86 Select the movie trailer to play or highlight a movie trailer and press “Options”. You can select to save the trailer to the internal hard disk drive or view the information of the trailer. The downloaded trailers can be located in \\NMP IP\Download\Trailers.
-
Page 87: Shoutcast
6.5.3 SHOUTcast The NMP-1000 provides quick access to worldwide popular radio stations from SHOUTcast for you to play them on your audio system. Go to “All media” or “Music” and select “SHOUTcast”. - Page 88 Browse the radio channels from SHOUTcast. Press “OK” to play the channel or press “Options” to add the radio channel to the favorites.
-
Page 89: Internet Radio Site
6.5.4 Internet radio site You can input your favorite Internet radio channels to the NMP-1000. Go to “All media” or “Music” and select “Internet radio site”. Select “Add Internet radio site URL” and enter the URL of the Internet radio site. -
Page 90: Flickr
6.5.5 Flickr The NMP-1000 allows you to access your Flickr photos shared by your friends and family. Go to “All media” or “Photos” and select “Flickr”. - Page 91 Select “Add Flickr contact” and enter the Flickr contact name.
- Page 92 After adding a Flickr contact, press “OK” to view the shared albums/ photos, favorites, and contacts of the user. You can also select to remove the user from the Flickr contact list on the NMP-1000.
- Page 93 When viewing an album or photos from Flickr, press “Options” for the following features: Play mode: Select “Repeat” or “Shuffle” mode. Slideshow timer: Select to the number of seconds each photo will be shown in a slideshow. Save to disk: Save the Flickr photo to \\NMP IP\Download\Flickr. Information: View the information of the Flickr photo.
-
Page 94: Upnp
6.5.6 UPnP The NMP-1000 supports UPnP/ DLNA supported storage devices for online media playing over the local network. To use this function, go to “All media” and select “UPnP. - Page 95 The NMP-1000 searches for all the UPnP/ DLNA supported storage devices automatically. Select a device to connect to and browse the multimedia contents for playback.
-
Page 96: Weather
6.6 Weather You can connect the NMP-1000 to the Internet and view the real-time weather information and the weather forecast of your location. To use this function, go to the home menu, select “Network” > “Weather”. Select your location and go to... -
Page 97: Bittorrent Download
> “Add new task”. Select where the torrent file is located, the local disk or the remote disk. If you select the local disk, remember to copy the torrent file to the NMP-1000. Highlight the torrent file and press “OK”. You can check the download status on the “Run list”. -
Page 98: Qget Download Software
7.3 QGet Download Software QNAP provides an exclusive download utility QGet for remote management of the download tasks on the NMP-1000. 1. To use QGet, download the utility from the product CD-ROM. 2. After successful installation, use the “Add Server” function to add the NMP-1000. - Page 99 4. When the management screen is shown, you can use QGet to manage the download tasks.
-
Page 100: Extra Features In Different Media Modes
Extra Features in Different Media Modes This section covers specific features that are available in different media modes. 8.1 DVD Playback When you are playing a DVD file, you can use the Audio/ Menu/ Subtitle/ Title keys to use the standard DVD navigation feature. 8.2 Page up/ down in File List Browsing When you are browsing a long list of media files, instead of keep pressing the Move up/ Move down keys, you can use the Previous menu/ Next menu keys to... -
Page 101: Folder Copy, File Copy And Deletion
8.3 Folder Copy, File Copy and Deletion You can copy a folder or file by highlighting the folder or file and using the “Options” key. Once you have copied a folder or file, you will see the “Paste” item on the “Options” menu. Simply go to a desired folder to paste the copied folder or file. -
Page 102: Now Playing
8.4 Now Playing When you are playing a music file or have paused a video and return the Home menu, an option “Now Playing” will appear on the menu and the playback status will be shown at the bottom of the screen. Select “Now Playing” to return to the media playback screen. -
Page 103: Nas Mode
Linux OS, and other features such as FTP server, BT download, users and user group management, and network share management. 1. To use the NAS features of the NMP-1000, open a web browser (IE or Firefox) and enter the server IP. -
Page 104: Quick Configuration
9.1 Quick Configuration You can configure the NMP-1000 in the Quick Configuration. Step 1. Enter the server name. Step 2. Change the administrator password or select to use the original password. - Page 105 Step 3. Enter the date, time and select the time zone for the server. Step 4. Select the filename encoding. Step 5. Enter the IP address, subnet mask and default gateway for the server.
- Page 106 Step 6. Select to initialize the hard disk or not. If your hard disk has been formatted, select not to initialize the hard disk. Step 7. The basic system settings are shown. Click “Finish” to begin the system installation. After the system is initialized, click “Close” to exit.
-
Page 107: System Settings
Settings. 9.2.1 Server Name Enter the server name of the NMP-1000. The server name supports maximum 14 characters, which can be a combination of alphabets, numbers, and hyphen (-). The server does not accept spaces, period (.), or other symbols. -
Page 108: Filename Encoding
9.2.3 Filename Encoding Select the language the NMP-1000 uses to display files and directories. 9.2.4 View System Settings You can view all current system settings on this page. -
Page 109: Network Settings
9.3 Network Settings 9.3.1 TCP/ IP Configuration You can configure the IP address of the NMP-1000 when using wired network connection. When using wireless network connection, this feature is disabled. The NMP-1000 uses DHCP by default. 9.3.2 Microsoft Networking If you are using Windows OS, enable this service to allow access to the network... -
Page 110: Apple Networking
NMP-1000. If you do not want to assign a network zone, enter an asterisk (*) to use the default setting. This setting is disabled by default. -
Page 111: Ftp Service
9.3.6 FTP Service The NMP-1000 supports FTP service. You can define the port number for the service and maximum number of users connected to the FTP at the same time. Unicode Support Select to enable or disable Unicode Support. The default setting is No. -
Page 112: Download Station
Users are subject to the restrictions of the copyright laws and should accept all the consequences. Open a web browser and enter http://NMP-1000 IP/Qdownload or click “Download Station” on the login page of the NMP-1000 to access the Download Station. - Page 113 Internet. There are websites that provide legally sharing torrents e.g. www.legaltorrents.com. Download the torrent files to your local disk and then upload them to the NMP-1000. 2. After uploading a download task, the task appears on View Run List.
- Page 114 3. Click “Set Config” and enter the maximum number of tasks you want to download at the same time (Default number: 3). Enter the maximum download rate (0 means unlimited). Enter the maximum upload rate (0 means unlimited). Check UPnP NAT port forwarding to enable automatically port forwarding on UPnP supported gateway (default is not checked).
- Page 115 You can select to remove the download task only and retain the downloaded files, or remove the task and downloaded files. 6. To logout Download Station, click on the top right hand corner. 7. The downloaded files are saved in the network share “Download” of the NMP-1000.
- Page 116 Dump Diagnostic Information To view the diagnostic details of a download task, select a task on the list and click “Dump Diagnostic Information”.
- Page 117 3. Set the maximum number of simultaneous downloads as 3-5 for the best download rate. 4. The NMP-1000 is located behind NAT router. The port settings have led to slow BT download rate or no response. You may try the following means to solve the problem: a.
-
Page 118: Ddns Service
DDNS Service You can enable this option to allow access to the server by a domain name. Before using the DDNS service, please register a host name for the NMP-1000 from the DDNS provider*. The NMP-1000 supports the DDNS providers: members.dyndns.org, update.ods.org, members.dhs.org, www.dyns.cx,... -
Page 119: View Network Settings
9.3.10 View Network Settings This page shows the current network settings and status of the NMP-1000. -
Page 120: Device Configuration
This page shows the model, size and current status of the hard drive installed on the NMP-1000. You can format the hard disk on this page. When the hard drive is formatted, the NMP-1000 creates the following default share folders:... -
Page 121: User Management
9.5 User Management You can create multiple users and user groups on the NMP-1000 for file sharing. 9.5.1 Users The following users are created by default: admin This is the administrator account which has full system access right. This account cannot be deleted. - Page 122 User name The user name should be less than 32 characters. It is case-insensitive and supports double-byte characters, such as Chinese, Japanese, and Korean. The user name cannot contain the following characters " / \ [ ] : ; | = , + * ? < > ` ' or begin with - # @ Password The password is case-sensitive and can be 16 characters long at maximum.
-
Page 123: User Groups
User Groups The user group is a collection of users with the same access right to the network shares. The NMP-1000 has created the following user groups by default: administrators All members in this group have administration right. You cannot delete this group. -
Page 124: Network Share Management
9.6.1 Create Up to 128 network shares can be created on the NMP-1000 (including the default network shares). To create a network share, enter the following information: Network share name The length of the network share name cannot exceed 32 single-byte... -
Page 126: Property
9.6.2 Property To edit the property of an existing network share, select a share and click “Property”. You can then edit the content of that share. -
Page 127: Access Control
9.6.3 Access Control When a network share is created, you can assign different access rights to the users or user groups: Deny access The access to the network share will be denied. Read only The users can only read the files and folders on the network share. Full access The users can read, write, create, or delete the files and folders on the network share. -
Page 128: Delete
9.6.4 Delete Select a share and click “Delete”. Click “OK” to confirm. 9.6.5 NFS Access Control You can set the NFS access right of the network share. The access is denied by default. -
Page 129: System Tools
Click “Restart” to restart the server or “Shutdown” to turn off the server. 9.7.2 Hardware Settings You can enable hard disk standby mode on the NMP-1000. If there is no access to the hard drive within the specified period of time, the hard drive will enter standby mode. -
Page 130: System Update
Before updating system firmware, please make sure the product model and firmware version are correct. Follow the steps below to update firmware: Step 1: Download the release notes of the new firmware from QNAP website http://www.qnap.com. Read the release notes carefully to make sure you need to upgrade the firmware. -
Page 131: Back Up/ Restore Settings
9.7.4 Back up/ Restore Settings • To back up all the settings, including the user accounts, server name and network configuration etc., click “Backup” and save the setting file. • To restore all the settings, click “Browse” to select a previously saved setting file and click “Restore”. -
Page 132: Remote Login (Telnet Connection)
9.7.6 Remote Login (Telnet Connection) Enable this option to allow access to the server by Telnet. Make sure you have opened the port on your router or firewall when using this function. -
Page 133: System Logs
9.8 System Logs 9.8.1 System Event Logs The NMP-1000 can store 10,000 recent event logs, including warning, error, and information messages. In case of system malfunction, you can refer to the event logs to analyze the errors. 9.8.2 System Information... -
Page 134: Web File Manager
10. Web File Manager To manage the data on the NMP-1000 by the web-based Web File Manager, launch the web browser and go to the NMP-1000 administration page. Click “Web File Manager” and enter the correct login name and password. You can login as “guest”... - Page 135 Select a network share. You can upload, rename, or delete files and folders in the network shares. View files online Click a file displayed on the web page. The information of the file is shown. If your browser does not support the file format, a download window pops up automatically.
- Page 136 Move/copy files or folders Select the files or folders to move or copy. On the tool bar, click (Move/Copy). iii. You can select the destination folder to which the selected files or folders are moved or copied. Delete file or folder Select a file or folder to delete.
-
Page 137: Other Software Utilities
11. Other Software Utilities 11.1 QNAP Finder The QNAP Finder is a utility provided for you to search for all available NMP-1000 devices on the local network and map the shares as network drives. You can install the Finder from the CD-ROM. - Page 138 If you are using Windows XP SP2, unblock the utility the first time you run it. Double click the NMP-1000 name on the list to connect the device by your default web browser. Note that the NMP-1000 must be connected to the network.
- Page 139 You can choose to map the shares of the NMP-1000 as your network drives on Windows OS from the “Tools” menu.
-
Page 140: Netbak Replicator
NetBak Replicator is a powerful program installed on user’s system (Windows® OS only) for data backup. You can back up any files or folders on local PC to specified share folder on the NMP-1000 by LAN or WAN. Main Functions 1. - Page 141 Install NetBak Replicator 1. Run the NMP-1000 CD-ROM. Select “Install NetBak Replicator”. 2. Follow the steps to install NetBak Replicator. 3. Upon successful installation, a shortcut icon will be shown on the Desktop. Double click the icon to run NetBak Replicator.
- Page 142 2. Run NetBak Replicator. Click . All the NMP-1000 servers and their share folders within the network will be displayed. Note that you must turn off QNAP Finder when you are using NetBak Replicator in order to search for the NMP-1000 successfully.
- Page 143 3. When the following window appears, all the NMP-1000 on the LAN will appear on the left list. Select a server and a share folder on the right. NetBak Replicator also supports backup via WAN, you can enter the IP address of the NMP-1000 for data backup directly and select a share folder.
- Page 144 Select All: Select all items in the window. Clear All: Clear selection. Select My Document: Select all folders in My Document. Open NMP-1000 Backup Folder: This button allows users to find out where the files were backed up, and check or manage the archived files manually.
- Page 145 • Backup Select the files and folders for backup.
- Page 146 Start When you have selected the files for backup to the NMP-1000, click “Start”. The program will start to copy the selected files to the specified share folder on the NMP-1000.
- Page 147 File Filter Click “File Filter” on NetBak Replicator main page to select file format to be skipped from backup. Then click “OK”.
- Page 148 Schedule Click “Schedule” on NetBak Replicator main page. Then check the box “Enable Backup Schedule” and select the frequency and time for backup. Click “OK” to confirm.
- Page 149 Monitor Select a folder for monitoring. When this option is enabled, the system will upload all files or folders to the server instantly for backup when the files or folders are modified. Other files will be gray and cannot be selected.
- Page 150 Initialize Configuration When using this function, NetBak Replicator will record all current settings of the user, including whether or not monitor function is enabled. When the user login again, this program will load the previous recorded settings for users to manage data backup.
- Page 151 • Restore Please follow the steps below to restore files from the NMP-1000 to your a. Restore to original position: Select the location that the data will be restored to. b. Select new restore position: Click to select the directory to restore data to or select a previously chosen location from the drop-down menu.
- Page 152 d. Option: Select recovery option and error option. If the restoring file existed, NetBak Replicator will: Overwrite all the files Ask first Skip this file If an error happens in the process of file restoring, NetBak Replicator will: Stop the restoring Ask first Ignore this error message...
- Page 153 • Log a. Save As…: To save all logs on NetBak Replicator, click this button. All logs will be saved as text file. b. Clear All: Click this button to clear all logs. c. Option: Select the type of logs to be recorded “Record all logs”...
-
Page 154: System Maintenance
(1) The NMP-1000 can be recognized as a USB mass storage device when connected to the PC with external disk mode by the eSATA or USB 2.0 interface. (2) The internal hard drive of the NMP-1000 must have at least 256MB of free spaces for saving the firmware file for system update. - Page 155 Place the latest NMP-1000 firmware in the “qnapfw” folder. Safely remove and disconnect the device from the PC. Make sure you have the power supply connected to the NMP-1000 and the device is powered off. On the front panel of the device, press and hold the “Option” button and press the “Power”...
-
Page 156: Hardware Reset
12.2 Hardware Reset If your NMP-1000 does not respond for any reasons, you can try to reset the hardware. To do this, press and hold the “Power” button on the front panel for more than 6 seconds. The device will reset itself and power off. You can then power on the device and have the player working properly again. -
Page 157: Technical Support
Technical Support QNAP provides dedicated online support and customer service via instant messenger. You can contact us by the following means: Online Support: http://www.qnap.com/ MSN: q.support@hotmail.com Skype: qnapskype Forum: http://forum.qnap.com/ Technical Support in the USA and Canada: Email: q_supportus@qnap.com TEL: 909-595-2819 ext. 110... -
Page 158: Gnu General Public License
GNU GENERAL PUBLIC LICENSE Version 3, 29 June 2007 Copyright © 2007 Free Software Foundation, Inc. <http://fsf.org/> Everyone is permitted to copy and distribute verbatim copies of this license document, but changing it is not allowed. Preamble The GNU General Public License is a free, copyleft license for software and other kinds of works. - Page 159 Developers that use the GNU GPL protect your rights with two steps: (1) assert copyright on the software, and (2) offer you this License giving you legal permission to copy, distribute and/or modify it. For the developers' and authors' protection, the GPL clearly explains that there is no warranty for this free software.
- Page 160 To “modify” a work means to copy from or adapt all or part of the work in a fashion requiring copyright permission, other than the making of an exact copy. The resulting work is called a “modified version” of the earlier work or a work “based on”...
- Page 161 enable use of the work with that Major Component, or to implement a Standard Interface for which an implementation is available to the public in source code form. A “Major Component”, in this context, means a major essential component (kernel, window system, and so on) of the specific operating system (if any) on which the executable work runs, or a compiler used to produce the work, or an object code interpreter used to run it.
- Page 162 control, on terms that prohibit them from making any copies of your copyrighted material outside their relationship with you. Conveying under any other circumstances is permitted solely under the conditions stated below. Sublicensing is not allowed; section 10 makes it unnecessary. 3.
- Page 163 License and any conditions added under section 7. This requirement modifies the requirement in section 4 to “keep intact all notices”. c) You must license the entire work, as a whole, under this License to anyone who comes into possession of a copy. This License will therefore apply, along with any applicable section 7 additional terms, to the whole of the work, and all its parts, regardless of how they are packaged.
- Page 164 and noncommercially, and only if you received the object code with such an offer, in accord with subsection 6b. d) Convey the object code by offering access from a designated place (gratis or for a charge), and offer equivalent access to the Corresponding Source in the same way through the same place at no further charge.
- Page 165 If you convey an object code work under this section in, or with, or specifically for use in, a User Product, and the conveying occurs as part of a transaction in which the right of possession and use of the User Product is transferred to the recipient in perpetuity or for a fixed term (regardless of how the transaction is characterized), the Corresponding Source conveyed under this section must be accompanied by the Installation Information.
- Page 166 covered work, you may (if authorized by the copyright holders of that material) supplement the terms of this License with terms: a) Disclaiming warranty or limiting liability differently from the terms of sections 15 and 16 of this License; or b) Requiring preservation of specified reasonable legal notices or author attributions in that material or in the Appropriate Legal Notices displayed by works containing it;...
- Page 167 under this License. Any attempt otherwise to propagate or modify it is void, and will automatically terminate your rights under this License (including any patent licenses granted under the third paragraph of section 11). However, if you cease all violation of this License, then your license from a particular copyright holder is reinstated (a) provisionally, unless and until the copyright holder explicitly and finally terminates your license, and (b) permanently, if the copyright holder fails to notify you of the violation by some reasonable...
- Page 168 substantially all assets of one, or subdividing an organization, or merging organizations. If propagation of a covered work results from an entity transaction, each party to that transaction who receives a copy of the work also receives whatever licenses to the work the party's predecessor in interest had or could give under the previous paragraph, plus a right to possession of the Corresponding Source of the work from the predecessor in interest, if the predecessor has it or can get it with reasonable efforts.
- Page 169 If you convey a covered work, knowingly relying on a patent license, and the Corresponding Source of the work is not available for anyone to copy, free of charge and under the terms of this License, through a publicly available network server or other readily accessible means, then you must either (1) cause the Corresponding Source to be so available, or (2) arrange to deprive yourself of the benefit of the patent license for this particular work, or (3) arrange, in a manner...
- Page 170 If conditions are imposed on you (whether by court order, agreement or otherwise) that contradict the conditions of this License, they do not excuse you from the conditions of this License. If you cannot convey a covered work so as to satisfy simultaneously your obligations under this License and any other pertinent obligations, then as a consequence you may not convey it at all.
- Page 171 no additional obligations are imposed on any author or copyright holder as a result of your choosing to follow a later version. 15. Disclaimer of Warranty. THERE IS NO WARRANTY FOR THE PROGRAM, TO THE EXTENT PERMITTED BY APPLICABLE LAW. EXCEPT WHEN OTHERWISE STATED IN WRITING THE COPYRIGHT HOLDERS AND/OR OTHER PARTIES PROVIDE THE PROGRAM “AS IS”...
Need help?
Do you have a question about the NMP-1000 and is the answer not in the manual?
Questions and answers