Table of Contents
Advertisement
Advertisement
Table of Contents

Related Manuals for Phase Linear UV8


Summary of Contents for Phase Linear UV8
- Page 1 Instruction Manual...
-
Page 3: Table Of Contents
Thank you for choosing a Phase Linear product. We hope you will find the instructions in this owner’s manual clear and easy to follow. If you take a few minutes to look through it, you’ll learn how to use all the features of your new Phase Linear UV8 Mobile Multimedia Receiver for maximum enjoyment. -
Page 5: Preparation
To prevent a short circuit, be sure to turn off the ignition and remove the negative (-) battery cable prior to installation. NOTE: If the UV8 is to be installed in a car equipped with an on-board drive or navigation computer, do not disconnect the battery cable. -
Page 6: Installation
NOTE: When replacing a fuse, be sure to use correct type and amperage to avoid damaging the radio. The UV8 uses one 10 amp mini-ATM fuse, located in the black filter box in-line with the main wire harness. Final Installation After completing the wiring connections, turn the unit on to confirm operation (ignition switch must be on). -
Page 7: Wiring Diagram
WIRING DIAGRAM External Power Amplifier Antenna Jack Antenna Car Phone FRONT L+ FRONT L- FRONT R+ FRONT R- REAR R+ REAR R- REAR L+ REAR L- BLUE SUB.W FRONT R WHITE FRONT L REAR R WHITE REAR L Harness Cord Auto antenna control (connect to antenna control lead &... -
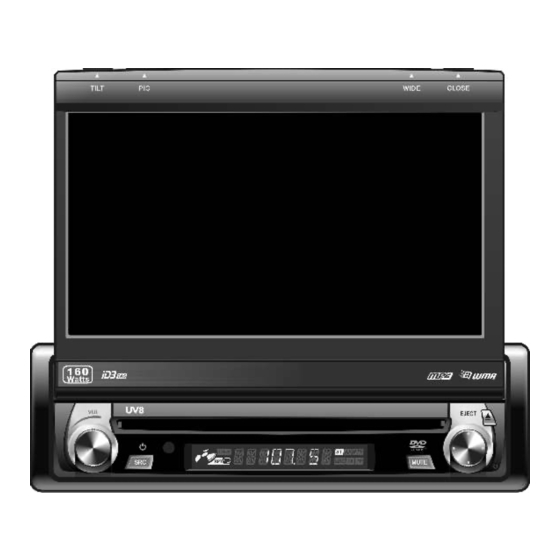
Page 8: Controls And Indicators
7. LCD Display 8. MUTE Press to silence the receiver. Press again to resume previous volume level. NOTE: The UV8 features Softmute, which will allow the volume to increase or decrease gradually when the MUTE function is activated or deactivated. TILT... - Page 9 CONTROLS AND INDICATORS 9. IR Remote Control Receiver 10. ( DVD Mode: Press once to play back the previous chapter/ track. TUNER Mode: Press once to auto-search for the previous available radio station. MENU Mode: Press once to move the cursor to the left. 11.
-
Page 10: Remote Control
REMOTE CONTROL Table 1: Remote Control Functions Button Name Ref# MENU Enters the main menu of Turns on/off PBC when the disc playing VCD TITLE Enters the title menu of the Plays first ten seconds of disc each chapter/title MUTE Toggles on/off audio output Toggles on/off audio output Turns the power on/off... - Page 11 Table 1: Remote Control Functions Button Name Ref# EJECT Ejects disc Ejects disc Decreases monitor tilt Decreases monitor tilt angle angle Increases monitor tilt angle Increases monitor tilt angle DISP Selects display mode: Selects display mode: FULL or NORMAL FULL or NORMAL 1, 2, 3, 4, 5, Directly accesses chapter 6, 7, 8, 9, 0...
-
Page 12: Using The Tft Monitor
USING THE TFT MONITOR Open/Close TFT Monitor Open TFT Monitor Press the OPEN button (1) on the front panel or press the ) button (31) on the remote control to activate the mechanism that moves the display panel into the viewing position. - Page 13 Table 3: Monitor Protective Measures Self OPEN Button Power Obstruction Protection Pressed Reconnected Monitor Unit stops at Monitor Monitor swiv- loading out obstruction swivels back els back to vertically point to the unit the unit Monitor Unit stops at Monitor Monitor swiv- loading in obstruction...
-
Page 14: Operating Instructions
OPERATING INSTRUCTIONS Power On / Off Press the /SRC button (6) on the unit (or the button (4) on the remote control) to turn the unit on. The buttons on the front of the unit light up and the current mode status appears in the LCD (7). -
Page 15: Setup Menu
SETUP MENU To access system settings, press the SETUP button (29) on the remote control or touch the button on the screen to enter the “SETUP” menu. The “GENERAL” sub-menu appears highlighted in blue. SETUP MENU General Language Audio BACK Rating Clock Mode 12Hr... -
Page 16: Exiting The System Setup Menu
Setting Options Function Sub.W Subwoofer output IN phase Phase Subwoofer output OUT OF phase NOTE: Depending on your installation, reversing the sub- woofer phase may increase Bass output. Sub Filter 80Hz Selecting a crossover fre- quency sets a cut-off frequency 100Hz of the subwoofer's LPF (low- pass filter). -
Page 17: Tuner Operation
TUNER OPERATION Tuner TFT Display FM-1 P1 87.5 MHz 01:02 PM RADIO 87.5 90.1 98.1 106.1 107.9 102.9 BAND Current radio band indicator Radio frequency indicator Clock Stereo broadcasting indicator Strong Local signal broadcasting indicator Preset radio stations: Touch to recall preset stations Information about the current function Touch for quick access to Equalizer level settings Touch to access the direct entry screen... -
Page 18: Local Radio Station Seeking (Loc)
Recalling a Station Select a band (if needed). Touch an on-screen preset button (6) to select the corresponding stored station. 87.5 90.1 98.1 106.1 107.9 102.9 Auto Store (AS) To select six strong stations and store them in the current band: Select a band (if needed). -
Page 19: Dvd/Vcd Video Operation
DVD/VCD VIDEO OPERATION NOTE: When properly installed, DVD video cannot be displayed on the main TFT screen unless the parking brake is applied. If you attempt to play a DVD while the vehicle is moving, the TFT screen displays “PARKING” with a blue background. -
Page 20: Playback Information
• For DVD mode, you can choose Time or Title/ Chapter search. DVD Search Time – Go to specific time in current title Title/Chapter – Go to specific time in a chapter • For VCD mode, press the GOTO button to choose between Track Search, Disc Search and Exit. -
Page 21: General Disc Information
General Disc Information Table 5: Disc Properties Max Play Symbol 12cm Disc Properties Time Single side single layer (MPEG 2 (DVD-5) Method) Single side double layer 133 minutes (DVD-9) 242 minutes Double side single layer 266 minutes (DVD-10) 484 minutes Double side double layer (DVD-18) Single side single layer... -
Page 22: Dvd/Cd Audio Operation
Instructions for TFT control and Insert/Eject are the same for DVD and CD operation. Please see the DVD/Disc Video Operation section for information about these topics. The UV8 will play music or other audio files from the following disc media: •... -
Page 23: Mp3/Wma Operation
Folder Search, File Search or Folder Select, as shown below. The UV8 player will only recognize three folder levels and does not display folders containing only other folders. In the example above, the unit will display folders 3, 4, 6, and 8, but not 2 and 7 since they do not contain any tracks directly. -
Page 24: Controlling Playback
Controlling Playback Playing MP3/WMA Files After inserting a MP3/WMA disc, files will play in the sequence of the “Root’ directory. NOTE: When burning MP3 / WMA files onto a DVD disc, use the 2X or 4X burning option, if available. This slower burning speed will help eliminate buffer errors and increase disc reading reliability. -
Page 25: Troubleshooting
TROUBLESHOOTING Problem GENERAL Unit will not power on Radio Fuse blown Car battery fuse blown Illegal operation Remote control does not function Battery depleted Battery installed incorrectly No/low audio output Improper audio output connection Volume set too low Improper “MUTE” connection Speakers damaged Heavily biased volume balance Speaker wiring is in contact with metal part of car Insulate all speaker wiring connections... -
Page 26: Care And Maintenance
Problem Disc does not play back Disc is warped or scratched Disc is dirty or wet Laser pickup is dirty Incompatible disc is used Disc rating exceeds Parental Lock rating limit Disc region code is not compatible with unit Disc is inserted upside down PBC cannot be used during VCD playback PCB is not available on the disc No repeat or searching while playing VCD... -
Page 27: Specifications
SPECIFICATIONS DVD/CD Player Compatible Disc Media: DVD + R / RW (Single and Dual Layer) and CD-R / RW Compatible Media Formats: CD-DA, MP3, WMA, VCD, SVCD, DivX, Xvid, AVI, MPEG1 / 2 Signal to Noise Ratio: >95dBA Dynamic Range: >95dB Frequency Response: 20Hz to 20 kHz, -3dB Channel Separation: >... -
Page 29: Limited Warranty
Limited Warranty CD or Multimedia Radios/Headunits Audiovox Electronics Corporation (“the Company”) is committed to quality and customer service, and are pleased to offer you this Warranty. Please read it thoroughly and contact the Company at 1-800- 323-4815 with any questions. Who is covered? The Company extends this warranty to the original retail purchaser of products purchased through an authorized Audiovox retailer in the U.S.A., Puerto Rico or... - Page 30 Audiovox Electronics Corporation Hauppauge, NY 11788 Technical Assistance: 1-800-323-4815 www.audiovox.com © 2007 Audiovox Ver. 041107 Printed in China...
Need help?
Do you have a question about the UV8 and is the answer not in the manual?
Questions and answers