
Related Manuals for Everlast ev-700


Summary of Contents for Everlast ev-700
-
Page 1: Home Gym
HOME GYM CAUTION BEFORE USING THIS EQUIPMENT, CAREFULLY FOLLOW THE INSTRUCTIONS AND READ ALL PRECAUTIONS, THEN RETAIN FOR FUTURE REFERENCE. EN-957 COMPLIES WITH MAXIMUM USER’S WEIGHT LOAD :110 KG... -
Page 3: Table Of Contents
INDEX SAFETY INFORMATION P.04 BEFORE YOU BEGIN P.05 PARTS LIST DRAWINGS P.06 ASSEMBLY INSTRUCTIONS P.08 WARM-UP AND COOL-DOWN WORKOUT GUIDELINES P.17 TRAINING INSTRUCTIONS P.18 EXERCISE PROGRAM P.19 EXPLODED DRAWING P.22 PARTS LIST P.23... -
Page 4: Safety Information
SAFETY INFORMATION WARNING To reduce the risk of serious injury, read the following safety instructions before using the EVERLAST HOME GYM. IMPORTANT: THIS UNIT IS INTENDED FOR HOME USE ONLY Read all the instructions in this manual before using the product. Keep this manual for the entire life of the product. -
Page 5: Before You Begin
BEFORE YOU BEGIN Thank you for choosing the EVERLAST HOME GYM. We take great pride in producing this quality product and hope it will provide many hours of quality exercise to make you feel better, look better and enjoy life to the full. -
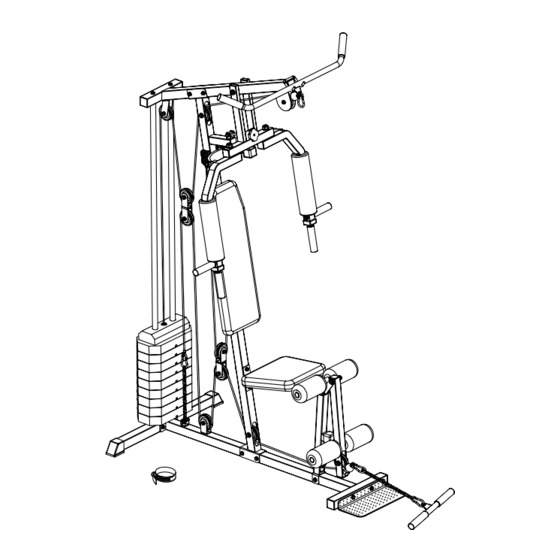
Page 6: Parts List Drawings
PARTS LIST DRAWINGS 45 Outside-End Cap HELP LINE NUMBER: 08456 400800 -700... - Page 7 PARTS LIST DRAWINGS Nylock Nut M12 3pcs Nylock Nut M10 Nylock Nut M8 28pcs 2pcs NOTE : Please check all parts are present prior to commencing assembly. HELP LINE NUMBER: 08456 400800 -700...
-
Page 8: Assembly Instructions
ASSEMBLY INSTRUCTIONS Carefully unpack each component, checking against the parts fist that you have all the necessary parts to complete the assembly of your product. Please note that as part of our production checking and for your convenience, all nut, cap, where necessary, have been fitted in the pre-packing stage. - Page 9 ASSEMBLY INSTRUCTIONS Stage B No. Description Q'ty 1. Slide 9 x Weight Plates (22) down Weight Guide Tube (6). 2. Attach the Selector Shaft Bush (25) onto the top hole of the Selector Weight Selector Pin Shaft (07) using Selector Shaft Pin (24). Slide the Top Weight Plate (23) onto the Weight Guide Tubes (06) and locate the Selector Shaft (07) in position, setting the Top Selector Shaft Pin...
- Page 10 ASSEMBLY INSTRUCTIONS Stage C 1. Lay the Upper Cross Beam (09) onto the Main Frame (03) and connect them using 2 x M10 x 65mm Hex Bolts (56), 4 x M10 Washers (63) and 2 x M10 Nylock Nuts (66). 2.
- Page 11 ASSEMBLY INSTRUCTIONS Stage D No. Description Q'ty 1. Connect the Press Bar (16) to the Upper Cross Beam (09) using M12 x 120mm Hex Bolt (59). 2 x M12 Washers (62), and M12 Nylock Nuts (65). 2. Connect the Press Arm (L) (11) and Press Arm (R) (10) to Hex Bolt (M10 x 120mm) the Press Bar (16) using 2 x M12 Washers (62) and 2 x M12 Nylock Nuts (65).
- Page 12 ASSEMBLY INSTRUCTIONS Stage E No. Description Q'ty 1. Fit the Back Cushion (21) to the Main Frame (03) using 2 x M8 x 65mm Hex Bolts (60) and 2 x M8 Washers (64). 2. Connect the Front Support Frame (04) to the Front Base Frame (01) using M10 x 65 Hex Bolt (56), 2 x M10 Washers (63) and M10 Hex Bolt Nylock Nut (66).
- Page 13 ASSEMBLY INSTRUCTIONS Stage F 1. Start With The Upper Cable 23 70mm (52) a) With Upper Cable (52) in groove of Pulley (31), thread Upper Cable (52) through brackets on Upper Cross Beam (9). b) Install Pulley NO.1 (31) to Upper Cross Beam (9) using one M10 x 45mm Hex Bolt (58), two M10 Washers (63) and one M10 Nylock Nut (66).
- Page 14 ASSEMBLY INSTRUCTIONS Description Q'ty Description Q'ty Chain Hex Bolt (M10 x 65mm) Pothook Hex Bolt (M10 x 45mm) Washer (M10) Pulley Fastness Bush (Big) Pulley Fastness Bush (Small) Nylock Nut (M10) Hex Bolt (M8 x 40mm) Reverse U Washer (M8) Pulley Nylock Nut (M8) Pulley U...
- Page 15 ASSEMBLY INSTRUCTIONS Recheck all bolts and nuts are tightened securely before using this equipment HELP LINE NUMBER: 08456 400800 -700...
- Page 16 ASSEMBLY INSTRUCTIONS NOTE: IF YOU FIND THAT THE CABLES ARE NOT LONG ENOUGH, USE THE CHAIN AS AN EXTENSION WITH POTHHOOK AS CONNECTORS. SAFETY NOTICE: When your gym is not in use. It’s important insert the Weight Selector Pin (26) into the weld loop on the back of the Back Base Frame (2) which will lock the Selector Shaft (07) to lock all Weight Plates (22) firmly in the down position.
-
Page 17: Warm-Up And Cool-Down Workout Guidelines
WARM-UP AND COOL-DOWN WORKOUT GUIDELINES Each workout should include the following three parts: • A warm-up, consisting of 5 to 10 minutes of stretching and light exercise. A proper warm-up increases your body temperature, heart rate, and circulation in preparation for exercise.Training zone exercise, consisting of 20 to 30 minutes of exercising with your heart rate in your training zone. -
Page 18: Training Instructions
TRAINING INSTRUCTIONS AEROBIC EXERCISE Aerobic exercise is any sustained activity that sends oxygen to your muscles via your head and lungs. Aerobic exercise improves the fitness of your lungs and heart - your body’s most important muscle. Aerobic exercise fitness is promoted by any activity that uses your large muscles (arms, legs, or buttock, for example).Your heart beats quickly and you breathe deeply An aerobic exercise should be part of your entire exercise routine. -
Page 19: Exercise Program
EXERCISE PROGRAM 1. Bench press Bench press release lock lever, fit roll pads to top. Hole for leg room if required from the seated position grip handles and push forward with elbows directly out to the sides. The bench arm system provides goods Pre- stretch. - Page 20 EXERCISE PROGRAM 4. Lat pull-front Fit bar to high pulley and roll pads to lop hole. Arch your back and pull the bar to the top of your chest. 5. Lat Pull-Back Fit bar to high pulley and roll pads to Top hole.
-
Page 21: Standing Leg Curl
EXERCISE PROGRAM 7. Standing leg curl Stand facing the machine with your ankle hooked behind the bottom roller pad and your knee pressing against the top roller pad curl your leg as high as possible. Low- er weights under control. 8. -
Page 22: Exploded Drawing
EXPLODED DRAWING HELP LINE NUMBER: 08456 400800 -700... -
Page 23: Parts List
EV-700-66 Nylock Nut (M10) EV-700-33 Handle Bar Grip EV-700-67 Nylock Nut (M8) EV-700-34 Mid-empty Plug EV-700-68 Plastic Washer AN AUTHORISED LICENCEE OF EVERLAST WORLD WIDE INC FCSI LTD HELP LINE NUMBER : 08456 400800 HELP LINE NUMBER: 08456 400800 -700...
Need help?
Do you have a question about the ev-700 and is the answer not in the manual?
Questions and answers