Table of Contents
Advertisement
Advanced Hotspot
Gateway Products
WiFi Hotspots made easy
so you can provide a
better Internet service for
your guests and visitors
A Guide to the Operation
of Guest Internet Hotspot
Gateway Products
Revision 2.3 Software
Manual Revision 2.3.7
Guest Internet Solutions is a business unit of Fire4 Systems Inc., a Florida Corporation. Copyright © Fire4 Systems Inc., 201 3. All rights reserved. Fire4,
Guest Internet, and the respective logos are registered marks of Fire4 Systems Inc. All other registered marks, trademarks, service marks and logos are
the property of their respective holders. Information here is subject to change without notice.
Advertisement
Table of Contents

Related Manuals for Guest Internet GIS-K1+


Summary of Contents for Guest Internet GIS-K1+
- Page 1 Manual Revision 2.3.7 Guest Internet Solutions is a business unit of Fire4 Systems Inc., a Florida Corporation. Copyright © Fire4 Systems Inc., 201 3. All rights reserved. Fire4, Guest Internet, and the respective logos are registered marks of Fire4 Systems Inc. All other registered marks, trademarks, service marks and logos are...
-
Page 2: Fcc Statement
Modifications The FCC requires that no changes or modifications may be made to this device that are not expressly approved by FIRE4 Systems Inc, and Guest Internet Solutions. Any unauthorized changes may void the users authority to operate the equipment. -
Page 3: Table Of Contents
Switching the Gateway Product on for the First Time Installing the Gateway product in the Computer Network Connecting Your Computer Browser to the Guest Internet Product The Quick Start Wizard: Get Your Gateway Working Quickly The Quick Start Wizard: Check the Internet Connection... - Page 4 Advanced Settings: Credit Card /PayPal Advanced Settings: Edit Disclaimer Advanced Settings: Time Zone Advanced Settings: Email Settings Advanced Settings: Content Filter Advanced Settings: Dynamic DNS Advanced Settings: Bandwidth Control Advanced Settings: Network Interfaces Advanced Settings: Wireless Settings: for the GIS-K1+/K3 product only Advanced Settings: WAN Settings: GIS-R10 to GIS-R20 only Advanced Settings: LAN Settings: GIS-R10 to GIS-R20 only Advanced Settings: Firewall...
-
Page 5: Introduction
Introduction You are planning to use a Guest Internet gateway to provide a WiFi hotspot Internet service for people that frequent your business. First be aware of an issue with wireless routers that will prevent your WiFi hotspot working if the wireless router is not configured correctly. -
Page 6: Provide A Public Internet Hotspot Service For Your Guests And Visitors
You can brand your Internet service with our easy to use wizard Use your guest Internet service to advertise your special offers and promote your website You can control Internet access to prevent guests abusing the service ... - Page 7 PC laptops, MAC computers, netbook computers, iPhones™, and Blackberries™. Guest Internet products have a ‘login page’ that requires the user to agree to the terms and conditions, and possibly pay a fee for an access code. The business owner decides if Internet will be free or if guests will pay for the service.
- Page 8 Login Page Example: the user has to accept the terms and conditions Login Page Example: in addition to accepting the terms and conditions, the user has to enter an access code provided by the business owner Guide to Operation Copyright © Fire4 Systems, Inc., 2013. All Rights Reserved www .
-
Page 9: Principal Features Of Guest Internet Gateway Products
Cable Cable Choosing the Right Hotspot Guest Internet manufactures a range of Hotspot gateways that provide different levels of performance and features. The gateway performance is specified as the number of users Gateway that can use the Hotspot simultaneously. This is called the maximum number of concurrent users. - Page 10 Login Page The login page is the most important feature of the Hotspot gateway. All Guest Internet gateways provide three levels of login page customization; Twelve pre-prepared login pages are contained in the gateway, choose one of the twelve login pages when answering the setup Wizard questions.
- Page 11 feature to provide access to the Hotspot gateway. In the case where the DSL or Cable service has a dynamic IP allocation the Hotspot gateway can be accessed remotely using the DynDNS service. The Hotspot gateway has a DynDNS agent installed to permit the network IP address to be located via the DynDNS server.
-
Page 12: Access Control
Performance Access Control Guide to Operation Copyright © Fire4 Systems, Inc., 2013. All Rights Reserved www . guest - internet . com... - Page 13 Management Security Guide to Operation Copyright © Fire4 Systems, Inc., 2013. All Rights Reserved www . guest - internet . com...
- Page 14 Billing Benefits Integrated Solution Guest Internet is committed to providing customers with an integrated product solution and we work with partners to achieve this goal. Partners provide us with value-added channels and with additional functionality that we don’t provide. Currently we have four functionality partners.
-
Page 15: Choose To Provide Unlimited Internet Access Or Controlled Internet Access
3: Choose to Before installing the Guest Internet router product you must decide if you want to provide unlimited Internet for your guests or if you want to control the access your guests have to Provide Unlimited Internet services. Internet Access or Both unlimited access and controlled access show the guests your login page when their computer browser opens. - Page 16 The figure below shows the screen that the guest sees when the ‘I agree..’ button is clicked In addition to the browser showing the Web page that was originally requested, a small window will open that provides a button for the guest to log out of the Internet service. The figure below on the left shows the window that the guest sees when the ‘Click here’...
- Page 17 “I agree to the terms and conditions of use”. Access codes are generated within the Guest Internet gateway unit for use with only that unit: see later sections describing how this is done. Each access code has a fixed duration, determined when the code is generated.
- Page 18 In addition to the browser showing the Web page that was originally requested, a small window will open that provides a button for the guest to log out of the Internet service. The figure below on the left shows the window that the guest sees when the ‘Click here’ button is clicked.
-
Page 19: Features Of Controlled Guest Internet Access
Internet might find that guests are occupying tables to use the Internet and not buying coffee or food. This problem can be easily solved using Guest Internet gateway products. Give 30-minute free codes at the checkout, and state that codes are given only with a purchase. -
Page 20: Your Guest Internet Gateway Product Contents
Ethernet cable Power supply When you receive your Guest Internet product first check that you received all the parts listed above. If one of these items is missing then please inform our customer support immediately; contact information is provided on our website. - Page 21 GIS-K1+: Wireless Hotspot gateway GIS-K3: Wireless Hotspot gateway for GIS-R3: Hotspot gateway for 100 for 25 concurrent users. For bars, 50 concurrent users. For bars, concurrent users. Medium restaurants and any type of public restaurants and any type of public performance for hotels and motels up to commercial environment.
-
Page 22: Characteristics Of The Gis-K1+ Gateway Product
6: Characteristics The GIS-K1+ is a wireless hotspot gateway for up to 25 concurrent users; this means that the unit can have wired computers connected directly to it (Internet kiosks, business center of the GIS-K1+ computers, etc), and can have wireless access points connected to it. Each wireless access point can provide a wireless, or WiFi connection for laptop computer users who are within Gateway Product range of the wireless transmission. - Page 23 The GIS-K1+ is shown with the LAN port GIS-K1+ GIS-K1+ configured to extend the DSL router DSL router Wireless Internet Wireless Internet wireless hot spot Gateway Gateway network. The LAN port is firewalled to prevent Guest computers Guest computers public hotspot users Internet Internet hacking into business...
- Page 24 7: Characteristics The GIS-K3 is a wireless hotspot gateway for up to 50 concurrent users; this means that the unit can have wired computers connected directly to it (Internet kiosks, business center of the GIS-K3 computers, etc), and can have wireless access points connected to it. Each wireless access point can provide a wireless, or WiFi connection for laptop computer users who are within Gateway Product range of the wireless transmission.
- Page 25 The GIS-K3 is shown with the LAN port configured GIS-K2 Wireless Internet Gateway to extend the wireless DSL router hot spot network. The LAN port is firewalled to prevent public hotspot Guest computers Internet users hacking into business computers that are connected to the Point of Sale same DSL/cable circuit...
- Page 26 8: Characteristics The GIS-R3 is a hotspot gateway for up to 100 concurrent users; this means that the unit can have wired computers connected directly to it (Internet kiosks, business center of the GIS-R3 computers, etc), and can have wireless access points connected to it. Each wireless access point can provide a wireless, or WiFi connection for laptop computer users who are within Gateway Product range of the wireless transmission.
-
Page 27: 9: Characteristics Of The Gis-R5+ Gateway Product
9: Characteristics The GIS-R5+ is a hotspot gateway for up to 150 concurrent users; this means that the unit can have wired computers connected directly to it (Internet kiosks, business center of the GIS-R5+ computers, etc), and can have wireless access points connected to it. Each wireless access point can provide a wireless, or WiFi connection for laptop computer users who are within Gateway Product range of the wireless transmission. -
Page 28: Characteristics Of The Gis-R6+ Gateway Product
10: Characteristics The GIS-R6+ is a hotspot gateway for up to 200 concurrent users; this means that the unit can have wired computers connected directly to it (Internet kiosks, business center of the GIS-R6+ computers, etc), and can have wireless access points connected to it. Each wireless access point can provide a wireless, or WiFi connection for laptop computer users who are within Gateway Product range of the wireless transmission. -
Page 29: Characteristics Of The Gis-R8 Gateway Product
11: Characteristics The GIS-R8 is a hotspot gateway for up to 250 concurrent users; this means that the unit can have wired computers connected directly to it (Internet kiosks, business center of the GIS-R8 computers, etc), and can have wireless access points connected to it. Each wireless access point can provide a wireless, or WiFi connection for laptop computer users who are within Gateway Product range of the wireless transmission. -
Page 30: Characteristics Of The Gis-R10 Gateway Product
12: Characteristics The GIS-R10 is a hotspot gateway for up to 250 concurrent users; this means that the unit can have wired computers connected directly to it (Internet kiosks, business center of the GIS-R10 computers, etc), and can have wireless access points connected to it. Each wireless access point can provide a wireless, or WiFi connection for laptop computer users who are within Gateway Product range of the wireless transmission. -
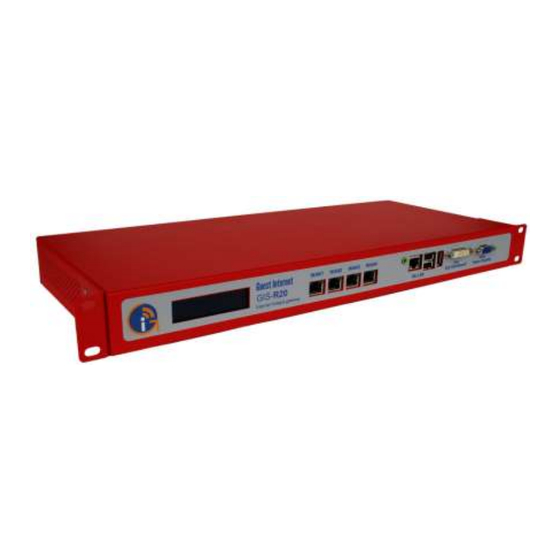
Page 31: Characteristics Of The Gis-R20 Gateway Product
13: Characteristics The GIS-R20 is a hotspot gateway for up to 500 concurrent users; this means that the unit can have wired computers connected directly to it (Internet kiosks, business center of the GIS-R20 computers, etc), and can have wireless access points connected to it. Each wireless access point can provide a wireless, or WiFi connection for laptop computer users who are within Gateway Product range of the wireless transmission. -
Page 32: Characteristics Of The Gis-Tp1 Ticket Printer Product
Ten access codes can be pre-configured and appear as buttons on the screen of the tablet computer. Like all Guest Internet gateway products, the ticket printer is very easy to install and operate. The ticket printer should be connected to a LAN port of the GIS gateway using a switch. - Page 33 GIS-TP1 network connection Power Ethernet The power and data connections of the GIS-TP1 are underneath the unit to the rear. Use only the 12 volt, 3 amp power supply provided with the unit. A power on/off switch is located at the rear of the printer.
-
Page 34: Discontinued Products
15: Discontinued Evolution of technology is extremely rapid for any type of computer or network product. Gordon Moore of Intel is famous for stating that processing power will double every 18 products: months (Moore’s Law). GIS products also follow the rules of Moore’s Law and evolve at the same speed as the computing industry. - Page 35 The GIS-R4 unit The GIS-R4 is a hotspot gateway for up to 100 concurrent users. The GIS-R4 gateway product is shown below. The GIS-R4 gateway has five Ethernet connectors. One is labeled Internet and is connected to the DSL/cable/T1 router. Four connectors are labeled LAN1 to LAN4.
- Page 36 The GIS-R6 unit The GIS-R6 is a hotspot gateway for up to 200 concurrent users. The GIS-R6 gateway product is shown below. The GIS-R6 gateway has three Ethernet connectors. One is labeled Internet and is connected to the DSL/cable/T1 router. Two GIS-R6 GIS-R6 GIS-R6...
-
Page 37: Installation Of Guest Internet Gateway Products
16: Installation of Guest Internet gateway products can be used to manage public Internet for many different applications. Guest Internet The following table shows how GIS gateway products are used for different applications. Gateway Products Product Application Type of access... -
Page 38: Powering The Gateway Products
17: Powering the This section describes the power supply units that Guest Internet gateway products are shipped with. Gateway Products Each product requires a specific power supply voltage as shown in the figures below. Each power supply plugs into the power connector shown on the product photos below. The power supply can be used with either 110 volts or 220 volts. - Page 39 GIS-R5+ power supply and connections 5 volt power supply Use only the power supply provided to avoid damage 5 volts Power supply 110/220volts GIS-R6+ power supply and connections 24 volt power supply Use only the power supply 24 volts provided to avoid damage Power supply 110/220volts GIS-R8 power supply and...
- Page 40 GIS-R10 power supply and connections 12 volt power supply 12 volts Use only the power supply provided to avoid damage Power supply 110/220volts GIS-R20 power connector 12 volt supply 4-pin power connector 12 volts 3 amps 12 volts, 3amps Use only the power supply provided to avoid damage Power supply 110/220volts...
-
Page 41: Switching The Gateway Product On For The First Time
18: Switching the The GIS-gateway must be configured before it can be used. The product has a very easy to use Wizard which speeds through the configuration process. Configuration takes around Gateway Product five minutes. on for the First The GIS-gateway must be connected as shown in the diagram at the bottom of this page. The INTERNET port must be connected to the Internet via the DSL router. - Page 42 Page computer with wireless Connect to: Hotspot With the Guest Internet gateway connected as shown, proceed to the Wizard configuration process. Guide to Operation Copyright © Fire4 Systems, Inc., 2013. All Rights Reserved www . guest - internet . com...
-
Page 43: Installing The Gateway Product In The Computer Network
Internet access. The PCI DSS standards recommend that two separate Internet circuits should be used: one for the point of sale system, and one for the public guest Internet network. One Internet circuit can be used when firewall devices are installed to protect the point of sale system from attack. - Page 44 Public user access i s blocked to the business Gateway Firewall network that includes a point of sale terminal Public network (DMZ): wireless Set private IP range 192.168.xx.xx or 10.xx.xx.xx hotspot, kiosks, busine ss center to prevent access from the public network Switch GIS-R6+ DSL/T1...
- Page 45 Internet access. The PCI DSS standards recommend that two separate Internet circuits should be used: one for the point of sale system, and on for the public guest Internet network. One Internet circuit can be used when firewall devices are installed to protect the point of sale system from attack.
-
Page 46: Connecting Your Computer Browser To The Guest Internet Product
When you open your browser your home page will change, instead of your usual home page you will see the Guest Internet setup wizard. If you did not have a home page set in your browser you should type the following into the URL address line. -
Page 47: The Quick Start Wizard: Get Your Gateway Working Quickly
21: The Quick The first time that you connect to your Guest Internet gateway product you should see the page shown below displayed in your Internet browser window. Start Wizard: Get The screen shows that there are five steps to complete the setup process. Each step is a Your Gateway page that requires some information to be typed in or an option selected. -
Page 48: The Quick Start Wizard: Check The Internet Connection
First verify that your DSL modem provides a good Internet connection by connecting a computer to the DSL modem using an Ethernet cable. Verify that the Guest Internet product is connected to the DSL router (check that the blue LED is lit) and then click on ‘click to test the internet connection’. - Page 49 If you still have a red NO after trying the steps described above then you will have to call a network specialist to help you. You can contact a network specialist by calling local IT companies. You may also find a network specialist by calling your high speed Internet service provider.
-
Page 50: The Quick Start Wizard: Set The Time Zone And Password
23: The Quick When your Guest Internet product has a good connection to the Internet and you have clicked on the link to proceed to page 2, then you will see the page shown below. Start Wizard: Set the Time Zone and... - Page 51 When you have completed this screen click on the button to proceed to step 3. Guide to Operation Copyright © Fire4 Systems, Inc., 2013. All Rights Reserved www . guest - internet . com...
-
Page 52: The Quick Start Wizard: Enter Your Business Information For The Login Page
24: The Quick The next step in the setup process is the creation of the login page. Your guests will see this page when they connect to your Internet service. Your guests have to click on the Start Wizard: disclaimer or enter a code to access the Internet. Enter Your Business Information for... -
Page 53: The Quick Start Wizard: Select Disclaimer Or Code Access
25: The Quick The next step is to select the type of access control you require. You have two options. Unlimited access: The guest sees the login page and has to click on the disclaimer Start Wizard: button to get Internet access. Select Disclaimer Controlled Access: The guest has to type in an access code. -
Page 54: The Quick Start Wizard: Completing The Process
26: The Quick The final step in the setup process is to restart or reboot the Guest Internet gateway unit. This step will restart the gateway unit with all the parameters that were entered during the Start Wizard: setup process. -
Page 55: Operating The Guest Internet Gateway Unit
Gateway Unit The Guest Internet gateway unit has many features that you may wish to take advantage of by accessing the unit as the administrator. The password that you entered during the wizard setup process will be required to login as the administrator so keep a note of that password in a safe place, and don’t share it with others, unless you are authorizing... -
Page 56: Using Advanced Functions To Access Additional Features
Advanced connected wirelessly through an access point connected to one of the LAN ports. Functions to After powering the Guest Internet product allow 2 minutes for the unit to perform internal test routines before beginning the configuration process. Access Additional The computer’s browser is used to configure the Guest Internet product. -
Page 57: Login For Access Code Generation And Management
29: Login for All GIS gateway products have a special graphic user interface specifically to generate access codes that are given to guests for Internet access. The user interface has been Access Code optimized for display on a 7inch tablet permitting the tablet to be located at the point of sale, and be operated like a PoS screen. - Page 58 If your Guest Internet gateway has been configured for the controlled access mode then you will use the Manage Codes feature frequently. This page is used to generate codes in several different formats and to cancel codes. It is also used to list outstanding codes.
- Page 59 Add one-click button page First type the name of the button that will be shown on the display subsequently. This could refer to the access time, e.g. two-hours, or the type of user, e.g. conference-guest. The code duration can be selected from 30 minutes to 180 days using the drop down menu.
- Page 60 Click the ‘exit management’ button to see the display with button that is used to generate access codes. Access code generation page Two more buttons have been added to the display shown below. A maximum of ten buttons can be added to the display. Access code generation page showing three buttons...
- Page 61 Access code generated Buttons can be removed, and new buttons created at any time by clicking on ‘manage one- click buttons’. When clicked the screen shown on the following page is displayed. Any button can be removed by clicking on ‘remove one-click button’. New buttons can be added by following the procedure describer above.
- Page 62 Create/view codes page The create/view codes page provides two features. The first is the option to create custom codes. The screen below shows a custom code that has been generated. Create new custom code Guide to Operation Copyright © Fire4 Systems, Inc., 2013. All Rights Reserved www .
- Page 63 This option is used when several of codes are required as the number of codes can be specified. As an alternative, one code can be generated with a name that can be specified in the code text box, rather then use the random codes generated by the buttons. As with the button, the code duration, user type, and download /upload limits are specified.
- Page 64 Available access codes are shown in the list of generated codes. When the time of a code has expired it remains in the list for seven days before automatic deletion. An expired code can be removed from the list by clicking in the box to the left of the code then clicking the ‘Delete checked codes’...
-
Page 65: Status Functions: System Information
30: Status On completion of the administrators login process the system information screen is displayed (shown below). The information displayed shows; Functions: System Product model (required for firmware upgrades) Information Firmware version (required for firmware upgrades) Serial number (required for firmware upgrades) Verification that the device is connected to the Internet Current date and time and timezone Authenticated users and codes used... - Page 66 Four main menu topics are shown, and each main menu has several configuration pages: Setup Wizard Status (includes this system information page) Management Advanced settings The management menu is used to manage the product for day-to-day use. Click on the down arrow to expand the Setup Wizard and the Advanced settings.
-
Page 67: Status Functions: Connected Users
31: Status Clicking on the Connected Users menu will show the page seen in the figure below. There are two boxes, Authenticated users and Connected users. Functions: Connected Users Connected users lists all the computers that are connected to the gateway unit: they have requested and obtained an IP address. -
Page 68: Status Functions: Usage Reports
32: Status Clicking on Usage reports will display the page shown below. The last 1000 entries are stored and displayed on this page. The number of users per day is shown on a time- Functions: Usage varying graph that can extend up to 28 days. Report The usage data can be downloaded in a CSV format and loaded into a spreadsheet program such as Excel for further analysis. -
Page 69: Status Functions: Billing Reports
33: Status The GIS-R3 to R20 products include PayPal™ credit card billing functionality for public hotspots and Internet cafes. Please see the later section: Advanced Settings: Credit Cards / Functions: Billing PayPal™, for additional information about credit card billing. Report (GIS-K3, The status functions section includes a billing report that summarizes the transactions process. -
Page 70: Management Functions: Manage Codes
34: Management If your Guest Internet gateway has been configured for the controlled access mode then admin codes you can login as to use the Manage Codes menu page or login as to use Functions: the Manage Codes page (previous section). This page is used to generate codes in several different formats and to cancel codes. - Page 71 Access code generation and management page, the access code type is custom: a name up to 9 digits can be entered – spaces are not allowed. An example for an access code is ‘cityhotel’. Only one code can be generated with this name.
- Page 72 Select the duration of the code(s) from 30 minutes to 180 days, or unlimited Select the type of code(s): single user or multi-user Guide to Operation Copyright © Fire4 Systems, Inc., 2013. All Rights Reserved www . guest - internet . com...
- Page 73 Select download speed limit for the code(s) (in Kbytes/second). If the speed you want is not in the drop-down menu then select custom and type in the speed in Kbits/sec. Select upload speed limit for the code(s) (in Kbytes/second). If the speed you want is not in the drop-down menu then select custom and...
- Page 74 The screen shows the generation of an access code with a random name. Access code verification. Type in the access code to display all information about that code Guide to Operation Copyright © Fire4 Systems, Inc., 2013. All Rights Reserved www .
- Page 75 List all access codes generated. The access code list shows the code, the duration of the code, the code type, if used, the time remaining, and the download/upload maximum speeds set for the code. Check the box then click on ‘delete checked codes’...
-
Page 76: Management Functions: Hotspot Availability
35: Management Hotspot availability permits the gateway to be enabled or disabled during a weekly cycle. Clicking on the Hotspot availability menu opens the default page, which shows always Functions: enabled. Hotspot Click on the right hand arrow to see the drop down menu. Availability Default Hotspot availability screen,... - Page 77 Hotspot availability selection table Guide to Operation Copyright © Fire4 Systems, Inc., 2013. All Rights Reserved www . guest - internet . com...
-
Page 78: Management Functions: Change Password
Always make a note of your passwords and keep in a safe place: if the admin password is lost then the Guest Internet gateway will have to be reset to factory defaults and you will have to configure the device again. -
Page 79: Management Functions: Reboot System
37: Management The reboot system function restarts the device. Some functions may require the device to be rebooted before the changes take effect. Functions: Reboot To reboot the device select Reboot System from the menu. The screen will show the System page in the figure below. - Page 80 Auto Reboot time selection Guide to Operation Copyright © Fire4 Systems, Inc., 2013. All Rights Reserved www . guest - internet . com...
-
Page 81: Advanced Settings: Login Settings
38: Advanced The login page is a mechanism to present the Internet user with a browser page with authorization request box (sometimes called the splash page) when the user attempts to Settings: Login access a Web site. Settings When with login page is displayed on the users computer an access code can be entered if the unit is configured for controlled access. - Page 82 Login page Menu Page Display Several configuration parameters can be modified: the function of each is explained below. Login page type: The drop down menu has four options, two of which were available for selection during the wizard setup process. Open access: permits all users to connect directly to the Internet without the login page.
- Page 83 URL of site: This is the Web site of the business providing Internet service. This landing page website URL can become the (substituting the users home page) by checking the box below to force visit to this website. Enable Timer window: checking this box will enable the pop-up timer window that the user sees after completion of the login process.
- Page 84 Registered access login page settings Guide to Operation Copyright © Fire4 Systems, Inc., 2013. All Rights Reserved www . guest - internet . com...
- Page 85 The image can be a composite photo plus logo prepared using software such as Photoshop. Custom login page A custom login page can be created using HTML code and uploaded to the Guest Internet gateway. Login page sample designs can be downloaded from the Guest Internet website http://www.guest-internet.com/loginpages A custom design log in page can include advertising banners.
- Page 86 The only requirement to create a login page is knowledge of programming using HTML code and Javascript. The completed program is saved as a ZIP archive (e.g. using WinZip, not the MAC zip). The login page can be customized with a logo, a corporate identity, and information about the hotspot or public Internet service.
- Page 87 ‘Walled Garden’ login page Internet access granted page Guide to Operation Copyright © Fire4 Systems, Inc., 2013. All Rights Reserved www . guest - internet . com...
- Page 88 When the user types the access code and clicks on the ‘connect and agree’ button then the ‘thank you’ page appears, informing the user that the login was successful, and requesting the user to click a button to connect to the Internet. When the button is clicked to access the Internet the users Web page appears (or the landing page if set).
- Page 89 Login code error message If the user enters the wrong login code then a message is shown in the login box Guide to Operation Copyright © Fire4 Systems, Inc., 2013. All Rights Reserved www . guest - internet . com...
-
Page 90: Advanced Settings: Login Messages
39: Advanced All messages displayed on the login pages can be modified. This is very useful if the hotspot is being setup in a non-English speaking country permitting interaction with the Settings: Login users to be in the native language. Messages Login page message editor... - Page 91 There are a total of 19 messages that can be modified. The messages are as follows: Access message 1: When the controlled access mode is selected this message is displayed in the login box shown on the login page. The default message reads, “Enter a login token to use this hotspot”.
- Page 92 PayPal™ business account and use the transaction ID to obtain additional information about the transaction. Guest Internet Solutions does not make any additional charge for credit card processing. The GIS gateway functions identically to a Point of Sale (PoS) terminal. Credit card charges are the sole responsibility of the hotspot operator, who is referred to as the ‘merchant’...
- Page 93 When the PayPal™ button is clicked a drop down menu is shown to select the time and cost of the Internet access. After the selection is made then the PayPal™ button is clicked The login page drop down menu showing the Internet access options that have been configured...
- Page 94 After the selection is made then the ‘Check out with PayPal™’ button is clicked. The user then sees the merchants payment page on the PayPal™ web site. Payment can be made using a credit card as shown below. PayPal™ website credit card payment page Guide to Operation Copyright ©...
- Page 95 Payment can also be made with a PayPal account. See the screen below. PayPal™ website payment using a PayPal™ account When the payment is completed then the GIS gateway displays an access code (token) for the user to note. A confirmation email is also sent by the GIS gateway to the users email address.
- Page 96 PayPal™ website introductory page To create an API signature with your PayPal Business account: Log in to PayPal, then click Profile under My Account. Click My selling tools. Click API Access. Click Request API Credentials. Check Request API signature and click Agree and Submit.
- Page 97 PayPal™ credit card billing setup page Check the box shown to enable PayPal™ payments via credit card When the PayPay™ business account has been authorized then it is necessary to obtain three account parameters to copy to the boxes shown previously. PayPal™...
- Page 98 PayPal™ credit card billing setup page (continuation) Six boxes shown on the screen above have the messages that are sent to the purchasers email address, and also to the hotspot owners email address. The parameters included in the respective emails are shown. These messages can be translated to other languages, or elaborated.
- Page 99 There is a final check box called ‘receive error emails’. When a transaction does not complete then it is not necessary to receive a message about this in most cases. However the hotspot owner might wish to be notified when an error condition occurs, for example if the credit card is declined.
- Page 100 Internet. Settings: Edit The terms and conditions of use is a document contained within the Guest Internet unit Disclaimer that was drafted by a legal team to remove liability from the Internet service provider in the case that the guest is using the network for illegal purposes, such as downloading copyrighted material.
- Page 101 42: Advanced The correct time zone is selected during the setup wizard. However if the gateway is moved to a different location then the time zone can be changed. Settings: Time A drop down menu is used to select the correct time zone. Zone Set time zone menu Click on the correct time zone in the list to set the gateway time zone.
- Page 102 43: Advanced Gateway features that require email transmission include device monitoring and credit card billing. The Email settings page must be configured before the email features can be Settings: Email used. The settings that are configured are: Settings SMTP server name SMTP server port number SMTP username (usually not required) SMTP password...
- Page 103 Filter names rather than IP addresses. OpenDNS Guest Internet Solutions partners with a 3 party content filtering service, , who OpenDNS maintains a current list of web sites to block.
- Page 104 Provide your email address and password. This email and password will be required by the GIS product to use your content filtering account. Select the options ‘where did your hear…’ and ‘where will you use…’ to complete the account registration process. Finally click on CONTINUE.
- Page 105 You should click on ‘sign out’ at this point as you need to confirm your account by checking OpenDNS your email and then clicking on the link provided to confirm your account. Thanks for registering with OpenDNS! Click this link to confirm your registration: Account confirmation email sent by OpenDNS https://www.opendns.com/dashboard/c/xxxxxxxxxxxxx...
- Page 106 dashboard Open DNS home page Click on the link ‘Add a network’; you will see the IP address of your network. Your network IP address must be added to you’re your OpenDNS account as OpenDNS will filter all traffic from this IP address.
- Page 107 Click on the button ‘Add this network’, and then provide a name for the network as shown below. Check the dynamic address box for DSL or cable modem. T1 connections will be static. Finally click on the DONE button. Next you will see a page showing your IP address, click on this as it is a link to the configuration page.
- Page 108 Next you have to select your content filtering level: you will see that content filtering is not active until you make your selection. Make your selection, high, moderate, low, depending on the level of content filtering you require. Finally click on the APPLY button.
- Page 109 Any attempt to access a blocked site will give the page shown here. There is a configuration step that makes your content filter look professional. You can upload your business logo to the OpenDNS page shown above to personalize it for your users and guests.
- Page 110 After customization your guests and users will see the page shown when they try to see blocked web sites. Finally, you can complete your OpenDNS account information. Select the menu options SETTINGS as shown. Some settings have already been entered. Select the menu options on the left side of the screen to complete the remaining settings.
- Page 111 Next click on the MY ACCOUNT tab to enter your account information. You can also click on the TELL A FRIEND tab and let other people know what a great content filtering service OpenDNS provides. Guide to Operation Copyright © Fire4 Systems, Inc., 2013. All Rights Reserved www .
-
Page 112: Configuration Page
45: Advanced The Dynamic DNS is used to access the gateway remotely when the DSL or Cable Internet service has a dynamic IP address setting. The gateway is located using the services of Settings: Dynamic DynDNS (http://www.dyndns.com/). The Dynamic DNS setting requires a hostname account with DynDNS. When the box is checked to enable the DynDNS agent the DynDNS hostname, username and password must be entered. - Page 113 46: Advanced Bandwidth control is very important for a public Internet hotspot. Many users simply want to check emails, or flight times and such browser-based applications consume little Settings: bandwidth. Bandwidth However some users have applications that require a very large Internet bandwidth: such as peer-to-peer applications, sometimes-called file sharing applications (Bittorrent, Control Limeware, etc.), or large file downloads (music MP3’s, videos).
- Page 114 Setting the download speed limit Setting the upload speed limit Guide to Operation Copyright © Fire4 Systems, Inc., 2013. All Rights Reserved www . guest - internet . com...
- Page 115 When the settings have been selected click on the update settings button. Bandwidth usage depends on the type of data traffic that the Hotspot users are sending and receiving over the network. Contact your broadband sevice provider for additional information about data charges and limits. AT&T have provided information about typical data consumption of their broadband network for two data plans with monthly limits of 150MB and 250MB.
- Page 116 Open the network interfaces page by clicking in the Network Interfaces menu line. The network interfaces page is shown below. This page may have opened during the wizard set up process if the Guest Internet unit had to be configured with a fixed IP address. Network Interface Menu Page showing the WAN tab.
- Page 117 The screen view on the previous page shows the WAN tab (Wide Area Network). These settings are for the gateway unit Internet port. The DHCP box checked for default configuration. In this case the DSL router or cable modem provides the IP address for the gateway.
- Page 118 for a very fast DSL line. You can set the maximum number of users to 25, for example, by changing the last 3 digits of the IP range end, from 240 to 35. The number of users is determined by subtracting the IP range start from the IP range end (in this case 35 – 10 = 25 users).
- Page 119 48: Advanced Products that have a wireless interface (GIS-K1+, GIS-K3) also have an additional menu page for wireless settings. There are two configuration options: Settings: Wireless Name (SSID) Settings (for the Channel GIS-K1+ and K3 The menu page is shown below. products only) Wireless Settings Menu (ONLY for the GIS-K1+...
- Page 120 49: Advanced The GIS-R10 and GIS-R20 products have dual port WAN interfaces. Two WAN connections permit these products to balance loads over two Internet backhaul circuits to increase the Settings: WAN throughput and permit more users to be connected simultaneously. In addition the dual WAN has a fail-over feature: when one of the WAN backhaul circuits fails then all traffic is Settings (GIS-R10 routed through the functional circuit.
- Page 121 GIS-R10/20 WAN2 Configuration The GIS-R10 and R20 can have the WAN ports configured for either dual WAN or single WAN. The default is dual-WAN. When the configuration is changed from dual to single WAN the WAN2 port becomes a LAN port. Guide to Operation Copyright ©...
- Page 122 50: Advanced The GIS-R10 and GIS-R20 products have dual port WAN interfaces. Two WAN connections permit these products to balance loads over two Internet backhaul circuits to increase the Settings: LAN throughput and permit more users to be connected simultaneously. In addition the dual WAN has a fail-over feature: when one of the WAN backhaul circuits fails then all traffic is Settings (GIS-R10 routed through the functional circuit.
- Page 123 GIS-R20 LAN port Configuration The GIS-20 has three LAN ports in the default settings. If the WAN ports are reconfigured from dual to single WAN then the GIS-R20 has four WAN ports. Guide to Operation Copyright © Fire4 Systems, Inc., 2013. All Rights Reserved www .
- Page 124 51: Advanced The gateway has a firewall that provides four features: remote management, blocking private IP address ranges, blocking of virus DoS attacks, and blocking of peer-2-peer file Settings: Firewall sharing. The first feature permits administrator login access via the Internet port to allow remote management of the gateway by opening the HTTP/HTTPS port.
- Page 125 Allow remote A computer is connected to one of the LAN ports to configure the Guest Internet gateway. Connecting a computer to the gateway Internet port and checking the Allow Remote management Management box can also be used to configure the gateway.
- Page 126 Block private IP ranges The Guest Internet gateway has a firewall that is designed to protect computers connected to the Internet port network from public users connected to the gateway LAN ports. The firewall provides compliance with the PCI DSS requirements for data security. The business network is connected as shown in the diagram below.
- Page 127 GIS-K2 Wireless Internet Gateway DSL router GIS-K2 LAN port Guest computers extending the public Internet network by connecting additional wireless access points. Computers Point of Sale (PoS) connected to the same computer DSL circuit as the GIS-K2 Expansion Expansion are protected from wireless Touch wireless...
- Page 128 52: Advanced Port forwarding permits a computer on the WAN side of the gateway to connect to a device on the LAN side of the gateway. Port forwarding is very useful for remote configuration of Settings: Port wireless access points. Forwarding Port forwarding can be configured for up to 25 devices (up to 100 on the R10/R20).
- Page 129 53: Advanced The purpose of the monitoring and alerting feature is to advise the Hotspot owner that a wireless access point or other device connected to the LAN port has failed. The GIS Settings: gateway can be set to periodically ‘ping’ each device in the device list. If a device does not respond then a second attempt is made to ‘ping’...
- Page 130 Information has to be provided for three fields, and there is also a drop down tab to select the port that the device is connected to. MAC address The MAC address is provided for the device Ethernet port. Not that wireless access points usually have two MAC addresses, one for the Ethernet port and one for the wireless port.
- Page 131 54: Advanced The hostname is a special URL or Web address that is used by Guest Internet products for the login page and to access the configuration pages. The default hostname is: Settings: aplogin.com Hostname Therefore to access the configuration pages in a browser enter the URL in the address line http://aplogin.com/admin...
- Page 132 IP List logging in. For example. The Guest Internet product may be installed in a hotel and the hotel charges for Internet access. If however the hotel wishes to give guests free access to airline websites then the URL’s of the airlines are entered in this window. Click on the Allowed IP addr menu tab to see the table of allowed IP addresses shown in the figure below.
- Page 133 56: Advanced Allowed MAC addresses permit you to configure the Guest Internet unit so that specific computers can bypass the login process. These computers can be your business Settings: Allowed computers, or a laptop computer used for network maintenance. MAC List Click on the Allowed MAC addr menu line and you will see the screen shown below.
-
Page 134: Mac List
57: Advanced Any user can be prevented from using the Internet Hotspot by including the MAC address of that users computer on the blocked MAC address list. Settings: Blocked A computer is blocked using the usage report page (see previous section). Select the user MAC List by access code or MAC address and click on the ‘block user’... - Page 135 58: Advanced The ticket printer GIS-TP1 is used to print access codes for a point of sale station in Internet Cafes or for user businesses, such as a hotel concierge desk, or a trade show Settings: Ticket management desk. Printer Setup The GIS-TP1 connects to the gateway LAN port via an Ethernet cable connected to a switch.
- Page 136 Ticket Printer Setup Page When the configuration page is first opened the printer status will be shown as disabled. First click on the printer status enable button to enable printing via the printer. Next type the messages that will be displayed on the ticket: the business name, the ticket header text that is printed before the access code, and finally the ticket footer text which is printed below the access code.
- Page 137 First ensure that a CODES password has bee set in the previous section: Management Functions: Change Password. Using the tablet computer, connect to the wireless access point that is connected to the gateway LAN port. When the tablet is connected then open the browser, instead of the home page, the login page will be displayed.
- Page 138 Parameters have to be set to configure the button. The first parameter is very important as this name is what the operator will see on the display. An example is shown. Name of button: 1 hour for $5.00 The text ‘1 hour for $5.00’ will be displayed on the button. This will tell the operator that when a customer requests a 1-hour code this button should be touched, and the customer should be charged $5.00.
- Page 139 Click on a button to display the access code and send the code to the printer. The screen shown below will be seen. Access code generated by clicking the one-click buttons Buttons can be modified or deleted at any time by clicking on manage one-click buttons.
- Page 140 Create/view codes display A code that has been generated and given to a user can be checked to verify the time remaining for the code. Type the code in the box ‘enter code to check’ then click the check code button. A custom code requires the selection of random text or custom text.
- Page 141 All access codes can be viewed by clicking the view all codes button. When this button is clicked a screen similar to the one shown below will be displayed. View all codes display When the code is sent to the printer the code is printer in receipt format. The figure below shows the ticket that is printed onto the thermal paper.
- Page 142 59: Advanced The Guest Internet product firmware can be upgraded by loading the firmware file from the computer used for the upgrade process. Firmware upgrades will be announced through Settings: Upgrade the Guest Internet newsletter as they become available. Firmware Remember that each Guest Internet product has a unique firmware file.
- Page 143 60: Advanced All configuration parameters that have been set on a gateway unit are stored in a file in memory. The configuration file can be downloaded to a computer and saved for backup Settings: Backup purposes. This page also permits the configuration backup file to be uploaded into the gateway to restore a previous configuration setting.
-
Page 144: Factory Defaults
61: Reset the It is possible to get locked out of the Guest Internet gateway product, by forgetting the password or by incorrectly changing one of the IP addresses shown on the network Product configuration page. Configuration to This section describes procedures to reset all product parameters to factory defaults so that the product can be accessed once more. - Page 145 Reset GIS-R8 gateway has a hole in the enclosure with the reset button behind it The GIS-K1+ and K3 gateways have a hole in the enclosure as shown with the reset button behind it Reset Reset Switch The GIS-R10 and GIS-R20 products do not have a reset button. These products are reset to the factory default configuration using a computer connected to the primary WAN port of the device.
- Page 146 GIS-R20 gateway connection to reset to Set browser to factory defaults 192.168.200.1 To see the reset screen Username: reset Password: reset Ethernet cable to WAN1 port Set computer static IP to 192.168.200.2 255.255.255.0 reset A box will open requesting a username and password. The username is reset the password is .
- Page 147 62: Programmers This section describes implementation of PoS access code requests using the Guest Internet firmware API Reference: Access The access code request API is implemented in GIS firmware so that PoS vendors can Code Request API include a screen button that prints a hotspot access code on the ticket printer for sale to guests.
- Page 148 Guest Internet Login Any computer or other system capable of performing HTTP communications can control the login codes on the GIS R and K units remotely. The programmer must have the password Code API for the CODES login in order to perform API commands.
- Page 149 The programmer can provide the password with each call to ensure that the call can be completed in the event that power has been cycled on the GIS device or on the PoS. Deleting codes Codes can be deleted from the system via a single HTTP call, the URL to use is: http://aplogin.com/codes/deletecode.cgi Parameters to pass include: Parameter...
- Page 150 CODE TIME TYPE USED LEFT DOWN 113DRW Expired 1AT1AQ 3B0AQ0 Expired 61QG8G 8CWJLE 94KH4E ARLGH0 BJKBH7 Expired M47TGF WY7W0R The * (asterisk) in the UP and DOWN limit columns show that no limit has been set and that system wide limits will be imposed on the user. The error message below will be returned if the clock is not set on the system, without the clock it is not possible to calculate the time remaining: ERROR: Clock not set...
- Page 151 (General Public License). Guest Internet Solutions and its parent company Fire4 Systems Inc. abides by all the terms of the GNU. The Linux distribution installed in Guest Internet products is available on a CD. Customers can request a copy of the Linux distribution CD and will be charged $10 for packing and postage of the CD.
- Page 152 GNU GENERAL PUBLIC LICENSE TERMS AND CONDITIONS FOR COPYING, DISTRIBUTION AND MODIFICATION 0. This License applies to any program or other work which contains a notice placed by the copyright holder saying it may be distributed under the terms of this General Public License. "Program", below, refers to any such program or work, and a "work based on the Program"...
- Page 153 a) Accompany it with the complete corresponding machine-readable source code, which must be distributed under the terms of Sections 1 and 2 above on a medium customarily used for software interchange; or, b) Accompany it with a written offer, valid for at least three years, to give any third party, for a charge no more than your cost of physically performing source distribution, a complete machine-readable copy of the corresponding source code, to be distributed under the terms of Sections 1 and 2 above on a medium customarily used for software interchange;...
- Page 154 THE POSSIBILITY OF SUCH DAMAGES. END OF TERMS AND CONDITIONS This Manual is Copyright © Fire4 Systems, Inc., 2005-2013. All Rights Reserved Guest Internet Solutions is a division of Fire4 Systems Inc. Guide to Operation Copyright © Fire4 Systems, Inc., 2013. All Rights Reserved...
Need help?
Do you have a question about the GIS-K1+ and is the answer not in the manual?
Questions and answers