Table of Contents
Advertisement
Setting the Standard With the
World's Most Valued Grinders.
384
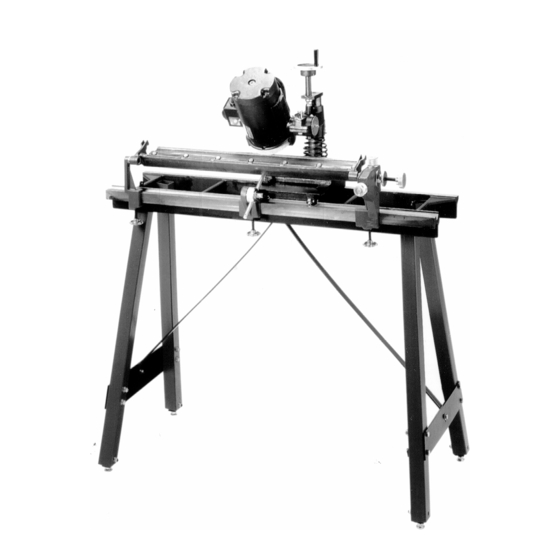
MANUAL
BEDKNIFE GRINDER
This book consists of two manuals:
The OPERATORS MANUAL which contains all the
information on operating and doing routine daily
maintenance on this equipment.
The ASSEMBLY and SERVICE MANUAL which is
used by the maintainence department to install the
equipment and to do all maintenance except routine
daily maintenance.
1
Advertisement
Table of Contents

Related Manuals for Foley United 384

Summary of Contents for Foley United 384
- Page 1 Setting the Standard With the World's Most Valued Grinders. MANUAL BEDKNIFE GRINDER This book consists of two manuals: The OPERATORS MANUAL which contains all the information on operating and doing routine daily maintenance on this equipment. The ASSEMBLY and SERVICE MANUAL which is used by the maintainence department to install the equipment and to do all maintenance except routine daily maintenance.
- Page 2 Setting the Standard With the World's Most Valued Grinders. W e are committed to: Providing superior customer support, training, and service. Manufacturing the highest quality products at an unequaled value. Setting the industry standard by investing in technological product innovation. Manufacturing products specifically designed to maintain original equipment manufacturers' specifications.
- Page 3 MANUAL BEDKNIFE GRINDER OPERATORS MANUAL WARNING You must thoroughly read and understand this manual before operating the equipment, paying particular attention to the Warning & Safety instructions. 3847953 (7-03)
-
Page 4: Safety Instructions
SAFETY INSTRUCTIONS Safety Awareness Symbols are inserted into this manual to alert you to possible Safety Hazards . When- ever you see these symbols, follow their instructions. The Caution Symbol identifies special instructions The Warning Symbol identifies special instructions or procedures which, if not strictly observed, could or procedures which, if not correctly followed, could result in damage to or destruction of equipment. - Page 5 SAFETY INSTRUCTIONS IMPROPER USE OF GRINDING WHEEL MAY CAUSE BREAKAGE AND SERIOUS INJURY. Grinding is a safe operation if the few basic rules listed below are followed. These rules are based on material contained in the ANSI B7.1 Safety Code for "Use, Care and Protection of Abrasive Wheels".
-
Page 6: Table Of Contents
OPERATING INSTRUCTIONS This machine is intended for manual reel mower bedknife grinding ONLY. Any use other than this may cause personal injury and void the warranty. To assure the quality and safety of your machine and to maintain the warranty, you MUST use original equipment manufactures replacement parts and have any repair work done by a qualified professional. -
Page 7: Specifications
SPECIFICATIONS AND DAILY MAINTENANCE SPECIFICATIONS Electrical Requirements ....120V 60 Hz 13-amp or 220 VAC 50Hz 7 Amp circuit Net Weight ....................230 lbs [104 kg] Shipping Weight ..................250 lbs [113 kg] Maximum Grinding Length ................ 34 in. [ 864 mm] Sound Level ....................Less than 75 Dba DAILY MAINTENANCE On a daily basis, clean the grinder by wiping all areas down. - Page 8 MOTOR TILT LOCK KNOB MOTOR VERTICAL ADJUSTING KNOB ON/OFF MOTOR SWITCH MOTOR ANGLE PROTRACTOR GRINDING WHEEL ADJUSTABLE CENTER GUARD LOCK KNOB VERTICAL ADJUST KNOB ADJUSTABLE CENTER LOCK RING FIXED CENTER ADJUSTABLE CENTER BED- KNIFE HOLD ADJUSTMENT BLADE FIXED SUPPORT CENTER BLADE ASSY SUPPORT...
-
Page 9: Getting To Know Your Grinder
GETTING TO KNOW YOUR GRINDER OPTIONAL TOOLS Angle Finder (optional) Measures the mounting angles of the bedknife and the grinding wheel motor, so they can be matched (for proper grinding angle). Has a magnetic base. VERTICAL HANDWHEEL GRIND HEAD ADJUSTMENTS 1. -
Page 10: Getting To Know Your Grinder
GETTING TO KNOW YOUR GRINDER (Continued) FIXED SUPPORT FIXED BEDKNIFE SUPPORT Handwheel locks the center in position on the base. See FIG. 4 FIG. 4 CENTER BEDKNIFE SUPPORT MIDDLE SUPPORT - Lower Handwheel locks the center support in position on the base. See FIG. - Center Support Lock Handle Bedknife in rotational position to the grinding wheel. -
Page 11: General Operating Information
WHEN TO SHARPEN THE BEDKNIFE NOTE: To fully sharpen a reel mower, you need to grind the reel blades (using a Reel Grinder) and reshape the cutting edge of the bedknife (using the 384 Bedknife Grinder). NOTE: New bedknives should be ground before being put into use. -
Page 12: General Operating Information
6. Reattach the wheel cover guard. 7. After you install a new or different wheel, we recommend that you dress it before grinding. See Page 10. GRINDING WHEELS FOR MODEL 384 WHEEL PART NO. COLOR/DESCRIPTION/SIZE GRIT USE FOR GRINDING 3700067 6/4 x 1 x 1.25 Bore Flaring Cup... - Page 13 GENERAL OPERATING INFORMATION (Continued) DRESSING THE GRINDING WHEEL There are two methods to dress the grinding wheel, the dressing brick which comes standard with the grinder and the diamond dresser which is optional for the grinder. Dress the grinding wheel whenever there is any glazing ("glazing" is the buildup of stone dust and grinding grit on the face of the wheel).
- Page 14 GENERAL OPERATING INSTRUCTIONS (Continued) USING A FLARE CUP WHEEL FOR ADDED CLEARANCE The shape of some bed bars requires using an optional flare-cup grinding wheel to clear the end supports. See FIG. 15. Flare-cup wheels can be ordered in 6 [150 mm] diameter.
-
Page 15: Operating Instructions
OPERATING INSTRUCTIONS INSTALL THE BEDKNIFE 1. Inspect the Bedknife: Inspect the bedknife and bar for damage (cracks, warpage, bushing wear, excessive knife wear.) Replace or repair as required. (See Manufacturer's Manual.) Thoroughly clean the bedknife, especially on the bottom where the middle support's will contact. Prepare the Machine for Mounting Pivot the grinding head to the vertical position. -
Page 16: Operating Instructions
OPERATING INSTRUCTIONS (Continued) GRINDING THE TOP FACE NOTE: The following instructions presume that you have already studied "General Operating Information" starting on Page 11. Loosen the thumbscrew on the wheel guard and rotate to the rear and lock in place. If you want to match the exsisting angle, place the Angle Finder on the bedknife as shown in FIG. - Page 17 OPERATING INSTRUCTIONS (Continued) TOP FACE GRINDING (continued) When the grind is complete, dress the grind- Next, back off the grinding wheel only enough so ing wheel, cool the knife and spark out. that it is no longer touching the bedknife face. Move the carriage down to the end of the bedknife Infeed the grinding head for only that is supported by the adjustable center stand...
- Page 18 OPERATING INSTRUCTIONS (Continued) GRINDING THE FRONT FACE NOTE: On some mower bedknives, the front face is curved and therefore may not have to be sharpened. Reposition the Head for Front-Face Grinding Set the head angle protractor to zero (if not already at zero) after the top face is ground.
- Page 19 OPERATING INSTRUCTIONS (Continued) GRINDING THE FRONT FACE (Continued) Hand crank the vertical feed adjustment knobs and move the horizontal adjustment until grinding wheel just touches the face of the bedknife and covers the surface to be ground. At this point the grinding wheel rim is to extend over the bedknife surface being ground by 1/2"...
-
Page 20: Mounting Bedknives Without Centering Holes
MOUNTING BEDKNIVES WITHOUT CENTERING HOLES TORO MOUNTING KIT (OPTIONAL) Use Kit #3840553 shown in FIG. 30. When the kit is not available, drill a 1/4" diameter hole in each end of the bedknife about 1/4" deep. It only has to be deep enough for the centers to go into. - Page 21 Bed Knife Grind Angles Front Angle in Make Model Top Angle in Degrees Degrees 0 to -5 Jacobsen 19” & 22” Greens Mower -8 to -10 Jacobsen Blitzer, F133, Fairway +4 to +6 0 to -5 Greens King 418, 518, 422, 522 0 to -5 Jacobsen -8 to -10...
Need help?
Do you have a question about the 384 and is the answer not in the manual?
Questions and answers