Table of Contents
Advertisement
User Manual
Oxygen Concentrators without SensO
Perfecto
Model IRC5PO2
Model IRC5PO2W
Model IRC5PO2V
Dealer: This manual MUST be given to the end
user of this product.
User: BEFORE using this product, read this
manual and save for future reference.
For more information regarding
Invacare products, parts, and services,
please visit www.invacare.com
Perfecto
Oxygen Concentrators with SensO
HomeFill
with SensO
2
Series
™
2
Compatible
®
2
®,
2
2
Perfecto
2
Model IRC5P
Model IRC5PW
Advertisement
Table of Contents

Related Manuals for Invacare IRC5PO2V


Summary of Contents for Invacare IRC5PO2V
- Page 1 Dealer: This manual MUST be given to the end user of this product. User: BEFORE using this product, read this manual and save for future reference. For more information regarding Invacare products, parts, and services, please visit www.invacare.com Series ™ HomeFill Compatible ®...
-
Page 2: Accessories Warning
MAY OCCUR. ACCESSORIES WARNING Invacare products are specifically designed and manufactured for use in conjunction with Invacare accessories. Accessories designed by other manufacturers have not been tested by Invacare and are not recommended for use with Invacare products. ACCESSORIES There are many different types of humidifiers, oxygen tubing, cannulas and masks that can be used with this device. You ... -
Page 3: Table Of Contents
TABLE OF CONTENTS ACCESSORIES ... 2 SPECIAL NOTES ... 4 LABEL LOCATION ... 6 SECTION 1—GENERAL GUIDELINES ... 7 To Reduce the Risk of Burns, Electrocution, Fire or Injury to Persons ... 7 Operating Information ... 8 Radio Frequency Interference... 8 SECTION 2—FEATURES ... -
Page 4: Special Notes
SPECIAL NOTES SPECIAL NOTES Signal words are used in this manual and apply to hazards or unsafe practices which could result in personal injury or property damage. Refer to the following table for definitions of the signal words. SIGNAL WORD DANGER WARNING CAUTION The information contained in this document is subject to change without notice. DO NOT SMOKE while using this device. Keep all matches, lighted cigarettes or other sources of ignition out of the room in which this product is located and away from where oxygen is being delivered. - Page 5 SPECIAL NOTES CAUTION “Caution: Federal law restricts this device to sale or rental by or on order of a physician, or any other practitioner licensed by the law of the State in which he/she practices to use or order the use of this device.” Invacare recommends an alternate source of supplemental oxygen in the event of a power outage, alarm condition or mechanical failure. Consult your physician or equipment provider for the type of reserve system required. This equipment is to be used as an oxygen supplement and is not considered life supporting or life sustaining. Part No 1143482 Perfecto Series ™...
-
Page 6: Label Location
LABEL LOCATION LABEL LOCATION FOR OPERATING INSTRUCTIONS or ALARMS DANGER - RISK OF FIRE NO SMOKING - Keep ALL sources of ignition out of the room in which this product is located and away from areas where oxygen is being delivered. Textiles, oil and other combustibles are easily ignited and burn with great intensity in oxygen enriched air. -
Page 7: Section 1-General Guidelines
These substances MUST be kept away from the oxygen concentrator, tubing and connections, and all other oxygen equipment. DO NOT use any lubricants unless recommended by Invacare. Avoid creation of any spark near medical oxygen equipment. This includes sparks from static electricity created by any type of friction. -
Page 8: Operating Information
SECTION 1—GENERAL GUIDELINES Operating Information For optimum performance, Invacare recommends that each concentrator be on and running for a minimum of 30 minutes at a time. Shorter periods of operation may reduce maximum product life. Keep the oxygen tubing, cord, and unit out from under such items as blankets, bed coverings, chair cushions, clothing and away from heated or hot surfaces, including space heaters, stoves and similar electrical appliances. DO NOT move or relocate concentrator by pulling on the power cord. NEVER drop or insert any object or liquid into any opening. Invacare recommends that Crush‐Proof oxygen tubing be used with this product and not exceed 50 ft in length. There are no user serviceable parts. This does not include normal maintenance items. See maintenance section for user maintenance items. A product should NEVER be left unattended when plugged in. Make sure the Perfecto is Off when not in use. Close supervision is necessary when this product is used near children or physically‐challenged individuals. Additional monitoring or attention may be required for patients using this device who are unable to hear or see alarms or communicate discomfort. DO NOT connect the concentrator in parallel or series with other oxygen concentrators or oxygen therapy devices. Radio Frequency Interference This equipment has been tested and found to comply with EMC limits specified by IEC/EN 60601‐1‐2. These limits are designed to provide a reasonable protection against electromagnetic interference in a typical medical installation. Perfecto Series Part No 1143482 ™... - Page 9 Other devices may experience interference from even the low levels of electromagnetic emissions permitted by the above standards. To determine if the emissions from the Perfecto causing the interference, turn the Perfecto interference with the other device(s) stops, then the Perfecto is causing the interference. In such rare cases, interference may be reduced or corrected by one of the following measures: • Reposition, relocate, or increase the separation between the equipment. • Connect the equipment into an outlet on a circuit different from that to which the other device(s) is connected. Part No 1143482 SECTION 1—GENERAL GUIDELINES Off. If the is Perfecto Series ™...
-
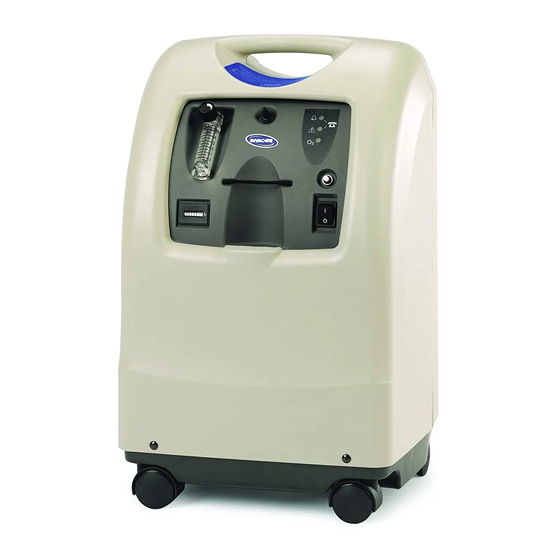
Page 10: Section 2-Features
Accessory - IRCPF16 (Perfecto HomeFill home oxygen compressor - IOH200 *NOTE: This outlet fitting is to be used only for filling oxygen cylinders with the HomeFill home oxygen compressor. The outlet fitting does not affect concentrator performance. Refer to the HomeFill ownerʹs manual, part number 1100873, for connection and operating instructions. When not in use, the plug provided with the concentrator should be inserted into the outlet fitting. For more information about the HomeFill, contact your Invacare dealer. Oxygen Purity Indicator Lights / Fault and Power Indicator Lights Circuit Breaker Power Switch 5 Only) Part No 1143482... -
Page 11: Section 3-Handling
SECTION 3—HANDLING The concentrator should ALWAYS be kept in the upright position to prevent cabinet damage while being transported. If the concentrator is to be reshipped by common carrier, additional cartons are available from Invacare. Unpacking NOTE: For this procedure, refer to FIGURE 3.1. 1. Check for any obvious damage to the carton or its contents. If damage is evident, notify the carrier, or your local dealer. 2. Remove all loose packing from the carton. 3. Carefully remove all the components from the carton. NOTE: Unless the oxygen concentrator is to be used immediately, retain containers and packing materials for storage until use of the concentrator is required. Inspection Inspect/examine exterior of the oxygen concentrator for nicks, dents, scratches or other damages. Inspect all components. Storage 1. Store the repackaged oxygen concentrator in a dry area. 2. DO NOT place objects on top of repackaged concentrator. Part No 1143482 SECTION 3—HANDLING FIGURE 3.1 Unpacking... -
Page 12: Section 4-Typical Product Parameters
5 psi ± 0.5 psi (34.5 kPa ± 3.45 kPa) 0.5 to 5 L/min For flowrates less than 1 L/min, we recommend the use of the Invacare Pediatric Flowmeter IRCPF16 Accessory. 0 L/min to 0.5 L/min Rapid Audible Alarm Beeping (No Accessories Connected). - Page 13 SECTION 4—TYPICAL PRODUCT PARAMETERS Change in maximum recommended flow when back pressure of 7kPa is applied: Filters: Safety System: Width: Height: Depth: Weight: Shipping Weight: Operating Ambient Temperature: Exhaust: Oxygen Output Temperature: Cabinet: Regulatory Listing: Electrical: Part No 1143482 0.7 L/min Cabinet, Outlet HEPA and Compressor Inlet Current overload or line surge shutdown.
- Page 14 SECTION 4—TYPICAL PRODUCT PARAMETERS Placement: Tubing: Relative Humidity: Time of Operation: Recommended Storage and Shipping Tempera- ture: *NOTE: Stated concentration levels achieved after initial warm‐up period (approximately 30 minutes). Perfecto Series ™ No closer than three inches from any wall, furniture, draperies, or similar surfaces. 7 ft cannula with a maximum 50 ft of Crush-Proof Tubing (DO NOT pinch).
-
Page 15: Section 5- Operating Instructions
SECTION 5—OPERATING INSTRUCTIONS OPERATING SECTION 5— INSTRUCTIONS Introduction Your oxygen concentrator is intended for individual use indoors. It is an electronically operated device that separates oxygen from room air. It provides high concentration of oxygen directly to you through a nasal cannula. Clinical studies have documented that oxygen concentrators are therapeutically equivalent to other types of oxygen delivery systems. Your provider will show you how to use your oxygen concentrator. He/She should be contacted with any questions or problems regarding your oxygen concentrator. This owner’s manual will tell you about your concentrator and will serve as a reference as you use your concentrator. Select a Location WARNING NEVER block the air openings of the product or place it on a soft surface, such as a bed or couch, where the air opening may be blocked. Keep the openings free from lint, hair and the like. Keep unit at least 3 inches away from walls, draperies, furniture, and the like. You may select a room where using your oxygen concentrator would be most convenient. Your concentrator can be easily rolled from room to room on its casters. Your oxygen concentrator will perform best when operated under the following conditions. Refer to Typical Product Parameters on page 12. Usage in environments other than those described may result in the need for increased equipment maintenance. The air intake of the unit should be located in a well ventilated area to avoid smoke, airborne pollutants and/or fumes. DO NOT place in a closet. Part No 1143482 Perfecto Series ™... -
Page 16: Plug In Power Cord
SECTION 5—OPERATING INSTRUCTIONS Set Up Plug in Power Cord Plug in power cord to an electrical outlet. Connect Humidifier (If So Prescribed) DO NOT overfill humidifier. DO NOT reverse the oxygen input and output connections. Water from the humidifier bottle will travel through the cannula back to the patient. NOTE: For this procedure, refer to FIGURE 5.1, FIGURE 5.2 on page 17, FIGURE 5.3 on page 18. 1. Remove cap from bottle. 2. Fill humidifier with distilled water to the level indicated by the manufacturer. Replace the humidifier cap and securely tighten. Humidifier Bottle with Cap FIGURE 5.1 3. Insert a flathead screwdriver in the plate groove on the top edge of the filter access door and gently pry the filter access door off (FIGURE 5.2). 4. Pull up and remove the humidifier bottle adapter (FIGURE 5.2). - Page 17 Humidifier Bottle Adapter FIGURE 5.2 5. Attach the humidifier bottle adapter to the humidifier bottle by turning the wing nut on the humidifier bottle counterclockwise until it is securely fastened. See Detail “A” in FIGURE 5.3. 6. Place the humidifier bottle/adapter assembly in the humidifier compartment on the concentrator. See Detail “B” in FIGURE 5.3. 7. Attach oxygen tubing from the humidifier bottle/adapter assembly to oxygen outlet connector on the concentrator. See Detail “B” in FIGURE 5.3. 8. Attach the cannula/patient supply tubing to the humidifier bottle outlet. See Detail “B” in FIGURE 5.3. 9. After assembly, ensure that oxygen is flowing through the cannula. Part No 1143482 SECTION 5—OPERATING INSTRUCTIONS Humidifer Bottle Adapter Insert Flat Head Screwdriver Here Cabinet Filter Filter Access Door Perfecto Series...
-
Page 18: Power Switch
SECTION 5—OPERATING INSTRUCTIONS DETAIL “A” Humidifier Bottle Adapter Humidifier Bottle FIGURE 5.3 Power Switch NOTE: F or t his p rocedure, r efer t o FIGURE 5.4. 1. Press power switch to on position. All the panel lights and the audible alarm will come on for one second, indicating that the unit is functioning properly. Perfecto Series ™ DETAIL “B” Oxygen Tubing Humidifier Bottle... -
Page 19: Flowrate
Flowrate NOTE: For this procedure, refer to FIGURE 5.5 on page 20. 1. Turn the flowrate knob to the setting prescribed by your physician or therapist. Never set the flow greater than 5 L/min. DO NOT change the L/min setting on the flowmeter unless a change has been prescribed by your physician or therapist. NOTE: To properly read the flowmeter, locate the prescribed flowrate line on the flowmeter. Next, turn the flow knob until the ball rises to the line. Now, center the ball on the L/min line prescribed. 2. If the flowrate on the flowmeter ever falls below 0.5 L/min for more than about one minute, the LOW FLOW alarm will be triggered. This is a rapid beeping of the audible alarm. Check your tubing or accessories for blocked or kinked tubing or a defective humidifier bottle. After rated flow is restored, between 0.5 L/min and 0.75 L/min, the LOW FLOW audible alarm will turn off. NOTE: The use of some accessories such as the pediatric flowstand and the HomeFill compressor will deactivate the Low Flow Alarm. Part No 1143482 SECTION 5—OPERATING INSTRUCTIONS CAUTION WARNING Perfecto Series ™... -
Page 20: Front Panel Indicators - Units With Senso2
SECTION 5—OPERATING INSTRUCTIONS Flow Knob Flowmeter 0.5 L/min Ball Front Panel Front Panel Indicators - Units with SensO The SensO feature monitors the purity of oxygen generated by the oxygen concentrator. If purity falls below factory preset standards, indicator lights on the control panel will illuminate. Auto Shut Down Use Backup Below Normal Normal FIGURE 5.6 Front Panel Indicators - Units with SensO2 Perfecto Series ™... -
Page 21: Initial Startup Of The Concentrator
Initial Startup of the Concentrator NOTE: Concentrator may be used during the initial start warm‐up time (approximately 30 min.) while waiting for the O reach maximum. LABEL SYMBOL SYSTEM OKAY over 85% (± 2%) Between 73% (± 3%) to 85% (±2%) SYSTEM FAILURE Below 73% (±3%) Front Panel Indicators - Units without SensO NOTE: For this procedure, refer to FIGURE 5.7. Auto Shut Down Use Backup Normal FIGURE 5.7 Front Panel Indicators - Units without SensO2... -
Page 22: Indicator Lights
SECTION 5—OPERATING INSTRUCTIONS Initial Startup of the Concentrator NOTE: Concentrator may be used during the initial start warm‐up time (approximately 30 min). O during this period. LABEL SYMBOL SYSTEM OKAY SYSTEM FAILURE Perfecto Series ™ purity will build to a maximum STATUS INDICATOR LIGHTS GREEN Indicator Light RED Indicator light Continuous Audible Alarm Sieve-GARD™Compressor Shutdown Call a qualified technician. Switch to a back-up supply of oxygen immediately. -
Page 23: Section 6-Maintenance
SECTION 6—MAINTENANCE SECTION 6—MAINTENANCE WARNING The Invacare concentrators are specifically designed to minimize routine preventive maintenance. Only qualified personnel should perform preventive maintenance on the concentrator. Power should be disconnected before beginning preventive maintenance on the Invacare concentrator. NOTE: At a minimum, preventive maintenance MUST be performed according to the maintenance record guidelines. In places with high dust or soot levels, maintenance may need to be performed more often. Refer to Preventive Maintenance Record on page 25. Routine Maintenance NOTE: The following routine maintenance should be performed more frequently. See recommended intervals in each section and preventive maintenance record. Cleaning the Cabinet Filter CAUTION DO NOT operate the concentrator without the filter installed. NOTE: For this procedure, refer to FIGURE 6.1 on page 24. NOTE: There is one cabinet filter located on the back of the cabinet. 1. Remove the filter and clean at least once a week depending on environmental conditions. NOTE: Environmental conditions that may require more frequent cleaning of the filters include but are not limited to: high dust, air pollutants, etc. Part No 1143482 Perfecto Series ™... -
Page 24: Cleaning The Cabinet
SECTION 6—MAINTENANCE 2. Clean the cabinet filter with a vacuum cleaner or wash in warm soapy water and rinse thoroughly. 3. Dry the filter thoroughly before reinstallation. FIGURE 6.1 Cleaning the Cabinet Filter Cleaning the Cabinet Clean the cabinet with a mild household cleaner and non‐abrasive cloth or sponge. Cleaning the Humidifier NOTE: To clean the oxygen humidifier, follow the instructions provided by the manufacturer. If none are provided, follow these STEPS: 1. Clean the humidifier every day. 2. Wash it in soapy water and rinse it with a solution of ten parts water and one part vinegar. 3. Rinse thoroughly with hot water and refill with distilled water to the level shown on the humidifier. Perfecto Series ™ Part No 1143482... - Page 25 SECTION 6—MAINTENANCE MODEL NO. I RC SERIAL NO. FIGURE 6.2 Preventive Maintenance Record Part No 1143482 Perfecto Series ™...
-
Page 26: Section 7-Troubleshooting Guide
SECTION 7—TROUBLESHOOTING GUIDE SECTION 7—TROUBLESHOOTING GUIDE SYMPTOM: PROBABLE CAUSE: Alarm: Main Power Loss: Short beeps, long 1. Power cord not pause plugged in. 2. No power at outlet. Concentrator not operating, power switch On. 3. Tripped circuit breaker. Beep...Beep... Alarm: System Failure: Continuous 1. - Page 27 SYMPTOM: PROBABLE CAUSE: YELLOW or RED 1. Low oxygen purity.* light Illuminated. 2. Kinked or blocked tubing, cannula or Alarm: humidifier.* Continuous On RED light only. 3. Flowmeter set at 0.5 * Only applies to L/min or less.* IRC5PO2. 4. Unit overheating due to blocked air intake.
- Page 28 NOTES NOTES Perfecto Series Part No 1143482 ™...
- Page 29 NOTES NOTES Part No 1143482 Perfecto Series ™...
- Page 30 NOTES NOTES Perfecto Series Part No 1143482 ™...
-
Page 31: Limited Warranty
Invacare or a dealer, with a copy of the seller’s invoice required for coverage under this warranty. - Page 32 CONTAINED HEREIN. THE APPLICATION OF ANY IMPLIED WARRANTY WHATSOEVER SHALL NOT EXTEND BEYOND THE DURATION OF THE EXPRESS WARRANTY PROVIDED HEREIN. INVACARE SHALL NOT BE LIABLE FOR ANY CONSEQUENTIAL OR INCIDENTAL DAMAGES WHATSOEVER. SOME STATES DO NOT ALLOW THE EXCLUSION OR LIMITATION...
Need help?
Do you have a question about the IRC5PO2V and is the answer not in the manual?
Questions and answers