Table of Contents

Summary of Contents for Neostar Electronics AC002
- Page 1 5 in 1 AIR COOLER - HEATER - AIR PURIFIER - FAN - HUMIDIFIER Model No. AC002 INSTRUCTION MANUAL READ CAREFULLY AND SAVE THESE INSTRUCTIONS FOR FUTURE REFERENCE For after sales support call 0845 555 4440 For more great products visit www.neostar-electronics.co.uk...
-
Page 2: Table Of Contents
CONTENTS Safety instructions Product description 3,4,5,6,7 Operating instructions Maintenance Frequently asked questions Trouble shooting 11,12. Technical data Warranty... -
Page 3: Safety Instructions
SAFETY INSTRUCTIONS When using an electrical appliance, basic safety precautions should always be observed. READ ALL INSTRUCTIONS CAREFULLY BEFORE USING THE APPLIANCE 1. This appliance is for household use ONLY. 2. ALWAYS operate the appliance from a power source of the same voltage, frequency and rating as indicated on the product identification label. -
Page 4: Product Description
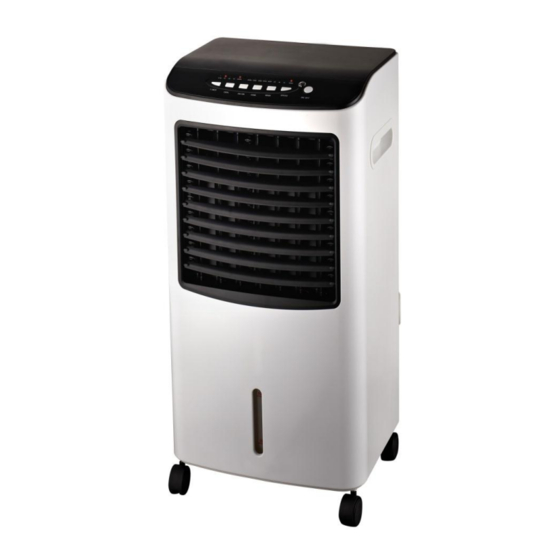
PRODUCT DESCRIPTION Main power switch (Turn to ‘ON’ position to use) Control Panel/Remote Air inlet grille & Filter control sensor Handle Castors Water tank lock Air outlet grille Removable Water tank Water level indicator Ice basket Freezer ice pack... -
Page 5: Operating Instructions
OPERATING INSTRUCTIONS Control Panel Remote control sensor ON/OFF: Press the ON/OFF button to start the appliance. NOTE: the default fan speed is Medium and the fan mode is Normal. When switching OFF, the fan will continue for approximately 5 minutes to dry the honeycomb filter. This is normal and is designed to prolong the life of your cooler. - Page 6 OPERATING INSTRUCTIONS continued MODE: The default setting is NORMAL. Press the mode button to select your requirement. The sequence is as follows:- NORMAL – NATURAL – SLEEP The corresponding LED will illuminate with each selection. NORMAL MODE: The unit will operate at the selected fan speed setting NATURAL MODE: The fan speed will alternate between settings to simulate a natural breeze.
- Page 7 REMOTE CONTROL The AC002 is supplied with a remote control that will operate all the features on the control panel. The remote control will operate up to a distance of 5 meters.
- Page 8 OPERATING INSTRUCTIONS continued Adding Water Add water Removable water bucket Ice basket Freezer Ice blocks Pull out the water bucket. DO NOT use excessive force. Add the water as indicated in the image above using a water vessel or if you prefer, directly from a tap.
- Page 9 OPERATING INSTRUCTIONS continued Fig. 1 Fig. 1 Illustrates the incorrect use of the evaporative air cooler in cooling mode. For correct operation and most effective use, the doors and windows should not be closed. Fig. 2 Fig.2 Illustrates the correct use for the evaporative air cooler. Regular air changes are necessary for the most effective results.
-
Page 10: Maintenance
MAINTENANCE Air Filter Filter lock Honeycomb filter Removing & Cleaning The Filters Switch OFF the appliance and remove the plug from the power socket outlet. Pull the air filter in an outward direction to remove. Turn the filter lock to the horizontal position to release the honeycomb filter. -
Page 11: Frequently Asked Questions
FREQUENTLY ASKED QUESTIONS Q: What is the advantage of an air cooler over a traditional fan? A: A fan simply circulates air at room temperature whilst the air cooler lowers the temperature before circulating it around the room. Based on the principle of evaporative cooling air passes through a moist screen increasing the relative humidity as moist air is cooler. -
Page 12: Trouble Shooting
TROUBLE SHOOTING PROBLEM RESOLUTION The unit does not work Ensure that the unit is plugged in to the correct electrical socket outlet and main power switch is turned on The unit is working but the windows have Open windows and doors condensation Ensure sufficient water is in the tank The COOL LED is flashing... -
Page 13: Technical Data
TECHNICAL DATA POWER SUPPLY: 220~240volts 50Hz POWER CONSUMPTION: 65 Watts HEATER POWER CONSUMPTION: 2000 Watts WATER TANK CAPACITY: 8 litres WATER CONSUMPTION: 1 litre per hour DIMENSIONS: 695 x 370 x 290mm NETT WEIGHT: 7.02kg BOXED DIMENSIONS: 747 x 418 x 332mm BOXED WEIGHT: 8.3kg... -
Page 14: Bs Plug Wiring
TECHNICAL DATA BS Plug Wiring Wiring Instructions: Should it be necessary to change the plug please note the wires in the mains lead are coloured in accordance with the following code: BLUE - NEUTRAL BROWN - LIVE As the colours of the wires in the mains lead of this appliance may not correspond with the coloured markings identifying the terminals in your plug, proceed as follows: 1. -
Page 15: Warranty
WARRANTY ONE (1) YEAR LIMITED WARRANTY Retain this warranty information This product is guaranteed for a period of 12 months from the date of purchase against faulty workmanship and materials. This guarantee will be invalidated if the product is altered or modified in any way, used for purposes other than intended and outlined in this instruction manual or used in an industrial environment.
Need help?
Do you have a question about the AC002 and is the answer not in the manual?
Questions and answers