
Related Manuals for Keurig K-CUPK70


Summary of Contents for Keurig K-CUPK70
- Page 1 P1 201309003 KER755_K70-75.pdf 4C( CMYK) ZB2319 2013.09.06 Owner’ s manual Keurig K-Cup K70/K75 Platinum Brewer ® ®...
-
Page 2: Important Safeguards
Contact installed and located in accordance the power cord or use an adapter. Keurig Customer Service to report with these instructions before it is used. Consult a qualified electrician if any malfunction of or damage to the... -
Page 3: Table Of Contents
K-Cup Pack Holder and the other in the bottom of the K-Cup Pack ® ® KEURIG GOURMET SINGLE CUP HOME BREWING SYSTEM ® Holder. To avoid risk of injury, do not put your fingers in the K-Cup Pack ®... -
Page 4: Set-Up
3. For the best tasting gourmet coffee, tea or To brew into a travel mug, simply remove the brewer behind the Drip Tray (when removed). hot cocoa, Keurig recommends using bottled Drip Tray Assembly and place the travel mug or filtered water. -
Page 5: Controls And Indicators
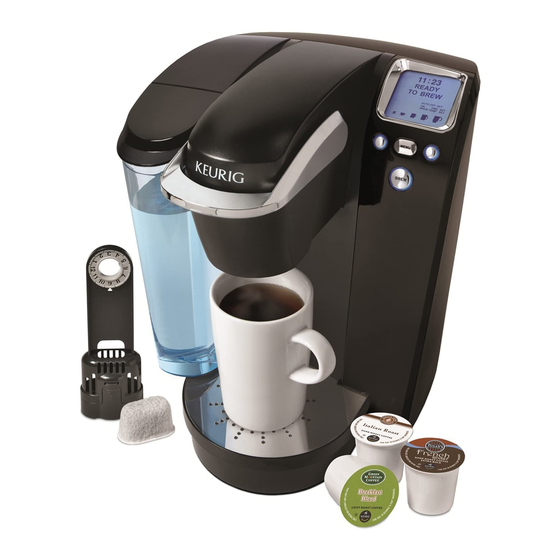
P5 201309003 KER755_K70-75.pdf 1C( K) ZB2319 2013.09.06 Features K70/K75 Platinum Brewer Controls and Indicators K70/K75 Platinum Brewer Water Reservoir Lid Handle K-Cup Pack Vent LCD Control Center ® Easy-Fill Lid Funnel Assembly Housing Power Cord Left Button Housing Power Switch not MAX FILL K-Cup Pack Holder... -
Page 6: Set-Up & First Brew
P6 201309003 KER755_K70-75.pdf 1C( K) ZB2319 2013.09.06 SECTION 1 Set-Up & First Brew IMPorTanT: You cannot use your Keurig brewer until it has been set Lock Tab ® fig. up for its first use. noTe: If brewer has been exposed to temperatures below freezing, allow brewer at least two hours to reach room temperature before brewing. - Page 7 P7 201309003 KER755_K70-75.pdf 1C( K) ZB2319 2013.09.06 small amounts of water coming from the Vent Place a K-Cup pack in the K-Cup Pack ® ® fig. and dripping into the Water Reservoir during Holder (fig. 6). CAUTION: There are two sharp this and subsequent heating —...
-
Page 8: Stopping The Brew Process
“ADD K-Cup pack. ® WATER” is indicated (fig. 9). CAUTION: K-Cup ® pack will be hot. Enjoy your first cup of Keurig Brewed ® gourmet coffee, tea or hot cocoa! -
Page 9: Purging The Brewer
P9 201309003 KER755_K70-75.pdf 1C( K) ZB2319 2013.09.06 The Water Reservoir can be filled in two ways. Purging the Brewer Open the Easy-Fill Lid and pour water directly into the Water Reservoir If your brewer has not been used for more than one week, you should purge while it is still attached to the brewer. -
Page 10: Controls & Indicators
P10 201309003 KER755_K70-75.pdf 1C( K) ZB2319 2013.09.06 SECTION 2 Controls & Indicators (LCD Control Center) Setting the clock The correct time should now be displayed in the LCD Control Center. NOTE: If power is interrupted to the brewer by unplugging it, or if power is Setting the clock is optional. - Page 11 P11 201309003 KER755_K70-75.pdf 1C( K) ZB2319 2013.09.06 b. Press or hold the Left Button under the c. Press or hold the Right Button under the “M” fig. fig. blinking “H” to advance 1 hour at a time, up to scroll through the minutes to your desired to 9 hours.
-
Page 12: Programming Brew Temperature
P12 201309003 KER755_K70-75.pdf 1C( K) ZB2319 2013.09.06 Controls & Indicators (LCD Control Center) Programming Brew Temperature (187° – 192º F) SECTION 2 The brewer is preset to brew at a temperature of 192°. You can adjust this simply press the Power Switch and you can fig. -
Page 13: Cleaning External Parts
P13 201309003 KER755_K70-75.pdf 1C( K) ZB2319 2013.09.06 SECTION 3 Cleaning & Maintenance To change the brew temperature again, repeat steps 1 through 3 to change the temperature up or down, remembering that the cleaning external Parts temperature can only be between 187° and 192° . NOTE: At high altitudes (over 5,000 feet), if boiling occurs, use the temperature Regular cleaning of the brewer’s external components is recommended. -
Page 14: Descaling
P14 201309003 KER755_K70-75.pdf 1C( K) ZB2319 2013.09.06 Cleaning & Maintenance (continued) SECTION 3 Rinse the filter screen with the strong force of water from your faucet. If you have a sprayer, aim the water spray at the filter screen. Fill the Water Reservoir with approximately two inches of clean water and 2. -
Page 15: Descaling Procedure
30 minutes before continuing with the rinse. the largest brew size. Do not use a K-Cup pack. Pour the contents of the ® Visit us online for more information at www.keurig.com/descaling. mug into the sink. STEP 2: SECOND DESCALING SOLUTION RINSE • Repeat the brew process without a K-Cup pack, until ADD WATER is ®... -
Page 16: Storage
P16 201309003 KER755_K70-75.pdf 1C( K) ZB2319 2013.09.06 Cleaning & Maintenance (continued) SECTION 3 Service Beyond these recommended cleaning and maintenance procedures, this brewer is not user serviceable. For service, please refer to the Warranty section of this guide. Storage Empty the Water Reservoir before storing, and take care to ensure that you store your brewer in a safe and frost free environment. -
Page 17: Troubleshooting
P17 201309003 KER755_K70-75.pdf 1C( K) ZB2319 2013.09.06 SECTION 4 Troubleshooting SITUATION SOLUTION SITUATION SOLUTION Brewer does not Plug brewer into an independent outlet. Brewing a The Exit Needle may be clogged (refer to page 14). • • have power Check to be sure that it is plugged in securely. partial cup Clean the K-Cup Pack Holder Assembly if necessary... -
Page 18: Warranty
SPECIFICALLY DISCLAIMS ALL OTHER WARRANTIES WITH RESPECT TO in our system. Keurig will, at its option, repair or replace a defective brewer YOUR K70/K75 PLATINUM BREWER, INCLUDING ANY IMPLIED WARRANTY without charge upon its receipt of proof of the date of purchase. - Page 19 We’re here to help! Scan this QR code with your smartphone for step-by-step videos on cleaning, Keurig is committed to your satisfaction. If you have questions, just give descaling and more. Or if you prefer, you can watch the videos us a call to have them answered quickly without leaving the comfort of on your computer at www.keurig.com/customer-service...
- Page 20 P20 201309003 KER755_K70-75.pdf 4C( CMYK) ZB2319 2013.09.06 To learn more about Keurig, visit www.keurig.com or call 1.866.901.BREW (2739) Keurig, Incorporated 55 Walkers Brook Drive © 2013 Keurig, Incorporated Reading, MA 01867 All rights reserved For Household Use Only Keurig, Incorporated is a wholly-owned P/N 60-202471-000 Rev C subsidiary of Green Mountain Coffee Roasters, Inc.
Need help?
Do you have a question about the K-CUPK70 and is the answer not in the manual?
Questions and answers
I just wanna plug the machine in and use the machine without the on and off timer working
To use the Keurig K-CUPK70 without the on and off timer, simply do not set the clock. The clock must be set to use the Auto On/Off Time programming feature. If the clock is not set, the timer function will not be active, and you can manually turn the brewer on and off as needed.
This answer is automatically generated
i was in the hospital for over a week, a friend/caregiver stayed at my apt. once i was discharged, he had to be around for a week after my surgery so i hardly did anything. he is gone now and my keurig K75 platinum is acting like HAL 9000. "sorry david, i can't do that." pushing ANY of the menu buttons shuts the machine off! the menu button shuts the screen off. i can't do anything but stand there holding the brew button down after 5 tries to finally brew a cup. wtf? what did he do? HOW DO I UNDO IT without a menu?
To reset the Keurig K75 Platinum if the menu buttons are not functioning:
1. Turn off and unplug the brewer.
2. Let it sit unplugged for at least 30 minutes.
3. Plug the brewer back in and power it on.
If the issue persists after this reset, further troubleshooting or service may be needed.
This answer is automatically generated