Table of Contents
Advertisement
Quick Links
Advertisement
Table of Contents

Summary of Contents for X4-TECH ClipStar XXL
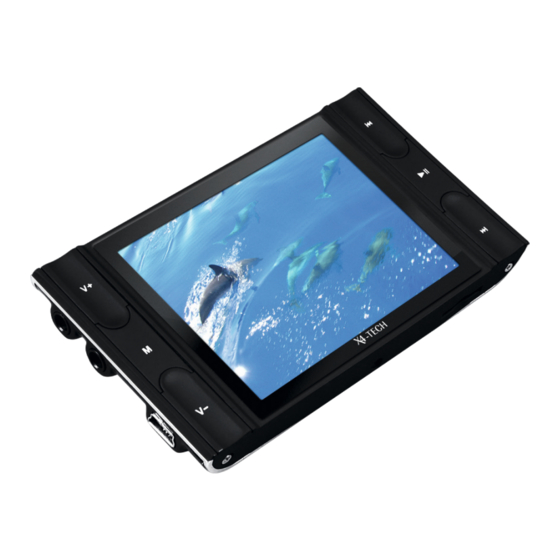
- Page 1 Audio/video player with a 2.8” TFT color display Instruction manual...
-
Page 2: Table Of Contents
Table of contents 5 Chapter 1 Intended use 28 Functions 30 Radio recordings 6 Chapter 2 Safety information Chapter 9 Displaying pictures Chapter 3 General information 10 Features Chapter 10 E-books 11 Battery information 33 Chapter 11 Audio recordings 12 MP3/WMA music format information Chapter 12 Explorer 14 Copyright information Chapter 13 Settings 18 Chapter 4 The device 36 Music... -
Page 3: Chapter 1 Intended Use
This product is intended for music and video file playback. This device features an internal memory of 16 GB that can be expanded, where required, with a micro SD or micro Thank you for deciding on purchasing the ClipStar XXL au- SDHC memory card. dio and video player from X4-TECH. This instruction manual will give you a general idea of how this device operates, Use the USB 2.0 connection to copy music and video files to as well as provide you with information on cleaning and your MP3 player; during data transport between two com- safety procedures. Please read and follow all safety and... -
Page 4: Chapter 2 Safety Information
Safety information The following safety and hazard warnings are not only for › The device should never come in contact with water or the protection for your device, but also serve as a protec- moisture! Condensation can build up suddenly, when this tion against potential health hazards. Please take time to device is brought from a colder into a warmer area (e.g. read the following instructions carefully. when transporting). Should this happen, allow the device We assume no liability for personal or property damage to warm up to room temperature first before using. - Page 5 Precautions! tracting, as using your cell phone while driving. In case of an accident, insurance coverage might be denied and you › Do not use this device in places that are extremely hot, could be partially blamed for the accident respectively! cold, dusty or humid. If your car radio has an audio input connection (Line le- vel), then you can also connect and play this MP3 player › Avoid dropping the device or subjecting it to strong im- through your radio. Appropriate cables are available at pact. This could damage the surface of the device, batteries...
-
Page 6: Chapter 3 General Information
General information The player’s memory is empty when delivered. This means › Integrated FM radio with recording function, stores up to there are no existing music files found on the player that 20 stations can be played back. › Various equalizer settings › Built-in loudspeaker In case you do not have any MP3 files, you can use any › Supports Windows 98/SE/ME/2000/XP/Vista available audio CD with one of the various programs › USB 2.0 with 4.5 MB/second available to create your own MP3 files. It’s also possible to › E-book function (.txt and .lrc) record radio or television programs with the appropriate › Reads micro SD and micro SDHC memory cards with a programs. -
Page 7: Mp3/Wma Music Format Information
A charging process can be identified when the indication Later on, the Compact Disc was developed for storing mu- bar inside the battery symbol begins to fill up. sic in digital form. An analog signal is measured at specific intervals, transferred in numerical value and stored in a The battery is completely charged when the indication bar specific form on the CD. A CD player (or amplifier) evaluates inside the battery symbol has been completely filled with the computed value once again into an analog signal. a color green. An audio CD can hold approximately 70 – 80 minutes of If the MP3 player is not in use, then the POWER switch music. Its format is similar to that of a normal computer should be switched to „... -
Page 8: Copyright Information
Please note: in mobile devices (e.g. the included MP3 player) or in cars is satisfactory. A lot of audio CDs are copy protected to prevent cloning. In some cases, complications could arise when converting The most common known compressed file format is „ MP3“, into a compressed music data file. which offers a variety of quality levels (The principle is: the better the format, the greater the amount of data). Hi-fi CD players will normally not be affected by copy pro- tected CDs; a lot of computer drives will although refuse Later on, other different compressed audio file formats playback. were developed; the second most important after „MP3“ is the „WMA“ format. Meanwhile, there are both free of char- The industry is tending to gradually change back to CDs ge and/or very expensive programs for almost all opera- that are not copy protected, due to the many problems ting systems available on the market that can be used with... - Page 9 compressed music files that can be legally purchased and downloaded. Being able to listen to different samples of music and having the ability to download directly, one is only minutes away (granted you have DSL) from desired songs in either MP3 or WMA format. Chapter 3 General information Chapter 3 General information...
-
Page 10: Chapter 4 The Device
The device 1. „V +“: increase volume 2. „M“: selection/confirmation/main menu 3. „V –“: decrease volume/previous menu 4. „ “: previous/return/fast reverse 5. „ “: turn ON/OFF, Play, Pause, Stop 6. „ “: next/forward/fast forward 7. ON/OFF: main switch 8. Loudspeaker 9. Micro SD memory card slot 10. Earphone jack 11. Earphone jack 12. USB connection Chapter 4 The device Chapter 4 The device... -
Page 11: Chapter 5 Basic Operation/Main Menu
Basic operation/Main menu Turning ON/OFF 5. E-book (text playback) 6. Audio recordings (recordings via microphone) 7. Explorer (file display and deleting files) Push the main switch (POWER) to „ON”. Press and hold the 8. Settings „ “ button to turn the player on. Press and hold the „ “ button to turn the player off. After the player has been tur- The earphones serve as an antenna for radio operation. The ned off, push the main switch to „ OFF“. loudspeaker will turn off, once the earphones have been connected to the player. Main menu Operation The player automatically enters the main menu after being turned on. The main menu allows access to various player If the buttons on the player have not been used for a whi- functions. Use the „ “ buttons to navigate and select a le, then pressing a button for the first time again will only player function. Press the „M“ button to confirm and enter reactivate button functions. Only after a button has been the selected menu. pressed for the second time will its function be activated. -
Page 12: Chapter 6 Music Playback
Music playback Navigate with the „ “ buttons to „MUSIC“ in the main list for direct selection. menu and press the „M“ button to confirm and enter the Use the „ “ buttons for file or folder selection. Pressing music file playback mode. The player immediately begins the „M“ button down shortly starts playback or provides music playback. access to a folder. Press the „V –“ button to return to the previous folder. This device supports MP3 and WMA file playback. Press the „M“ button down longer (approx. 2 sec.) to exit the submenu and to return to the main menu. -
Page 13: Fast Forward/Fast Reverse A Music File
Video file playback Fast forward/Fast reverse a music file Use the „ “ buttons to navigate to „VIDEO” in the main menu and press the „M“ button to enter the video mode. This player supports and plays MPEG-4 (AVI) video files in Press and hold the „ “ buttons to fast forward or fast reverse through a music file. a 320 x 240 format. Please convert your files first, before transferring them to your player. Refer to chapter 16 for more information on converting files. -
Page 14: Volume Regulation
Volume regulation File display in a video mode Press the „M“ button down shortly to enter the file list You can press the „V –“ button to decrease or the „V+“ but- selection mode. Use the „ “ buttons for file or folder ton to increase the volume. selection. Pressing the „ M“ button down shortly starts play- back or provides access to a folder. Press the „ V –“ button to return to the previous folder or press the „M“ button down Fast forward/Fast reverse a video file longer to return to the main menu. -
Page 15: Chapter 8 Radio
Radio Manual Use the „ “ buttons to navigate to „RADIO“ in the main menu and press the „M“ button to enter this submenu. Navigate with the „V+“ or „V –“ button to „Manual“ and Your earphones act as an antenna and need to be plugged press the „ M“ to confirm and enter this mode. Now you can into the earphone jack, otherwise FM reception will not be manually set the radio reception frequency of stations by possible. Please note that the loudspeaker is principally using the „ “ buttons. shut off when the radio mode has been selected and the earphones have been plugged in. Therefore, FM radio re- Preset ception is not possible via the integrated loudspeaker. -
Page 16: Radio Recordings
Displaying pictures of the 20 preset memory locations. Press the „M“ button and navigate with the „ “ buttons to „YES“ to delete a station or to „ NO“ to cancel. Press the „ M“ button to confirm your selection. Automatic Navigate with the „V+“ or „V –“ button to „Auto“ and press Pictures the „M“ button to activate this mode. The device will now begin an automatic station search and will automatically store stations found. This device supports and displays JPEG, BMP and GIF image files. Radio recordings Use the „ “ buttons to navigate to „PICTURES“ in the main menu and press the „M“ button to enter and display You have the opportunity to record from the radio. Press the data found in this mode. -
Page 17: Chapter 10 E-Books
E-books Audio recordings E-books Record Navigate with the „ “ buttons to „E-books“ in the main Navigate with the „ “ buttons to „Record“ in the main menu and press the „ M“ button to enter this mode. This de- menu and press the „ M“ button to enter this mode. vice supports and displays LRC and TXT text files. Press the Press the „ “ button to start recording. Pressing the „ “ „M“ button down shortly to display a file list. button once again lets you pause or resume playback. Pressing the „M“ button down longer will stop and store a Use the „ “ buttons to select a file. Press the „ M“ button recording and return the player to the main menu. Pressing down shortly for text display or to enter a folder. Press the the „... -
Page 18: Chapter 12 Explorer
Explorer Settings Navigate with the „ “ buttons to „Explorer“ in the main menu and press the „M“ button to enter this mode. This function allows you to scroll through the directories found on the player. Press the „M“ button down shortly to access either the file Settings or folder list. Navigate with the „ “ buttons to select a file. Press the „M“ button following this to start playback of the selected file (music, recording, picture, text or film). Navigate with the „ “ buttons to „Settings“ in the main Pressing the „V –“ button in this mode provides access to menu and press the „M“ button to enter this mode. A list a higher folder level and exits the present folder in which of the following menu options will then appear on display: you are in. If the „V+“ button is pressed down longer the dialog „Dele- Music te“ will appear on display. Use the „ “ buttons to select Radio either „Yes“ or „No“ and confirm your selection following... -
Page 19: Music
Use the „ “ buttons to select a menu item. Press the „ M“ Selection Action to confirm a selection. Press the „M“ button down longer The selected song will be played to return to the main menu. Press the „V –“ to return to the Once back once. previous menu. The selected song will be repea- Repeat once ted continuously. Warning: Settings that have been made or changed will only be permanently stored, , when the player has been turned off The songs found within a folder Folder once with the „ “ button. Simply turning the player off with the will be played back once. main power switch will not save any new changes made. The- The songs found within a folder Folder repeat se settings will be lost the next time the player is turned on. will be repeated continuously. All once All songs will be played back once. Music All songs will be repeatedly con- All repeat tinuously. In the submenu „ Music“ you can select one of the following The first few seconds of each song Intro menu items: will be played back. -
Page 20: Radio
Record Equalizer settings In this submenu you have the opportunity to choose one of the following equalizer modes: Normal, 3D, Rock, Pop, This submenu is for recording settings in a .wav format. You Classic, Bass, Jazz and User EQ. can choose between one of the following menu items: User equalizer settings High quality, 256 kbps (occupies more REC You can use the „ “ buttons to select which frequency storage space) quality range an equalizer setting is to be carried out in. You can Normal quality (less memory-intensive) change settings with either the „V+“ or „V –“ button. After From +1 to +5 (The higher the level the REC a setting has been selected you can choose „Yes“ to accept more sensitive the player will be and recor- volume or „ No“ to refuse. dings will be recorded louder.) Radio Display In this submenu you can select one of the following radio This submenu is for changing display settings. You have settings: the opportunity to choose between the following menu... -
Page 21: Auto Play Settings
System Bright- Choose between a setting of 1 to 5. This con- ness trols how bright the display should be. Here you can choose a preferred menu Choose between Normal (regular operation) Language language. Display and Power Save (consumes less power, since mode the display turns off after a certain amount Once selected the following information will of time. appear on display: date, version informati- on, ClipStar XXL available memory capaci- About ty/entire memory capacity and the available memory capacity/entire memory capacity Auto Play Settings of the SD card. Upgrading firmware is only to be carried This submenu is for „Slideshow“ and „E-book“ settings. out by qualified personnel. Should you have Choose between one of the following menu items: Upgrade any questions pertaining to this, then please contact a specialized dealer or our service address. Viewing interval setting (minimum: 1 second; Text maximum: 5 seconds Viewing interval setting (minimum: 1 second;... -
Page 22: Setting
USB connection (Data transfer) Default Setting This device has an USB 2.0 connection with a speed of 4.5 MB/second. This option returns all player settings to a default setting and restores the player to its original delivery status. After Windows XP, Vista this option has been selected a dialog box will appear on These operating systems require no driver installation. The display. You can now use the „ “ buttons to select either driver is already a part of these systems. „Yes“ to restore default settings or „ No“ to cancel this action. The player’s menu language will be reset to English. Turn your computer on and wait until the boot sequence has been fully completed. Connect your MP3 player to a USB port on your computer. Windows will recognize the new hardware automatically and the respective drivers will be installed. -
Page 23: Chapter 15 Sd Card
SD card Creating video files This device supports micro SD and micro SDHC memory The format *.avi is one of the most popular video formats cards. used in portable media players. Video files not matching this type can be easily converted into an .avi format by Inserting or removing the SD card should only take place using the included software. when the player is turned off. Press the memory card carefully into the slot until you hear System requirements it click and according to the symbol that can be seen on the In order to convert video files into an *avi format you will back of the player. To remove the card, press the card down... -
Page 24: Chapter 17 Maintenance And Cleaning
Maintenance and cleaning 8. Click on „ Close“. This is a maintenance-free product that should never be 9. Click on „ Convert Now“ to start converting. disassembled. Once the conversion progress reaches 100 % and has been This product should only be repaired by qualified, autho- completed you will then be able to copy the converted file rized personnel or by an authorized dealer, otherwise any to your player. Now you will be able to play the file. damage caused by improper use or unauthorized modifi- cation will void the warranty/warranty claims and CE aut- horization. Use a soft, dry, clean and fuzz-free cloth to clean. Never use any cleaning agents as these could damage any markings, labels or the exterior. Dust can be easily removed with either a soft, clean brush or a vacuum cleaner. Chapter 16 Creating video files Chapter 17 Maintenance and cleaning... -
Page 25: Chapter 18 Troubleshooting
Troubleshooting You have just purchased an MP3 player that meets today’s Check the earphone jack for dust. standard of technology and that is reliable in operation. Check and compare with another file that is functioning properly, to see Nevertheless, sometimes problems or malfunctions may Static noise duri- if it might only be the MP3 file that occur. That is why we would like to help you with the fol- ng playback. is defect.Try digitalizing again, e.g. lowing possible solutions should any problems occur. Windows Media Player should help to solve this problem. Problem Solution Adjust earphone and player position. The MP3 player Check if the battery has been charged. Poor radio Turn off other devices found within can not be Check if the main power switch has reception. range of the player that might cause turned on. been switched to „ ON“. interference. Check that the player has been con- Check the volume. File transfer is No sound can be nected properly to the PC. -
Page 26: Chapter 19 Product Specifications
Product specifications Service Technical data Should questions arise then please contact our service hotline: › Display: 2.8” dot matrix (320 x 240) TFT Hotline: +49 (0) 53 02/8 06-450 › Data connection: USB 2.0 with 4.5 MB/second Address: x-services.eu gmbh › Built-in memory: 16 GB Service department X4-TECH › Power supply: built-in lithium-ion battery Brackestraße 3 · 38159 Vechelde/Germany › Music formats: MP3/WMA › Video formats: AVI (MPEG-4) › Image formats: JPEG/BMP/GIF Information and updates: http://www.x4-tech.de › Recording format: WAV › We reserve the right to alter specifications and informati- › Dimensions: 93 x 54 x 11 mm; Weight: 61 g on contained in this manual without notice. › Operating temperature: 5°C to 40°C › All brands mentioned are property of X4-TECH or of their › Languages: German, English › OS: Windows 2000/XP/VISTA respective owners. › Record: integrated microphone › X4-TECH assumes no responsibility or liability for any errors › Music output: 2 x 3.5 mm earphone jacks or inaccuracies that may appear in this instruction manual. - Page 27 Version 1.0 –11/2008 www.x4-tech.de...
Need help?
Do you have a question about the ClipStar XXL and is the answer not in the manual?
Questions and answers