Table of Contents
Advertisement
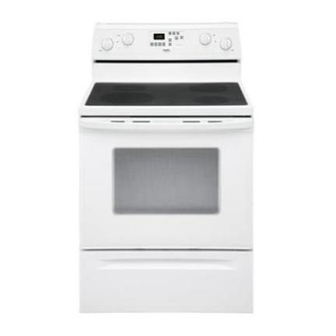
ELECTRIC RANGE
Use & Care Guide
For questions about features, operation/performance, parts,
accessories or service, call: 1-800-253-1301.
Table of Contents ................................................. 2
To the installer: Please leave this
instruction book with the unit.
To the consumer: Please read and
keep this book for future reference.
9761806
Advertisement
Table of Contents

Related Manuals for Inglis Range


Summary of Contents for Inglis Range
- Page 1 ELECTRIC RANGE Use & Care Guide For questions about features, operation/performance, parts, accessories or service, call: 1-800-253-1301. Table of Contents ... 2 To the installer: Please leave this instruction book with the unit. To the consumer: Please read and keep this book for future reference.
-
Page 2: Table Of Contents
TABLE OF CONTENTS RANGE SAFETY ...3 The Anti-Tip Bracket ...3 PARTS AND FEATURES...5 COOKTOP USE ...7 Cooktop Controls...7 Ceramic Glass ...7 Coil Elements and Burner Bowls ...8 Lift-up Cooktop ...8 Home Canning ...8 Cookware ...9 ELECTRONIC OVEN CONTROL ...9 Oven Indicator Lights ...9 Display...9... -
Page 3: Range Safety
The range will not tip during normal use. However, the range can tip if you apply too much force or weight to the open door without having the anti-tip bracket fastened down properly. -
Page 4: Important Safety Instructions
BRACKET. CAUTION: Do not store items of interest to children in cabinets above a range or on the backguard of a range – children climbing on the range to reach items could be seriously injured. Proper Installation – Be sure the range is properly installed and grounded by a qualified technician. -
Page 5: Parts And Features
This manual covers several different models. The range you have purchased may have some or all of the items listed. The locations and appearances of the features shown here may not match those of your model. Control Panels A. Left front control knob B. - Page 6 Range A. Surface cooking area or element B. Anti-tip bracket C. Door stop clip D. Model and serial number plate (behind left side of storage drawer) E. Storage drawer F. Control panel G. Hot surface indicator light (on ceramic glass models) H.
-
Page 7: Cooktop Controls
Stew or steam food. Simmer. Keep food warm. Melt chocolate or butter. REMEMBER: When range is in use or (on some models) during the Self-Cleaning cycle, the entire cooktop area may become hot. NOTE: On self-cleaning models, the cooktop will not operate when the range is in a self-cleaning mode. -
Page 8: Coil Elements And Burner Bowls
Use flat-bottomed cookware for best heat conduction and energy efficiency. Cookware with rounded, warped, ribbed or dented bottoms could cause uneven heating and poor cooking results. Determine flatness by placing the straight edge of a ruler across the bottom of the cookware. While you rotate the ruler, no space or light should be visible between it and the cookware. -
Page 9: Cookware
Cookware IMPORTANT: Do not leave empty cookware on a hot surface cooking area, element or surface burner. Ideal cookware should have a flat bottom, straight sides and a well-fitting lid, and the material should be of medium-to-heavy thickness. Rough finishes may scratch the cooktop. Aluminum and copper may be used as a core or base in cookware. -
Page 10: Clock
Clock This is a 12-hour clock and does not show a.m. or p.m. To Set: Before setting, make sure the oven and Timer are off. 1. Press CLOCK. 2. Press the TEMP/TIME “up” or “down” arrow pad to set the time of day. -
Page 11: Aluminum Foil
To Adjust Oven Temperature Calibration (on models with manual oven control): 1. Make sure the oven temperature control knob is in the Off position. Pull oven temperature control knob straight off and turn it over. 2. Loosen the locking screws inside the oven temperature control knob. -
Page 12: Bakeware
Press TEMP/TIME “up” or “down” arrow pad to set a temperature other than 350°F (177ºC) in 5°F (3ºC) amounts. The bake range can be set between 170°F (77ºC) and 500°F (260ºC). When the oven temperature is greater than 170°F (77ºC), no preheat conditioning time will be shown in the display. -
Page 13: Broiling And Custom Broiling
3. Press START/ENTER. The oven control automatically sets preheating times based on the oven temperature selected. The temperature can be changed after this step. START/ ENTER does not need to be pressed again. After the oven is preheated and the countdown time is finished, a 1-second tone will sound, the ON indicator light will go off and the set temperature will appear on the display. -
Page 14: Timed Cooking
When the set cook time ends, the oven will shut off automatically and “End” will appear on the display. 8. Press OFF/CANCEL or open the oven door to clear the display. RANGE CARE Self-Cleaning Cycle (on some models) Do not block the oven vent(s) during the Self-Cleaning cycle. Air must be able to move freely. -
Page 15: General Cleaning
Prepare Cooktop and Storage Drawer: Remove plastic items from the cooktop because they may melt. Remove all items from the storage drawer. How the Cycle Works IMPORTANT: The heating and cooling of porcelain on steel in the oven may result in discoloring, loss of gloss, hairline cracks and popping sounds. - Page 16 Tiny scratches and abrasions Cooktop Polishing Creme: Rub creme into surface with a damp paper towel or soft cloth. Continue rubbing until white film disappears. Scratches and abrasions do not affect cooking performance, and after many cleanings they will become less noticeable. COOKTOP CONTROLS Do not use steel wool, abrasive cleansers or oven cleaner.
-
Page 17: Oven Light
5. Plug in range or reconnect power. Oven Door For normal range use, it is not suggested to remove the oven door. However, if removal is necessary, make sure the oven is off and cool. Then, follow these instructions. The oven door is heavy. -
Page 18: Troubleshooting
Try the solutions suggested here first in order to avoid the cost of an unnecessary service call. Nothing will operate Is the power supply cord unplugged? Plug into a grounded outlet. Has a household fuse blown, or has a circuit breaker tripped? Replace the fuse or reset the circuit breaker. -
Page 19: Assistance Or Service
Before calling for assistance or service, please check “Troubleshooting.” It may save you the cost of a service call. If you still need help, follow the instructions below. When calling, please know the purchase date and the complete model and serial number of your appliance. This information will help us to better respond to your request. -
Page 20: Warranty
INGLIS BY WHIRLPOOL CORPORATION™ RANGE WARRANTY For one year from the date of purchase, when this appliance is operated and maintained according to instructions attached to or furnished with the product, Whirlpool Corporation will pay for FSP materials or workmanship. Service must be provided by a Whirlpool designated service company.
Need help?
Do you have a question about the Range and is the answer not in the manual?
Questions and answers