Table of Contents
Advertisement
Quick Links
Download this manual
See also:
User Manual
Displays your heart rate as bpm and % of HR
heart rate and exercise duration.
COMPLETE HR
Allows you to set 5 exercise sets for interval training
with HR target zones and recovery calculation. Records
complete files of the exercises.
Predicts your maximal oxygen uptake.
Reduces possible interference from other heart rate
monitors.
Sports watch features.
Cycling functions – speed, altitude and thermometre.
Optional cadence™ and power output sensors™.
Infra red communication allows two-way
exchange of settings and exercise
data with a PC.
S720
/S710
™
™
i
i
H E A R T R A T E M O N I T O R
, average
max
S720
/S710
™
i
H E A R T R A T E M O N I T O R
Quick Guide
Signal/Light
Stop
• exit the
displayed mode
• return to the
Time of Day display
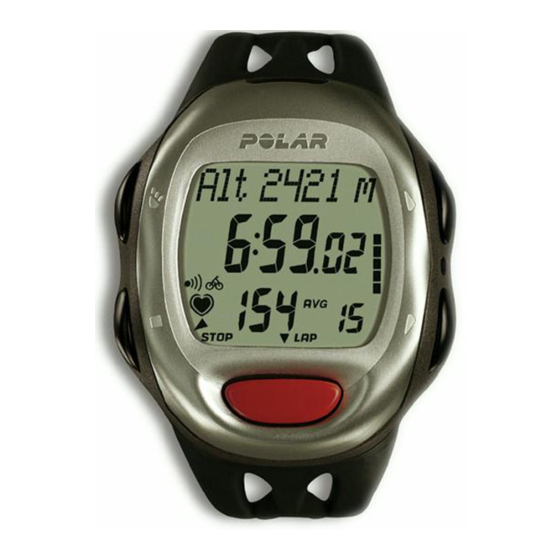
How to Start Measuring Your Heart Rate (BasicUse)
1. Place the transmitter around your chest and wet the electrodes. Place the
receiver on your wrist.
2. Press and hold the OK button to start the measurement. The stopwatch and
the exercise recording start. Your heart rate will appear in about 15 seconds.
U S A
U S E R M A N U A L
How to Stop Measuring Your Heart Rate
™
i
1. Press the stop button. The stopwatch and other calculations stop. Heart rate
measurement continues but exercise data is not recorded into a file anymore.
2. Press the stop button again. The receiver returns to the Time of Day display.
Up
• move onward
• increase the
selected value
Down
• move backward
• reduce the
selected value
OK
•
start measuring the heart rate
•
lock in your selection
Advertisement
Table of Contents

Related Manuals for Polar Electro S720i


Summary of Contents for Polar Electro S720i
- Page 1 Displays your heart rate as bpm and % of HR , average Quick Guide heart rate and exercise duration. COMPLETE HR Allows you to set 5 exercise sets for interval training with HR target zones and recovery calculation. Records complete files of the exercises. Signal/Light •...
- Page 2 Manufactured by: Road Map Dear Customer Polar Electro Oy Professorintie 5 FIN-90440 KEMPELE Scroll Up / Down STOP - exit the displayed mode Tel +358 8 5202 100 Congratulations on purchasing a Polar Heart Rate Time Of Day File Options Fit.
- Page 3 Polar heart rate monitor models S720i and S710i offer you the same features. The difference between these products is in their appearance: Polar S720i case is stainless steal whereas Polar S710i case is plastic. The features of this heart rate monitor provides you with the various ways to customize your exercise sessions so they meet your personal needs.
-
Page 4: Table Of Contents
CONTENTS C. Exercise ........ 45 Resetting the Trip Distance ....62 A. Getting Going ....... 5 Setting Recording Rate ......30 Returning to the Manually Heart Rate Monitor Parts ....... 5 Turning Functions on/off ....... 32 Measure Mode ........45 Autostart for Recording Set Altitude ........ -
Page 5: Getting Going
G. Care and Maintenance ..88 Cumulative Calorie Count ..... 68 A. GETTING GOING Cumulative Exercise Time Count ..68 H. Precautions ......91 Cumulative Riding Time ......68 Odometer ..........68 I. Frequently Asked Interval Training Information ....69 Questions ...... -
Page 6: Buttons And Their Functions
Buttons and Their Functions Moves to the following mode. Increases the Signal/ Light Turns the beep on or off. SIGNAL selected value. LIGHT Turns the backlight on. Reset Resets the heart rate Stop Return - Stops measuring the heart rate. monitor. -
Page 7: Easy Start
Easy Start Installing the Polar Bike Mount Use cable ties to secure the bike mount securely on the rubber pad. How to Prepare the Wrist Receiver Attach the receiver by securing the wrist strap. 1. Since the display is blank when the receiver leaves the factory, you have to activate the wrist receiver by pressing Installing the Polar Speed Sensor™... -
Page 8: How To Put The Transmitter On
4. There are two spoke magnet options. How to Put the Transmitter On You only need to install one of them. Check which of the magnets fits the 1. Attach the transmitter to the elastic strap. spoke of your bike best. (A) One is 2. -
Page 9: How To Stop Measuring Your Heart Rate
4. Press the OK button to start measuring your heart rate. A heart symbol Modes and Their Functions will start flashing and your heart rate (beats per minute) will appear in a maximum of 15 seconds. Your receiver has six main modes: Time of Day, Exercise, File, Options, 5. - Page 10 A. During BasicUse, you can save 99 split and lap times with detailed C. Freely programmable Interval Trainer will automatically guide heart rate and cycling information for each lap. You can configure the you through your interval training session with the help of the display to show information on the following: following, preset exercise phases: •...
- Page 11 • time spent in, above and below your target zones during exercise Function Settings: OwnCal calorie counter on/off, fitness test on/off, • OwnCal calorie expenditure predicted maximum heart rate on/off, altitude on/off • cumulative calorie expenditure • cumulative exercise time Bicycle Feature Settings: bike 1 or 2 on/off, wheel size, •...
-
Page 12: How To Enter Settings
User Information Settings B. HOW TO ENTER SETTINGS Options User Set lbs/ kg feet inch/ cm Birthday Activity 2max In the User Set loop you can move forward only by pressing OK. The digits run faster if you press and hold the up or down button as you adjust the value. - Page 13 Date of Birth (Birthday) You participate regularly in heavy physical exercise at least 5 times 7. Scroll up or down to adjust your month of birth. a week. Ex. you exercise to improve performance for competitive Units 1: setting order Press OK.
-
Page 14: Exercise Settings
Exercise Settings Setting Exercise Sets Preset exercise sets ready for five exercise sets; when you start exercising, When you start setting your exercise preferences your first choice is to select just select one of the sets. whether you want to set your personal exercise set or to exercise with Interval Training Set BasicSet BasicUse option. -
Page 15: Setting Timers
1. In the Time of Day display Setting Timers Options If you start from the Time of Day display, repeat steps 1-5. scroll up or down until OPTIONS is displayed. Exercise Set 6. Scroll up or down until desired timer is displayed. Press OK to start 2. -
Page 16: Setting Interval Type
Setting Interval Type A. Time-based interval You can select four optional types of intervals: 8. Scroll up or down to adjust minutes. Press OK. 9. Scroll up or down to adjust seconds. Press OK. Interval TIMER appears. A. Time-based interval Ends your interval when you have used the preset time. -
Page 17: Setting Recovery Calculation
Setting Recovery Calculation C. Rec. Dist is displayed. Units 1: Adjustable units You can select 3 optional types of recoveries: 10. Scroll up or down to adjust miles. are kilometers and Press OK. hundreds of meters. A. Time-based recovery Ends your recovery as you reach the preset 11. -
Page 18: Setting Recording Rate
Setting Recording Rate The following table shows the maximum exercise times for each recording rate. You can program your receiver to record data in 5, 15 or 60 seconds Altitude Speed Cadence Power Rec. Rate 5s Rec. Rate 15s Rec. Rate 60s intervals. -
Page 19: Turning Functions On/Off
Turning Functions on/off 6. Press OK to start setting the fitness test. On/OFF starts to flash. 7. Scroll up or down to set the fitness test on or off. Press OK. Options Predicted Maximum Heart Rate on/off (HR If you start from the Time of Day display, repeat steps 1-4. Function Set 5. -
Page 20: Bicycle Feature Settings
Bicycle Feature Settings You have the following alternatives to find out the wheel size of your bike: In this section you can set up your preferences for two bikes and adjust the wheel size(s). METHOD 1. Options Look at the wheel of your bike and find the wheel diameter printed on it. On the chart below, find your wheel diameter in inches or in ERTRO Bike Set reading and match it to the wheel size in millimeters on the right. -
Page 21: Cadence On/Off
METHOD 2. Power* on/off If you start from the Time of Day display, repeat steps 1-5. Mark the tread of the front tire with a line and roll the tire perpendicular to the ground. You can also use the valve as 6. -
Page 22: Monitor Settings
Naming Bike 1 and Bike 2 Monitor Settings You can name the bikes with four letters, numbers or marks. Number in the right corner indicates, which bike settings are in use. 1. In the Time of Day display Options (b0=Bike OFF, b1=Bike 1, b2=Bike 2) scroll up or down until Monitor Set 1. -
Page 23: Watch Settings
The units settings affect the following features: Watch Settings Units 1: Units 2: 1. In the Time of Day Options User information kg, cm lbs, feet display scroll up or Date of birth day-month-year month-day-year Watch Set down until OPTIONS Speed km/h is displayed. -
Page 24: Setting Time Of Day
Setting Time of Day Turning Reminders on/off If you start from the Time of Day display, repeat steps 1-4. If you start from the Time of Day display, repeat steps 1-4. 5. Scroll up or down until TIME1/ TIME2 is displayed. 5. -
Page 25: Setting Tips
Setting Tips C. EXERCISE Swap Time 1 or Time 2 In the Time of Day display press and hold the down button. Time 1 or Time 2 is displayed in the uppermost row for a couple of seconds. Displayed time will now be used in all watch and alarm functions. If you chose time 2, “2”... -
Page 26: Exercise
3. Start from the Time of Day display by pressing the OK to start measuring The following displays start to alternate, if you have bike 1 or 2 and your heart rate. A heart symbol will start flashing and your heart rate in altitude on, as you enter the Measure mode. -
Page 27: Measure Mode
Autostart for Recording a Cycling Exercise If there is - - / 00 reading on the display, there is no heart rate reception. If you start from the Time of Day display, press OK briefly to enter the Bring the wrist receiver up to your chest near the transmitter’s Polar logo. Measure mode. -
Page 28: Swapping The Heart Rate Limits
Swapping the Heart Rate Limits Storing Lap and Split Time Press and hold the up button. Repeat until the desired limits are displayed. Press OK to store lap and split time. In the Interval Training mode the limits are automatically swapped when the phase changes to the preset limits. -
Page 29: Swapping The Displayed Exercise Information
Swapping the Displayed Exercise Information Phase Name When you have set your Interval There are six display options, which you can swap between by pressing the Countdown Training Set on, you will have one down button. The receiver saves the upper and lower row settings for the timer extra display. -
Page 30: Resetting The Stopwatch To Zero
Select the Lower Heart Rate Information Row Exercising with Interval Training Set (Int on, E1-E5) 3. Press and hold the down button to select from the following: Current heart rate, average heart rate (avg) or the reading in In this mode you can also use the functions in “Exercise recording mode” percentages of your maximum heart rate (% max) if you have set your section. -
Page 31: Warm-Up Phase
A. Manual interval Warm-up Phase Number of set intervals. 1. First Current interval number. Heart rate limits 1 (if set on). Interval time. Heart rate information. 2. Then If you selected manual interval your interval will end as you Countdown timer 1. press and hold OK. -
Page 32: Cool-Down Phase
Recovery Calculation Cool-down Phase 1. First One of the following is displayed depending on your settings: A. time-based recovery calculation or B. heart- Preset heart rate limits 3 (if set on). rate-based recovery calculation or C. distance-based recovery calculation. 2. Then Countdown timer 3. -
Page 33: Interrupting An Interval Training Exercise
Interrupting an Interval Training Exercise Starting Recovery Calculation 1. Press the stop button to pause the exercise. To start the recovery calculation, press and hold the OK button. 2. Press and hold the stop button to return to the Time of Day display. See “Exercising with Interval Trainer”/ “Recovery calculation”... -
Page 34: Resetting The Trip Distance
Swap the Bike Setting (b0, b1 or b2) Start resetting by pressing and holding the down button. To restart the Start from the Measure mode. Press and hold the down button until Bike 1 same calculation press the OK button or to reset the interval training or 2 or Bike OFF is displayed. -
Page 35: How To Recall Training Information
File (F1-F99) Exe. Time D. HOW TO RECALL TRAINING Some information alternates on the display automatically. Recovery You can make the alternation faster by pressing the OK INFORMATION Exe. Dist button, Ex., the target heart rate zone information. Speed Exercise File Cadence 1. -
Page 36: Exercise Time
Exercise Time (Exe. Time) Altitude (Alt. Avg/ Max/ Min) The exercise time is the amount of time that you have Average, maximum and minimum altitude of the exercise alternate. exercised with the stopwatch running. Average and Temperature (°F or °C Avg/ Max/ Min) maximum heart rates of your exercise alternate on the display. -
Page 37: Calorie Expenditure
Calorie Expenditure (KCal) Interval Training Information (EXE. SET) You will see how many kilocalories you have expended during the exercise. F1-F99 Start with the display Cumulative Calorie Count (Tot. KCal) showing EXE. SET. EXE. SET Calculates the cumulative calories expended during several exercise sessions 1. -
Page 38: Lap Information
3. Press the stop button to return to the previous file level and skip steps 4 - 6. Or, continue recalling more detailed information of the interval phase. Heart-rate-based recovery. 4. Start with the display showing Interval. Press OK to see details of each Time it took reach the preset heart rate reading. -
Page 39: Recorded Samples
Laps Recorded Samples FILE Split time. Check the detailed information of the exercise in the F1-F99 Lap time. sample file. Lap number. Start with the display showing SAMPLES and the number SAMPLES The heart rate at the end of the lap, of recorded sample. -
Page 40: Deleting All Files
6. Press stop to exit the file. Wait appears. The receiver rearranges your 5. Scroll up or down to see the following values: file, which takes few seconds. • cumulative exercise time (Tot. Time) 7. Repress stop to return to the Time of Day display. •... -
Page 41: Returning To Your Previous Maximum Value
E. CONNECTION TO Returning to Your Previous Maximum Value Start with the display showing Max Spd, Max Cad*, Max Alt or Max Pwr* in COMPUTER the records file. 1. Press and hold the signal/light button to start returning to the previous value. -
Page 42: Uploading Settings From Computer
• the heart touch function to show the current heart rate limits, store a B) an optional Polar IR Interface for USB port and Windows® 98 operating lap time or swap the display options during your exercise system or later in your computer. •... -
Page 43: Polar Fitness Test
F. POLAR FITNESS TEST If you want to improve your cardiovascular fitness, it takes a minimum of 6 weeks on an average to see a noticeable change in OwnIndex. Less fit individuals see progress even more rapidly and for more fit individuals more time is needed. -
Page 44: Predicted Maximum Heart Rate
Predicted Maximum Heart Rate (HR Fitness Test Settings To be able to carry out the Polar Fitness Test you need to do the following The HR -p definition is carried out simultaneously with the Polar Fitness settings in the Options mode: Test. -
Page 45: Update Ownindex And Hr
Interrupt the Test Time of Day File Options Fit. Test Connect • You can stop the test any time during the test by pressing the stop button. Failed TEST is displayed for a few seconds. The latest OwnIndex and HR -p are not replaced. -
Page 46: Fitness Classes
Fitness Classes For various fitness classes we recommend the following: The Polar Fitness Test result, your OwnIndex, is most meaningful when comparing your individual values and changes in them. OwnIndex can also 5-7 Maintain current exercise habits be interpreted according to your gender and age. Locate your OwnIndex To ensure good health, for good health on the table to find your current cardiovascular fitness classification,... -
Page 47: Care And Maintenance
G. CARE AND backcover) clean to make sure that the altitude and temperature measurements work. Do not insert any objects into the openings. MAINTENANCE • Do not immerse the speed sensor in water. • Avoid hard hits to the speed sensor as these may cause damage. Batteries Your Polar heart rate monitor is a high-tech instrument of superior Transmitter... -
Page 48: Precautions
H. PRECAUTIONS Detach the sensor from your bicycle. 1. Open the sensor by removing the two small screws, counter-clockwise, with a small screwdriver. 2. Lift the case off carefully. Hold the sensor cover upwards so that the PCBA (printed circuit board assembled) stays in the case. 3. - Page 49 Polar Heart Rate Monitor and Interference Minimizing Possible Risks in Exercising with a Heart Rate Monitor Exercise may include some risk, especially for those who have been sedentary. Electromagnetic Interference Disturbances may occur near high voltage power lines, traffic lights, Before starting a regular exercise program an individual is recommended to overhead lines of electric railways, electric bus lines or trams, televisions, answer to the following questions for health status checking.
-
Page 50: Frequently Asked
I. FREQUENTLY ASKED Notice to persons with pacemakers, defibrillator or other implanted electronic device. Persons who have a pacemaker use the QUESTIONS Polar heart rate monitor at their own risk. Before starting use, we always recommend an exercise test under doctor’s supervision. The test is to ensure the safety and reliability of the simultaneous use of the pacemaker and the heart rate monitor. - Page 51 Center. The guarantee does not cover damage or consequential damage 2. Put the transmitter back and bring the receiver up to your chest near caused by service not authorised by Polar Electro. Polar Service will test the transmitter’s Polar logo. The receiver starts looking for a heart rate your wrist receiver for water resistance after battery replacement and make signal again.
-
Page 52: Technical Specifications
Polar heart rate monitor is designed to indicate the level of physiological strain 1. Check the correct position and distance of the speed sensor with the and intensity in sports and exercise. Polar S720i/S710i also measures altitude spoke magnet and the wrist receiver. - Page 53 Watch accuracy better than ± 0,5 seconds/ day at 77 °F/ 25 °C temperature. Activity Recording rate Polar S720i/S710i is a Class 1 Laser Product. 220-age Accuracy of heart rate measurement: ±1% or ±1 bpm, whichever larger, Limit Values...
-
Page 54: Limited Polar International Guarantee
All rights reserved. No part of this manual may be used or reproduced in any form or by any means without prior written permission of Polar Electro Oy. The names and logos marked with a ™ symbol in this user's manual or in the package of this product are trademarks of Polar Electro Oy, except that Sound Blaster is a trademark of Creative Technology, Ltd. -
Page 55: M.polar Glossary
M. POLAR GLOSSARY Display Symbols Indicates an ongoing heart rate measurement and flashes to the beat of your heart. Activity level: A personal Coded heart rate transmission: assessment of your long term Polar coded transmitter physical activity level that is used in automatically locks in a code to Indicates there has not been heart rate reception for less than 5 seconds. -
Page 56: Display Texts
The graphic bar consists of five blocks. A flashing block indicates in E1-E5: Indicates which exercise set KCal: Indicates the energy which level you are in the Options settings or File recalling loops. you have used for the exercise. expenditure of your exercise. Continuously running bars indicate that the exercise is recorded. - Page 57 Odometer: Measures cumulative received by entering your clinically File mode, you will see the drop in total distance of several exercise measured (in maximal treadmill or your heart rate and the recovery sessions. bicycle stress test) VO and HR distance. 2max OPTIONS: Indicates the Options into the wrist receiver.
-
Page 58: Index
Index Reset maximum values ......76 Reset the stopwatch ......54 12h/ 24h time mode ....... 42 How to enter settings ......18 Reset the trip distance ......62 Activity/button sound On/OFF ....39 -p On/OFF ........33 Return to the Time of Day display ..7 Alarm settings ........
Need help?
Do you have a question about the S720i and is the answer not in the manual?
Questions and answers