
Related Manuals for Pioneer HTZ180DVD


Summary of Contents for Pioneer HTZ180DVD
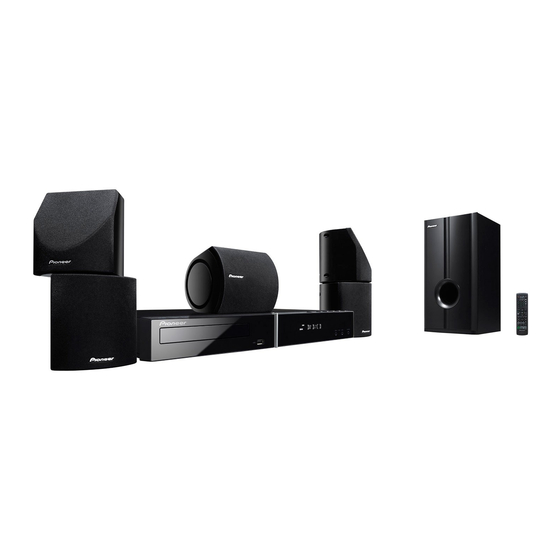
- Page 1 HTZ180DVD DVD/CD Receiver | Receptor con DVD/CD XV-DV180 Speaker System | Sistema de altavoces S-DV180 Operating Instructions Manual de instrucciones...
-
Page 2: Operating Environment
When you find it service personnel. If connected to an AC outlet, the damaged, ask your nearest PIONEER authorized cut-off plug can cause severe electrical shock. Make service center or your dealer for a replacement. - Page 3 (2) this device must accept any interference received, including interference that may cause undesired operation. Product Name: DVD/CD Receiver Model Number: XV-DV180 Responsible Party Name: PIONEER ELECTRONICS SERVICE, INC. Address: 1925 E. DOMINGUEZ ST. LONG BEACH, CA 90801-1760, U.S.A. Phone: 1-800-421-1404 D8-10-4*_A1_En...
-
Page 4: Table Of Contents
Thank you for buying this Pioneer product. Please read through these operating instructions so that you will know how to operate your model properly. After you have finished reading the instructions, put them in a safe place for future reference. - Page 5 07 USB playback and Recording 12 Additional information Using the USB interface ....29 Disc/content format playback compatibility ......41 Recording the tracks of a music CD on a USB device .
-
Page 6: Speaker Setup Guide
• If you are unsure of the qualities and strength of the wall, consult a professional Attaching non-skid pads for advice. • Pioneer is not responsible for any • Attach the smaller non-skid pads to the accidents or damage that result from base of each of the speakers. -
Page 7: Attaching The Brackets
Speaker Setup Guide Attaching the brackets • The subwoofer is not magnetically shielded and so should not be placed near a TV or • Make sure to tighten the supplied screw as monitor. Magnetic storage media (such as securely as possible when attaching the floppy discs and tape or video cassettes) bracket to the back of the speaker. -
Page 8: Connecting Up
WARNING c. If you want to fix to a wall or other surface, perform step b after first securing the • Pioneer bears no responsibility for stand with screws. accidents resulting from faulty assembly or It is recommended that you determine the... - Page 9 Connecting up • Match the color-coded wire with the color Connect the AM and FM antennas. indicator on the label, then insert the color- a. Pull off the protective shields of both AM coded wire into the red (+) side and the antenna wires.
- Page 10 Connecting up b. Secure the speaker wire. 3-2 Connect each speaker terminals on the receiver. After testing for the slack necessary to turn the speaker (see the following step), use the groove • Connect the other end to the color-coded provided to secure the speaker wire.
- Page 11 Connecting up Connect one end to a video input on your • Use the supplied video cable. Connect the other end to the video output of the receiver. • This unit is equipped with copy protection technology. Do not connect this unit to your TV via a VCR using AV cables, as the picture from this unit will not appear properly on your TV.
-
Page 12: Controls And Displays
Controls and displays Chapter 3 Controls and displays Front panel Display PRGSVE SOUND F.SURR. RPT -1 kHz PGM MHz RDM STANDBY/ ON OPEN/CLOSE FUNCTION VOLUME Decord indicators (page 20) DTS lights during playback of a DTS source. 2PL II lights during 2Dolby Pro Logic II decoding and 2D lights during playback of Dolby Digital sources. -
Page 13: Remote Control
SOUND (page 21 and 22) MP3 EXP/V.ENH (page 22) Playback controls (page 17 and 23) TV CONTROL buttons These control Pioneer flat screen TVs. STANDBY/ON (page 15, 30, 44, 46 and 10 SHIFT Function select buttons 11 OPEN/CLOSE (page 16, 30 and 47) Note 1 Hold down the number button 1 for over three seconds with the CLEAR pressed. -
Page 14: Putting The Batteries In The Remote
Controls and displays 12 PLAYLIST buttons (page 25) • When disposing of used batteries, please comply with governmental regulations or 13 MIC VOL +/– (page 31) environmental public instruction’s rules 14 MENU (page 17, 24 and 28) that apply in your country or area. •... -
Page 15: Getting Started
Getting started Chapter 4 Getting started Setting the channel levels Setting Speaker Layout Set the relative channel levels from your main Select the speaker layout for the speaker listening position. setting you arranged to your listening area Press SHIFT+SETUP. environment. Use /... -
Page 16: Using The On-Screen Displays
Getting started If the player isn’t already on, switch it on. Using the on-screen displays If you’re playing a disc with video, also turn on your TV and make sure that it is set to the For ease of use, this system makes extensive correct video input. -
Page 17: Basic Playback Controls
Getting started Basic playback controls Resume and Last Memory When you stop playback of a disc, RESUME The following table shows the basic controls on shows in the display indicating that you can the remote for playing discs. You can find resume playback from that point. -
Page 18: Video Cd/Super Vcd Pbc Menus
Getting started Video CD/Super VCD PBC menus Improving poor FM reception Some Video CD/Super VCDs have menus from If you’re listening to an FM station in stereo but which you can choose what you want to watch. the reception is weak, you can improve the These are PBC (Playback control) menus. -
Page 19: Memorizing Stations
Getting started Memorizing stations Listening to other sources This system can memorize up to 30 stations, stored in three banks, or classes (A, B and C) of You can connect auxiliary sources (TV, satellite 10 stations each. receiver, etc.) to this unit for playback through the speaker system. -
Page 20: Listening To Your System
Listening to your system Chapter 5 Listening to your system Important Auto listening mode • This unit’s audio function may be restricted The Auto listening mode is the simplest way to depending on the sound source, HDMI listen to any source as it was mastered: the audio setting (page 39) or karaoke mode output from the speakers mirrors the channels with the microphone plugged in (page 31). -
Page 21: Using Front Surround
Listening to your system • MUSIC (Dolby Pro Logic II Music) – Pro Listening in stereo Logic II 5.1 channel surround sound, especially suited to music sources (use You can listen to any source — stereo or with any two-channel source) multichannel —... -
Page 22: Boosting The Bass Level
With the uniquely shaped high-quality Press SOUND. speakers supplied with this unit, the Effective Sound mode enables the following Pioneer Use / to select BASSMODE then press exclusive audio technologies designed to ENTER. maximize the real experience of sound Use /... -
Page 23: Disc Playback Features
Disc playback features Chapter 6 Disc playback features During playback, press (pause). Important Press and hold / or / until slow • Many of the functions covered in this motion playback starts. chapter apply to DVD discs, Video CDs/ Press repeatedly to change the slow motion Super VCDs, CDs, DivX video/WMV and speed (shown on-screen). -
Page 24: Browsing Dvd Or Video Cd/Super Vcd Discs With The Disc Navigator
Disc playback features While the slideshow is running: The options available depend on the kind of disc loaded and whether the disc is playing or Button What it does not, but include: • Title – Titles from a DVD-Video disc. ... -
Page 25: Browsing Windows Media Tm Audio (Wma), Mp3, Mpeg-4 Aac, Divx Video/Wmv And Jpeg Files With The Disc Navigator
Disc playback features Browsing Windows Media • You can also play a JPEG slideshow while Audio (WMA), MP3, MPEG-4 listening to WMA/MP3/MPEG-4 AAC AAC, DivX video/WMV and JPEG playback. Simply select the audio file you files with the Disc Navigator want to listen to followed by the JPEG from which you want the slideshow to start. -
Page 26: Listening To Playlists
Disc playback features Press ENTER on ‘B(End Point)’ to set the loop end point. After pressing ENTER, playback jumps back • To add files without the on-screen display, simply press PLAYLIST 1, 2 or 3 during to the start point and plays the loop. normal playback of the file you want To resume normal playback, select ‘Off’. -
Page 27: Creating A Program List
Disc playback features To play the program list, press (play). Program play remains active until you turn off program play (see below), erase the program • Use the following controls during random list (see below), eject the disc or switch off. play: Button What it does... -
Page 28: Switching Subtitles
Disc playback features Use the number buttons to enter a title, Zooming the screen chapter or track number, or a time. • For a time search, enter the number of Using the zoom feature you can magnify a minutes and seconds into the currently part of the screen by a factor of 2 or 4, while playing title (DVD/DivX video/WMV) or watching a DVD, DivX video/WMV title or... -
Page 29: Usb Playback And Recording
(MP3 players) of format FAT16/32. It is not possible to connect this unit to a personal computer for USB playback. • Pioneer cannot guarantee compatibility (operation and/or bus power) with all USB mass storage devices and assumes no responsibility for any loss of data that may occur when connected to this unit. -
Page 30: Recording Specific Tracks
1 Recording cannot be started if there is not enough free space on the USB device. In this case, “Available USB space is low” is displayed. 2 • When recording is finished, a folder named “PIONEER” is created automatically on the USB device. The recorded tracks are stored in this folder. -
Page 31: Singing Karaoke
Singing karaoke Chapter 8 Singing karaoke OFF (default) – Switches the Karaoke mode off. Singing karaoke • Press SHIFT+AUDIO to switch between Using the karaoke features you can plug in a audio channels (except Data discs and USB microphone and mix the sound of your own sources) with discs that have vocal tracks on only one channel: voice with a backing track. -
Page 32: Audio Settings And Video Adjust Menus
Audio Settings and Video Adjust menus Chapter 9 Audio Settings and Video Adjust menus Press HOME MENU and select ‘Video Audio Settings menu Adjust’ from the on-screen display. The Audio Settings menu offers features for adjusting the way discs sound. Video Adjust Press HOME MENU and select ‘Audio Make settings using ///... -
Page 33: Initial Settings Menu
Initial Settings menu Chapter 10 Initial Settings menu Press DVD/CD. Using the Initial Settings menu With playback stopped, press HOME The Initial Settings menu provides audio and MENU and select ‘Initial Settings’. video output settings, parental lock settings, and display settings, among others. Initial Settings If an option is grayed out it means that it Use ///... -
Page 34: Language Settings
Initial Settings menu Setting Option What it means HDMI Resolution* 1920x1080p Set if your TV supports 1920 x 1080 pixel progressive-scan video. (See Connecting using 1920x1080i Set if your TV supports 1920 x 1080 pixel interlace video. HDMI on page 39.) 1280x720p Set if your TV supports 1280 x 720 pixel progressive-scan video. -
Page 35: Options Settings
Initial Settings menu Options settings Setting Option What it means Parental Lock – See Parental Lock below. DivX(R) VOD Display ® See About DivX VOD content below. Speakers settings Setting Option What it means Speaker Distance – Specify the distance of your speakers from your listening position (see Speaker Distance on page 36). -
Page 36: About Divx ® Vod Content
Initial Settings menu • Select by code number: Press then use ® Playing DivX VOD content the number buttons to enter the four-digit Some DivX VOD content may only be playable for Country/Area code. a fixed number of times. When you load a disc The new Country/Area code takes effect after containing this type of DivX VOD content, the ejecting the disc once. - Page 37 Initial Settings menu Press to change the speaker distance for the highlighted speaker. Use / to change the distance. • When you change the distance settings of the front left (L) or front right (R) speakers, all the other speaker distances change relative to it.
-
Page 38: Other Connections
Other connections Chapter 11 Other connections Important • When making or changing connections on the rear panel of this unit, be sure to switch power off and disconnect the power cord from the wall socket. After completing all connections, connect the power cord to the wall socket. Outdoor antenna To component input... -
Page 39: Connecting Using The Component Video
Other connections • Use an HDMI cable to connect the HDMI Connecting using the OUT interconnect on this player to an HDMI interconnect on a HDMI-compatible display. component video output • The arrow on the cable connector body If your TV has component video inputs, you can should be face down for correct alignment use these instead of the standard video outputs with the connector on the player. -
Page 40: Resetting The Hdmi Connection
Other connections Resetting the HDMI connection About HDMI If you get an error message (the display shows HDMI (High Definition Multimedia Interface) HDMI ERR) or if the screen goes blank (for supports both video and audio on a single example, after changing the resolution), check digital connection for use with DVD players, the troubleshooting guide on page 47. -
Page 41: Additional Information
Additional information Chapter 12 Additional information About DualDisc playback Disc/content format playback A DualDisc is a new two -sided disc, one side of which contains DVD content video, audio, compatibility etc. while the other side contains non-DVD This player is compatible with a wide range of content such as digital audio material. -
Page 42: About Dvd+R/Dvd+Rw Compatibility
Additional information About DivX Media Compatible formats Compressed • MPEG-1 Audio Layer 3 (MP3), audio Windows Media Audio (WMA), MPEG- 4 AAC • Sampling rates: 32 kHz/44.1 kHz/ 48 kHz • Bit-rates: Any (128 kbps or higher recommended) DivX is a digital video format created by DivX, •... -
Page 43: About Wmv
Additional information Group 3: Bulgarian (bg), Byelorussian (be), WMA is an acronym for Windows Media Audio Macedonian (mk), Russian (ru), Serbian (sr), and refers to an audio compression technology developed by Microsoft Corporation. WMA Ukrainian (uk) Group 4: Hebrew (iw), Yiddish (ji) content can be encoded by using Windows Group 5: Turkish (tr) Media Player version 7.7.1, Windows Media... -
Page 44: Dvd Video Regions
This unit is designed for use with conventional, may be exposed to smoke or steam. fully circular discs only. Pioneer disclaims all Use on a thick rug or carpet, or cover with cloth liability arising in connection with the use of —... -
Page 45: Screen Sizes And Disc Formats
Additional information Set to 4:3 (Pan & Scan), widescreen Screen sizes and disc formats discs are shown with the left and right sides cropped. Although the picture DVD-Video discs come in different screen looks larger, you don’t actually see aspects, ranging from TV programs, which are the whole picture. -
Page 46: Frequency Step Setting
Additional information Press ENTER while CHANGE is blinking. Setting the Key Lock The system will automatically enter standby mode, then turn on again. You’ll see the new TV You can disable the front panel buttons by system setting in the display after seeing switching the Key Lock feature on. -
Page 47: Troubleshooting
Sometimes the trouble may lie in another component. Investigate the other components and electrical appliances being used. If the trouble cannot be rectified even after exercising the checks listed below, ask your nearest Pioneer authorized service center or your dealer to carry out repair work. -
Page 48: Dvd/Cd/Video Cd Player
Additional information DVD/CD/Video CD player Problem Remedy The disc is ejected • Clean the disc and align the disc properly in the disc guide. automatically after • If the region number on a DVD-video disc does not match the number on the loading. -
Page 49: Tuner
Additional information Problem Remedy Can’t play WMV files. • When the bit rate the file is more than 192 kbps, the file cannot be played back. Tuner Problem Remedy Considerable noise in • Connect the AM antenna (see Basic connections on page 8) and adjust the radio broadcasts. -
Page 50: Error Messages
OVER TEMP • Try lowering the volume. If this problem is not fixed by removing and inserting the power cable, this unit may be damaged. In such an event, please contact a Pioneer- authorized service center or your nearest dealer. -
Page 51: Language Code List
Additional information Language code list Language (Language code letter), Language code Japanese (ja), 1001 Estonian (et), 0520 Lingala (ln), 1214 Slovak (sk), 1911 English (en), 0514 Basque (eu), 0521 Slovenian (sl), 1912 Laothian (lo), 1215 French (fr), 0618 Persian (fa), 0601 Lithuanian (lt), 1220 Samoan (sm), 1913 German (de), 0405... -
Page 52: Specifications
Additional information S-DV180 Speaker system Specifications • Front speakers • Amplifier section Enclosure ..Closed-box bookshelf type (magnetically shielded) RMS Power Output: System ....7.7 cm 1-way system Front, Center, Surround . - Page 53 DTS, Inc. All Rights Reserved. protection technology that is protected Published by Pioneer Corporation. by method claims of certain U.S. patents Copyright © 2009 Pioneer Corporation. and other intellectual property rights All rights reserved. owned by Macrovision Corporation and other rights owners. Use of this copyright...
- Page 54 IMPORTANTE CAUTION RISK OF ELECTRIC SHOCK DO NOT OPEN ATENCIÓN: La luz intermitente con el símbolo de punta El punto exclamativo dentro un triángulo de flecha dentro un triángulo equilátero. PARA PREVENIR EL PELIGRO DE CHOQUE equilátero convenido para avisar el usuário Está...
- Page 55 CA cuando no se tenga la reemplazo del mismo al centro de servicio autorizado intención de utilizarlo durante mucho tiempo PIONEER más cercano, o a su distribuidor. S002*_Sp seguido (por ejemplo, antes de irse de vacaciones).
- Page 56 Gracias por comprar un producto Pioneer. Le sugerimos que lea atentamente este manual de instrucciones a fin de que aprenda a utilizar su equipo de manera adecuada. Después de leer las instrucciones, guárdelas en un lugar seguro para futuras consultas.
- Page 57 07 Reproducción de USB y grabación 12 Información adicional Uso de la interfaz USB ....29 Compatibilidad de reproducción de formatos de disco/contenidos ..41 Grabación de pistas de un CD de música en un dispositivo USB.
-
Page 58: Guía De Configuración De Los Altavoces
• Si tiene dudas acerca de la calidad y la solidez de la pared, consulte a un Preparación de los altavoces profesional. • Pioneer no se hace responsable de accidentes, daños o lesiones como Colocación de almohadillas resultado de una instalación inadecuada. -
Page 59: Fijación De Las Escuadras
Fijación de las escuadras • Los altavoces frontales, centrales y de sonido envolvente suministrados con este • Al fijar la escuadra a la parte posterior del sistema disponen de blindaje magnético. altavoz, asegúrese de ajustar al máximo el Sin embargo, dependiendo de la ubicación tornillo suministrado. -
Page 60: Conexión
ADVERTENCIA haber asegurado el soporte con tornillos. Se recomienda determinar la intensidad de • Pioneer no será responsable de ningún recepción antes de asegurar el soporte con accidente provocado por un montaje o los tornillos. - Page 61 • Haga coincidir el cable con código de color Conecte las antenas de AM y FM. con el indicador de color de la etiqueta y, a a. Quite los protectores de los dos cables de continuación, inserte el cable con código la antena AM.
- Page 62 b. Fije el cable del altavoz. 3-2 Conecte cada terminal de altavoz al receptor. Después de comprobar la holgura necesaria para girar el altavoz (consulte el siguiente • Conecte el otro extremo a los terminales paso), utilice la ranura que se proporciona del altavoz con código de color de la parte para fijar el cable del altavoz.
- Page 63 Conecte un extremo a la entrada de vídeo de su televisión. • Utilice el cable de vídeo suministrado. Conecte el otro extremo a la salida de vídeo del receptor. • Esta unidad está equipada con tecnología de protección contra copia. No conecte esta unidad a su televisión mediante VCR utilizando cables AV, ya que la imagen procedente de esta unidad no se...
-
Page 64: Controles Y Pantallas
Capítulo 3 Controles y pantallas Panel frontal Pantalla PRGSVE SOUND F.SURR. RPT -1 kHz PGM MHz RDM STANDBY/ ON OPEN/CLOSE FUNCTION VOLUME Indicadores de reproducción (página 20) DTS se enciende durante la reproducción de una fuente DTS. 2PL II se enciende durante la descodificación 2Dolby Pro Logic II y 2D se enciende durante la reproducción de fuentes MAIN... -
Page 65: Mando A Distancia
(página 17 y 23) Botones TV CONTROL Controlan los televisores de pantalla plana de STANDBY/ON (página 15, 30, 44, 46 y Pioneer. 10 SHIFT Botones de selección de función 11 OPEN/CLOSE (página 16, 30 y 47) 12 PLAYLIST botones (página 25) 13 MIC VOL +/–... -
Page 66: Inserción De Las Pilas En El Mando A Distancia
14 MENU (página 17, 24 y 28) • Para evitar fugas en las pilas, retírelas cuando no vaya a utilizar el mando a 15 RETURN distancia durante un largo periodo (un mes 16 Teclas de sintonización o más). Si han producido fugas, limpie cuidadosamente cualquier fluido de la pila CLASS (página 19) del compartimento y sustituya las pilas por... -
Page 67: Primeros Pasos
Capítulo 4 Primeros pasos Ajuste de los niveles de canal Ajuste de la distribución de los Ajuste los niveles de canal relativos desde la altavoces posición principal de escucha. Seleccione la distribución de los altavoces Pulse SHIFT+SETUP. para el ajuste de los altavoces que haya fijado Utilice /... -
Page 68: Uso De La Información En Pantalla
Si el reproductor no está encendido, Uso de la información en enciéndalo. Si va a reproducir un disco de vídeo, encienda pantalla también el televisor y asegúrese de que tiene Para facilitar su uso, el sistema utiliza la ajustada la entrada de vídeo correspondiente. información gráfica que aparece en pantalla Pulse ... -
Page 69: Controles De Reproducción Básicos
Controles de reproducción básicos Punto de reanudación y último La siguiente tabla muestra los controles punto memorizado básicos para reproducir discos del mando a Cuando detiene la reproducción de un disco, distancia. Encontrará otras funciones de RESUME le indica en pantalla que puede reproducción en el capítulo 6. -
Page 70: Menús Pbc De Vídeo Cd/Súper Vcd
Menús PBC de Vídeo CD/Súper VCD Mejora de la recepción FM Algunos Vídeo CD/Súper VCD tienen menús Si está oyendo una emisora FM en estéreo pero desde los que puede elegir lo que desea ver. Se la recepción es mala, puede mejorar la calidad denominan menús PBC (Control de del sonido pasando al modo monoaural. -
Page 71: Memorización De Emisoras
Memorización de emisoras Escucha de otras fuentes Este sistema puede memorizar hasta 30 canales, almacenados en tres bancos o Esta unidad admite la conexión de fuentes clases (A, B y C) de 10 canales cada uno. auxiliares (televisor, receptor de satélite, etc.) para su reproducción a través del sistema de Sintonice una emisora AM o FM. -
Page 72: Escuchar Su Sistema
Capítulo 5 Escuchar su sistema Importante Modo de escucha Auto • La función de audio de esta unidad puede El modo de escucha Automático es la forma estar restringida dependiendo de la fuente más sencilla de escuchar cualquier fuente tal de sonido, el ajuste de audio HDMI como se masterizó: la salida de los altavoces (página 39) o el modo karaoke cuando hay... -
Page 73: Uso Del Modo Front Surround (Sonido Envolvente Frontal)
• MUSIC (Dolby Pro Logic II Music) – Sonido Escucha en estéreo envolvente Pro Logic II de 5.1 canales, ideal para la audición de música (para ser Se puede escuchar cualquier fuente — estéreo utilizado con cualquier fuente de dos o multicanal —... -
Page 74: Refuerzo Del Nivel De Graves
Effective Sound permite las siguientes Utilice / para seleccionar BASSMODE tecnologías de audio exclusivas de Pioneer, y, a continuación, pulse ENTER. diseñadas para maximizar la auténtica Utilice / para ajustar el sonido y, a experiencia del sonido inherente en las continuación, pulse ENTER para confirmar. -
Page 75: Características De Reproducción De Disco
Capítulo 6 Características de reproducción de disco Durante la reproducción, pulse (pausa). Importante Mantenga pulsado / o / hasta • Muchas de las funciones de este capítulo que comience la reproducción a velocidad corresponden a los discos DVD, Vídeo CD/ lenta. -
Page 76: Navegación En Discos Dvd Y Vídeo Cd/Súper Vcd Con Disc Navigator
Durante la presentación de diapositivas: Las opciones disponibles dependen del disco introducido y de si el disco se está Botón Función reproduciendo o no, pero incluyen: • Title – Títulos de un disco DVD-Vídeo. Interrumpe la presentación de diapositivas (o la reproducción •... -
Page 77: Búsqueda De Archivos Windows Media Tm Audio (Wma), Mp3, Mpeg-4 Aac, Divx Video/Wmv Y Jpeg Con Disc Navigator
Búsqueda de archivos Windows Sugerencia Media Audio (WMA), MP3, • También puede reproducir una presentación de diapositivas JPEG MPEG-4 AAC, DivX video/WMV y mientras escucha archivos WMA/MP3/ JPEG con Disc Navigator MPEG-4 AAC. Sencillamente seleccione el Use Disc Navigator para encontrar un archivo archivo de audio que quiere escuchar o carpeta específicos mediante el nombre de seguido del JPEG desde el que desea... -
Page 78: Cómo Escuchar Las Listas De Reproducción
Pulse ENTER en ‘B(End Point)’ para Sugerencia establecer el punto final del bucle. Después de pulsar ENTER, la reproducción • Para agregar archivos sin el menú en pantalla, sólo pulse PLAYLIST 1, 2 ó 3 salta al punto de inicio y reproduce el bucle. durante la reproducción normal del Para reanudar la reproducción normal, seleccione ‘Off’. -
Page 79: Creación De Una Lista De Programa
Para reproducir la lista de programa, Sugerencia pulse (reproducir). La reproducción de programa permanecerá • Use los siguientes controles durante la activa hasta que se desactive (véase abajo), reproducción aleatoria: borre la lista de programa (véase abajo), Botón Función expulse el disco o apague el equipo. -
Page 80: Cambio De Subtítulos
Utilice los botones de número para Ampliación de la imagen en introducir un título, capítulo o número de pista o un tiempo. pantalla • Para realizar una búsqueda por tiempo, Mediante la función zoom, puede ampliar una introduzca el número de minutos y parte de la pantalla por 2 ó... -
Page 81: Reproducción De Usb Y Grabación
32. Esta unidad no se puede conectar a un ordenador personal para la reproducción USB. • Pioneer no puede garantizar la compatibilidad (funcionamiento y/o potencia de bus) con todos los dispositivos de almacenamiento masivo USB y, por tanto, no se hace responsable de pérdidas de datos durante su conexión a esta unidad. -
Page 82: Grabación De Pistas Específicas
1 La grabación no puede iniciarse si no hay suficiente espacio libre en el dispositivo USB. En ese caso, se visualiza el mensaje “Available USB space is low”. 2 • Cuando la grabación ha finalizado, se crea automáticamente la carpeta “PIONEER” en el dispositivo USB. Las pistas grabadas se almacenan en esta carpeta. -
Page 83: Cantar Karaoke
Capítulo 8 Cantar karaoke OFF (predeterminado) – Desactiva el modo Cantar karaoke Karaoke. Con las funciones de karaoke puede conectar • Pulse SHIFT+AUDIO para cambiar los un micrófono y mezclar el sonido de su propia canales de audio (excepto en los discos de voz con la pista de fondo. -
Page 84: Menús Audio Settings Y Video Adjust
Capítulo 9 Menús Audio Settings y Video Adjust Pulse HOME MENU y seleccione ‘Video Menú Audio Settings Adjust’ desde la información en pantalla. El menú Audio Settings le ofrece funciones para ajustar el sonido de los discos. Video Adjust Pulse HOME MENU y seleccione ‘Audio Realice ajustes mediante ///... -
Page 85: Menú Initial Settings
Capítulo 10 Menú Initial Settings Pulse DVD/CD. Uso del menú Initial Settings Con la reproducción detenida, pulse El menú Initial Settings permite realizar HOME MENU y seleccione ‘Initial Settings’. ajustes de sonido y vídeo, de bloqueo para padres y de visualización, entre otros. Initial Settings Si una opción aparece en color gris, significa Utilice ///... -
Page 86: Configuración De "Language" (Idioma)
Ajuste Opción Significado HDMI Resolution* 1920x1080p Selecciónelo si su televisor soporta vídeo de barrido progresivo de 1920 x 1080 píxeles. (Consulte Conexión mediante HDMI en la 1920x1080i Selecciónelo si su televisor soporta vídeo entrelazado de 1920 x página 39.) 1080 píxeles. * El valor predeterminado 1280x720p Selecciónelo si su televisor soporta vídeo de barrido progresivo de... -
Page 87: Configuración De "Options" (Opciones)
Configuración de “Options” (Opciones) Ajuste Opción Significado Parental Lock – Consulte Parental Lock abajo. DivX(R) VOD Display ® Consulte Acerca de los contenidos DivX VOD abajo. Configuración de “Speakers” (Altavoces) Ajuste Opción Significado Speaker Distance – Especifique la distancia entre los altavoces y la posición de escucha (consulte Distancia de los altavoces en la página 36). -
Page 88: Acerca De Los Contenidos Divx ® Vod
• Selecciónelo por el número del código: ® Reproducción de contenidos DivX Pulse y utilice los botones de número Algunos contenidos DivX VOD sólo se pueden para introducir el código de país/zona de reproducir un número determinado de veces. cuatro dígitos. - Page 89 Pulse para cambiar la distancia del altavoz resaltado. Utilice / para modificar la distancia. • Cuando modifique la distancia de los altavoces frontales izquierdo (L) o derecho (R), las distancias de todos los demás altavoces cambiarán en relación con este ajuste.
-
Page 90: Otras Conexiones
Capítulo 11 Otras conexiones Importante • Antes de realizar o cambiar conexiones en el panel trasero de esta unidad, asegúrese de apagar la alimentación y desconectar el cable de alimentación de la toma de corriente de la pared. Después de haber finalizado la conexiones, conecte el cable de alimentación al tomacorriente de la red. -
Page 91: Conexión Mediante La Salida De Vídeo De Componentes
• Utilice un cable HDMI para realizar la Conexión mediante la salida de conexión entre la salida HDMI OUT de este reproductor y la toma HDMI de un monitor vídeo de componentes compatible con HDMI. Si su televisor dispone de entradas de vídeo de •... -
Page 92: Restauración De La Conexión Hdmi
Restauración de la conexión HDMI Acerca de HDMI Si recibe un mensaje de error (verá aparecer en HDMI (High Definition Multimedia Interface) pantalla HDMI ERR) o si la pantalla se pone en soporta tanto vídeo como sonido en una sola blanco (por ejemplo, después de cambiar la conexión digital para reproductores de DVD y resolución), consulte la guía de solución de... -
Page 93: Información Adicional
Capítulo 12 Información adicional Acerca de la reproducción DualDisc Compatibilidad de reproducción Un DualDisc es un nuevo disco de dos caras, una de las cuales incluye contenido de vídeo, de formatos de disco/contenidos audio, etc., de DVD, mientras que la otra Este reproductor es compatible con una recoge contenido que no es propio de DVD, amplia gama de tipos de disco (soportes) y... -
Page 94: Acerca De La Compatibilidad Con Dvd+R/Dvd+Rw
Acerca de DivX Soporte Formatos compatibles Audio • MPEG-1 Audio Layer 3 (MP3), comprimido Windows Media Audio (WMA), MPEG-4 AAC • Frecuencias de muestreo: 32 kHz/ 44,1 kHz/48 kHz • Tasas de bits: Cualquiera (se recomienda 128 kbps o superior) •... -
Page 95: Acerca De Wmv
Este reproductor puede reproducir contenido Este reproductor ha sido diseñado para usar de tipo Windows Media Audio. sólo discos circulares convencionales. Pioneer no asume ninguna responsabilidad relacionada con el uso de discos con otras formas. -
Page 96: Regiones De Dvd-Vídeo
Can’t play disc o suciedad, contacte con el centro de servicio (No se puede reproducir el disco) autorizado por Pioneer más cercano. Si bien en las tiendas se pueden comprar productos de limpieza para lentes, no recomendamos su Instalación y mantenimiento uso ya que algunos de ellos pueden dañarla. -
Page 97: Tamaños De Pantalla Y Formatos De Disco
Si lo configura en 4:3 (Pan&Scan), Tamaños de pantalla y formatos los discos para pantalla ancha aparecen con los laterales izquierdo y de disco derecho recortados. Aunque la Existen discos DVD-Vídeo para distintos imagen aparece más grande, en formatos de pantalla, desde programas de realidad no la ve entera. -
Page 98: Ajuste De Paso De Frecuencia
Pulse ENTER mientras parpadea CHANGE. Ajuste de la función Key Lock El sistema entrará, automáticamente, en modo de espera y, a continuación, se encenderá de Para desactivar los botones del panel frontal, nuevo. Verá el nuevo ajuste del sistema de active la función Key Lock. -
Page 99: Solución De Problemas
Inspeccione los otros componentes y los aparatos eléctricos que esté utilizando. Si el problema no se puede solucionar después de comprobar los puntos indicados abajo, solicite al centro de servicio autorizado por Pioneer o a su distribuidor que le haga los trabajos de reparación necesarios. -
Page 100: Reproductor De Dvd/Cd/Vídeo Cd
Reproductor de DVD/CD/Vídeo CD Problema Solución La unidad expulsa el disco • Limpie el disco y alinéelo adecuadamente en la guía de la bandeja. automáticamente después • Si el número de la región en el disco DVD-Vídeo no corresponde al de la unidad, de insertarlo. -
Page 101: Sintonizador
Problema Solución No se reproducen los • Los archivos fueron grabados con DRM (gestión de derechos digitales). No es un archivos WMA o MPEG-4 fallo de funcionamiento. AAC. No se pueden reproducir • Cuando la tasa de bits del archivo es superior a 192 kbps, el archivo no puede archivos WMV. -
Page 102: Mensajes De Error
• Compruebe si los cables del altavoz han sufrido un cortocircuito. Si el mensaje de error sigue OC ERR 2 mostrándose, póngase en contacto con el centro del servicio autorizado de Pioneer o con su distribuidor para que realicen una revisión. -
Page 103: Lista De Códigos De Idioma
Lista de códigos de idioma Idioma (letra de código de idioma), Código de idioma Japanese (ja), 1001 Estonian (et), 0520 Lingala (ln), 1214 Slovak (sk), 1911 English (en), 0514 Basque (eu), 0521 Laothian (lo), 1215 Slovenian (sl), 1912 French (fr), 0618 Persian (fa), 0601 Lithuanian (lt), 1220 Samoan (sm), 1913... -
Page 104: Especificaciones
Sistema de altavoces S-DV180 Especificaciones • Altavoces frontales • Características del amplificador Caja ... . . Caja cerrada tipo estantería (con protección magnética) Potencia de salida RMS: Sistema ..Sistema 7,7 cm de una sola dirección Frontal, Central, Sonido envolvente Altavoces . - Page 105 Macrovision Corporation, y deberá usarse Publicado por Pioneer Corporation. en casa o con fines de visión limitada, a Copyright © 2009 Pioneer Corporation. menos que Macrovision Corporation Todos los derechos reservados. autorice lo contrario. La inversión de ingeniería o el desmontaje están prohibidos.
- Page 106 253 Alexandra Road, #04-01, Singapore 159936 TEL: 65-6472-7555 PIONEER ELECTRONICS AUSTRALIA PTY. LTD. 178-184 Boundary Road, Braeside, Victoria 3195, Australia, TEL: (03) 9586-6300 PIONEER ELECTRONICS DE MEXICO S.A. DE C.V. Blvd.Manuel Avila Camacho 138 10 piso Col.Lomas de Chapultepec, Mexico,D.F. 11000 TEL: 55-9178-4270 K002_B_En Printed in <XRE3232-A>...