Table of Contents
Advertisement
Advertisement
Table of Contents

Related Manuals for TTI TCB-550


Summary of Contents for TTI TCB-550
-
Page 1: Instruction Manual
4W MOBILE CB TRANSCEIVER INSTRUCTION MANUAL www.ttikorea.co.kr... -
Page 2: Table Of Contents
CONTENTS Introduction Supplied Accessories Installation Transceiver Controls and Functions Microphone Jack Volume and Power On/Off Knob LCD Display Down Button Up Button AM/FM and Scan Button Emergency/Calling & Lock Button Squelch Control Knob Antenna Connector Power 13.2DC EXT-SPK Jack LCD Display Microphone Menu Setting Mode How to Operate the Transceiver... -
Page 3: Introduction
The transceiver should normally be mounted horizontally, but may be mounted vertically. The bracket supplied can be fitted above or below the case allowing the TCB-550 to be cradled by the bracket or suspended from it. - Page 4 The same colours are shown on the battery and in the fuse box of the car.) Mount the microphone bracket on one side of the transceiver, or near it using two screws included. Connect the microphone to the transceiver’s microphone receptacle. Now you are ready to operate the transceiver. TCB-550...
- Page 5 Make sure that you have a solid metal-to-metal ground connection. Be careful not to damage the cable during the installation. Warning : Never try the operation of your transceiver before connecting a proper antenna in order not to cause any damage. TCB-550...
-
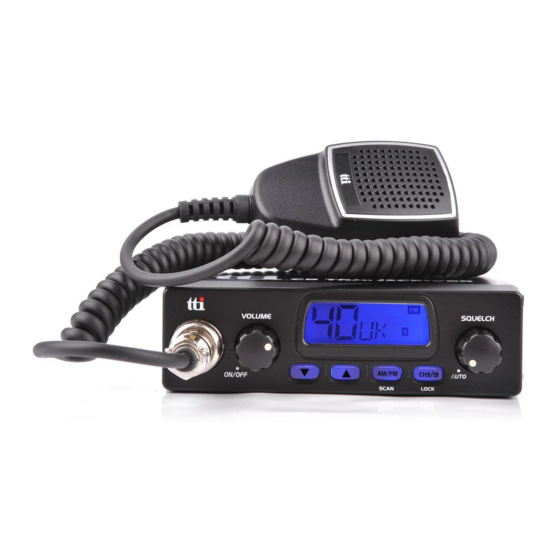
Page 6: Transceiver Controls And Functions
After clicking sound the transceiver is switched on. The more you turn this knob clockwise, the bigger the audio sound grows. 3) LCD Display Most operational information is displayed. Please see item no. 5 for the details of information. TCB-550... -
Page 7: Down Button
If you press the PTT button during scanning, the radio will return to your original channel. Scanning will resume after the scan receive time and/or the scan delay time. Use the up/down buttons to resume scanning immediately. TCB-550... -
Page 8: Am/Fm And Scan Button
Insert the mail connector of the antenna cable into this female antenna connector. 10) Power 13.2 DC The power supply cable is connected to this port. 13.2V 11) EXT-SPK Jack Connecting a loud speaker to this port makes the built-in speaker turned off. TCB-550... -
Page 9: Ext-Spk Jack
Keypad Lock Auto Squelch 9 10 Scan Emergency Channel Display 6. Microphone PTT Button : While pressing this button, you can transmit. 4 Pin Microphone Connector : Connect this to the microphone jack on the front panel of the transceiver. TCB-550... -
Page 10: Menu Setting Mode
Press the PTT button of the Microphone to complete the selections and changes and return to the stand-by mode. Or the selections and changes will be automatically confirmed after 5 seconds of the selections and changes. TCB-550... -
Page 11: How To Operate The Transceiver
Settings Display Band Europe 40 Ch FM 4W Spain 40 Ch AM/FM 4W France 40 Ch FM 4W, 40 Ch AM 1W Poland 40 Ch AM/FM 4W ( Polish frequencies : 5KHz) TCB-550... -
Page 12: Trouble Shooting
Europe 40 Ch FM 4W, 40 Ch AM 1W 10. Trouble Shooting If you experience problems with your TCB-550 transceiver, first check the power supply source. Poor connection of the power supply source can cause problems such as no transmission, no reception or poor reception, and weak or no sound. -
Page 13: Ce Declaration
11. CE Declaration CE versions of the TCB-550 which display the CE symbol on the product label, comply with the essential requirements of the European Radio and Telecommunication Terminal Directive 1999/5/CE. This warning symbol indicates that this equipment operates in non-harmonised frequency bands and/or may be subject to licensing conditions in the country of use. -
Page 14: Specification
60 dB Adjacent Channel Rejection 60 dB Conducted Spurious More than 60 dB Frequency Response 300 to 2500Hz Built-in Speaker 8 Ohms, round Squelch Adjustable; Threshold less than 1 microvolt * Specification is subject to change without prior notice. TCB-550... -
Page 15: Restrictions On The Use
40 Ch - 1W AM - Individual licence is required 40 Ch - 4W FM - Individual licence is required UK-RA-MPT 1382/MPT1320; UK-R&TTE - S.IL. 2000:730 POLAND PL EU 40 Ch - 4W FM / AM - Free use TCB-550... -
Page 16: Frequency Table
27.365 27.365 27.365 27.365 27.360 27.95125 27.375 27.375 27.375 27.375 26.925 27.375 27.370 27.96125 27.385 27.385 27.385 27.385 27.385 27.380 27.97125 26.935 27.395 27.395 27.395 27.395 26.945 27.395 27.390 27.98125 27.405 27.405 27.405 27.405 26.955 27.405 27.400 27.99125 AM/FM TCB-550... - Page 17 DECLARATION OF CONFORMITY We, TTI Tech Co.,Ltd (TTI house, 1163-4, Gaepo-dong, Gangnam-gu, Seoul, Korea) declare on our sole responsibility that this equipment complies with the essential requirements of the Radio and Telecommunications Terminal Equipment Directive, 1999/5/EC, and that any applicable Essential Test Suite measurements have been performed.
Need help?
Do you have a question about the TCB-550 and is the answer not in the manual?
Questions and answers