Fisher Gold Bug 2 Operating Manual
Prospector’s metal detector
Hide thumbs
Also See for Gold Bug 2:
- Operating manual (16 pages) ,
- Owner's manual (25 pages) ,
- Operating manual (16 pages)

Related Manuals for Fisher Gold Bug 2


Summary of Contents for Fisher Gold Bug 2
- Page 1 Gold Bug 2 Prospector’s Metal Detector Operating Manual F I S H E R R E S E A R C H L A B O R A T O R Y...
-
Page 2: Table Of Contents
CONTENTS About Your Gold Bug-2............pg. 1 Setting Up................. pg. 4 Hipmounting ................pg. 5 Control Panel ................pg. 6 Mode and Mineralization Switches ........pg. 8 Mode and Mineralization Switch Selection ....... pg. 10 Turn On Procedure ..............pg. 12 Ground Reject Procedure ............. -
Page 3: About Your Gold Bug-2
ABOUT YOUR DETECTOR The Fisher Gold Bug, the predecessor to the Gold Bug-2, was designed and engineered by Fisher engineers from the ground up for the sole purpose of finding gold nuggets small gold nuggets, large gold nuggets, deep gold nuggets and gold nuggets in highly mineralized soil. - Page 4 • Double-locking, fiberglass-reinforced, nylon lower stem. • Quartz-crystal locked electronics. • Built-in Fisher quality backed by 7 years of engineering excellence. The rest is up to you. You’ve got the right detector, but you’ll have to decide where to search and then put in a lot of long, hard hours searching.
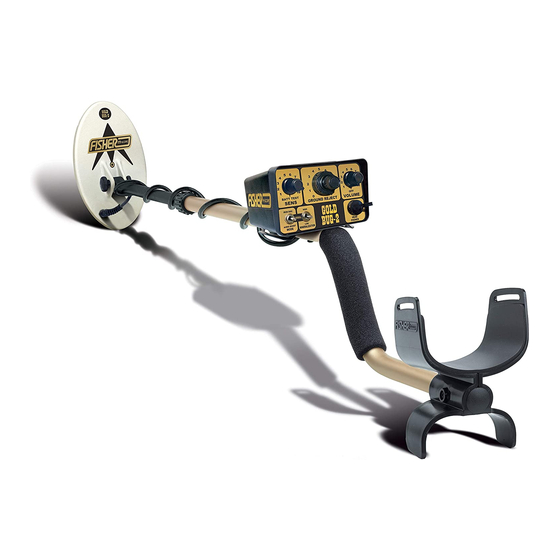
- Page 5 ABOUT YOUR DETECTOR Detector stand Padded arm rest Foam grip Drop-in battery compartments Cable Anodized aluminum connector upper stem Snap button Threshold 7-foot search control coil cable Velcro® Lock nut straps Adjustable, ABS, fiberglass-reinforced, nylon lower stem Nylon wing nut Waterproof, ESI-shielded, elliptical search coil Figure 1.
-
Page 6: Setting Up
SETTING UP The Gold Bug-2 comes to you just about ready to use. There are only three steps required: sliding the lower stem into the upper stem, connecting the loop coil to the control housing and adjusting the angle of the search coil. Take a look at page 3 and familiarize yourself with the parts of the Gold Bug-2 before proceeding. -
Page 7: Hipmounting
SETTING UP 6. With the shaft length and coil angle properly adjusted, you should be able to move into your “search” position (as shown on page 4) by leaning forward very slightly and raising your arm (still straight) until the search coil is about 2 inches above the ground and 12 inches in front of your foot. -
Page 8: Control Panel
HIPMOUNTING 4. Put your belt through the slots on the underside of the housing. 5. Left handers should wear the housing on their right hip and right handers on their left hip. NOTE: if you’re working in shallow water, you may want to strap the control housing on your chest in a heavy plastic bag, and seal Figure 4. - Page 9 Furthermore, we recommend our Fisher Phones, which enhance faint-target response by blocking out unwanted external noises, such as wind and vehicle sounds.
-
Page 10: Mode And Mineralization Switches
CONTROL PANEL 6. GROUND REJECT: This dual-knob control is used to electronically tune the search coil to prevailing ground-mineralization conditions. The small knob on top only makes one revolution and is used for coarse adjustments. It has 25 fixed positions. The large knob on the bottom is for fine-tune adjustments and is capable of 16 turns and an infinite number of positions. - Page 11 MODE AND MINERALIZATION SWITCHES The MINERALIZATION switch adjusts your Gold Bug-2 for ground conditions. It does this by decreasing or increasing the sensitivity (or gain) of your Gold Bug-2. Unlike the SENSITIVITY control, the MINERALIZATION switch also affects the retune speed, which is the amount of time it takes for your Gold Bug-2 to automatically retune itself after the search coil has passed over a target.
-
Page 12: Mode And Mineralization Switch Selection
MODE AND MINERALIZATION SWITCH SELECTION The chart below shows how your Gold Bug-2’s sensitivity and ability to operate in mineralized soil is affected by each combination of MINERALIZATION and MODE toggle-switch settings. High MIN. MIN. Mode switch in normal NORM MIN. - Page 13 MODE AND MINERALIZATION SWITCH SELECTION conditions will usually require the HIGH MINERALIZATION setting. IRON DISCRIMINATION MODE Don’t search in the IRON DISC mode unless the area is heavily littered with iron trash. This mode is better used by hunting in the NORMAL or AUDIO BOOST modes and switching to the IRON DISC mode only to identify a strong target response.
-
Page 14: Turn On Procedure
TURN ON PROCEDURE 1. Set your controls as follows: MODE: NORMAL MINERALIZATION: LOW SENS: 10 GROUND REJECT: 10 VOLUME: OFF NOTE: You will probably find that most of your searching will be done with the MODE and Figure 8. MINERALIZATION switches set to The threshold signal is a soft background NORMAL and the SENSITIVITY tone heard when operating the Gold... -
Page 15: Ground Reject Procedure
GROUND REJECT PROCEDURE When your Gold Bug-2 is properly tuned or “ground balanced,” it will have only a minimum response to ground minerals when the search coil is raised or lowered. Precise adjustment of the GROUND REJECT control is critical to your success. The lower the MINERALIZATION or the higher the SENSITIVITY settings, the more important it is to maintain proper ground rejection. - Page 16 GROUND REJECT PROCEDURE the GROUND REJECT control so that there is no change or at least only a small change in the threshold hum as you bob the coil up and down. Start by clicking the small, center knob back to about 8.
-
Page 17: Searching
SEARCHING 1. Keep the search coil moving at a comfortable rate. Remember that the Gold Bug-2 is a motion detector and responds only when the search coil (or the target) is moving. 2. Keep the search coil parallel to and as close to the ground as possible. - Page 18 SEARCHING MINERALIZATION, you also slightly decrease the sensitivity of your Gold Bug-2, and the retune speed increases slightly. This increase in the retune speed helps your Gold Bug-2 ignore abrupt changes in ground mineralization and hot rocks, but it also results in a slight decrease in sensitivity.
-
Page 19: Pinpointing
SEARCHING ferrous or gold. The IRON DISC mode, however, will ignore most hot rocks and small a ferrous objects while responding to gold and other nonferrous objects. 10. You can also use the IRON DISC mode to identify many buried targets that produce a good, strong signal. -
Page 20: Target Recovery
PINPOINTING the spot where the HOT SPOT was, and quickly mark the target location with your finger or digging tool. 7. For very strong signals, you may improve your pinpointing accuracy by adding one or more of the following steps: 1) Lift the coil until the signal is just barely heard. - Page 21 TARGET RECOVERY rocky ground, so a small pick axe is first choice for most electronic prospectors. Always carry a small magnet to determine if your target is just a nail or some other ferrous object. A ferrous object will stick to the magnet, whereas a gold nugget will not.
- Page 22 TARGET RECOVERY 5. If the target sounds small (faint and soft), sprinkle some of the target dirt on top of the Gold Bug-2 search coil. If you get a response, you can set aside the rest of the dirt in your hand and concentrate on the dirt on your coil.
-
Page 23: False Signals
FALSE SIGNALS A false signal occures when something that shouldn’t sound like a good target sounds like one. For example, the Gold Bug-2 may detect metal in your boots if you swing your search coil too close to your feet. Here’s some other sources of false signals, and here’s what to do about them. - Page 24 FALSE SIGNAL Solution: Hunt in the NORMAL MODE, but use the IRON DISC Mode to check targets to see if they’re ferrous. Fortunately, there’s not much junk in nugget country, and with practice you’ll be able to recognize a lot of it. Nails, for example, will respond with two beeps across the length of the nail (end to end), but only one beep when the search coil is swept at right angles to the length of the nail.
-
Page 25: Operating Tips
OPERATING TIPS 1. We’ve already said it, but it bears repeating: take your time, overlap your sweeps, keep your coil close to the ground, recheck your ground adjustment often. 2. Use good headphones: Your Gold Bug-2 will detect small, deep nuggets other detectors have missed. But to hear the very faintest targets, you’ll need headphones. -
Page 26: Coin Shooting, Beach And Relic Hunting
COIN SHOOTING, BEACH AND RELIC HUNTING There’s no reason why you can’t use your Gold Bug-2 for “coin- shooting” in parks, relic hunting old town sites or hunting on the beach. True, the Gold Bug-2 was designed for prospecting, but it’s also suitable for Treasure Hunting. -
Page 27: Maintenance
BATTERY REPLACEMENT Figure 13. Your Gold Bug-2 operates on two 9V batteries that drop into compartments at the rear of the control housing. Snapping the door latch in place makes the battery connection. MAINTENANCE Your Gold Bug-2 doesn’t require a lot of care but there are a few things you should do to keep it in peak operating condition. -
Page 28: Treasure Hunters' Code Of Ethics
TREASURE HUNTERS’ CODE OF ETHICS LETS PRESERVE OUR TREASURED SPORT! Laws governing the use of metal detectors are becoming more and more common. In many countries, the use of metal detectors is illegal or severely restricted. Don’t let this happen in your area. -
Page 29: Where To Use Your Gold Bug-2 In The U.s
Where To Use Your Metal Detector In The U.S. National Forest and Federal Lands—Metal detecting is allowed only by special permit acquired from the federal government. Each area has a district office. Corps of Engineers, Lakes, Shorelines and Lands—Permission has been granted only on predisturbed sites, such as beaches and attached swimming areas. -
Page 30: Specifications
SPECIFICATIONS Length ......Extended ........... 53" Collapsed........40" Weight ....... Complete ........2.9 lbs. Control Housing ...... 1.0 lbs. Handle and Coil ...... 1.9 lbs. Frequency ......LF Search ........ 71.01 kHz Response ......... (VCO) Operating Modes ..... 1. All-metal Autotune (Normal) 2. - Page 31 5. Electro-Static Insulated to eliminate certain types of false signals. Fisher Research Laboratory does not warrant suitability to specific use. Fisher Research Laboratory shall in no event be liable for any direct, inciden- tal, consequential or indirect damages.
- Page 32 REPUTATION Fisher produced the first patented metal detector in 1931. For over 70 years, the Fisher logo has been a mark of excellence. LIFETIME WARRANTY Fisher believes in the products they produce and backs this belief with a limited Lifetime warranty. Warranty may vary outside the United States.
Need help?
Do you have a question about the Gold Bug 2 and is the answer not in the manual?
Questions and answers