Table of Contents
Advertisement
Quick Links
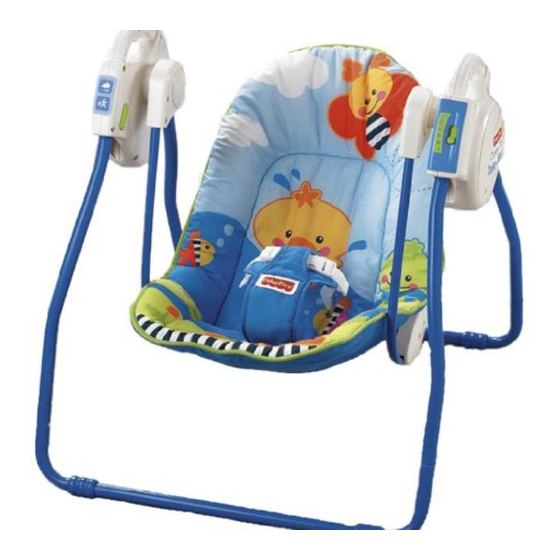
Open Top Take-Along Swing
™
Product features and decoration may vary from the picture above.
Model Numbers: 79028, B2479, B2106, B2107
Please keep this instruction sheet for future reference,
as it contains important information.
Adult assembly is required.
Tool required for assembly: Phillips screwdriver (not included).
Requires four "C" (LR14) alkaline batteries for operation (not included).
Weight Limit: 20 lbs (9 kg).
IMPORTANT! The maximum weight limit for this product is 20 lbs. If your child
weighs less than 20 lbs., but is really active and appears to be able to climb
out of the swing, immediately discontinue its use.
Advertisement
Table of Contents

Related Manuals for Fisher-Price 79028


Summary of Contents for Fisher-Price 79028
- Page 1 Open Top Take-Along Swing ™ Product features and decoration may vary from the picture above. Model Numbers: 79028, B2479, B2106, B2107 Please keep this instruction sheet for future reference, as it contains important information. Adult assembly is required. Tool required for assembly: Phillips screwdriver (not included).
-
Page 2: Warning And Caution
Usually, we can solve the problem over the telephone or send you replacement parts. Please call Fisher-Price® Consumer Relations, toll-free at 1-800-432-5437, 8 AM - 6 PM EST Monday through Friday. Hearing-impaired consumers using TTY/TDD equipment, please call 1-800-382-7470. - Page 3 Parts 2 Swing Frames Seat Pad 2 Base Tubes Seat Frame #6 x " Screw - 2 Shown Actual Size...
- Page 4 IMPORTANT! Before assembly, inspect this product for damaged hardware, loose joints, missing parts or sharp edges. DO NOT use if any parts are miss- ing or broken. Contact Fisher-Price® for replacement parts and instructions if needed. Never substitute parts. Swing Frame...
- Page 5 Assembly Base Tube • While pressing the buttons on the end of each front leg, insert the front legs into the ends of one of the base tubes. • Push the front legs down into the base tube until the buttons “click” into place.
- Page 6 Assembly PULL UP Base Tube • While standing on the base tube, pull the front legs up. The front legs should remain secured to the base tube. If you can remove the front legs, you have not assembled them correctly to the base tube. Re-read and repeat assembly step 2.
- Page 7 Assembly Base Tube • While pressing the buttons on the end of each back leg, insert the back legs into the ends of the remaining base tube. • Push the back legs down into the base tube until the buttons “click” into place.
- Page 8 Assembly PULL UP PULL UP Base Tube • While standing on the base tube, pull the back legs up. The back legs should remain secured to the base tube. If you can remove the back legs, you have not assembled them correctly to the base tube. Re-read and repeat assembly step 4.
- Page 9 Assembly Seat Frame Seat Hubs Socket Frame Arm Frame Arm Seat Frame Socket • Position the seat frame so that the tubes are upright, as shown. Hint: Note the location of the socket inside each seat hub. The ends of the frame arms will be inserted into these sockets.
- Page 10 Assembly Seat Seat • Insert a screw through the outside of each seat hub and into each frame arm. Tighten the screws with a Phillips screwdriver. Do not over-tighten.
- Page 11 Assembly Upper Pocket Seat Back Tube Waist Belts Waist Belt • Fit the pad upper pocket onto the seat Slot back tube, as shown. • Insert the waist belts on the seat hubs through the slots in the pad.
- Page 12 Assembly Lower Pocket Seat Bottom Tube • Fit the pad lower pocket onto the seat bottom tube, as shown. Assembly is now complete.
-
Page 13: Battery Installation
Battery Installation Battery Compartment Door • Locate the battery compartment door on the frame. • Loosen the screws in the battery compartment door with a Phillips screwdriver. • Remove the battery compartment door. • Insert four "C" (LR14) alkaline batteries as indicated inside the battery compartment. -
Page 14: Battery Safety Information
Battery Safety Information 1.5V x 4 "C" (LR14) SHOWN ACTUAL SIZE Batteries may leak fluids that can cause a chemical burn injury or ruin your product. To avoid battery leakage: • Do not mix old and new batteries or batteries of different types: alkaline, standard (carbon-zinc) or rechargeable (nickel-cadmium). -
Page 15: Securing Your Child
Securing Your Child WARNING • To prevent serious injury or death from falls and being strangled in the restraint system: - Always use the restraint system. - Never use with an active child who may be able to climb out of the seat. •... - Page 16 Securing Your Child Anchored End Anchored End Free End Free End Loosen Tighten To tighten the belts: • Feed the anchored end of the belt up through the buckle to form a loop • Pull the free end of the belt •...
- Page 17 IMPORTANT! Before each use, inspect this product for damaged hardware, loose joints, missing parts or sharp edges. DO NOT use if any parts are miss- ing or broken. Contact Fisher-Price® for replacement parts and instructions if needed. Never substitute parts.
- Page 18 Room-to-Room Portability WARNING • To prevent serious injury or death from falls and being strangled in the restraint system, always use the restraint system. • Never use on any elevated surface. • Make sure your child is properly secured in the swing seat. •...
- Page 19 Storage Lift • Lift the seat bottom. • Press the frame release buttons on the inside of the frames and push the front legs inward. • Press the frame release buttons on the inside of the frames and push the back legs inward.
-
Page 20: Fcc Note (United States Only)
Asia: Mattel East Asia Ltd, Room 1106, South Tower, World Finance Centre, Harbour City, Tsimshatsui, HK, China Fisher-Price, Inc., a subsidiary of Mattel, Inc., East Aurora, NY 14052 U.S.A. ©2003 Mattel, Inc. All Rights Reserved. ® and ™ designate U.S. trademarks of Mattel, Inc.
Need help?
Do you have a question about the 79028 and is the answer not in the manual?
Questions and answers