AMX SIP Communications Gateway CSG-500 Operation/Reference Manual
Sip communications gateway
Hide thumbs
Also See for SIP Communications Gateway CSG-500:
- Installation manual (2 pages) ,
- Installation manual (2 pages) ,
- Operation/reference manual (64 pages)
Table of Contents
Advertisement
Quick Links
Download this manual
See also:
Installation Manual
Advertisement
Table of Contents

Related Manuals for AMX SIP Communications Gateway CSG-500

Summary of Contents for AMX SIP Communications Gateway CSG-500
- Page 1 CSG SIP Communications Gateway Operation/Reference Guide Operation/Reference Guide SIP Communications Gateway CSG-500, CSG-544, CSG-580 N e t w o r k / C o m m u n i c a t i o n L a s t U p d a t e d : 0 8 / 1 0 / 2 0 1 1...
- Page 2 Products repaired under this policy will carry a ninety (90) day warranty on material and labor. • AMX will notify the AMX Authorized Partner with the cost of repair, if cost is greater than the Standard Repair Fee, within five (5) days of receipt.
-
Page 3: Safety Certification And Agency Approvals
Safety Certification and Agency Approvals Safety US/CSA 60950 IEC 60950 AS/NZS 60950 EN 60950 Other A-Tick (Australia) CE Mark (European Union) 2002/95/EC Restrictions on Hazardous Substances (RoHS), 2005/747/EC lead free exemption (Annex C) ... - Page 4 Safety Certification and Agency Approvals CSG SIP Communications Gateway...
-
Page 5: Table Of Contents
Table of Contents Safety Certification and Agency Approvals ... iii Safety... iii Other ... iii Telecom ... iii EMC ... iii CSG SIP Communications Gateway ...1 Overview ... 1 CSG Specifications ... 2 CSG Interface... 3 Installation ...5 Unpacking the Unit ... 5 Inspecting Your Shipment... - Page 6 Table of Contents Music on Hold ... 34 Call Queues... 35 Creating a Queue ... 35 Agent Login Settings ... 37 Voice Menus ... 37 Creating a Voice Menu ... 39 Voicemail Menu ... 40 Creating the Required Voice Menus for DTMF... 41 Record a Voice Menu ...
- Page 7 Table of Contents Other Settings Slide Out Menu ... 69 Setting Up Your Touch Panel to Work with Your CSG ... 71 MET-ECOM Web Console ... 72 Configuration Page - SIP Settings Tab ... 73 Configuring VoIP ... 74 Installing the NetLinx Module ... 74 CSG SIP Communications Gateway Operations/Reference Guide...
- Page 8 Table of Contents viii CSG SIP Communications Gateway Operations/Reference Guide...
-
Page 9: Csg Sip Communications Gateway
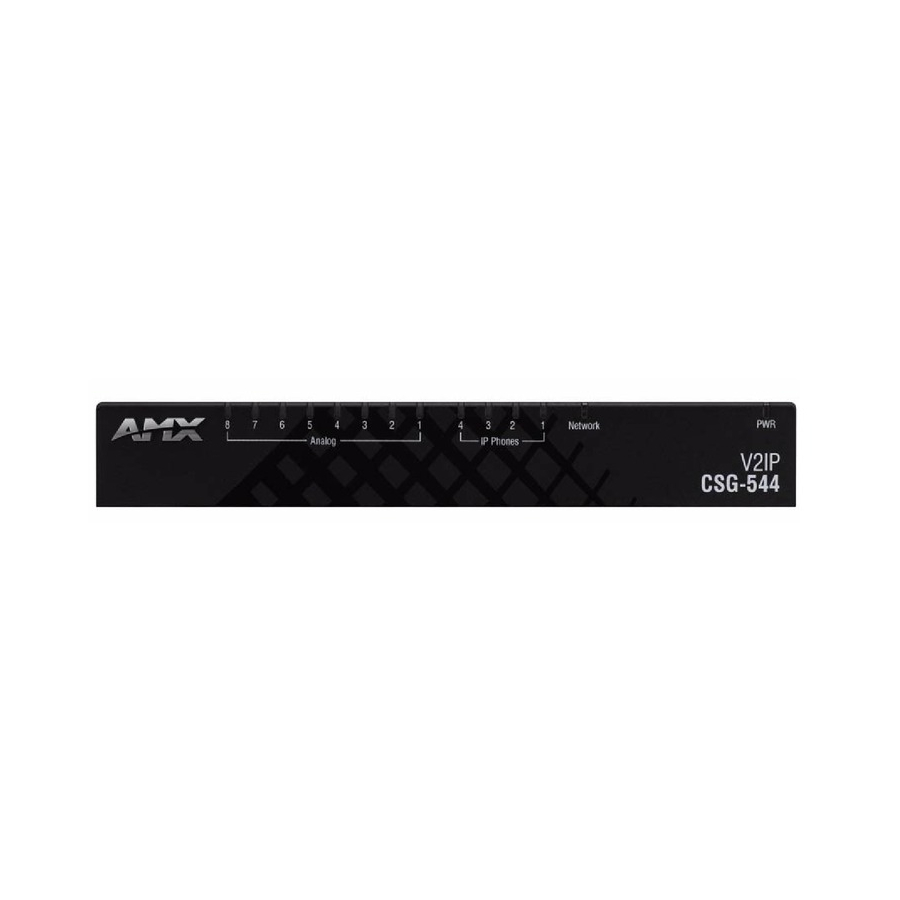
CSG-544 and CSG-580 to outside PSTN or POTS networks. The CSG-544 allows for up to four phones and four PSTN lines. The CSG-580 allows for up to eight PSTN lines. The CSG supports AMX Session Initiated Protocol (SIP)-enabled touch panels—such as the MVP-8400i, MVP-5200i, NXD-1000Vi, NXD-700Vi, and NXD-500i—and the MET-ECOM Metreau Entry Communcator, as well as 3rd party IP phones. -
Page 10: Csg Specifications
IP Phones ports Analog ports Compatible Devices Included Accessories Other AMX Equipment 1.74” x 11.45” x 5.44” (4.41 cm x 29.09 cm x 13.82 cm) 2.25 lbs (1.02 kg) Metal with black matte finish Constant current draw: 2.6 A @ 12 VDC •... -
Page 11: Csg Interface
CSG SIP Communications Gateway CSG Interface The CSG interface enables you to create a PBX solution that rivals the features and functionality of traditional telephony switches. Current PBX solutions are expensive and proprietary. Using the CSG, you can replace an existing small business PBX. Since it runs on Linux, it inherits all of the power and stability of that operating system. - Page 12 CSG SIP Communications Gateway CSG SIP Communications Gateway Operation/Reference Guide...
-
Page 13: Installation
When you unpack your unit, carefully inspect it for any damage that may have occurred in shipment. If damage is suspected, file a claim with the carrier and contact your reseller from which the unit was purchased or AMX Technical Support. Keep the original shipping container to use for future shipment or proof of damage during shipment. - Page 14 Installation Port/LED Correlation FIG. 2 CSG - Ports/LEDs CSG SIP Communications Gateway Operation/Reference Guide...
-
Page 15: Understanding The Leds
Understanding the LEDs There are 14 LEDs on the front panel of the CSG. The eight LEDs corresponding to the analog ports on the rear panel, indicate the type of interface installed. The definition of each LED and its color representation is explained below. -
Page 16: Pin Assignments
Installation If you press the RST CFG button, you to lose all configuration settings. Pin Assignments The following tables describe the pin assignments for the different ports on the CSG. Console Port Pinouts Description Ground (Connect to DB9 pin 5) Unused (Leave Open) Primary RxD (To CSG) -
Page 17: Installing The Hardware
If you are using the CSG-544, do NOT connect analog ports 1-4 to a phone line. Since both the FXS ports and the phone lines supply power, the hardware could sustain damage. This damage is not covered under the AMX standard warranty. This unit must be connected to the Telecommunications Network in your country using an approved line cord, e.g.: for Australia use only line cords complying with... -
Page 18: Mounting The Csg
Installation Mounting the CSG FIG. 4 illustrates the proper mounting installation options for wall mounting the unit: LEDs pointing UP DO NOT point the LEDs DOWN FIG. 4 Acceptable Mounting Orientation options (wall mounting) Instructions for Wall Mounting 1. Select the area to mount the CSG unit (refer to FIG. 4). The unit should be mounted at or below eye level to properly view the LEDs. - Page 19 There are indicators on both the bracket and the mounting clips to show which end is the “top” to ensure correct mounting orientation (see FIG. 5). The bracket has a notched side to indicate the top of the piece. The DIN mounting clips also have two holes drilled in the top portion of the clips that indicate the top of the clip.
- Page 20 Installation FIG. 7 illustrates the correct mounting orientation of the DIN Rail Mounting Bracket and the orientation of the mounted device. FIG. 7 Device mounted on a DIN rail using the DIN Rail Mounting Bracket kit Mounted Device (front panel facing UP) Bracket/Clamp assembly mounted to...
- Page 21 Installation You can also mount the CSG by attaching the mounting brackets to the bottom of the unit. FIG. 8 displays the CSG with mounting brackets attached to its underside. The bracket clamps attach to the DIN rail as shown in FIG. 6. FIG.
- Page 22 Installation CSG SIP Communications Gateway Operation/Reference Guide...
-
Page 23: Telephone System Configuration
Telephone System Configuration This chapter provides information on how to initially set up your telephone system via the CSG Interface. The CSG Interface gives you the ability to set up your telephone system without the need to use command line configuration. -
Page 24: Bonjour (Zero-Configuration) Client
Telephone System Configuration Bonjour (Zero-Configuration) Client You can also log on to the CSG by using a zero-configuration networking client that allows you to determine the unit’s IP address, such as Bonjour or a similar zero-configuration client. Zero-configuration (or Zeroconf, also known as "Bonjour") technology provides a general method to discover services on a local area network. -
Page 25: The Csg Interface
The CSG Interface The CSG Interface gives you the ability to configure the basic hardware and dial plan elements you need when initially setting up your system. You must create trunks, system users, conferencing, voice mail, etc. After logging into the CSG Interface, you’re presented with a variety of options on the left side of the page. FIG. -
Page 26: Analog Hardware Configuration
Telephone System Configuration In the upper right corner of each page you will see the Apply Changes and Logout buttons. Click Apply Changes to save and activate any changes you have made on a page so that you can utilize the changes. Click Logout on any page to exit the CSG Interface. -
Page 27: Advanced Analog Options
Advanced Analog Options There are also some advanced settings which are applied to your analog hardware. Specify them as needed, or accept the default values. Advanced Analog Options Option Description Opermode Setting operation mode, or Opermode, sets the On Hook Speed, Ringer Impedance, Ringer Threshold, Current limiting, Tip/Ring voltage adjustment, Minimum Operational Loop current, and and AC Impedance selection as predefined for each countries analog... -
Page 28: Trunk Configuration
Telephone System Configuration Advanced Analog Options (Cont.) Echo This option enables you to specify the type of Non Linear Cancellation NLP Processor (NLP) you want applied to the post echo-cancelled Type audio reflections received from analog connections. There are several options: •... -
Page 29: Analog Trunks
Trunk definitions are used in calling rules, dial plans, and call routing, etc. You can use a mixture of both analog and VoIP trunks. Analog Trunks Select the Analog Trunks tab to access the Manage Analog Trunks page. Here you can create an analog trunk definition for each analog port on your CSG. - Page 30 Telephone System Configuration New Trunk Analog Page Options (Cont.) Answer on If this option is enabled the reception of a polarity reversal will Polarity Switch mark when an outgoing call is answered by the remote party. Hangup on In some countries, a polarity reversal is used to signal the Polarity Switch disconnect (or hang up) on a phone line.
- Page 31 FIG. 15 Edit Analog Trunk The Audio Tuning section will allow you to calibrate your analog ports for optimum performance. Please ensure that your analog lines are plugged in before clicking the Easy Calibrate button. Your CSG must not have any active calls for the calibration process to complete successfully on all analog ports. If you wish to reset the calibration, click the Reset Calibration button.
-
Page 32: Adding Service Providers
The list of VoIP service providers and corresponding configuration information is pulled dynamically from a secure AMX webservice. If you are already a VoIP provider customer, select the provider from the list, click Add, and input your user name and password. Once you have added a service provider it will appear in the Service Providers list. -
Page 33: Adding Voip Trunks
Adding VoIP Trunks If you do not have a subscription with one of the VoIP providers listed above, or you have a special VoIP setup, you can add a custom VoIP trunk. Click the VoIP Trunks tab to add a VoIP (SIP or IAX) service provider. The Create New SIP/IAX Trunk page will be displayed. - Page 34 Telephone System Configuration The following options will be available: Edit VoIP Trunk Page Options Option Description Provider Name Enter a unique name to help you identify this trunk for use in calling rules, etc. Hostname The hostname or IP address assigned to the VoIP provider or server.
-
Page 35: Outgoing Calling Rules
Click Add when you have completed your changes, or Cancel to discard your changes. Outgoing Calling Rules An outgoing calling rule pairs an extension pattern with a trunk used to dial the pattern. This allows different patterns to be dialed through different trunks (e.g. "local" 7-digit dials through an analog line but "long distance"... - Page 36 Telephone System Configuration The Calling Rules menu shows every rule name established, the pattern the rule will match against, the trunk used to complete the call, and the failover trunk to be used. of call. Several default calling rules will be available when you initially set up your CSG.
-
Page 37: Dial Plans
New CallingRule Page Options (Cont.) Use Trunk Specify the trunk through which calls, matching the specified pattern, will be placed. Strip This option gives you the ability to remove specified number of digits from the front of the call string before the call is dialed and placed through the trunk specified in Use Trunk. -
Page 38: User Extensions
Telephone System Configuration User Extensions The User Extensions page is used to create individual user accounts on the system. Each user definition includes an extension, name, password, etc. User extension definitions are the basic components of your phone system. They are needed for voicemail, conferencing, call queues, dial plans, etc. Click the Users tab to view the main User Extensions page. - Page 39 Create New User Page Options (Cont.) Dial Plan This option references the Dial Plans option on the left tool bar. Based on the calling rules you’ve created, you can restrict the outbound dialing of this extension to local calls, emergency calls, and standard long-distance calls for North America.
- Page 40 Telephone System Configuration Create New User Page Options (Cont.) Line Number Polycom brand VoIP phones are capable of servicing 1 to 6 separate VoIP phone lines, depending on the model of the phone. If you are using the Polycom Auto-provisioning feature of the CSG, this option can be used to define which line of your phone will be used by the user.
-
Page 41: Editing Multiple User Definitions
Create New User Page Options (Cont.) Call Waiting If call waiting is not enabled, the extension accepts only one call before it is identified as busy. Selecting this option (Computer Telephony Integration) allows the user to connect applications to the Asterisk Management Interface. -
Page 42: Music On Hold
Telephone System Configuration To create a ring group, use the following procedure. Define the Name of the group. The name can be any mnemonic such as Sales or Technical Support. Specify an extension to associate with the ring group. This is the extension that can be dialed to ring all members of the group simultaneously or in order of listing. -
Page 43: Call Queues
Call Queues A call queue lines up callers and allows them to wait to speak to any group of employees taking a high volume of calls. The feature allows you to speak to more people rather than send callers back to voice mail to leave a message and receive a call back when time permits. - Page 44 Telephone System Configuration RrMemory - This option is Round Robin with Memory. It’s similar to Round Robin, but smarter — it remembers over the course of days, weeks, or years which agent received the last call so that it can commence with the next agent in sequence when calls begin again.
-
Page 45: Agent Login Settings
Using IVR menus for DTMF makes it easy for you to control your AMX system. Each CSG ships with a default voice menu already created. To better understand the creation and operation of these menus, this section examines the default menu. - Page 46 Telephone System Configuration In the example, when a caller dials your company number ending in 7000, the call is answered, and after a pause of one second the caller is greeted in the following manner: “Thank you for calling. If you know your party’s extension, please dial it now.
-
Page 47: Creating A Voice Menu
Add New Step Options (Cont.) Set Language This option gives you the ability to set the language for voice prompts in your voice menu. This option is especially useful if you want to begin with the default language, and then give the option of setting a different language for the rest of the menu. -
Page 48: Voicemail Menu
Telephone System Configuration Voicemail Menu This section lists the default voicemail menu for the CSG. You can use this menu as a guideline for creating your own voicemail menu. 1 Read voicemail messages 3 Advanced options 1 Reply 3 Envelope ... -
Page 49: Creating The Required Voice Menus For Dtmf
Creating the Required Voice Menus for DTMF The following procedure describes how to create IVR menus on the CSG. These menus generate DTMF events that are consumed by the Voice & Video Communications Module to facilitate the DTMF feature. The DTMF feature allows for remote activation of control functions defined for a NetLinx Master. If a user calls remotely into a defined extension on the CSG, the IVR menus associated with this extension accept touch tones which pass to the running Voice &... - Page 50 FIG. 30 Add new Step - User Event options Enter AMX in the User Event field. This field must be entered exactly as shown for the DTMF feature to function properly. Enter Press1 in the Body field. This field must be entered exactly as shown for the DTMF feature to function properly.
- Page 51 Steps 17 through 24 set up the KeyPress Events for each voice menu. Click the Allow KeyPress Events check box. Click on the "--" to the right of the "0". A drop-down menu appears (FIG. 32). FIG. 32 Allow KeyPress Events Select the VoiceMenu created above for 0, VoiceMenu -- Press0.
-
Page 52: Record A Voice Menu
Telephone System Configuration Click Save. Steps 41 through 46 add the DTMF destination to each voice menu. On the Voice Menus screen, click the Edit button associated with "Press 0". The Edit New VoiceMenu dialog box appears. Select Goto Destination from the Add new Step options menu. A series of new options appear (FIG. 34). Select VoiceMenu -- DTMF from the To Destination options menu. -
Page 53: Time Intervals
FIG. 37 Upload Menu Prompts Click Upload a Voice Menu prompt to upload a custom voice menu prompt. You will be prompted to specify the path to the audio file that you wish to upload. Each file uploaded must be less than 10 megabytes, in 8KHz mono, and in GSM or WAV format. -
Page 54: Incoming Calling Rules
Telephone System Configuration Click Update to save your time interval definition, or Cancel to discard your changes. Click Apply Changes to make the new time interval active. Once a time interval definition is created, you can either Edit or Delete the definition from the Time Interval page. - Page 55 New Time Interval Page Options Pattern The Pattern field gives you the ability to use basic pattern matching to differentiate calls and route them accordingly. For instance, if a number begins with _9256, and is followed by 7 or more digits, that would define a call within the state of Alabama. If a call began with _9 followed by 7 digits, it would be a local call that probably doesn’t require a long distance charge.
-
Page 56: Voicemail
Telephone System Configuration Voicemail Voicemail is an option available for every extension. The relationship between the extension and voicemail is established in Users. In that section you can specify whether voicemail is enabled for an extension, as well as the PIN for retrieving voicemail. The Voicemail page lets you specify voicemail parameters, as well as settings for sending voicemail notices to e-mail. -
Page 57: E-Mail Settings
General Voicemail Settings Options Playback Options Say Message The Say Message Caller ID option reads the caller ID before the Caller-ID voice mail message is played. Say Message If this option is enabled the duration of the message, in minutes, Duration will be played back before the voicemail message is played. -
Page 58: Paging/Intercom
Phones which are part of a page/intercom group will not ring, but will immediately answer into speakerphone mode. AMX recommends no more than four users in a simultaneous page/intercom group. This functionality is dependent on a compatible and correctly configured handset. For a user to be able to dial a page/intercom group, the ‘pagegroups’... - Page 59 The double left arrows will move all available users to this page/intercom group. The double right arrows will remove all page/intercom group members. The single left arrow will be move an individual available user to the page/intercom group. The single right arrow will remove an individual page/intercom group member. Click Save to retain your page/intercom group, or Cancel to abandon your changes.
-
Page 60: Conferencing
Telephone System Configuration Conferencing Every company reaches the point of needing more people on a phone call than it can effectively include through three-way calling. Conference bridges allow you to include more people as well as project a professional image. The configuration of the conference bridge and standard features is very straightforward. Click New Conference Bridge on the Conferencing page to design a conference bridge. -
Page 61: Follow Me
Apply Changes to make the bridge immediately available. For conference users, AMX recommends no more than 6 concurrent users in any conference (1 each in 6 rooms, 6 users in 1 room, 2 in 3, etc). Ring group members do not affect the concurrent call count, as the answering phone qualifies as a single call once it's answered. - Page 62 Telephone System Configuration If Buddy’s android had pressed 2, the call would have been rejected, Buddy’s mobile phone would have stopped ringing, and Dusty would have been transferred to Buddy’s voicemail box. If Buddy’s android had not hung up the phone and not pressed anything, the message would have ...
-
Page 63: Directory
Specify the number of seconds before the ring timeout occurs for the new Follow Me number. The ring timeout for the new Follow Me number is the total amount of time from when the Follow Me feature is initiated to when the call is accepted. The ring timeout is not reset or cancelled when the prompt is played to allow someone to accept or reject the call. -
Page 64: Call Features
Telephone System Configuration On this page you specify the extension for dialing the system directory, as well as announcement and search preferences. Settings Options Directory The extension to dial to access the names directory. Extension Also read the Select this checkbox if you would like the extension number as extension number well as user name to be read before presenting dialing options to the caller. - Page 65 Feature Codes & Call Parking Preferences Options Blind Transfer Specify the key sequence to initiate the Blind Transfer feature during an Feature Code active call. The default key sequence is ‘#’. Blind Transfer may also be referred to as an unannounced, unsupervised, or cold transfer. When initiated, this feature will prompt you to enter the destination extension for the blind transfer.
-
Page 66: Call Parking
Telephone System Configuration Call Parking Call Parking is an CSG feature which allows a user to place a call on hold so that it can be taken off hold from another extension. Click the Call Parking tab from the Call Features page to configure this feature. The Call Parking page gives you the ability to define the call parking options which will enable use of this feature. - Page 67 The options associated with an application map are described below. Application Map Options Enabled Select whether or not this application map is enabled. Feature Name Specify a unique name to be associated with this application map. Digits Specify the key sequence used to activate this feature. Activate On/By Select which channel of the call that the application will be executed on, and which channel is allowed to activate this...
-
Page 68: Dial Options
Telephone System Configuration Dial Options The Dial Options tab gives you the ability to configure feature code permissions for the called party and the calling party. Either party can be allowed or restricted access to the transfer, hang up, and call parking feature codes. -
Page 69: System Info
Click New Voicemail Group to create a voicemail group. New Voice Mail Group Options Voicemail Group Specify the group voicemail extension. Extension Label Specify a unique name for the voicemail group which can be referred to in the configuration of your CSG. User Mailboxes Click the checkbox of each user voicemail box which should be part of the group voicemail box. - Page 70 Clicking the Update Timezones button will download and install the latest timezone files from AMX’s website. You will need to restart your CSG to complete setting the time zone as your default. To reboot your appliance, go to Options, Reboot, and click Reboot Now.
-
Page 71: G.729 Codec
If the registration process fails, please confirm that you have entered the G.729 license key correctly, and that a firewall is not blocking the CSG from communicating with AMX’s registration server on TCP port 443. If you do not currently own a G.729 codec license, click Buy new G729 Codec Licenses to be directed to a page where you can purchase G.729 codec licenses. -
Page 72: Backup
The Updates tab provides an interface for downloading or uploading newer CSG firmware images, and for downloading newer Polycom firmware and bootrom images to the CSG. Visit the Tech Center at www.amx.com to download firmware updates for the CSG. FIG. 61 CSG Update There are two interfaces for putting a new CSG firmware image on the CSG. - Page 73 Click Update Polycom firmware to update the Polycom firmware or bootrom images on the CSG. A link is provided under the Download new Firmware button to get the latest archive names. The firmware and bootrom archive names must be specified exactly as they are at that link for the update to complete successfully.
-
Page 74: Options
Telephone System Configuration Options The options tab provides several options which allow you to change the password for your CSG Interface logon, modify local extension and agent settings, as well as reboot the CSG. FIG. 63 CSG Options General Preferences The General Preferences tab gives you several useful global settings for your CSG. -
Page 75: Language
The Language tab gives you the ability to specify the default language for all prompts for phone to phone, inbound, and outbound calls. If a soundpack selection is made, but the soundpack is not already installed, the soundpack will be downloaded from the AMX website. English, Spanish, and French prompts are loaded by default. -
Page 76: Reboot
Telephone System Configuration Reboot The Reboot tab gives you the ability to reboot your CSG. Some configuration changes you make may require a system reboot. Rebooting the appliance will terminate all active calls. CSG SIP Communications Gateway Operation/Reference Guide... -
Page 77: Device Configuration
Device Configuration AMX Modero panels feature on-board Setup pages and Metreau Entry Communicators use a web console that you can use to access device information and make various configuration changes. The MVP-8400i, MVP-5200i, NXD-700Vi, NXD-1000Vi panels and the MET-ECOM entry communicator support SIP calls, so you can use these models with your CSG. - Page 78 Device Configuration FIG. 66 SIP Settings page The following table describes the features on this page: SIP Settings Options Option Description Back Returns you to the previous page. If you make a change on this page, the Back button appears dimmed and is unavailable until you press either Save or Cancel.
-
Page 79: Setting Up Your Touch Panel To Work With Your Csg
SIP Settings Options (Cont.) Option Description Port Number The option displays UDP the port you use to connect to the proxy server. The standard SIP port is 5060, but some providers use different ports. STUN Address This option enables you to enter the IP address or DNS name of the Simple Traversal of UDP through NATs (STUN) server. -
Page 80: Met-Ecom Web Console
Device Configuration MET-ECOM Web Console Metreau Entry Communicators have a built-in web console (FIG. 67) that allows you to easily make various configuration settings via a web browser on any PC that has access to the device. The web console consists of a series of web pages that separate device configuration options by category. Collectively, the pages in the web console are referred to as the Configuration Manager. -
Page 81: Configuration Page - Sip Settings Tab
Configuration Page - SIP Settings Tab The options on the SIP Settings tab of the Configuration page are used to set the proxy server address and port and the username and password to log into the server. These settings enable VoIP and enable you to give your Metreau Entry Communicator phone capabilities to contact other units, such as intercom-enabled touch panels and IP phones. -
Page 82: Configuring Voip
Each panel has an available module which may be helpful with getting the panel to work with the CSG. Download the module for the intercom panel from the Tech Center at www.amx.com. Unzip the file, and include it in your NetLinx project file. For information on using the NetLinx Module, consult the Communications Module User Guide available at www.amx.com. - Page 83 Device Configuration CSG SIP Communications Gateway Operation/Reference Guide...
- Page 84 It’s Your World - Take Control™ 3000 RESEARCH DRIVE, RICHARDSON, TX 75082 USA • 800.222.0193 • 469.624.8000 • 469-624-7153 fax • 800.932.6993 technical support • www.amx.com...
Need help?
Do you have a question about the SIP Communications Gateway CSG-500 and is the answer not in the manual?
Questions and answers