Table of Contents
Advertisement
Quick Links
Advertisement
Table of Contents

Related Manuals for Alpha-nav AN5650NV

Summary of Contents for Alpha-nav AN5650NV
- Page 1 Alpha-nav multimedia Multimedia Navigation System AN5650NV OWNER’S MANUAL...
-
Page 2: Table Of Contents
CONTENTS Precautions....................On safety....................... Playable discs....................Touch Screen Operation................DVD Region Management................Controls and Indicators................Button Operation................... Remote Control .................... Remote Control Function List............... TFT Monitor Operation................. Rear Camera Mode (optional)..............Image Setting....................Parking Brake Inhibit..................Operation Instructions................... Power On / Off....................Selecting a Source.................. - Page 3 DVD Player Operation................Insert/Eject Disc.................... Accessing DVD Mode................... Using the Touch-Screen Controls..............Controlling Playback..................Stopping, Pausing and Repeating Playback..........Sectional Repeat Function................Fast Forward/Fast Reverse................PBC (Playback Control)................Direct Chapter / Track Selection..............Alternate Picture Angle, Zooming..............Changing Audio Language................Changing Subtitle Language................
-
Page 4: On Safety
Precautions To avoid the risk of injury or accident, read the following precautions before operating the unit. On safety Comply with your local traffic rules and regulations. • While driving -You must not watch or operate the monitor. It may lead to distraction and cause an accident. -
Page 5: Playable Discs
• Do not use the System Setup feature while driving, or perform any other function that could divert your attention from the road. • When you connect the backup camera: Watch the surroundings carefully for your safety. Do not depend on the back camera exclusively. -
Page 6: Touch Screen Operation
Touch Screen Operation Most of the touch screen buttons operate this system. To prevent damage to the screen, lightly touch buttons on the screen with your finger. When a button on the screen is touched, a beep sounds. Do not use other objects to touch the screen as it may cause damage to the LCD. -
Page 7: Controls And Indicators
Controls and Indicators Button Operation 1. EJECT Press for disc insertion/ejection. 2. POWER OFF/VOL Rotate dial to adjust the volume. Press to turn "ON" the unit. Press and hold to turn "OFF" the unit. Short press when the unit is "ON" to put the system in "Mute". 3. -
Page 8: Remote Control
Remote Control... -
Page 9: Remote Control Function List
Remote Control Function List Turn power on/off Power Disc inset/eject Open Toggle on/off audio output Mute Select playing mode Directly access certain track/chapter/ preset Numeric Button 6.7.8.9.0 station in current band Increase the volume VOL up Decrease the volume VOL down Display playing information Information Position search function on VCD/DVD mode... -
Page 10: Tft Monitor Operation
TFT monitor will automatically switch to the camera input source. (See installation guide for proper wiring of Reverse Trigger wire) NOTE: Rear Camera sold separately. Please contact your Alpha-Nav Dealer to inquire about the rear camera. -
Page 11: Parking Brake Inhibit
Adjustable Parameters Parameter Adjustment Procedure 1.Press the PIC button on the remote Each time the PIC button is pressed, the adjustment cycles from “BRIGHT’ to “CONTRAST,and the to “COLOR” 2. To adjust brightness, contrast and color Press the ( ) buttons on the remote to adjust 3. -
Page 12: Operation Instructions
Small blue dots in the lower center of the screen indicate which screen you are in. You can also select a source using your vehicle’s steering wheel controls (if they have been interfaced with your unit. (Check with your Alpha-Nav dealer for compatibility of your steering wheel controls with this unit) -
Page 13: Volume Adjustment
Volume Adjustment To increase or decrease the volume level, turn the POWER/VOL on the front panel or press the VOL+/ VOL- buttons on the remote control. The volume ranges from "0" to "40". Audio Equalizer Control Menu The Audio Equalizer Control feature allows you to easily adjust your audio system to meet the acoustical characteristics of your vehicle, which vary depending on the type of vehicle and its measurements. -
Page 14: System Reset
System Reset To correct a system halt or other unusual operation, use the tip of a pen to press the RESET button located on the front top-left corner of the unit. After a system reset, the unit restores the settings before last power off. Mute Press the MUTE button on the remote to mute the volume from the unit. -
Page 15: System Settings
System Settings Enter the System Settings program menu by touching SYSTEM. In system settings, there are options such as TS Calibrate, set password, Parental control, Factory default. See picture below: TS Calibration: After selecting "Yes", a crosshair + appears in the middle of the screen. To begin calibration, press and hold the crosshair for one second until the crosshair moves to the upper left quadrant. -
Page 16: Steering Wheel Function Study
NOTE: Some vehicles will require you to program your steering wheel controls to the unit by using both Mode 1 and Mode 2. Please see your Alpha-Nav dealer for more information. If this is required, program Mode 1 as above, and then press Mode 2 and follow the same programming steps you did in Mode 1. -
Page 17: Asp Settings
ASP (Audio Signal Processing) Settings Enter the ASP setup program menu by touching ASP. The ASP Settings menu allows you to make fine audio adjustments. ASP settings have four sub-menu settings: Bass, Treble, Subwoofer crossover frequency and Bass Q factor. See picture below: Bass Frequency: Touch Bass Freq to open adjust screen 60Hz, 80Hz, 100Hz,200Hz adjustment points Depending on the audio source,... -
Page 18: General Settings
Camera: Touch Camera to open adjust screen. When turned on, the rear view camera function is on. Your Alpha-Nav dealer can add this feature to your unit. Bluetooth: Touch Bluetooth to open adjust screen. When turned on, the Bluetooth receiver is on. -
Page 19: Language Settings
Language Settings Language settings have three sub-menu settings: OSD language, Subtitle language and audio language. See the picture below. OSD language: Set to show-on screen language display. Language options include English, Russian, French, Spanish and Chinese. Audio language: Set audio language display. Language options include English, Russian, French, Spanish and Chinese. -
Page 20: Navi Settings
Navi Setting Navi settings includes: Navi volume, GPS time, Daylight Savings Time, Navi setting. See the picture below: Navi Volume: Sets the navigation voice volume to blend in with the current sources audio levels. GPS Time: Setting to on allows the unit clock to display accurate time and date information without the need for manual time setting. -
Page 21: Manual Time Settings
Manual Time Setting Time setting includes: time setting and date setting. See pictures below: Date setting Time setting Date setting: Touch the date setting which prompts the keypad " MM/YY/DD", then touch the numeric keypad to set the date. Time setting: Touch the date setting which prompts the keypad "... -
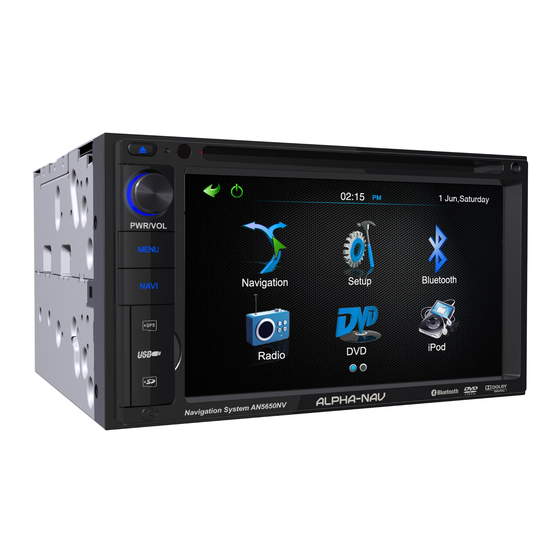
Page 22: Main Menu (Controls And Indicators)
Radio: Touch to listen to AM or FM radio stations DVD: Touch to play a DVD disc or CD audio disc. Inserting a disc will automatically select the DVD source. iPod: Touch to play iPod audio and video (special cable required for video playback, available from your Alpha-Nav dealer) - Page 23 USB: Touch to play music, video or pictures stored on a USB memory stick, or a portable USB drive (will support a portable drive up to 20GB) SD Card: Touch to play music, video or pictures stored on an SD Card. This unit will support SD Cards up to 2GB.
-
Page 24: Tuner (Fm/Am) Operation
Tuner (FM/AM) Operation From the main menu, touch the radio icon to enter radio mode, touch the home icon to exit the Radio source and return to the main menu screen. For reference the radio screen is shown below: Select FM/AM Band Touch the FM/AM band on the screen to change the following bands: FM-1, FM-2, FM-3, AM-1. -
Page 25: Scan Tuning
Scan Tuning To tune to the next strongest radio station, touch the icon on the top of the radio station display to tune up or the to tune down to the next strongest station. Local Distant (LD) Changes the radio’s sensitivity and helps to receive weak AM or FM stations. To tune in a weak station, set to Distant (DX) or for stronger stations, set to local (LOC). - Page 26 iPod Operation Before selecting the iPod source, make sure that the iPod cable is connected to the USB input behind the cover on the front panel. (see page 7 for location) Select iPod source by touching the iPod icon on th main menu screen. NOTE: It may take several moments before iPod audio will start to play.
-
Page 27: Touch Screen Button Functions
NOTE: In order to view iPod/iPhone video, the iPod Audio/Video cable must be installed. This cable will control all functions of the iPod/iPhone, and allow video to be displayed on the LCD screen. Check with your Alpha-Nav dealer for more details. -
Page 28: Accessing Dvd Mode
DVD Player Operation NOTE: When properly installed, DVD video cannot be displayed on the main TFT screen unless the parking brake is applied. If you attempt to play a DVD while the vehicle is moving, the TFT screen displays caution information with a blue background. - Page 29 Using the Touch Screen Controls While playing a DVD, touch the center of the screen to display the Touch Screen Controls. See picture below for details. Touch to Play/Pause Touch to stop Touch to fast reverse Touch to fast forward Touch to display Sub-title Touch to repeat playback Touch to go to audio controls screen...
-
Page 30: Fast Forward/Fast Reverse
Controlling Playback Stopping Playback Touch the stop button on the screen or press the button on the remote control to stop DVD play; touch the play/pause button on the screen or the OK button on the remote control to resume disk play. Pausing Playback Touch the play/pause button on the screen to suspend or resume disc play. -
Page 31: Direct Chapter / Track Selection
Direct Chapter / Track Selection During DVD, VCD and CD playback, you can use the numeric keypad on the remote control to access a track directly. Viewing an Alternate Picture Angle (DVD Only) Some DVDs contain scenes that have been shot simultaneously from differ- ent angles. -
Page 32: Cd/Mp3/Wma/Jpeg Operation
CD/MP3/WMA/JPEG Operation Instructions for Insert/Eject, Play/Pause, Stopping Playback, Track Selection, Fast Forward/Fast Reverse, Scan, and Random Play are the same for DVD, CD and MP3 operation. Please see the DVD Player Operation section for information about these topics. The file naming formats listed below are compatible with this unit: •... -
Page 33: Mp3/Wma Discs
Playing CD Files After inserting a CD disc, songs will play in the sequence of the CD.The display will show the track number of the song being played. While listening to the CD, you can press the numeric buttons on the remote control or touch a track on the on screen display to play the selected track. - Page 34 JPEG picture play back The JPEG picture screen with folder display is shown below: 1: Touch to play previous picture 2: Touch to play or pause a picture 3: Touch to play next picture 4: Touch to activate/deactivate Repeat Single 5: Touch to activate/deactivate Random Mode 6: Touch to display the numeric keypad on the screen and then you can use the numeric keypad to access a picture directly...
-
Page 35: Usb Operation
USB Operation Accessing USB Mode 1. To switch to USB mode, press the Menu button on the front panel to display the main menu screen, or press the (SRC) button on the remote control repeat- edly until USB appears the top of the screen screen. 2. -
Page 36: Sd Operation Accessing Sd Mode
SD Operation Accessing SD Mode 1. To switch to SD mode, press the Menu button on the front panel to display the main menu screen, or press the (SRC) button on the remote control repeatedly until SD appears the top of the screen screen. 2. - Page 37 Bluetooth Operation Before using the Bluetooth Before using the Bluetooth, it's necessary to perform the following steps. For more operating details, refer to each section below. 1. Select the "Bluetooth" option in the General setup and select the "On" option to activate the Bluetooth feature.
-
Page 38: Check Phone Numbers Function
5. End function: Touch to end a call 6. Phone Transfer function: Touch to switch audio between the car speakers and the cell phone handset speaker 7. Keypad: Touch the keypad to enter a phone number 8. Delete Button: Touch to remove incorrect numbers when using the keypad to dial a number 9. - Page 39 Bluetooth Setup touch the icon on the left side of the screen to access to the Bluetooth setup interface, which contains the pairing mode, auto answer and connect mode The interface returns to the keypad automatically when no settings are selected.
- Page 40 Pairing a mobile Bluetooth device to this unit See picture of the main Bluetooth screen below: NOTE: Please refer to your Bluetooth device instructions on how to pair your device to a Bluetooth system before attempting to pair your device to this unit. To pair a device: Touch the on-screen pair button to initiate the pairing, the words “Wait Paring: will display in the information screen above the keyboard.
-
Page 41: Bluetooth Streaming Audio (A2Dp)
Bluetooth Streaming Audio (A2DP) The Bluetooth provides the Advanced Audio Distribution Profile (A2DP) for streaming audio. Playback controls are located in the bottom center of the main Bluetooth screen shown below. 1. Play/Pause: Touch to play or pause audio playback 2. -
Page 42: Navigation
Navigation Please read the Navigation Software User Manual Accessing Navigation 1. Access the MAIN menu and touch the Navigation icon on the touch-screen to enter the Navigation Operation interface. 2. Or press the remote control to switch the source to Navigation. 3. -
Page 43: Troubleshooting
Troubleshooting PROBLEM CAUSE CORRECTIVE ACTION GENERAL Radio Fuse Blown Install new fuse with correct rating Car battery fuse blown Install new fuse with correct rating Unit will not power Illegal operation Press RESET button located in the top left corner of front panel Battery depleted Replace with new battery... - Page 44 PROBLEM CAUSE CORRECTIVE ACTION DISC Disc is warped or Use disc in good condition scratched Disc is dirty or wet Clean disc with soft cloth Disc rating exceeded Change Parental Lock set- Disc does not play Parental Lock rating tings to lower restriction back limit Disc region code is not...
-
Page 45: Remote Control
Remote Control 1. When using the remote for the first time, you must pull out the insulation strip 2. Remove the battery if the remote control is not used for a month or longer. Remove and dispose of the old battery immediately.Do not store the battery with metallic materials. -
Page 46: Specifications
NOTE: Use only one CR2025 (3V) lithium battery. Danger of explosion if battery is incorrectly replaced. Replace only with the same or equivalent type. Do not recharge, disassemble, heat or dispose of the battery in fire. Keep batteries away from children to avoid the risk of accident. Suggestions 1. - Page 47 FM Tuner Section Tuning Range: 87.5MHz - 107.9MHz Mono Sensitivity (-30dB): 10dBu Quieting Sensitivity (-50dB): 15dBu Alternate Channel Selectivity: 70dB Signal to Noise Ratio @ 1kHz: 58dB Image Rejection: 60dB Stereo Separation @ 1kHz: 30dB Frequency Response: 30Hz - 15kHz, -3dB DVD/CD Player Compatible formats: DVD-R, DVD-RW, DVD+R, DVD+RW,CD-R, CD-RW, CD-DA, MP3, WMA, HDCD, SVCD, VCD,MPEG, JPEG, MP3/WMA files...
- Page 48 Alpha-nav multimedia 41305 Albrae Street Fremont, CA 94538 www .alpha-nav.com...
Need help?
Do you have a question about the AN5650NV and is the answer not in the manual?
Questions and answers
Gambar socket double din alpha nav